Baby Swaddler and Burper Shower Gift

baby snuggler & burper

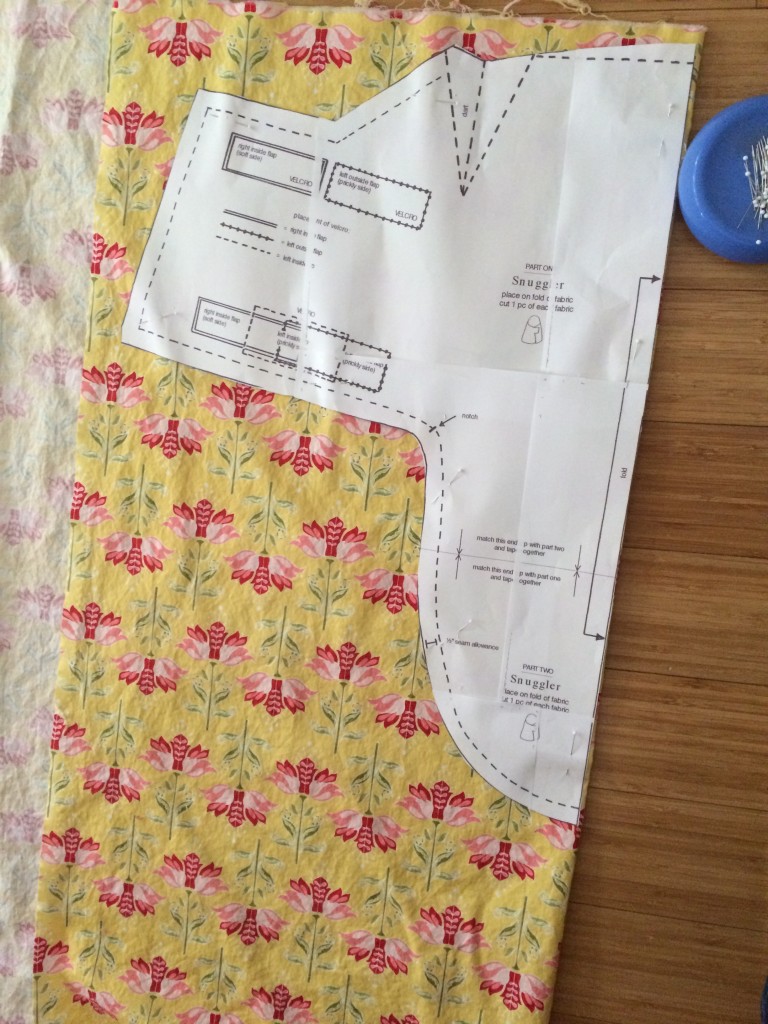
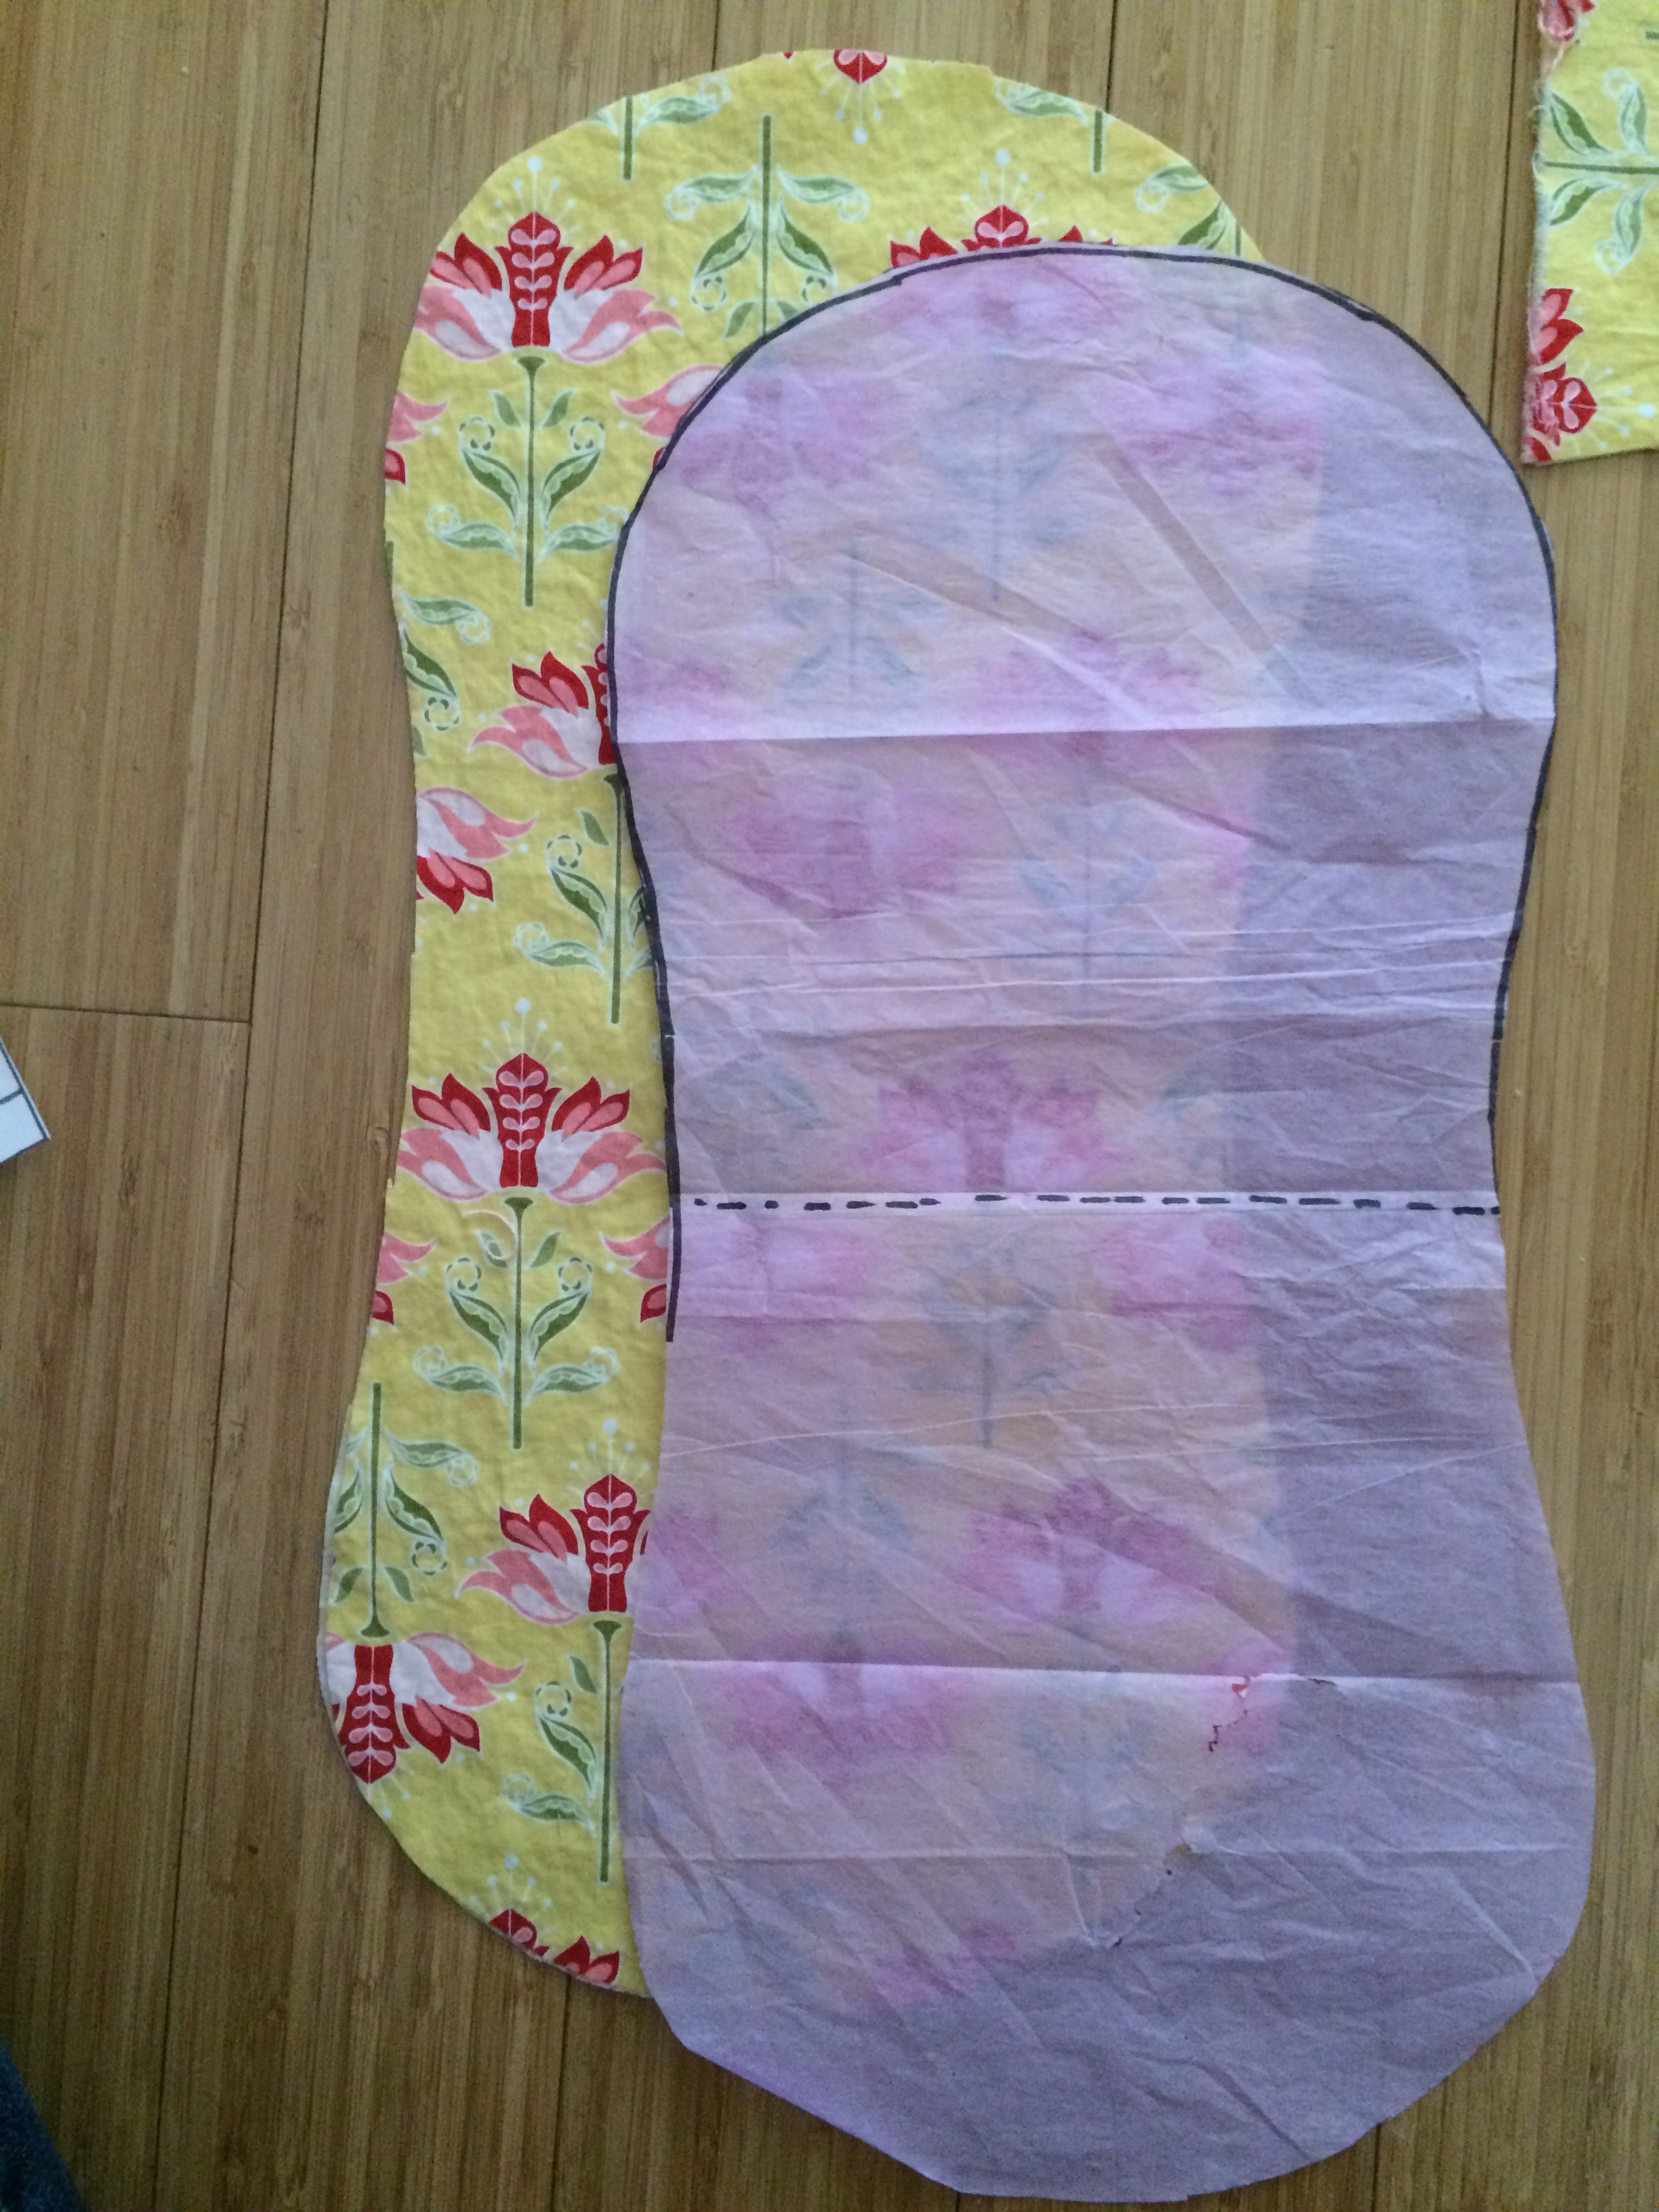
I was invited to a baby shower this weekend and I had a hard time figuring out what to give as a gift.  I love giving handmade items, especially quilts.  Sometimes it isn’t possible to make a quilt in time for a shower.  I came across this free pattern for a “Baby Snuggler or Baby Swaddler” by Lotta Jansdotter and I thought I would give it a whirl.  You can print the pattern HERE.  I read a few reviews and they all mentioned it was hard to print the pattern.  I agree.  I tried a few different browsers and printed in each.  Then I pieced them together the best I could.  This was the hardest part of the project.  I thought a picture of the pattern pieces all put together would be helpful:

IMG_3810

baby swaddler

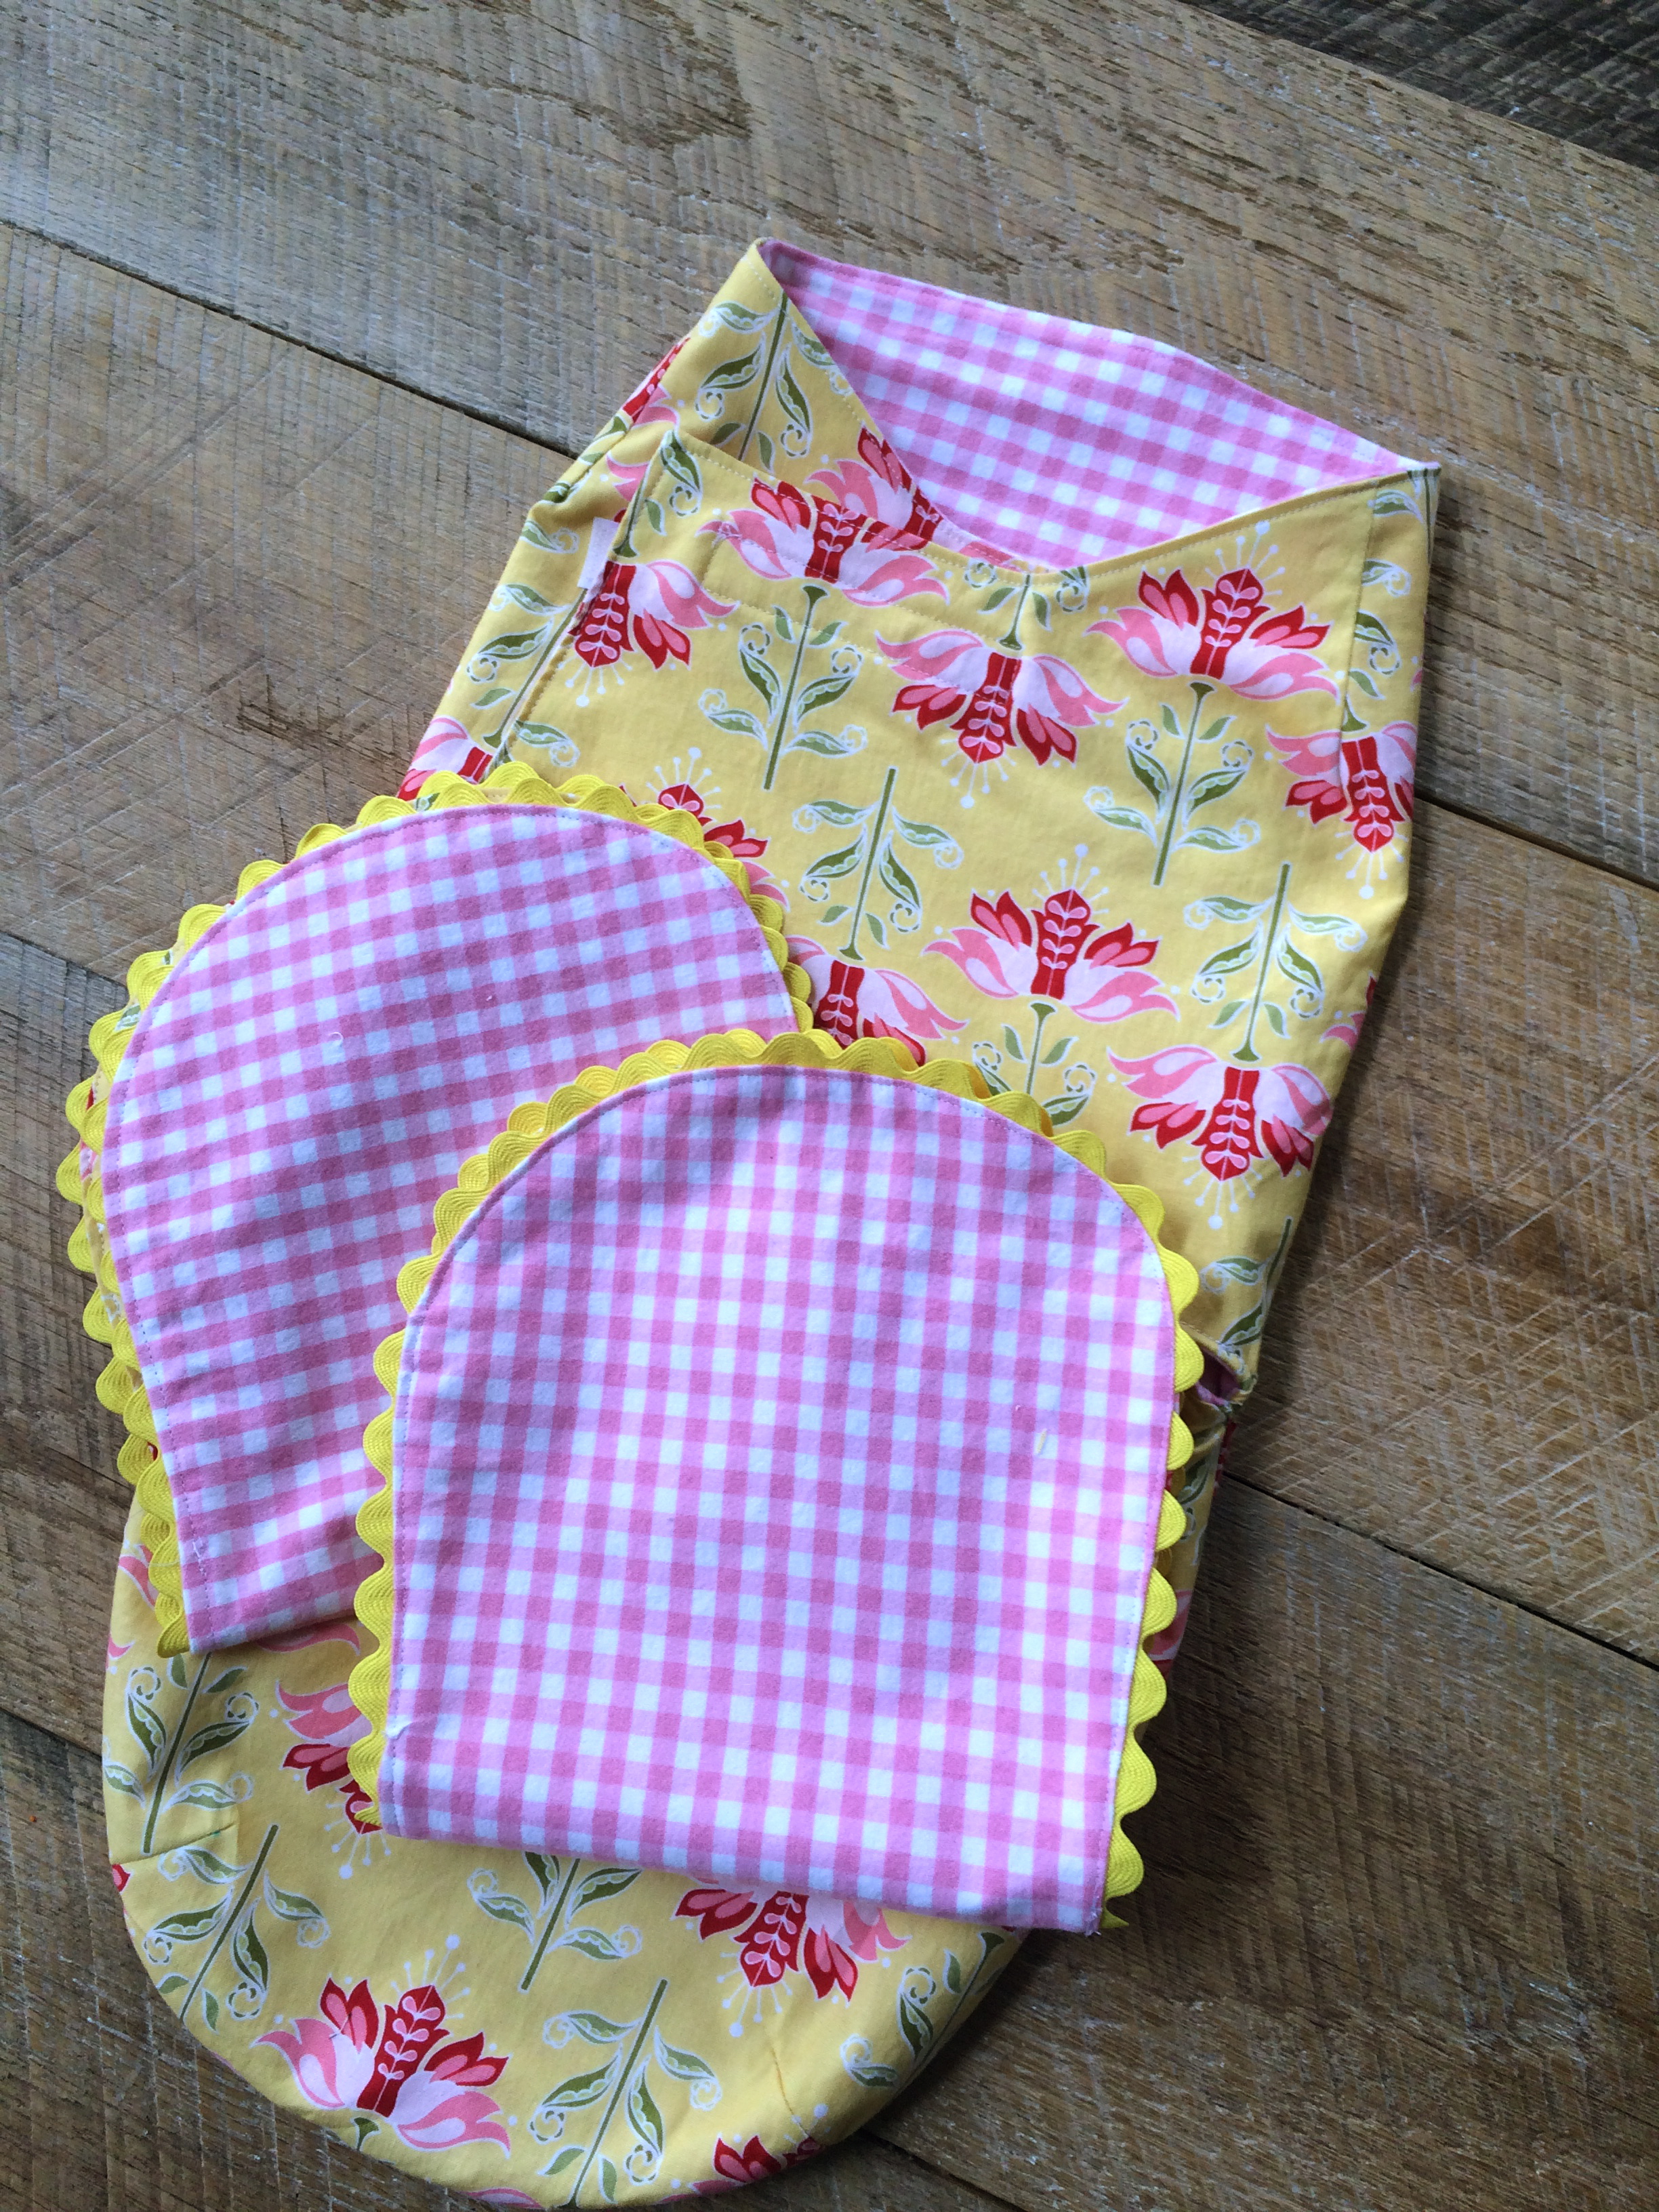
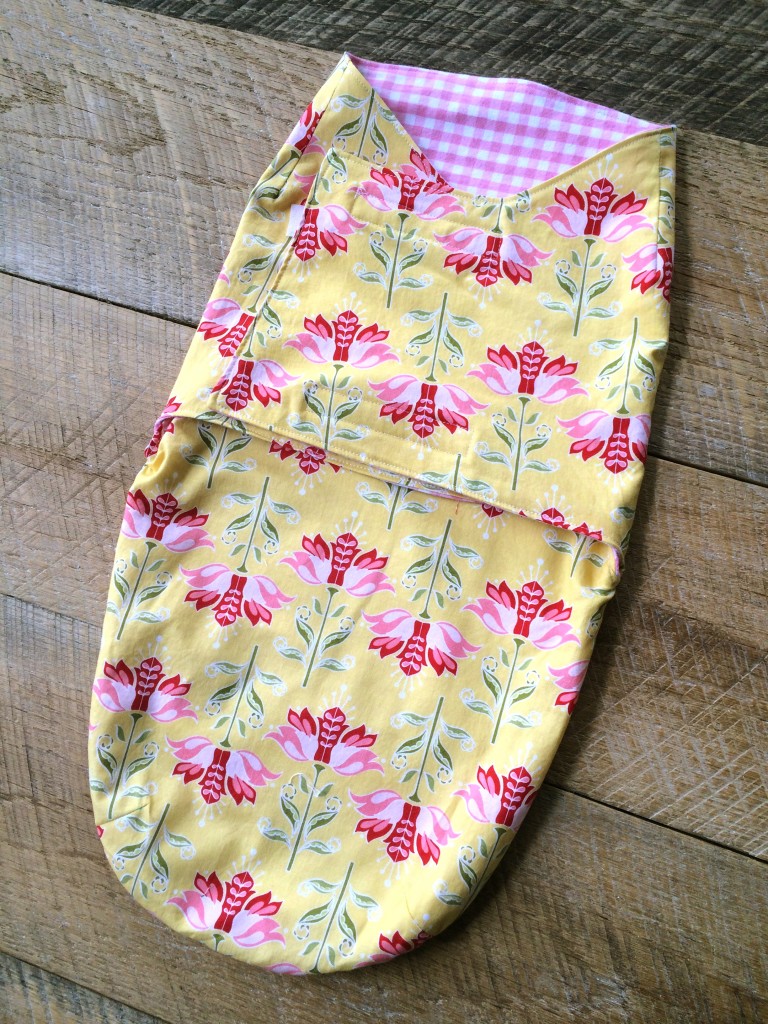
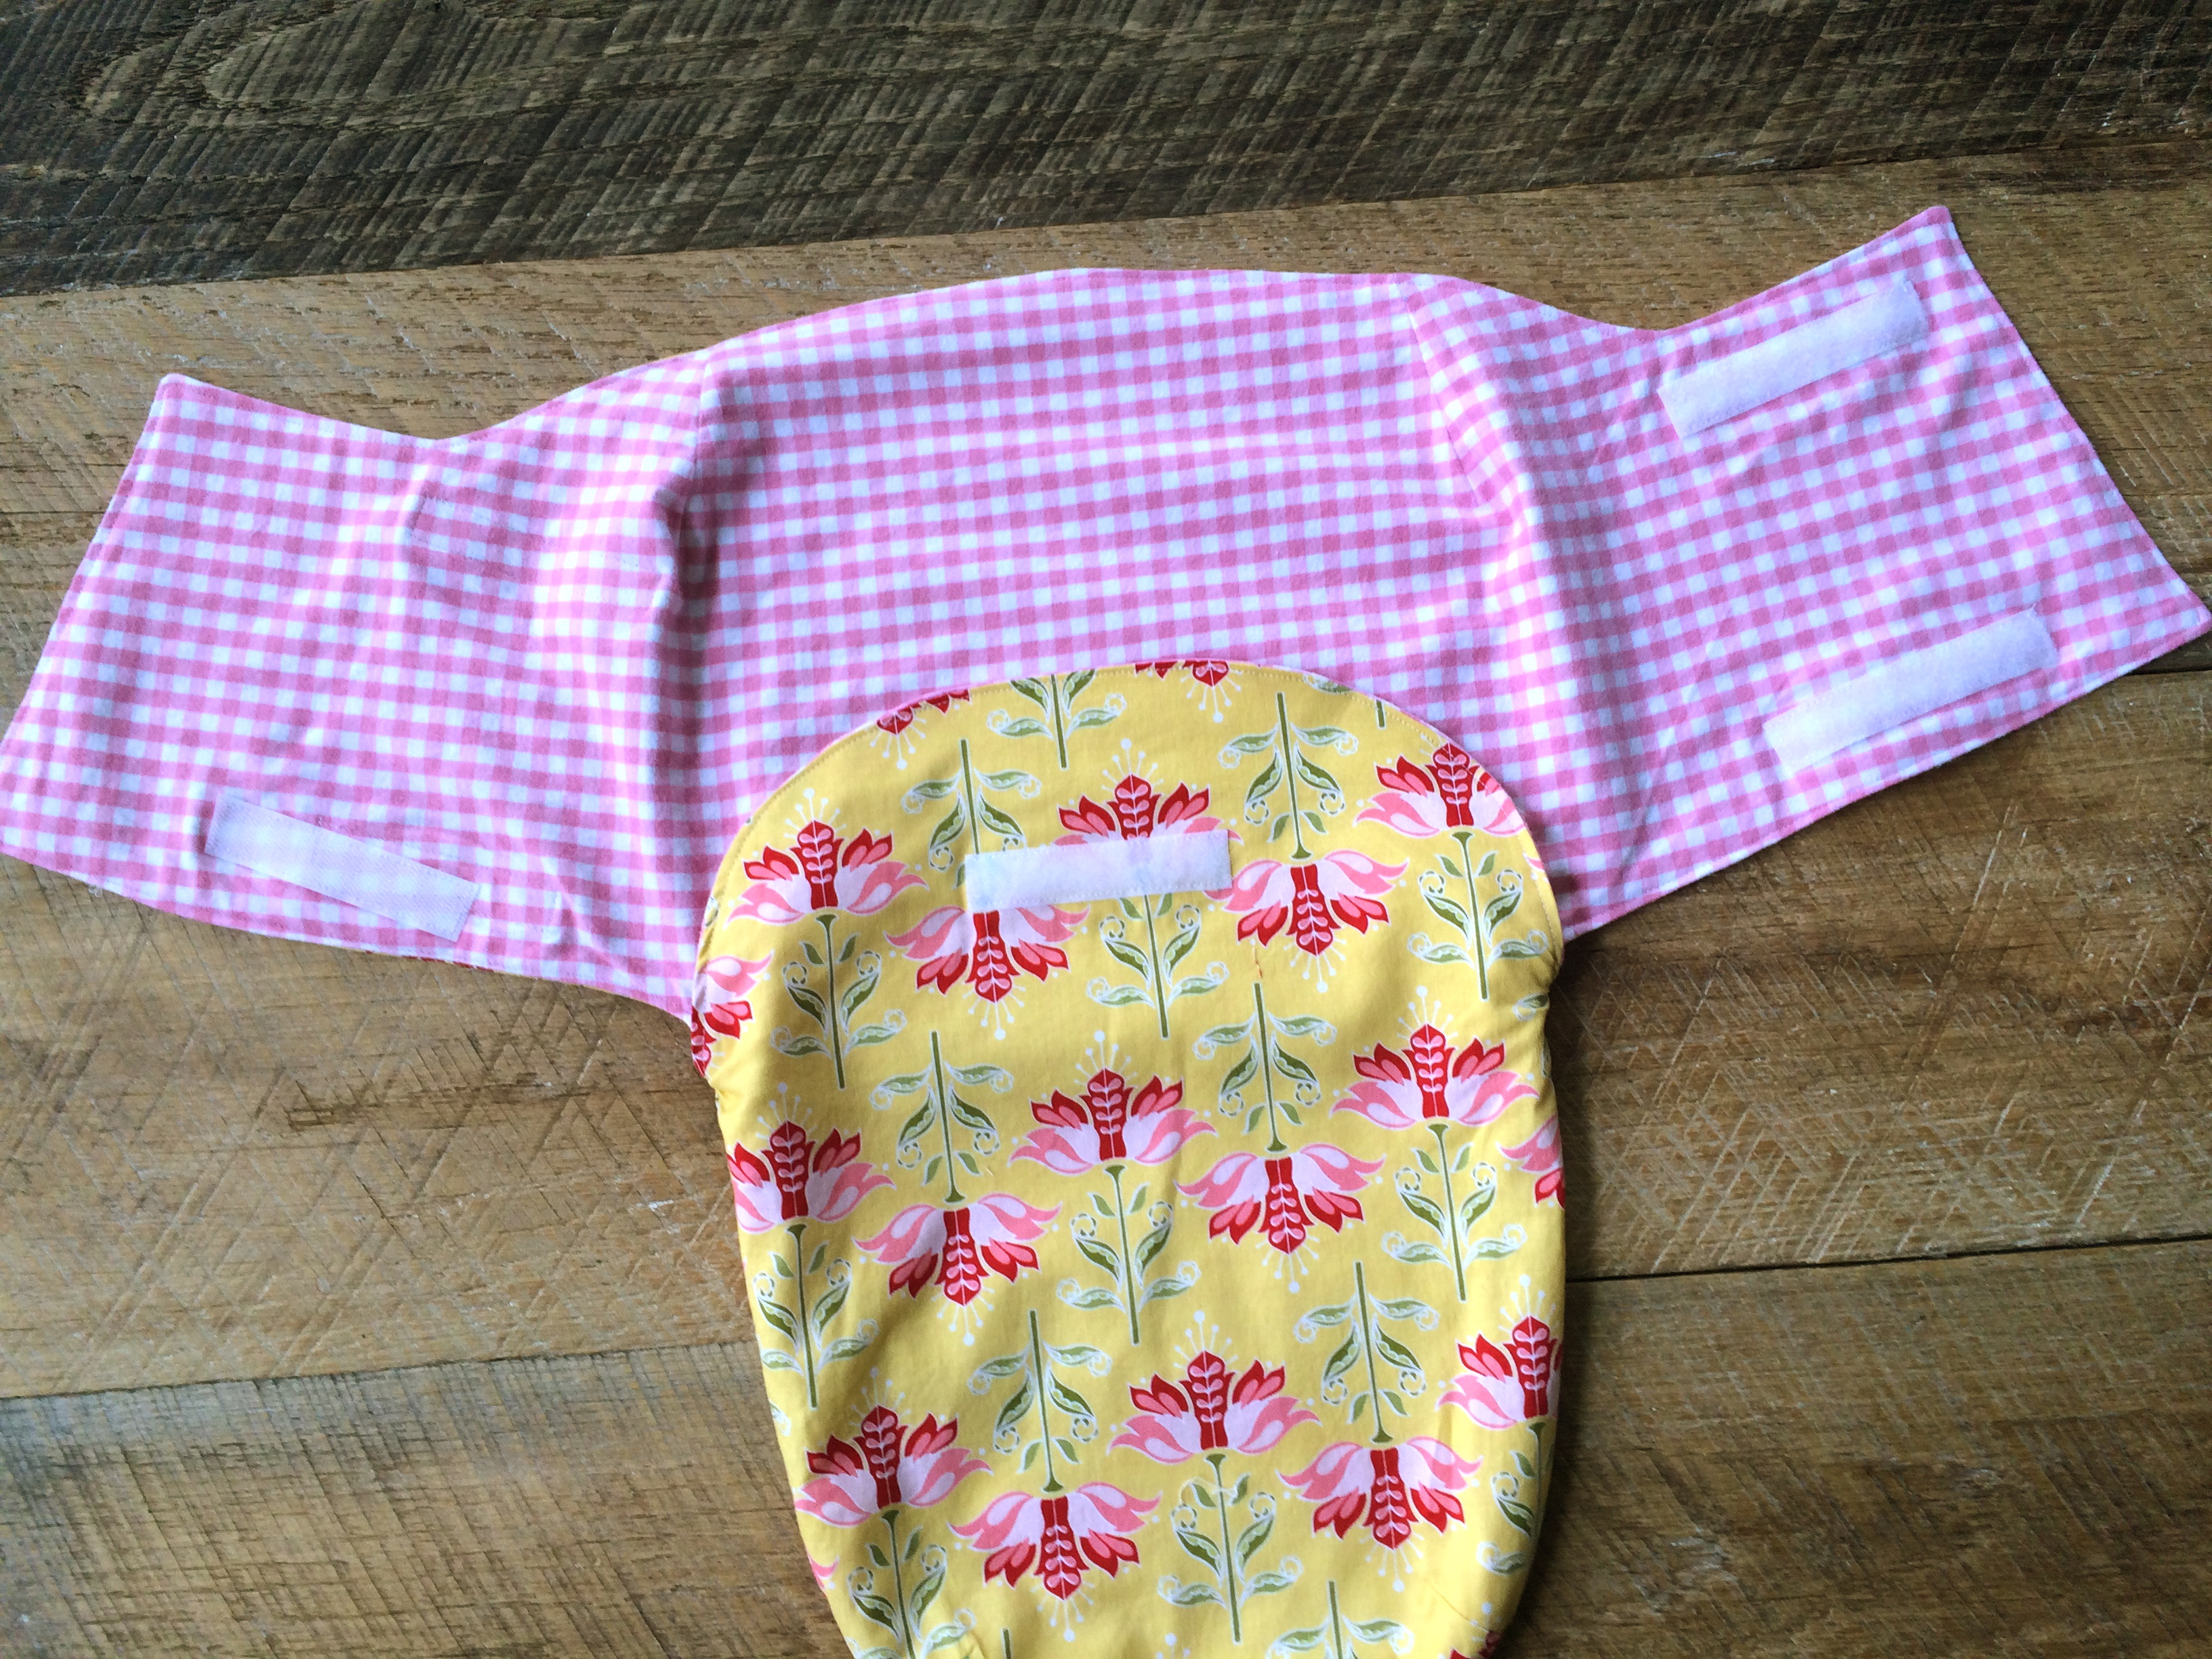
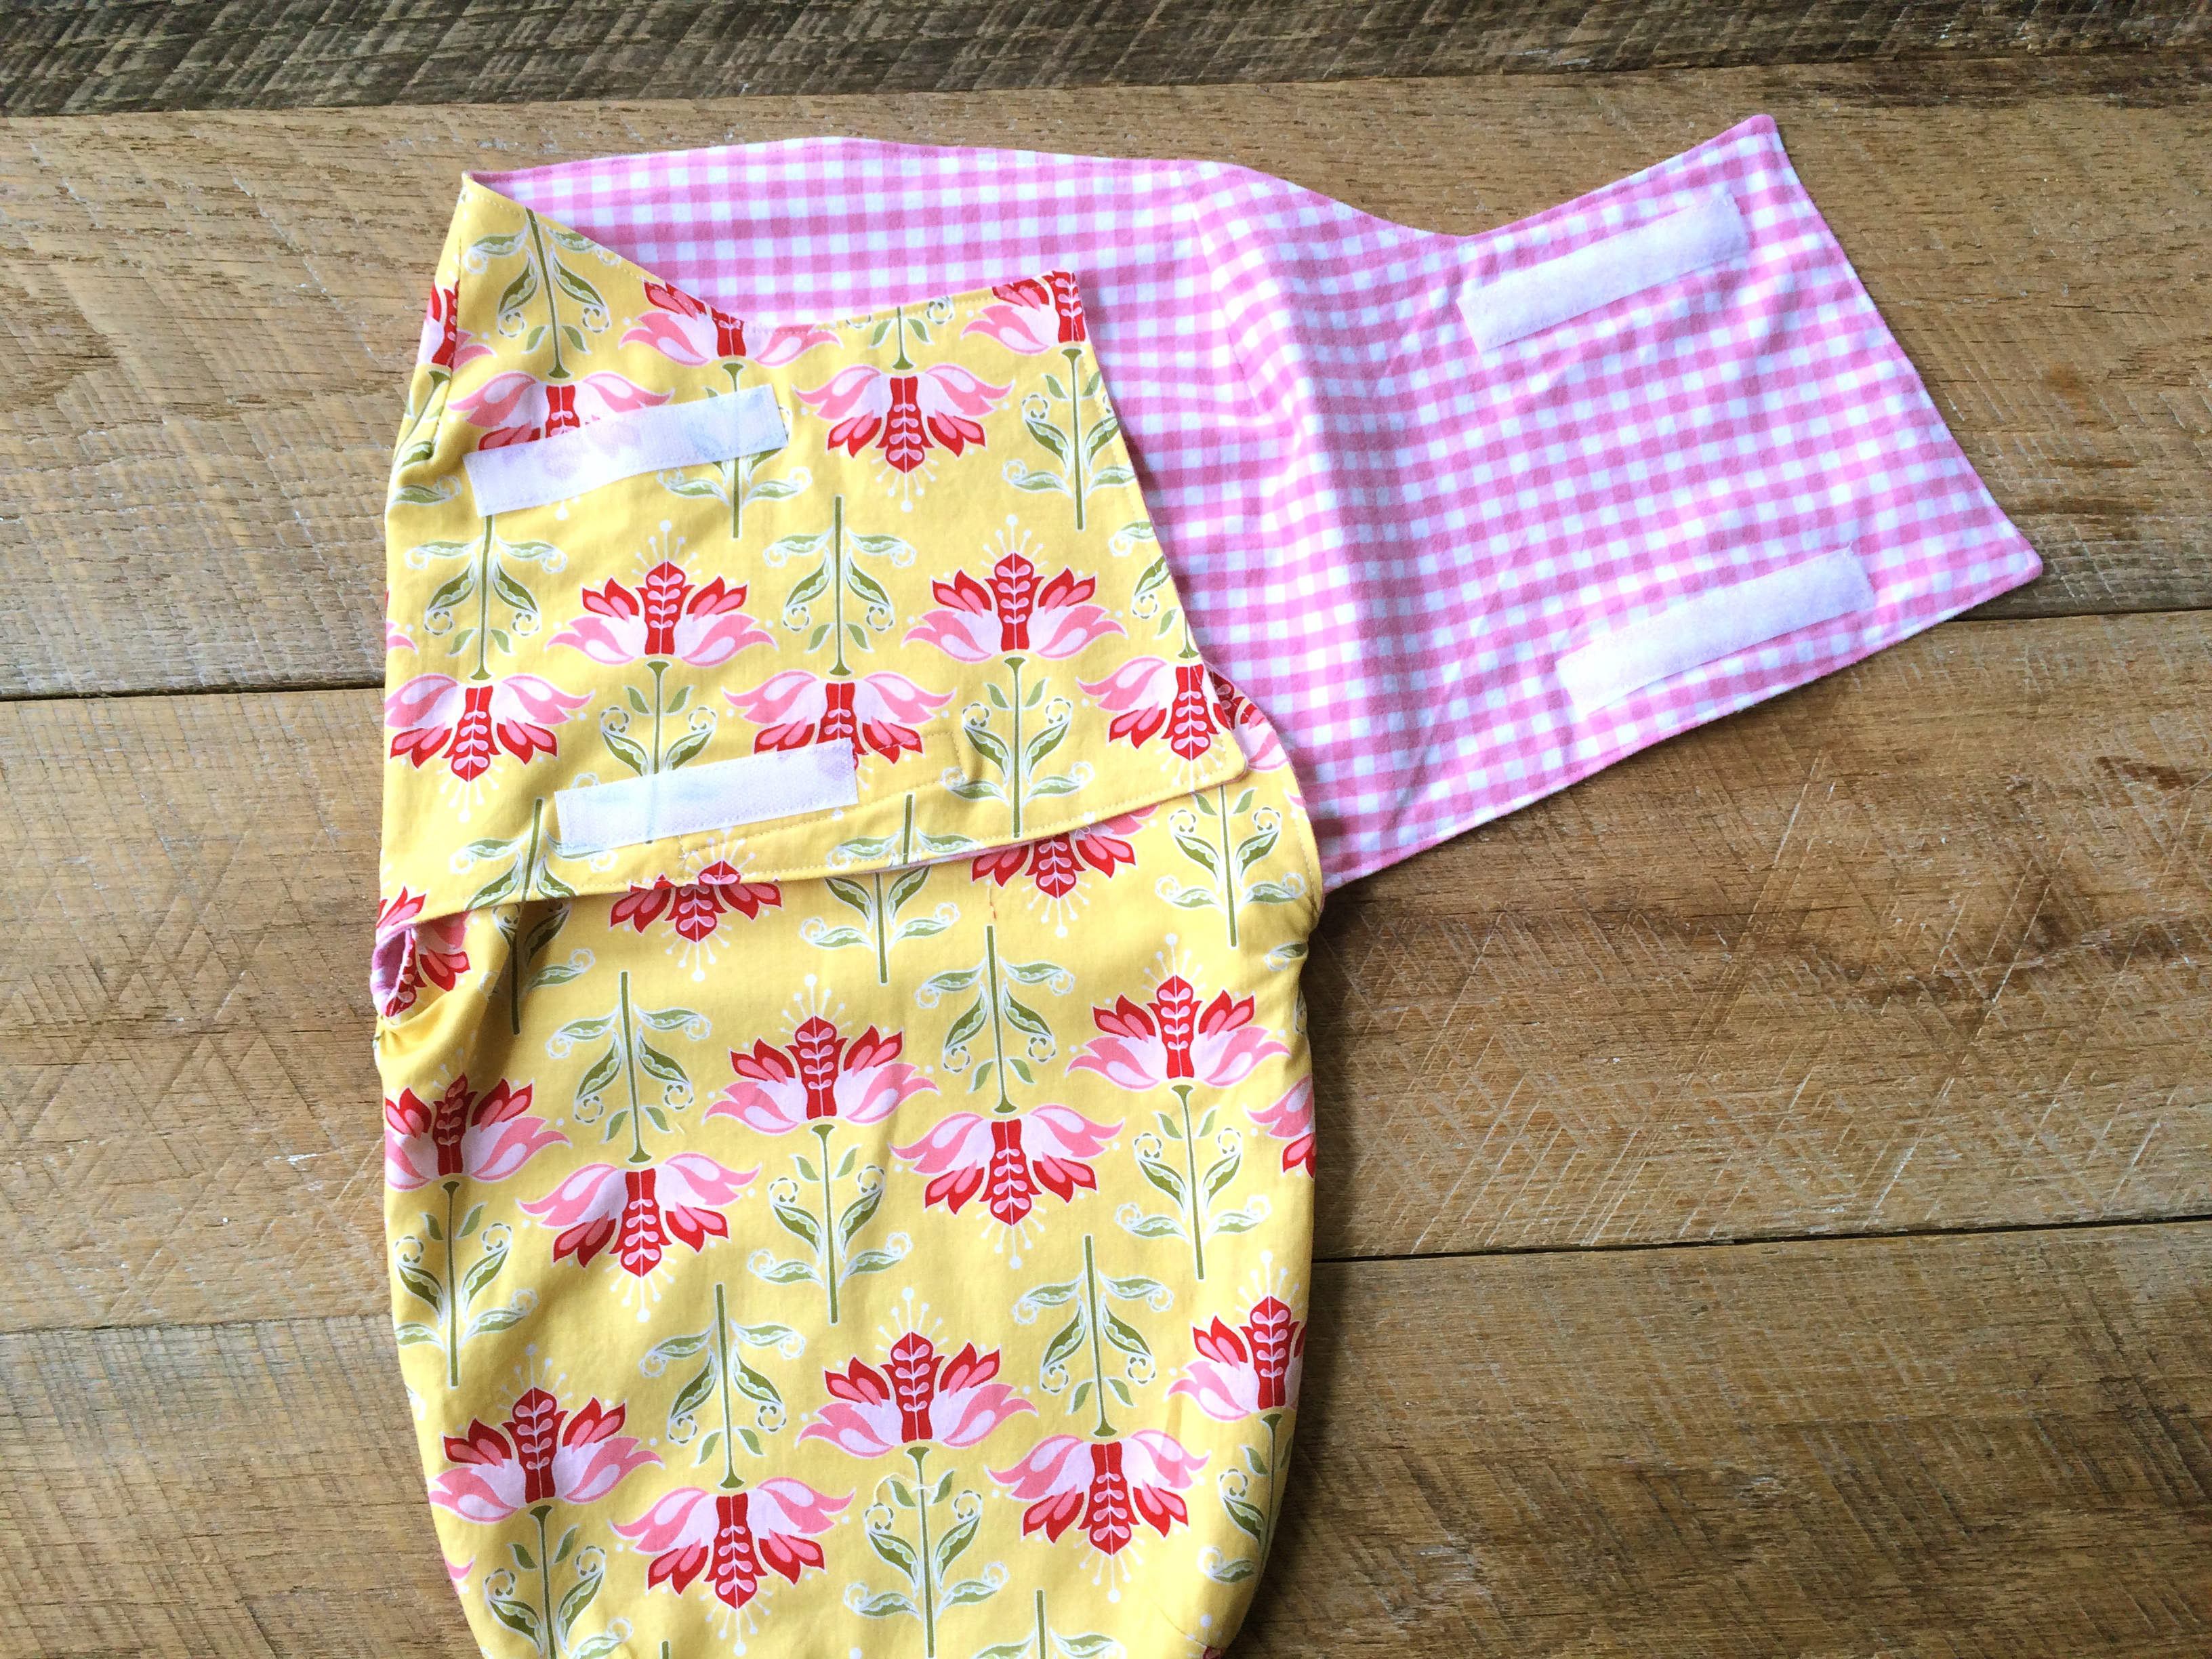
The pattern calls for 1 yard of outer fabric and 1 yard of minky fabric.  I choose this cute print from Riley Blake Designs Apple of my Eye.  Instead of working with Minky (it’s a love-hate thing) I choose this sweet flannel check also from Riley Blake Designs.  I pre-washed my fabrics.  The pattern sewed up really quick.  It consists of a main body and the pouch part and Velcro closures.   I choose to top stitch my snuggler which I don’t think it said in the pattern.

baby swaddler 10


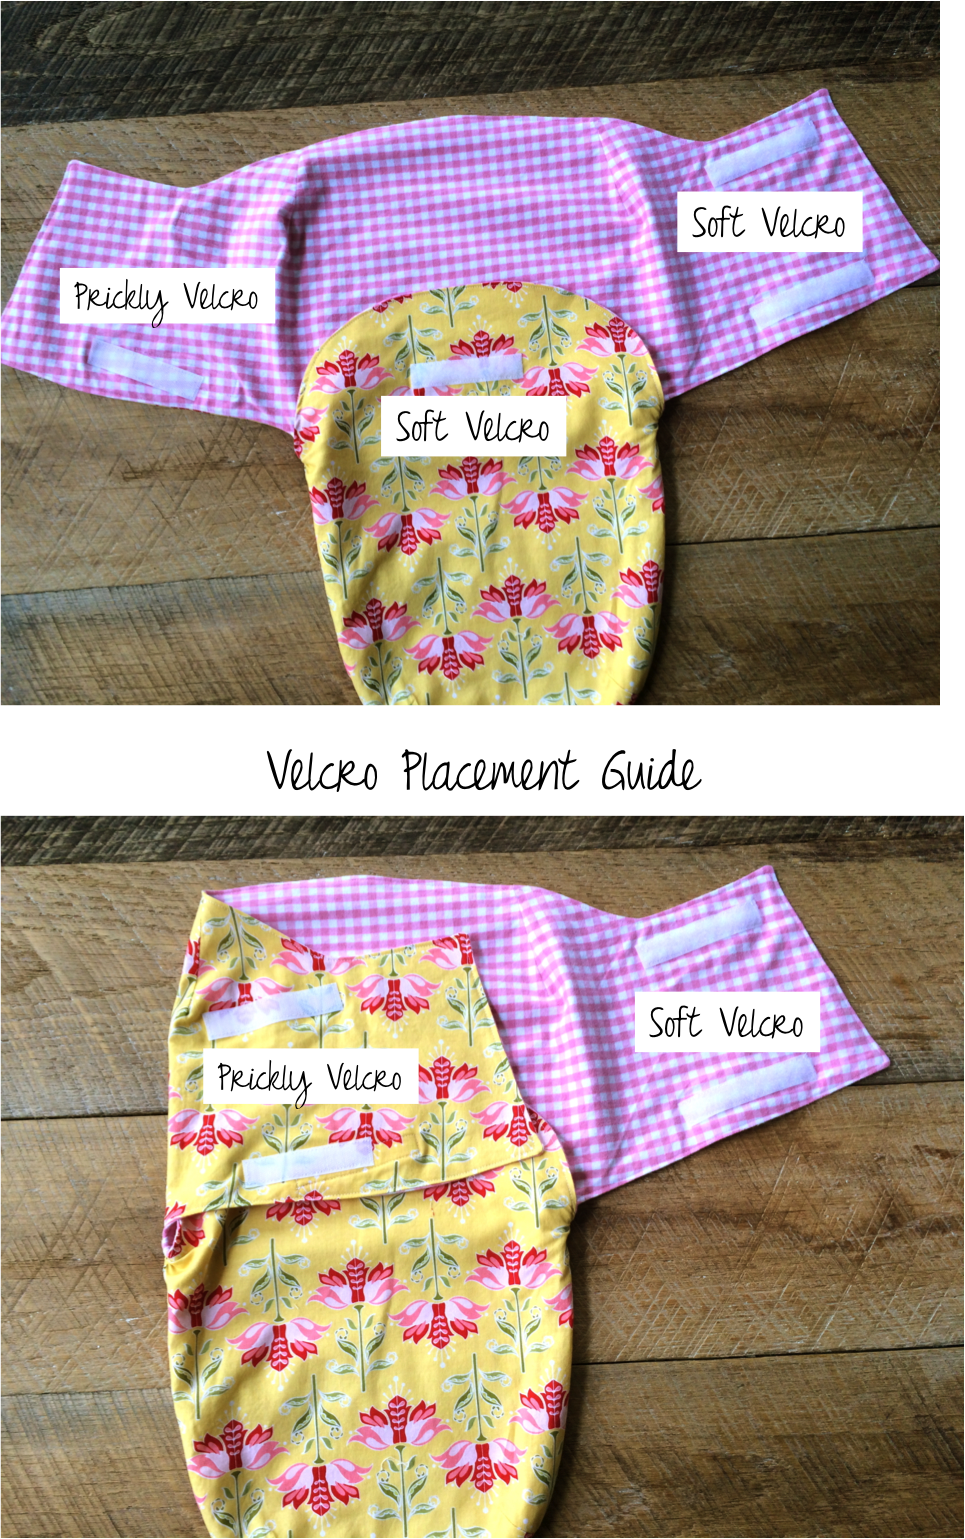
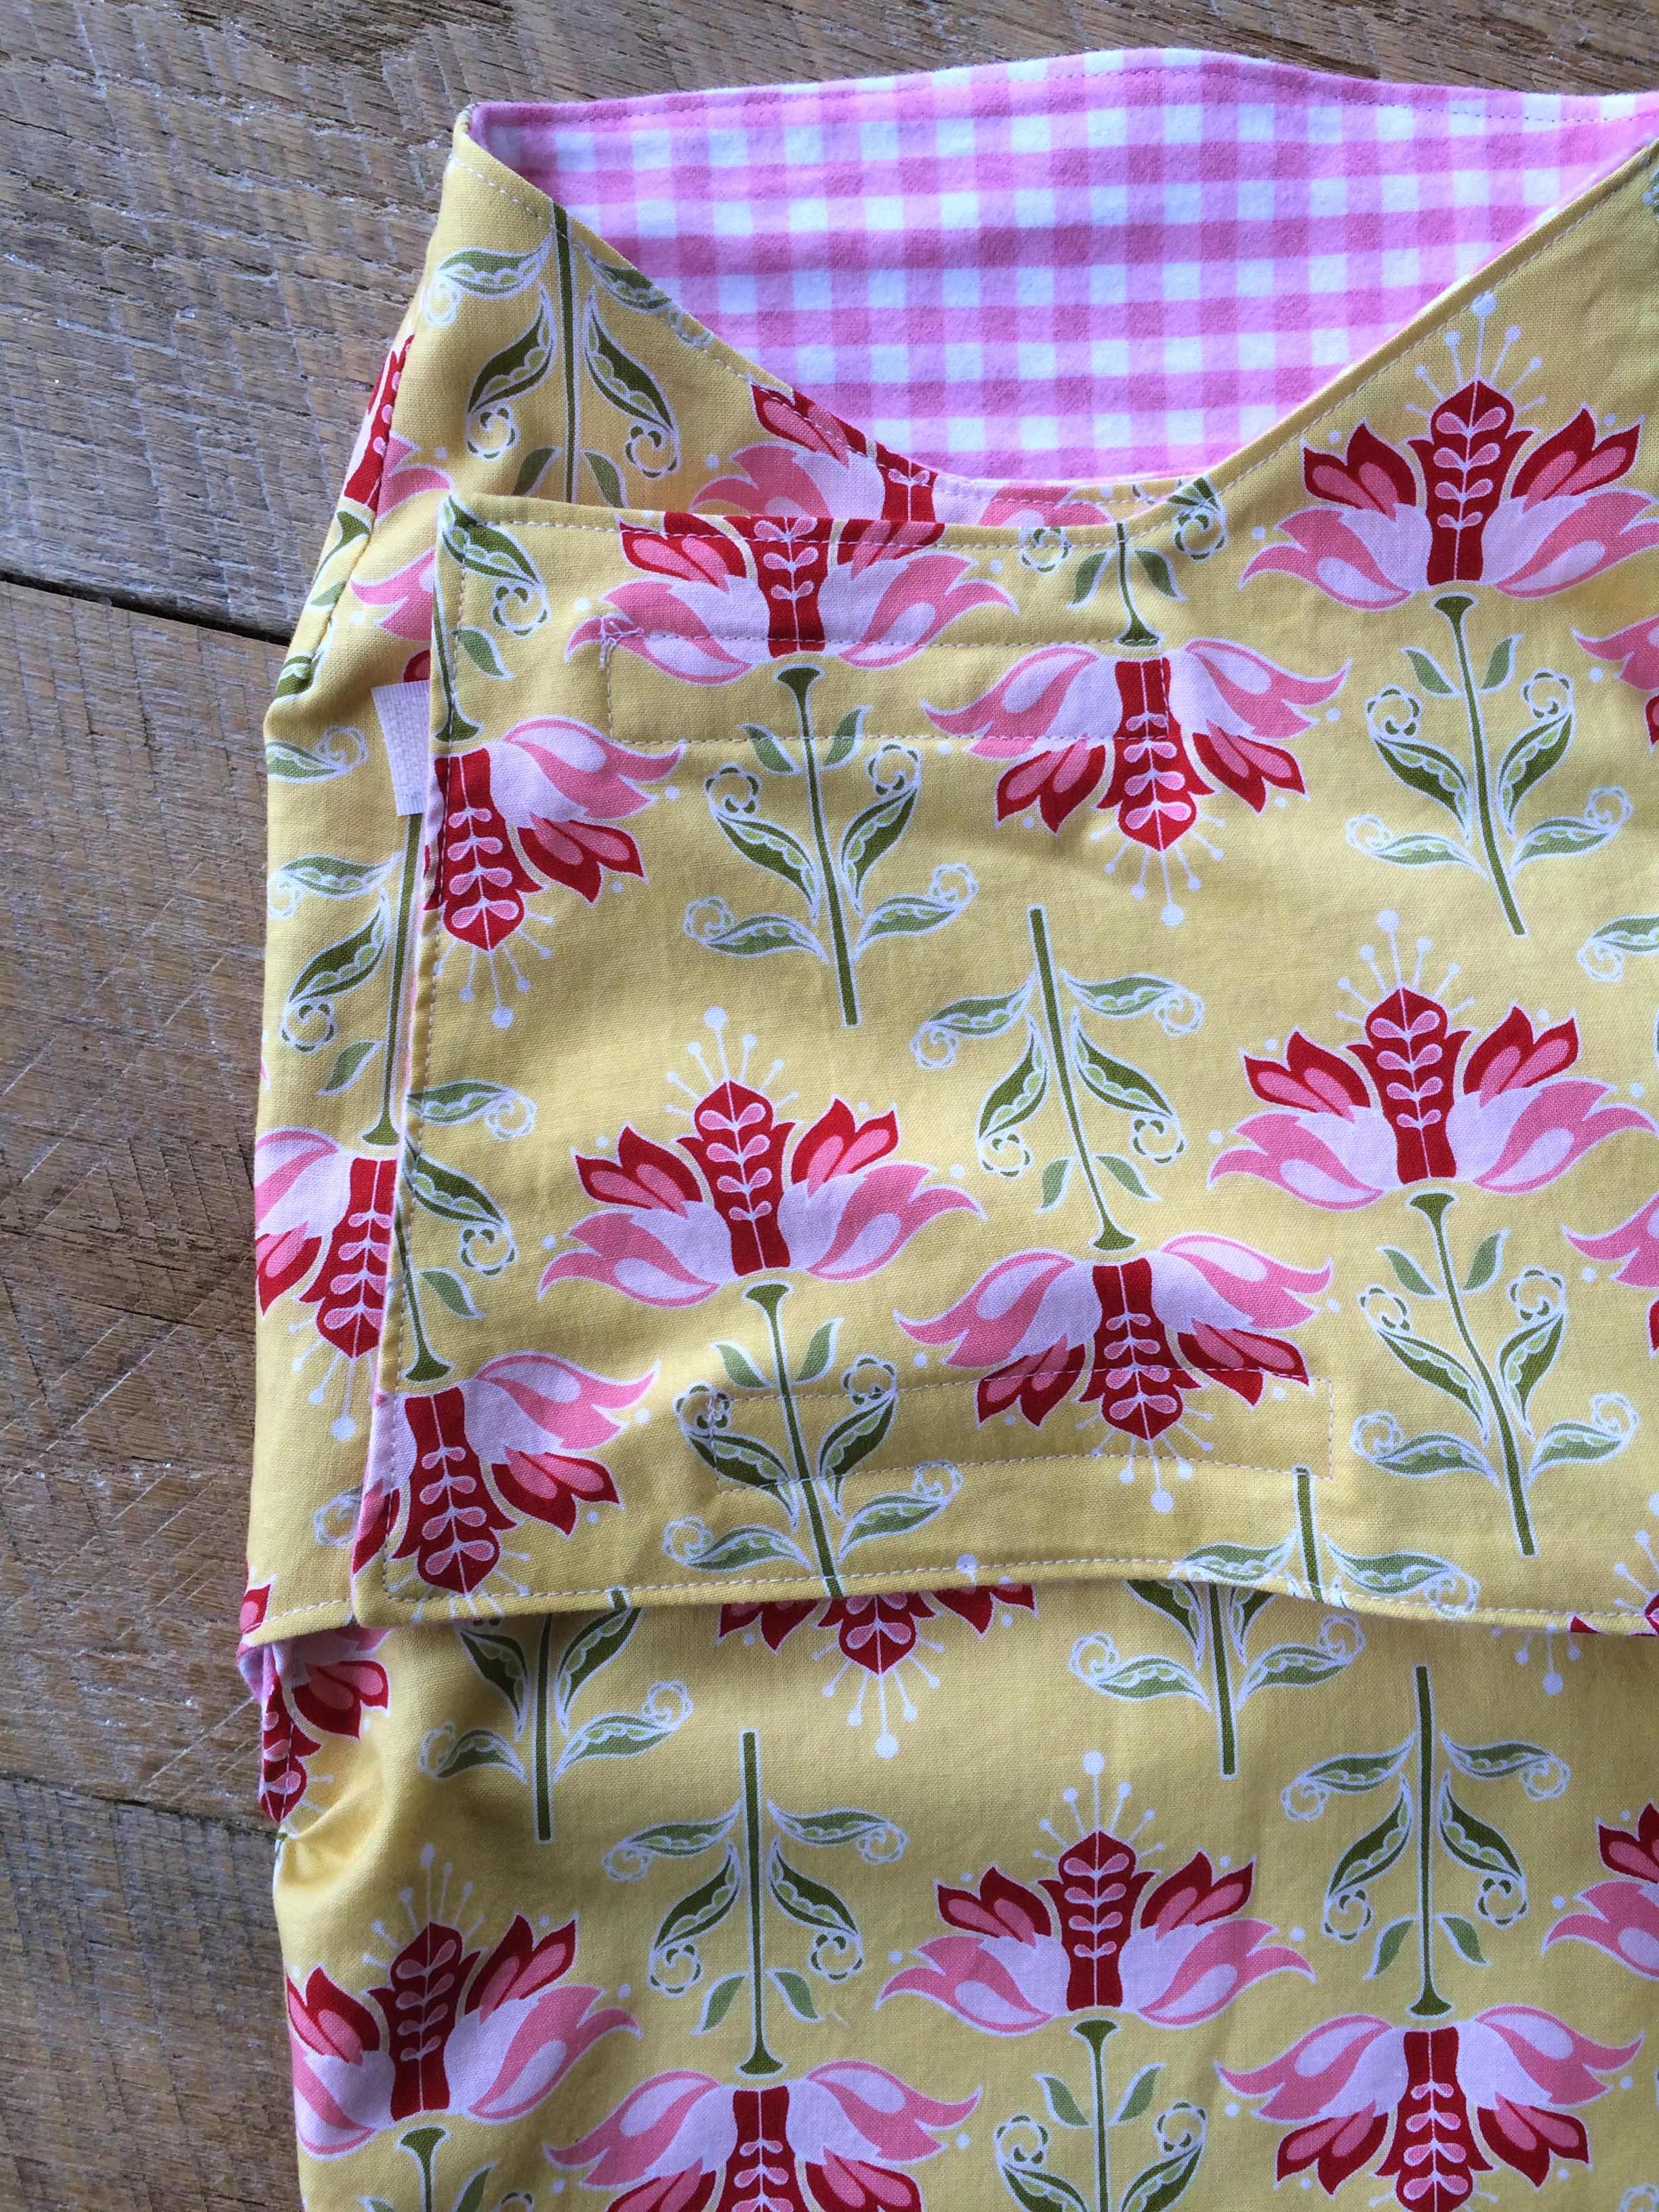
One thing I found confusing was the placement of the Velcro. I had seen this pattern sewn up in person it would have made more sense.  I made this little Velcro guide to make it clear which side of the Velcro to put where.  The pattern has the placement for the Velcro. baby snuggler

There is enough fabric left over to sew 2 matching Burpers.   They are still my favorite!  You can download my “Old School Baby Burper” pattern HERE.  Cut 2 from the flannel and 2 from the floral.    All you need is some ric rac.  Baste the ric rac to the yellow floral piece starting and stopping on a straight side.  Then put right sides together, sew around, following the basting stitch, leaving a 3″ opening on the side.  Turn, press, and top-stitch all the way around making sure to catch the opening.

baby swaddler 3

I think it makes a darling set!  I wish I had made these swaddlers when I had babies!!

baby swaddler 8

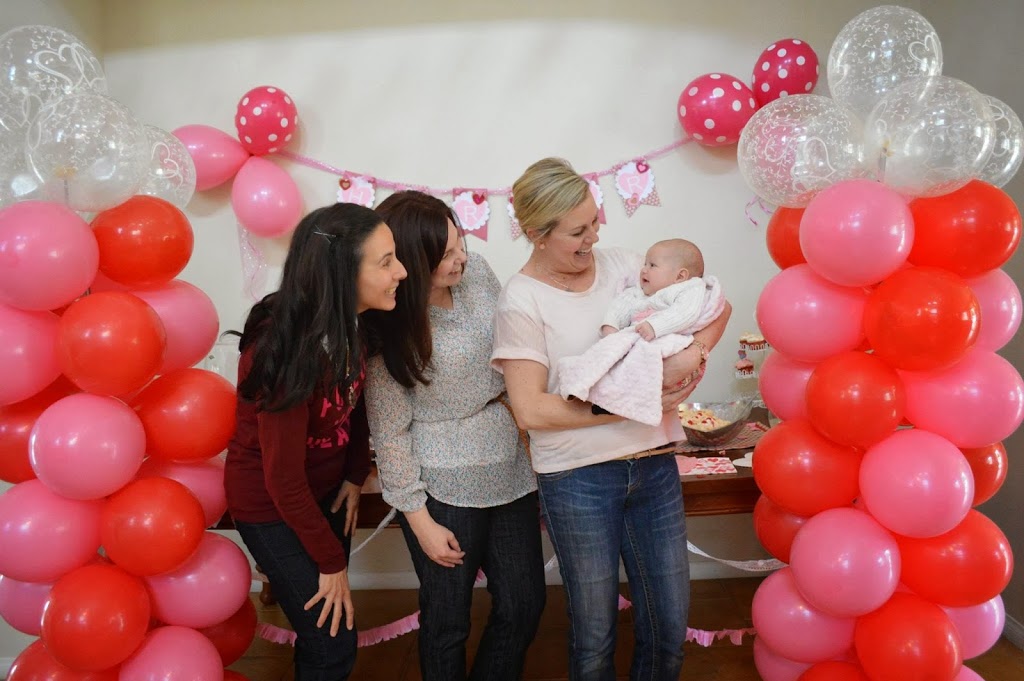
While I was at the shower, I borrowed my friends baby and tried out the swaddler.  It fits perfectly!
baby swaddler 16
I am for sure going to make more of these!!!
baby swaddler 7

Nautical Baby Quilt

nautical_quilt_tutorial_baby_shower

I am happy to share with you my Nautical Quilt tutorial.  One of my good friends is expecting a baby and her nursery has a nautical theme.  I came up with this quilt to give her at her baby shower.  I love how it turned out!

The quilt starts with a simple square in a square block.  (1/4″ seams throughout)


Cut the center piece is 3.5″ square.

Cut the side pieces (2) 3.5″ x 2.5″

Cut the top and bottom pieces 7.5″ x 2.5″

Nautical Quilt Tutorial_5

Sew the side pieces on and press toward the dark.  Sew the top and bottom pieces on and press toward the dark.

Nautical Quilt Tutorial_4

Now that you have the basic block down, make 9 like this with red or navy borders and a white center.  Then make 9 the reverse, white sides and a red or navy center.

Nautical Quilt Tutorial_3

Assemble the blocks in rows like this:

Nautical Quilt Tutorial_2

For the large white pieces, cut”

15″ x WOF

4.5″ x WOF

Sew these to the sides of the block portion.  Square up the edges.

For the appliqué, I just googled “anchor clip art” and found this anchor – there are hundreds to choose from.  Trace the anchor onto Therm O Web Heat n Bond Lite.  Iron the heat n bond to the wrong side of the navy fabric.  Cut out the anchor, peel off the back and press into place.  Top stitch in matching thread.  I toyed with the idea of adding rope, ribbon, or ric arc along the length connecting to the anchor, but ultimately I decided to leave it as is.

Nautical Quilt Tutorial


I quilted it with straight lines.  I measured the lines so they would cross the squares in equal portions.  I love the navy & white polkadot binding.  Now it’s time to throw a Nautical themed baby shower!Nautical Quilt Tutorial_17


This is me and the mommy-to-be.  The shower was super fun!!Nautical Quilt Tutorial_6

Nautical Quilt Tutorial_16

Nautical Quilt Tutorial_15 Nautical Quilt Tutorial_12

Nautical Quilt Tutorial_8

Nautical Quilt Tutorial_10


Baby Love Baby Shower

This weekend I helped host a baby shower for a dear friend who just adopted a precious bundle of joy!
Since it is so close to Valentine’s Day and we love baby Harper so much, we thought it fitting to have a Baby Love shower with all things pink, red, and hearts!

I made my favorite strawberry, coconut, and chocolate cupcakes.  We had a few ladies bring different salads as well.

I think our streamer treatment turned out pretty good!


 It was such a fun shower with lots of friends and lots of love for baby Harper!  At the end of the shower, things got a little crazy.  I wanted a picture all together and when we stood by the balloon towers, it felt like we were at the prom.  And this is the result!

Amanda

Monster Truck Baby Quilt

Modern Monster Truck Quilt

I came up with the idea for this quilt when I was invited to a baby shower for a friend who loves going to Monster Jam.  I wanted a cute, modern take on the monster truck and this what I came up with. To begin, select fat quarters  of various prints.  I choose gray, white, black and green.  You can choose any prints or patterns you like.  I only had 8 different fabrics, but I would have liked 12.IMG_1708

Next, cut your fabric into 12.5″ strips, then sub-cut into the following measurements:monster truck measurements
Do this with each of your fabrics.  Now mix up the pieces and sew the following 12″ (finished) block:  (quarter inch seams)monster truck quilt block
You want the top and bottom pieces to be the same fabric, and the center to be different.  Press the seams toward the 6.5″ piece.
I love personalizing quilts, especially if they are gifts.  To add a name to the quilt block, print the name using your favorite word processing program.  I tried several different fonts until I got the one I liked.  If you can, reverse the image when you print.  Take your Heat N Bond® Lite and trace the reversed name in pencil.  Iron the piece of Heat N Bond® with the name to the WRONG side of your fabric.  Then, cut the name out.  Peel the backing off and arrange the letters how you want on your quilt block.  Finally press to attach it.
I outlined the letters using a straight stitch.  I went around each letter twice to give it the “sketch” feel….which I love.
IMG_1743
  After you make 11 of these blocks, lay them out.  For the truck applique block, cut a white square 12.5″x 12.5″
  IMG_1709
Next,  follow the same technique using Heat N Bond® Lite to applique the monster truck to the quilt block.  Click HERE for the truck pattern.
To finish the quilt, sew the blocks together to form rows and sew the rows together.  Quilt as desiredIMG_1782
IMG_1783
IMG_1784
IMG_1787
Note: These are big blocks which help make this a fast, easy quilt to put together in a day.  If you would like the same look, but with smaller blocks here are the measurements:
For a 10″ finished block: cut pieces 10.5″ x 5.5″, 10.5″ x 2.25″, 10.5″ x 3.75″
For an 8″ finished block: cut pieces 4.5″ x 8.5″, 1.5″ x 8.5″, 3.5″ x 8.5″
Essentially the bottom strip is 1/2 the block size, the top strip is 1/3 the block size and the center strip is 1/6 the block size.
Here is a little peek of the baby shower – we centered the colors and theme around the quilt.  We even hung the quilt in the entry way so it was the first thing people saw as the entered.
IMG_1802
I love that we were able to get a stack of tires!!
Monster truck cupcakes – complete with “dirt” on the top.IMG_1805
IMG_1808


Amanda

Pinwheel Baby Shower


My friend, Brittany, hosted a “Pinwheel” themed baby shower this weekend.  She is such a great hostess!  She gave me permission to snap some pictures!
I love being greeted by the baby shower theme.  I love the pinwheels on the green window.
I love the pinwheel banner and the use of the shutters on the cupcake table.

She printed out labels for each of the water bottles and attached a toy pinwheel that can be kept as a favor.

 There were pinwheel cupcake toppers which also could be taken home as a favor.

 Also note the use of double cupcake wrappers.  Bake in one wrapper and serve in an additional wrapper!

I love the smaller pinwheels scattered around and attached to the pink frame!

 She taped extra invitations to colored plates and set them in easels to continue with the theme.

She hung large pinwheels on both her mantles.

She attached pinwheels to painted bottles and placed daffodils in the bottles for centerpieces.  I forgot to take pictures of the back yard.  There were pinwheels hanging everywhere!

 Such a fun and “springy” baby shower!


Amanda

Onsie Dress Tutorial

 My friend mailed me this “blank” onsie for a baby shower.  It’s a cute idea.  Everyone invited to the shower gets a onsie and they have to decorate/embellish it and bring it to the shower.  I think they are having prizes or something.  That’s a lot of pressure, “Here is a plain onsie, you write a craft blog, so this better be amazing!!”  Is how I felt 🙂  So this is what I came up with.  (I am sure there are lots of tutorials out there with the same idea – this is my take on it.)

Part 1 Bib construction

 Draw a “bib” shape on Heat N Bond Lite Fusable Web.  I curved the top of it to match the curve of the onsie neck.  I didn’t include a pattern because each onsie is slightly different.  You can do it – draw your own!!   Iron it on the wrong side of your fabric.  Then cut along your line and peel off the back and iron it right on your onsie.

 Cut your piece of lace and a matching piece of Heat N Bond.  Iron it to the lace.  Then cut the lace so it matches the curve of the bib.  Iron the lace to the bib piece.


Sew the lace down both sides.  Then sew around the bib portion using a straight stitch.
Next, prepare the ruffle.  Cut a strip of fabric 1 3/4″ x 23″. 
I don’t have a serger so I did a rolled hem on the strip of fabric – which is just turning it twice as narrow as you can and sew along the fold. 

 Now, because I am not using a serger, I zigzagged the opposite side of the fabric so it won’t fray.  (above)

Then roll the edges in and hem.

 Now roll your zigzagged edge over and stitch in place.  I used the zigzag because I will be gathering it and I wanted to reduce the bulk.  Sew a gathering stitch along the edge of the zigzag hem and gather.   It should look like this:

Get out your pins and start fussing with the ruffle to get it to fit.  I use a lot of pins in this process so it fits perfectly.  Make adjustments in the ruffle as necessary.

 Sew the ruffle along your gathering stitch.

You could add buttons along the lace – but I was worried about putting buttons on something for a baby.

Part 2 – Skirt Construction

You can tell from the photos it is getting later and later and I am getting tired-er.  My photos aren’t the best.  Essentially you are making a little gathered skirt and sewing it to the onsie.

Cut your skirt fabric 11 1/2″x 34″.
My onsie is size 3 to 9 months.  (That’s a new size to me.  My youngest is 5 and I never had onsies made that size!)  If your onsie is larger I would add a little to both measurements. 

With right sides together, sew the two edges together to form the back seam.  You will have a continuous piece.  Press the seams open or zigzag the edges.  My seam allowance was a generous quarter inch.  It doesn’t really matter on this project.

(Maybe I should iron my fabric!!)  The skirt is top-stitched to the onsie (you could cut the onsie apart and sew it to the shirt portion like a T-shirt dress, but then you wouldn’t have the onsie diaper cover which is what I love about this dress.)  Because it is a top-stitched skirt, you need a rolled hem on the top of the skirt piece so it doesn’t fray.

Now we are ready to gather.  Sew a gathering stitch around your skirt waist about 1/4 inches below your top hem.  Pictured below:

 Gather your skirt and ease it around the waist of the onsie.  You can choose where you want this.  Mine was 2 1/2″ below the armpit.   I drew a light line in pencil so I could see where to pin the skirt.  Pin your ruffled skirt following your line making sure to evenly distribute the ruffles.  When you are happy with how it looks, sew it along your gathering stitch.  I covered my seam by sewing ric rac.  You could sew ribbon or lace or your favorite trim….or not.  It doesn’t look that bad with just the seam.

Dress Hem:  You can hem the dress how ever you like.  I was going to sew a small ruffle along the hem in coordinating fabric but I ran out of time.  So I did a lace hem.  I sewed the lace and pressed it out and top stitched it down.  You could use ric rac, or other decorative trim, or you can sew a regular hem.

Here it is!!  I also sewed a matching flower for the baby’s head – but I finished it on my way out the door to mail it – so no photo 🙁

Amanda

ABC Baby Quilt

My friend had her baby 7 weeks early.  They are now doing well and are home.  I made little Max this baby quilt.  I had planned to make more of a pieced quilt but when I went to the fabric store I fell in love whit this alphabet panel.  The colors are darling and the animals are cuter than any other I’ve seen!  It’s called “Aldo to Zippy” by P&B.

 I cut the panel out then sewed a 2″ white border, a 4 1/2″ polka dot boarder, and a 1 1/2″ orange boarder. (those are the cut sizes)  It’s bound with turquoise polka dot fabric.

Here are a few close ups of my favorite animals:


 The back is soft grey flannel with a strip of the coordinating fabric. 

Diaper Change on the Go – Baby Shower Gift

 I have seen different versions of this idea all over Pinterest.  Here is my take on this fun idea!!

 I sewed 5 zipper pouches.  The measurements for the rectangles are 11″x10″ with a 1 1/2′ pleat in the bottom.  They are each lined.  For instructions on making a basic zipper pouch, look HERE, HERE or HERE.  I choose to sew 5 because 10 seemed like a lot!

 Each zipper pouch holds 1 diaper, 1 disposable changing pad, 1 Ziplock of wipes, 1 bottle of hand sanitizer and a trash bag.  This is essentially all the things you need for 1 diaper change.  The idea is the mom can grab one of these on the go and know she is prepared.  As the child grows, you can add in things like baby food, spoon, disposable bib, etc.

 Put them all inside and you are good to go!

 I bought a basket and placed all the pouches in.

Print out a tag & tie it onto the basket

Click HERE for the pdf of the Blue Tag Instructions.
Click HERE for a Pink version

 No, off to the baby shower you go!!

A Circus Theamed Baby Shower

My friend, Mary, is having her first baby – we threw her a “Circus” baby shower last night.


I made Mary this cute polka dot quilt – I didn’t want to cut the fabric up, so I just quilted it. On the back is blue polka dot flannel – it’s like a receiving blanket quilt! It matched the “Circus” theme shower so cute!
We had popcorn, darling mini cupcakes,
Cotton Candy,
and caramel apples that you top yourself (nuts, chocolate chips, toffee & sprinkles)

Then we played a few circus inspired games and opened gifts. It was super fun!