Mother’s Day Pom Pom Pen Bouquet

pom pom pens

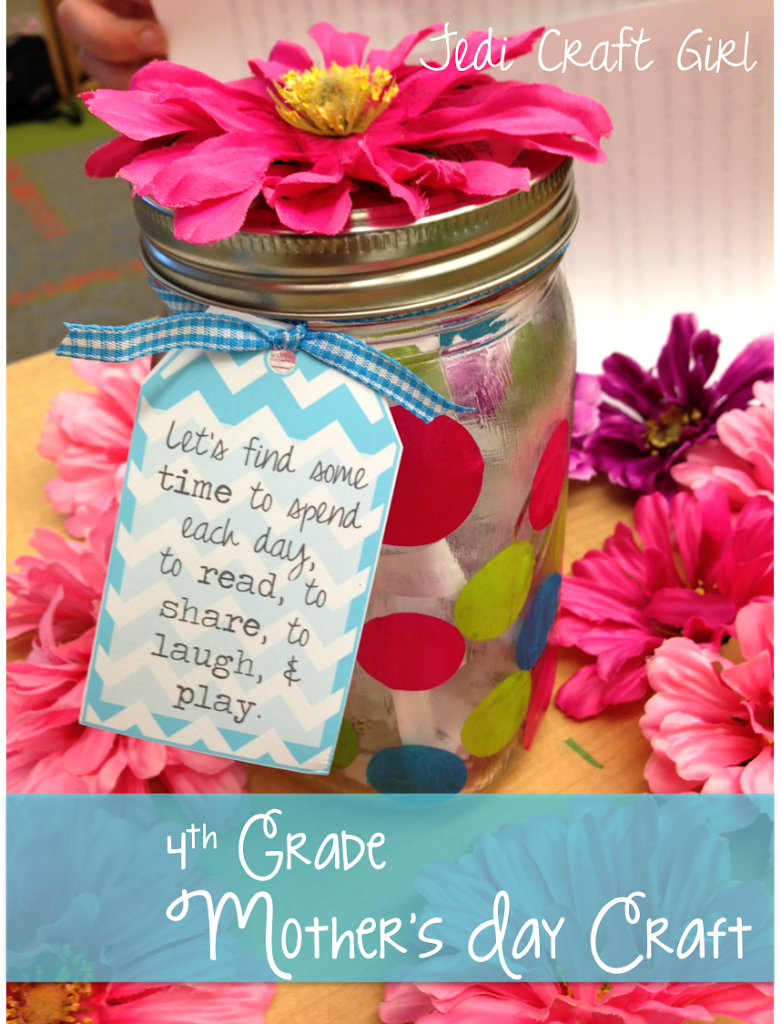
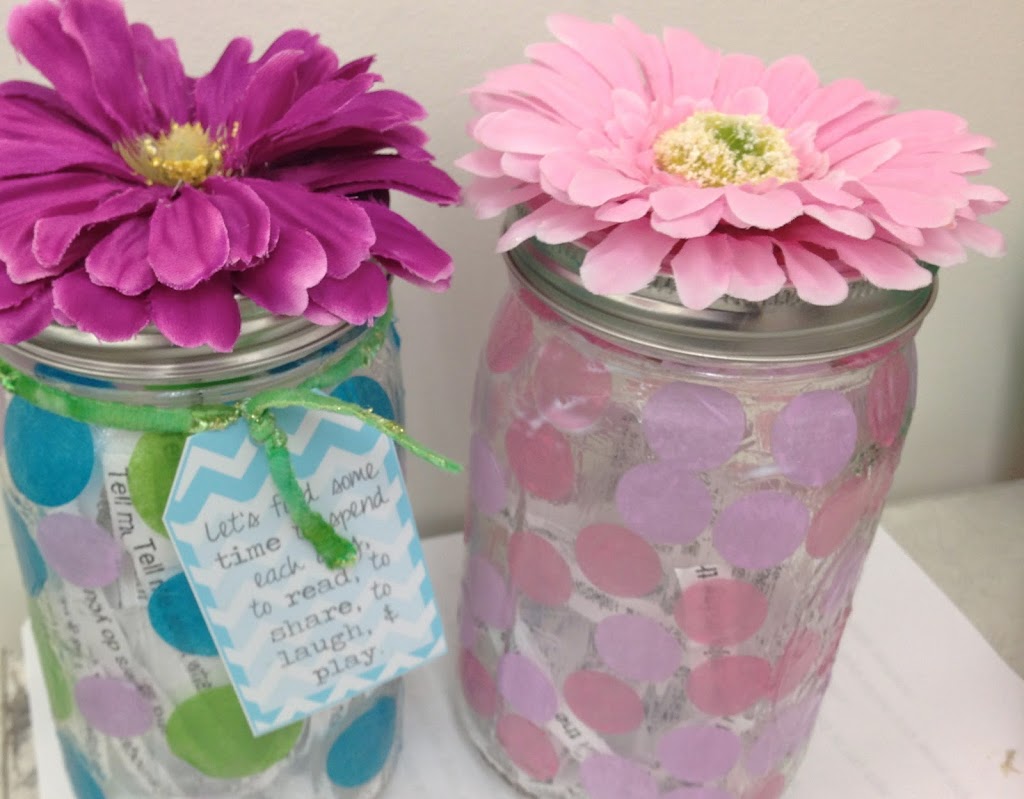
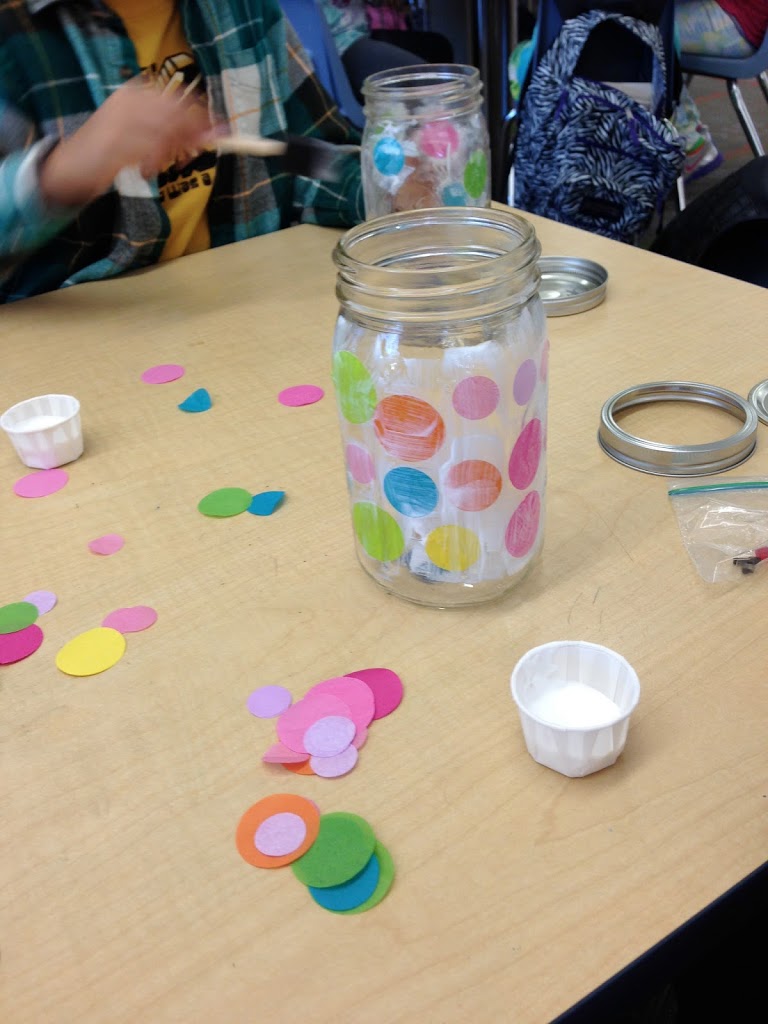
I can’t believe how fast May is flying by!  And Mother’s Day is this weekend!  I thought this project would be great for moms or for Teacher Appreciation Week which is also going on here in our schools!  It’s pretty simple to make and the kids can get in on the fun!

Have you ever heard of Flower Power Vases?  I hadn’t until the cute little company sent me 2 vases to try out.  They wanted to see my thoughts  – so this is NOT a paid tutorial, just my thoughts and ideas 🙂flower power pom pom  8

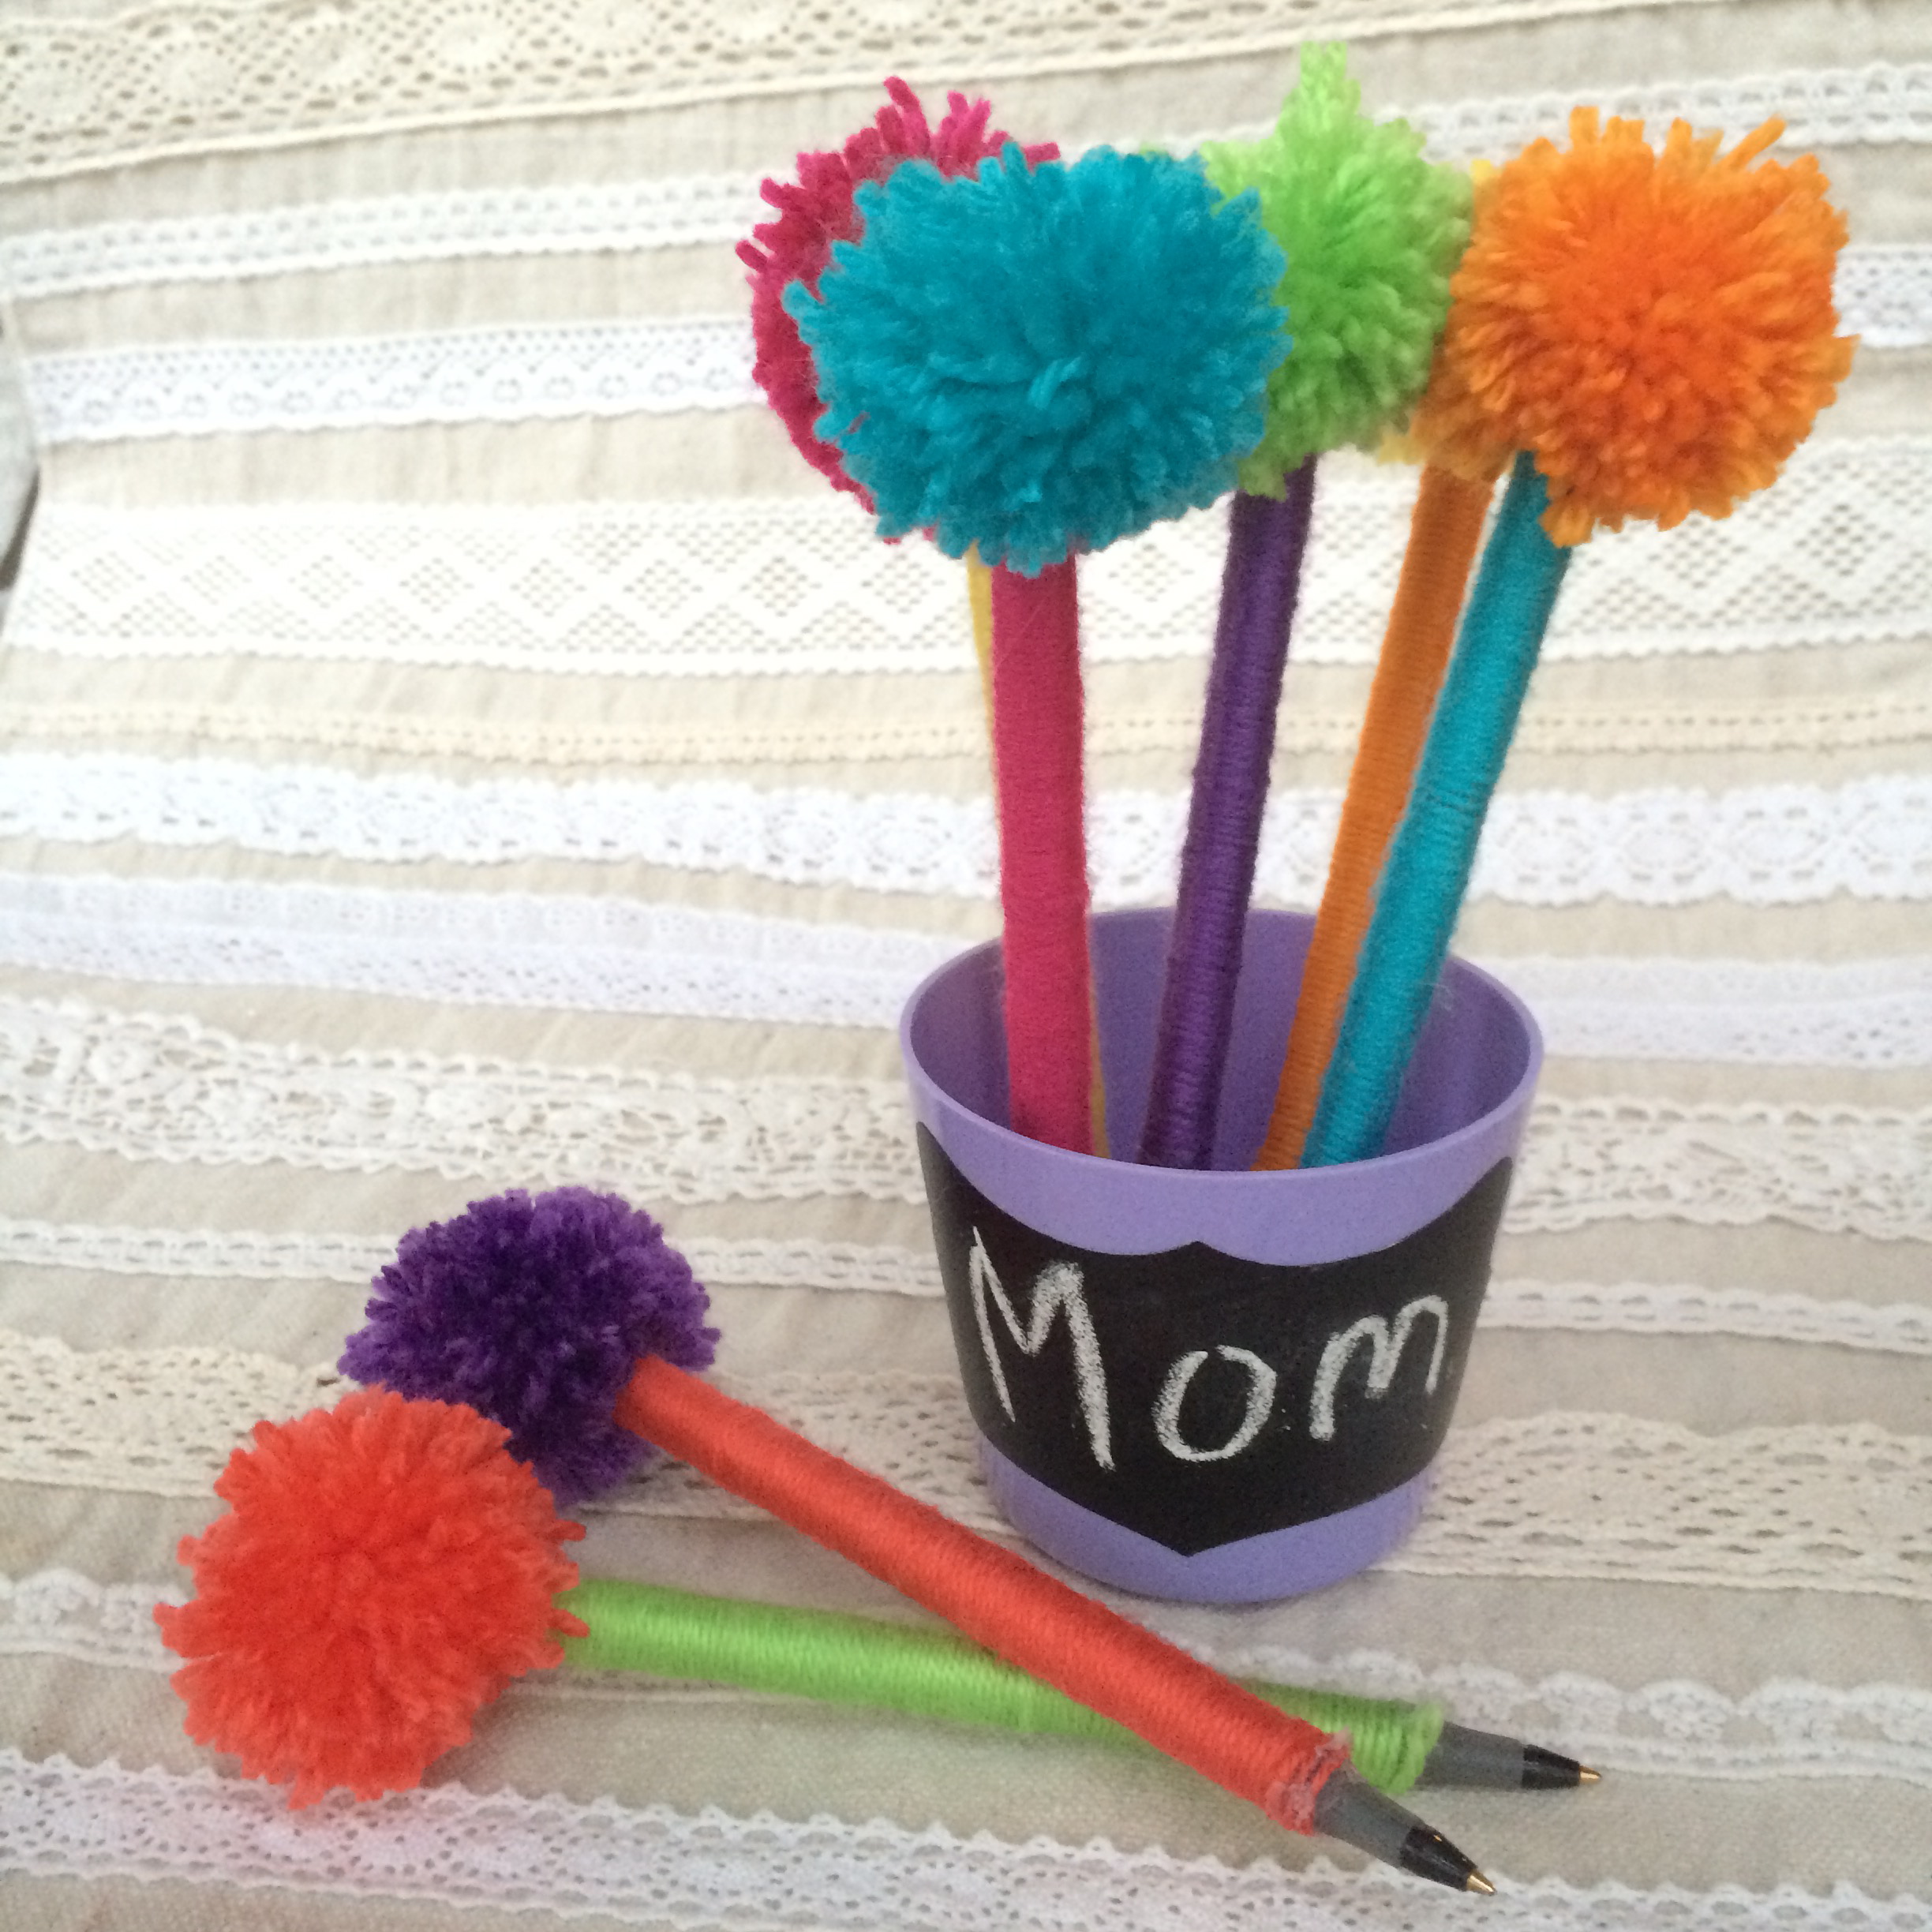
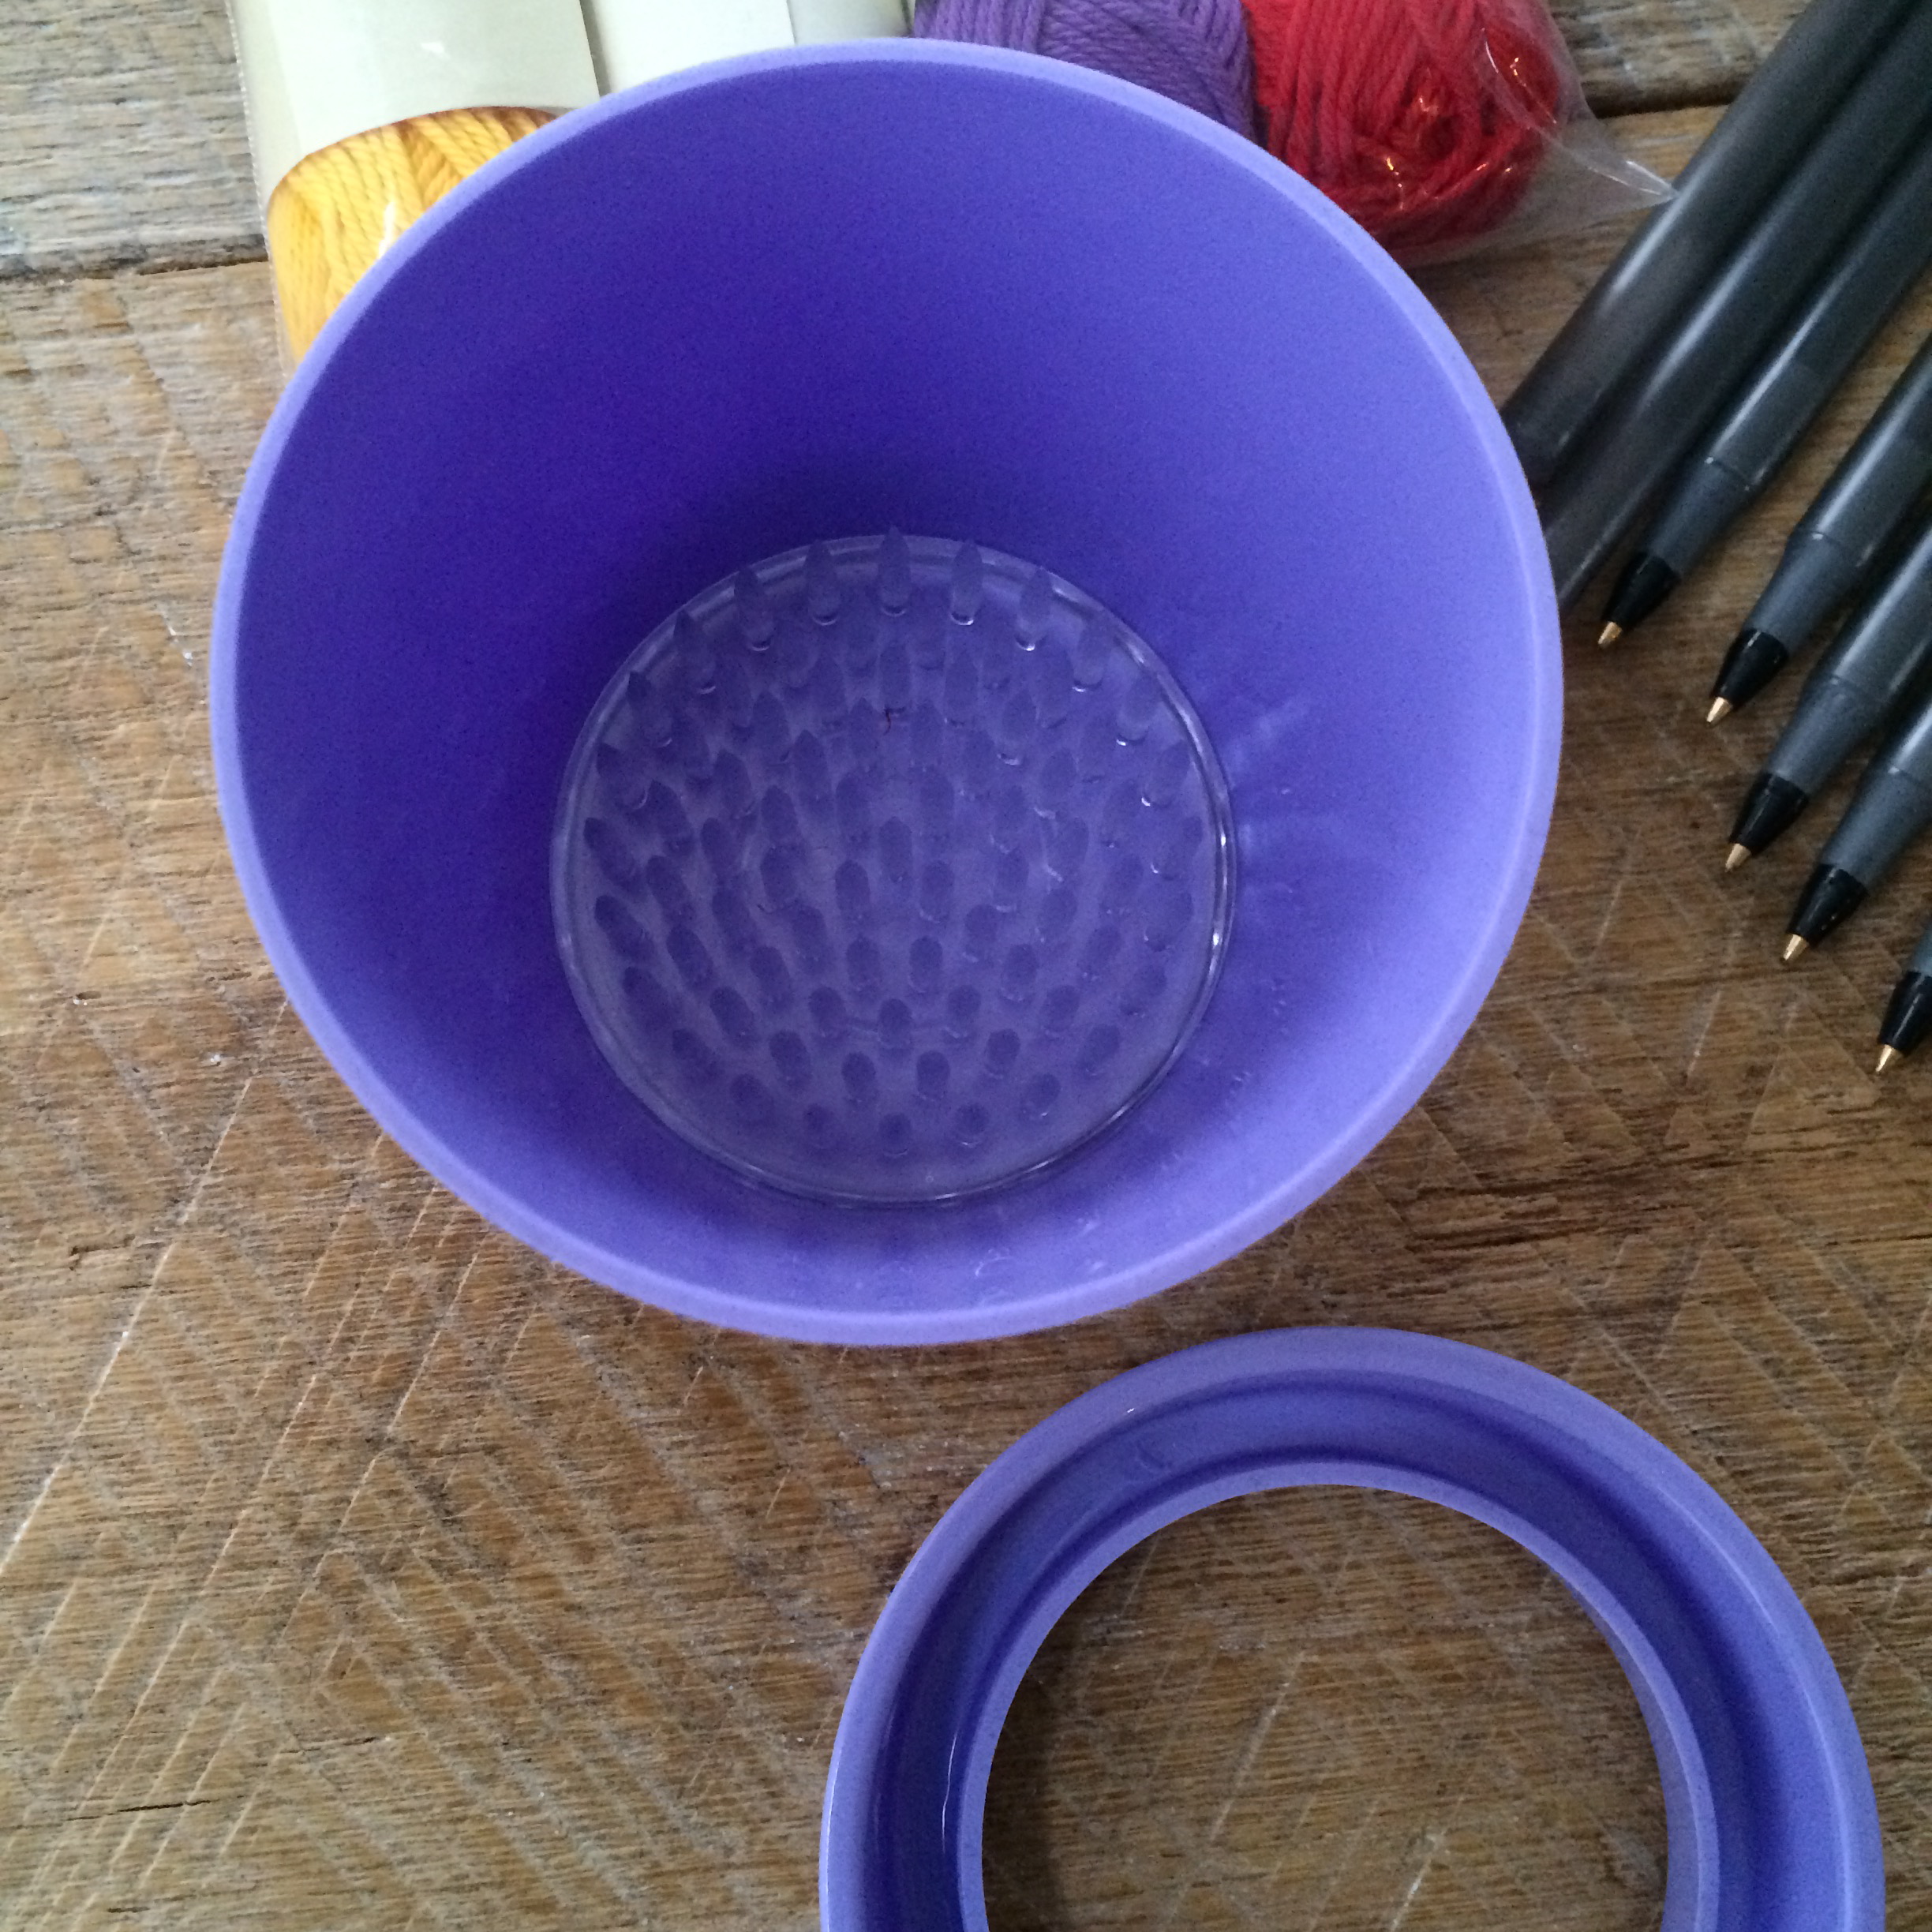
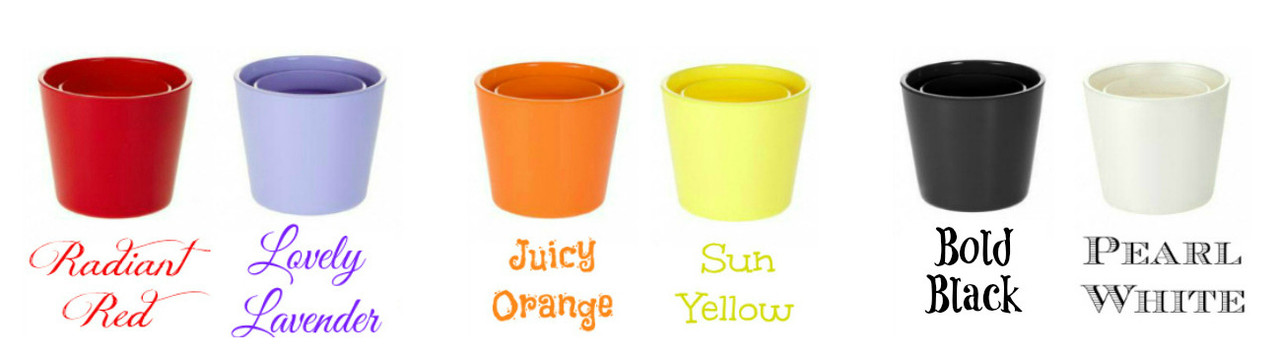
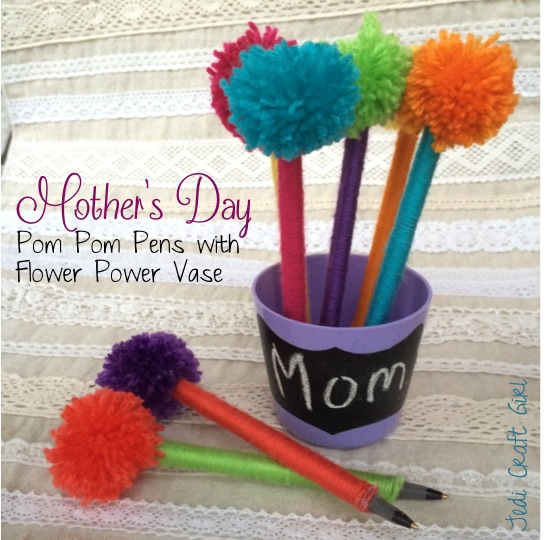
First of all, the little vases come in many colors.  They all have this special grippy thing in the bottom to hold cut flowers.

slideshow_4

flower power pom pom  2

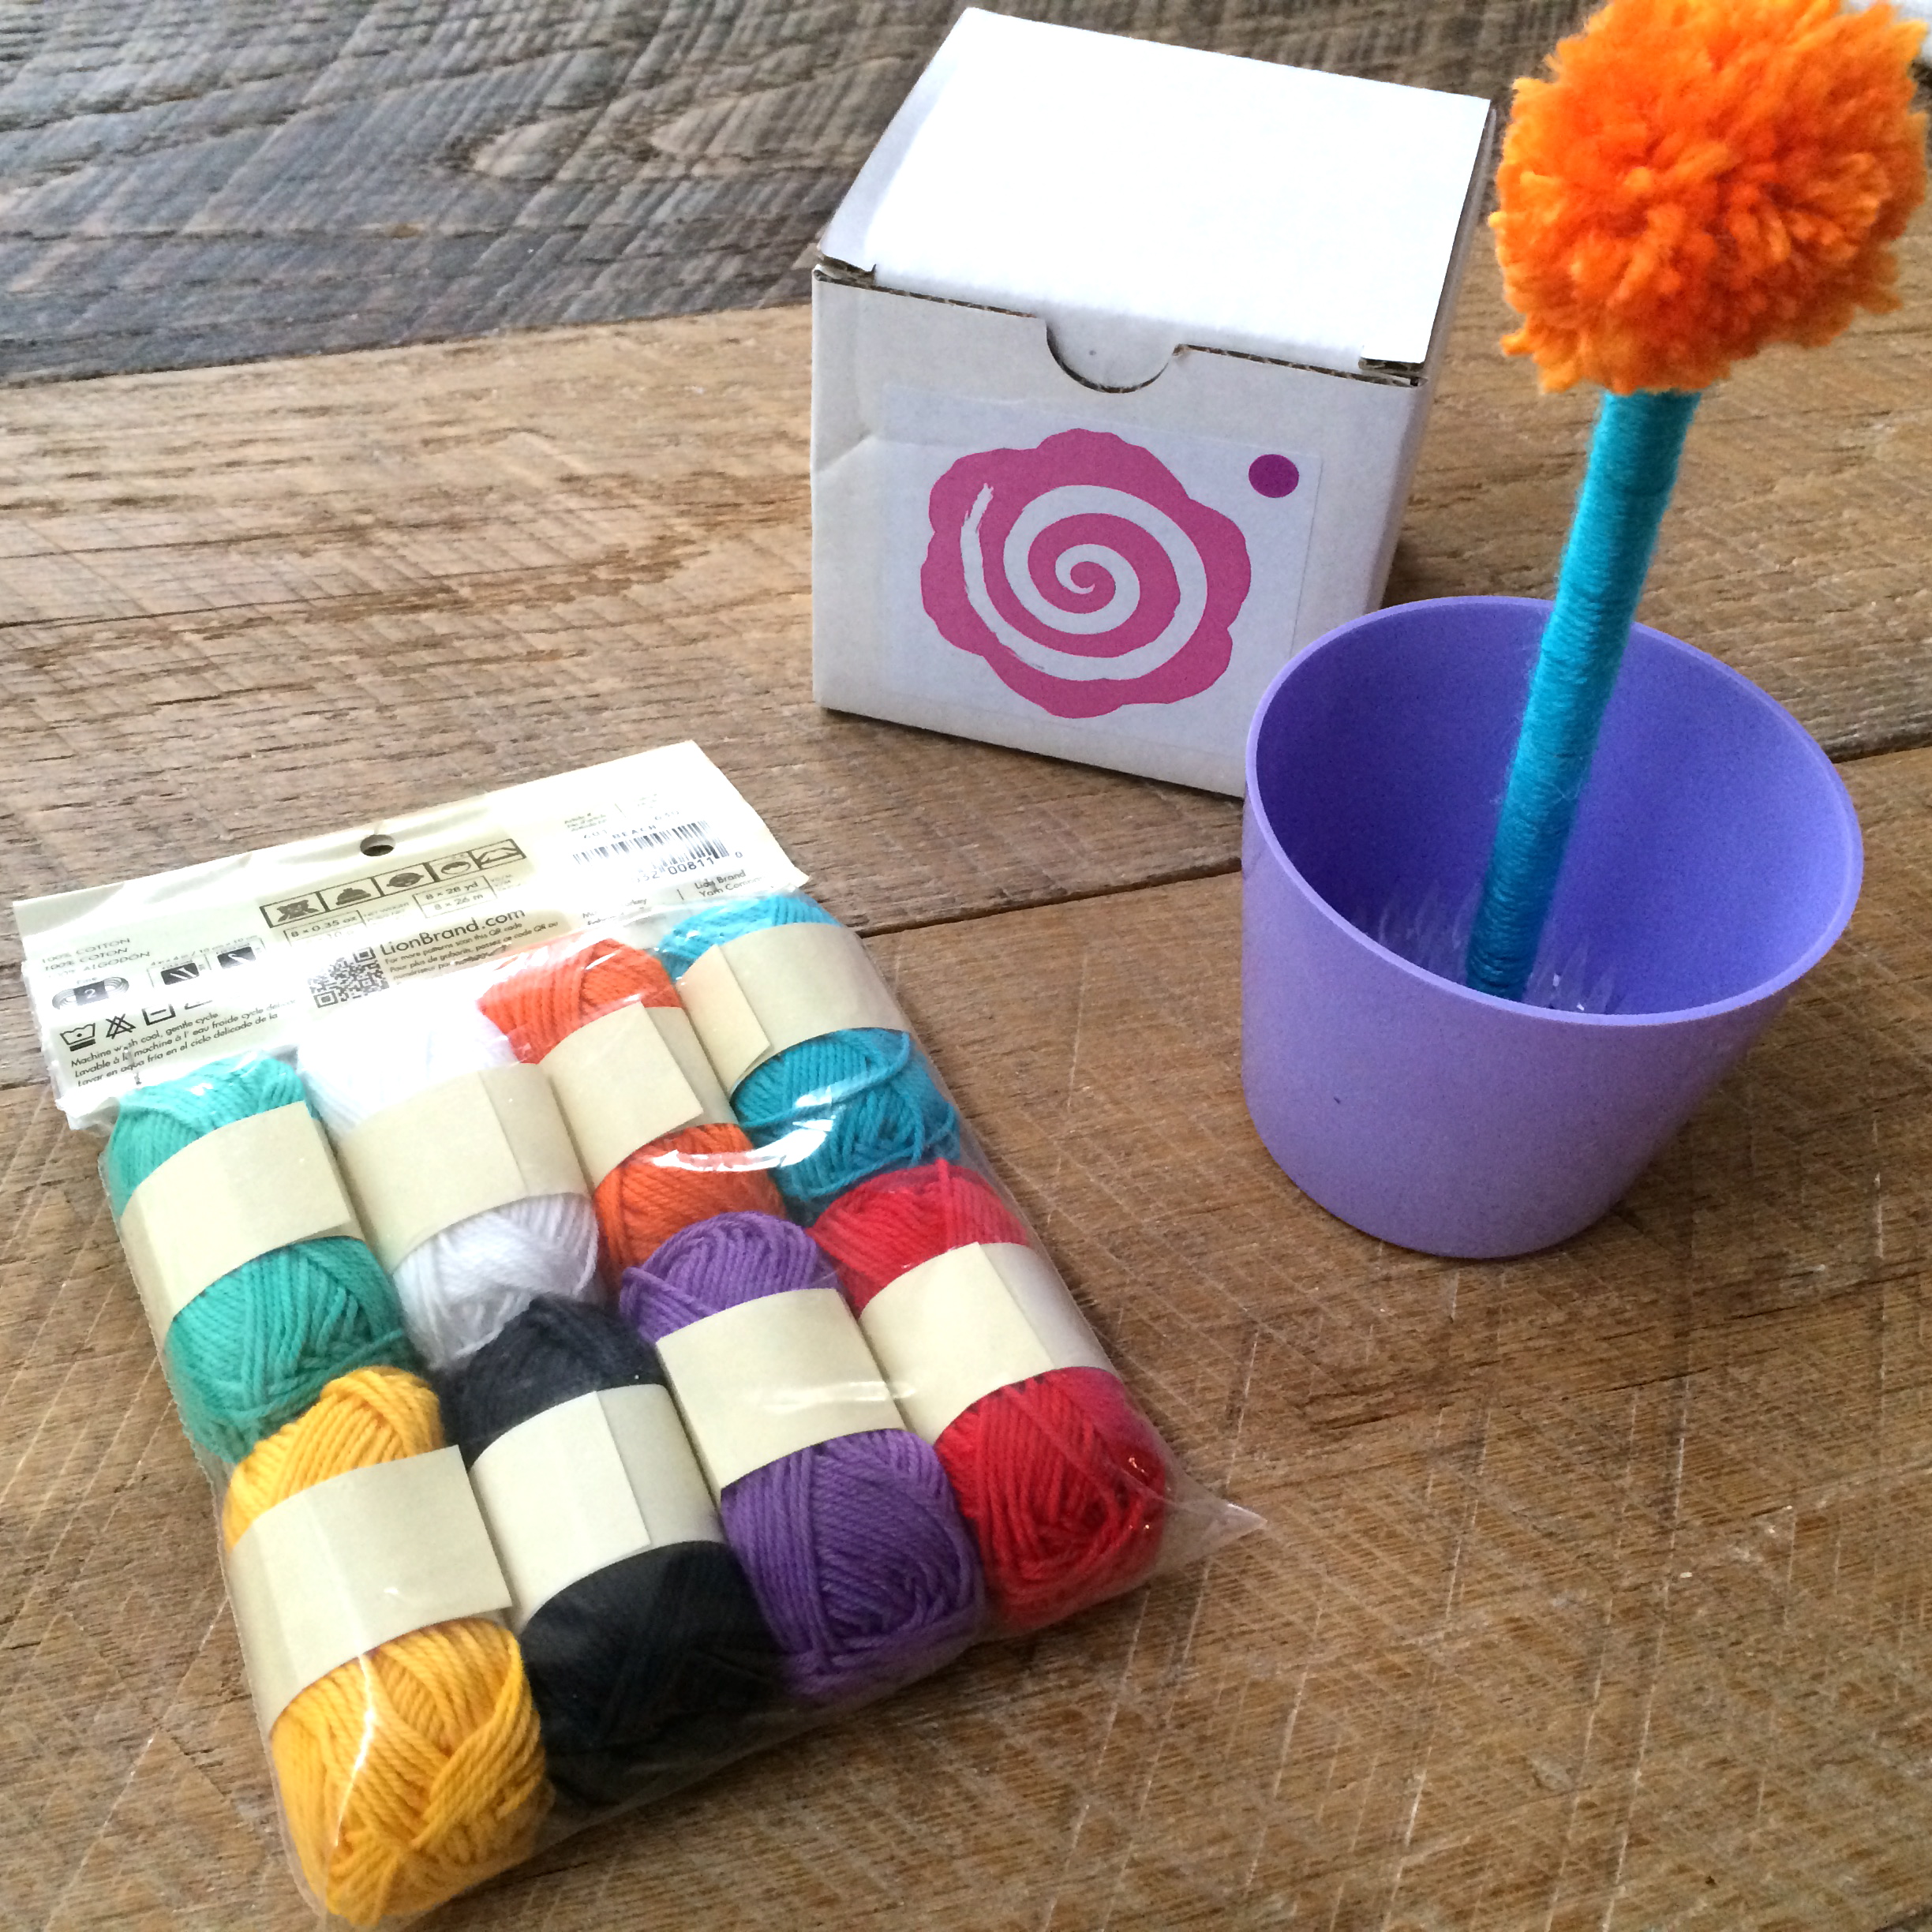
Of course they are perfect for cut flowers (and they fit in the cup holder of a car)….I wanted to turn it into a little crafty gift.  Here’s what you need:

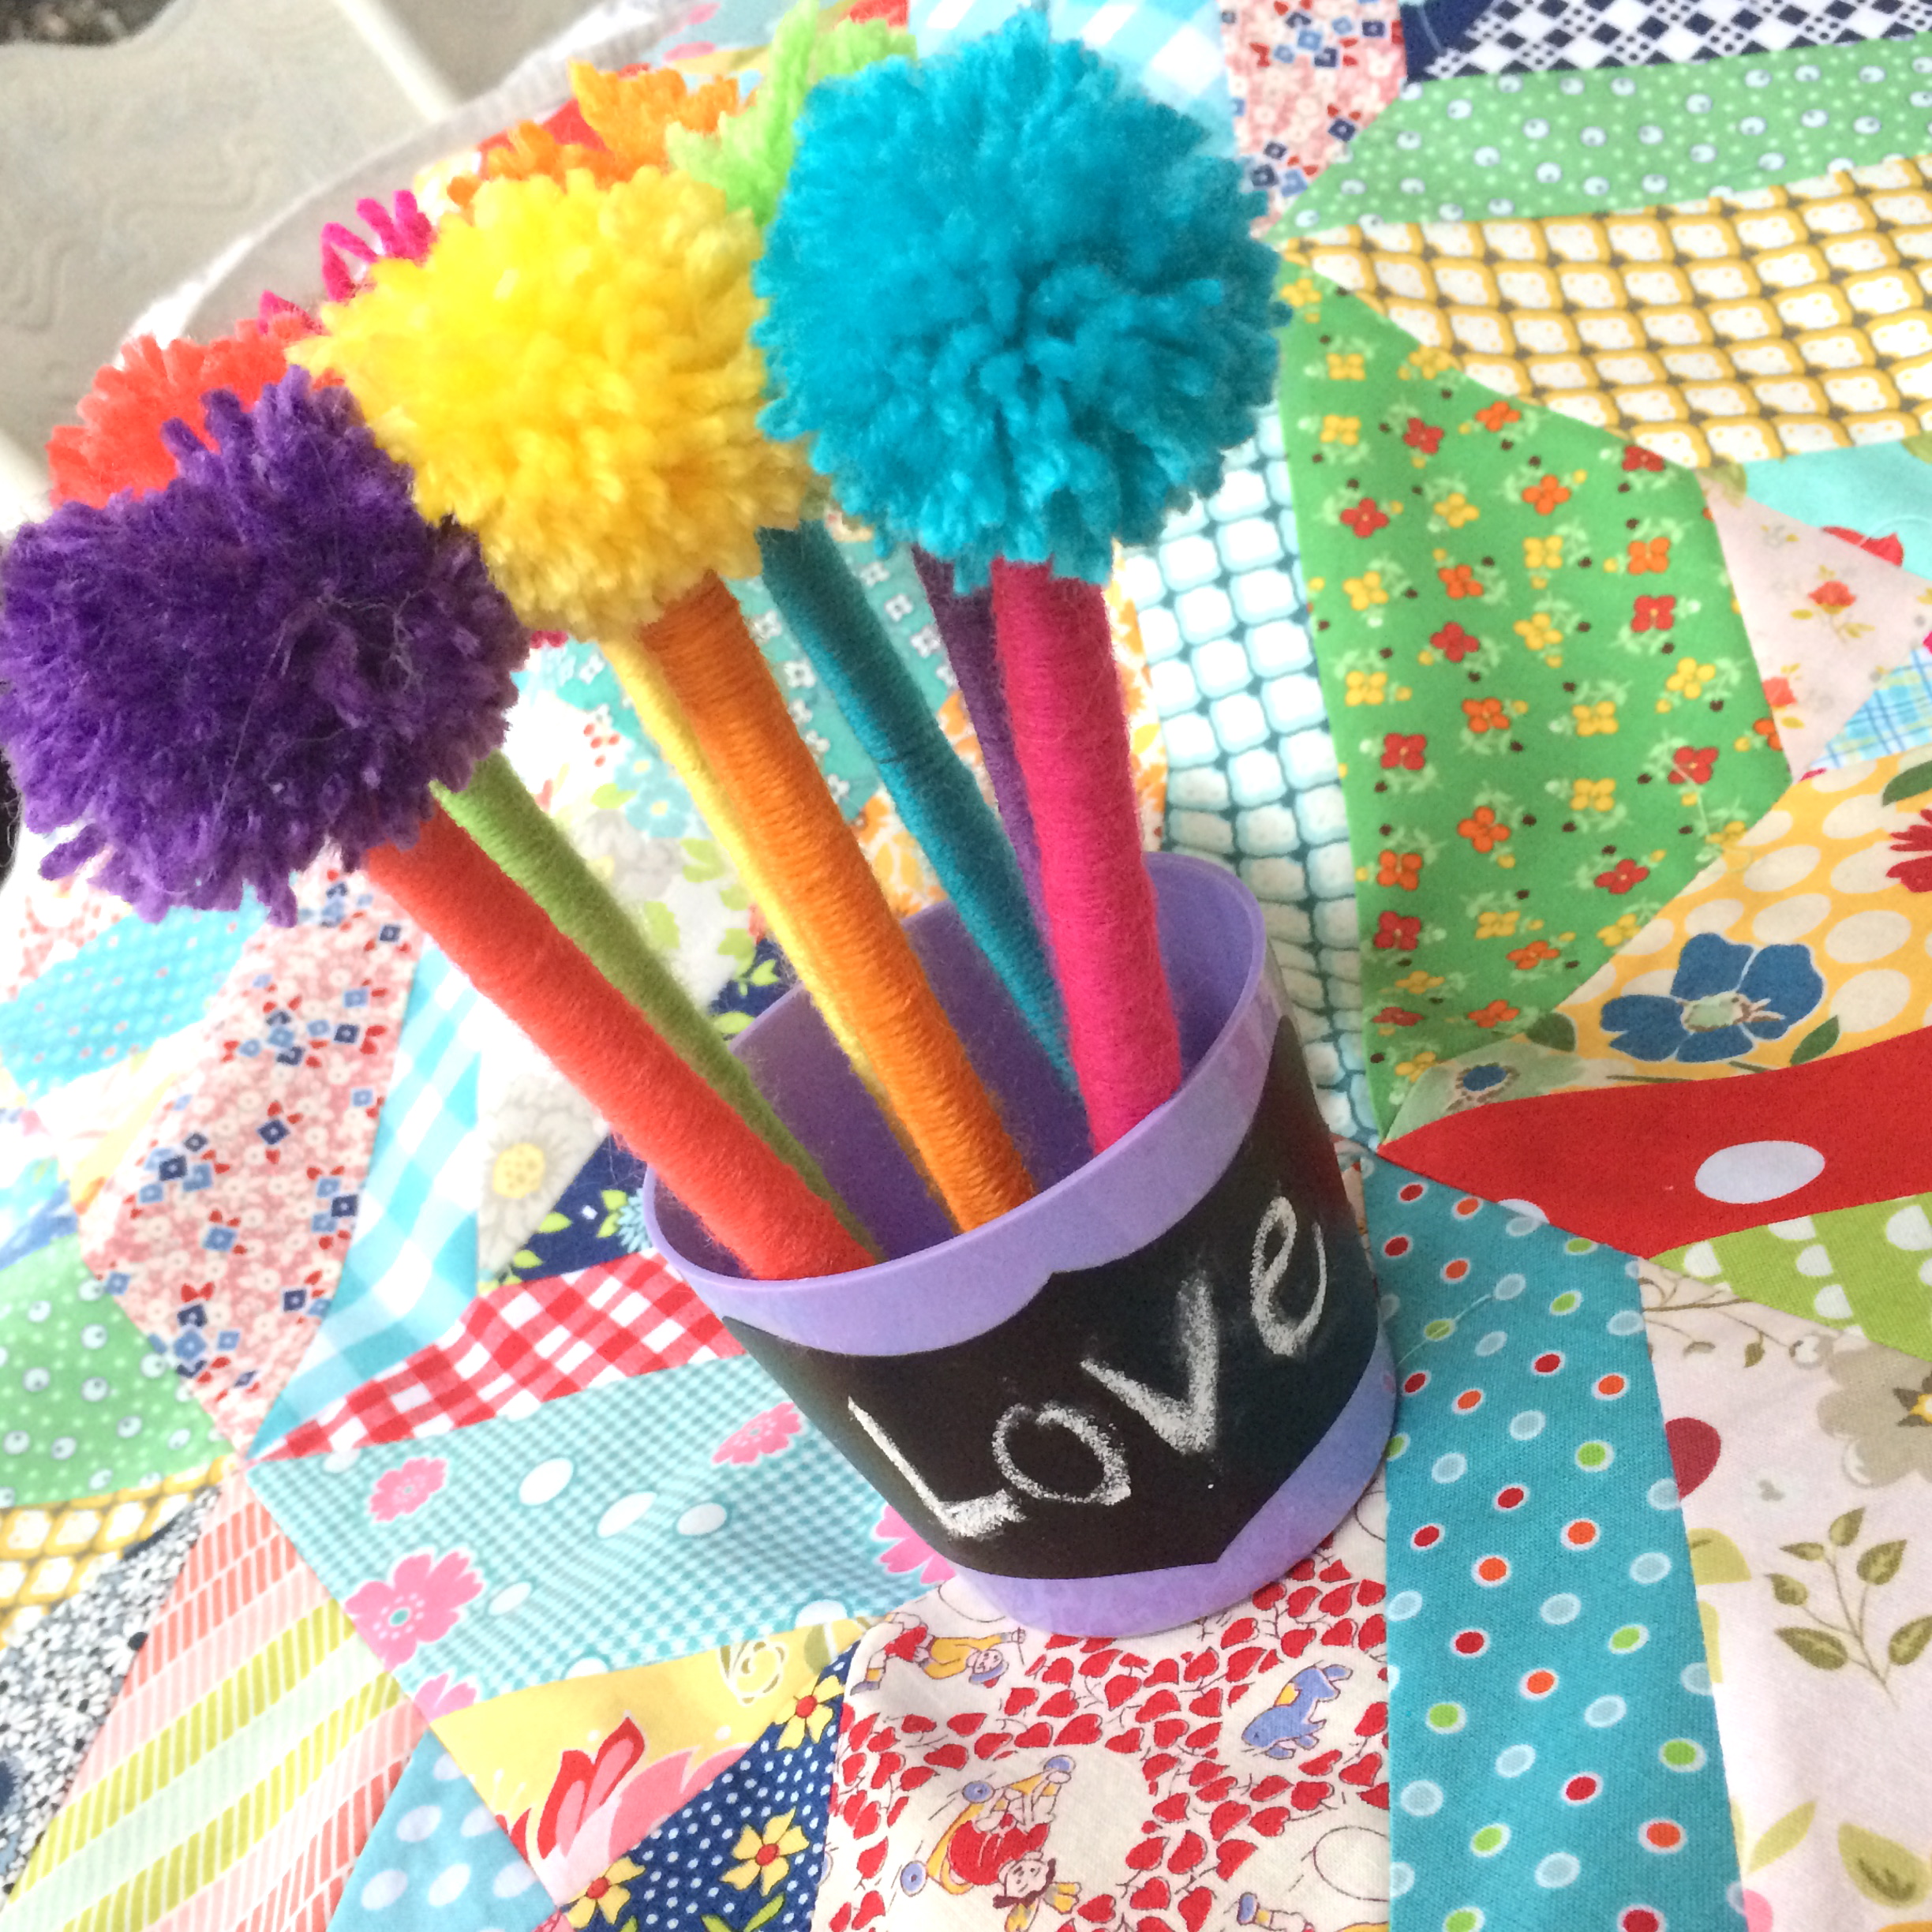
Pens, yarn, hot glue, small pom pom maker, and the Flower Power Vase.  I added a chalkboard label so you can change the word on the vase.

flower power pom pom

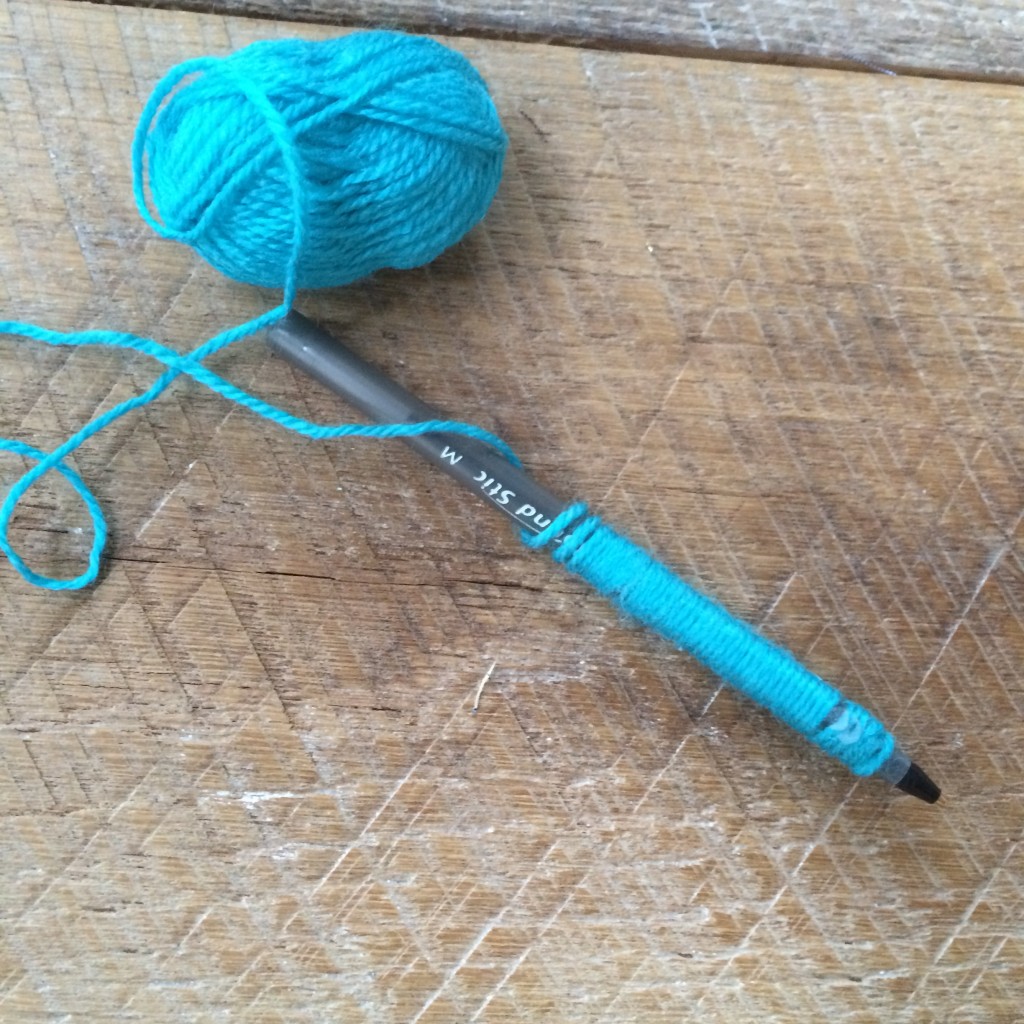
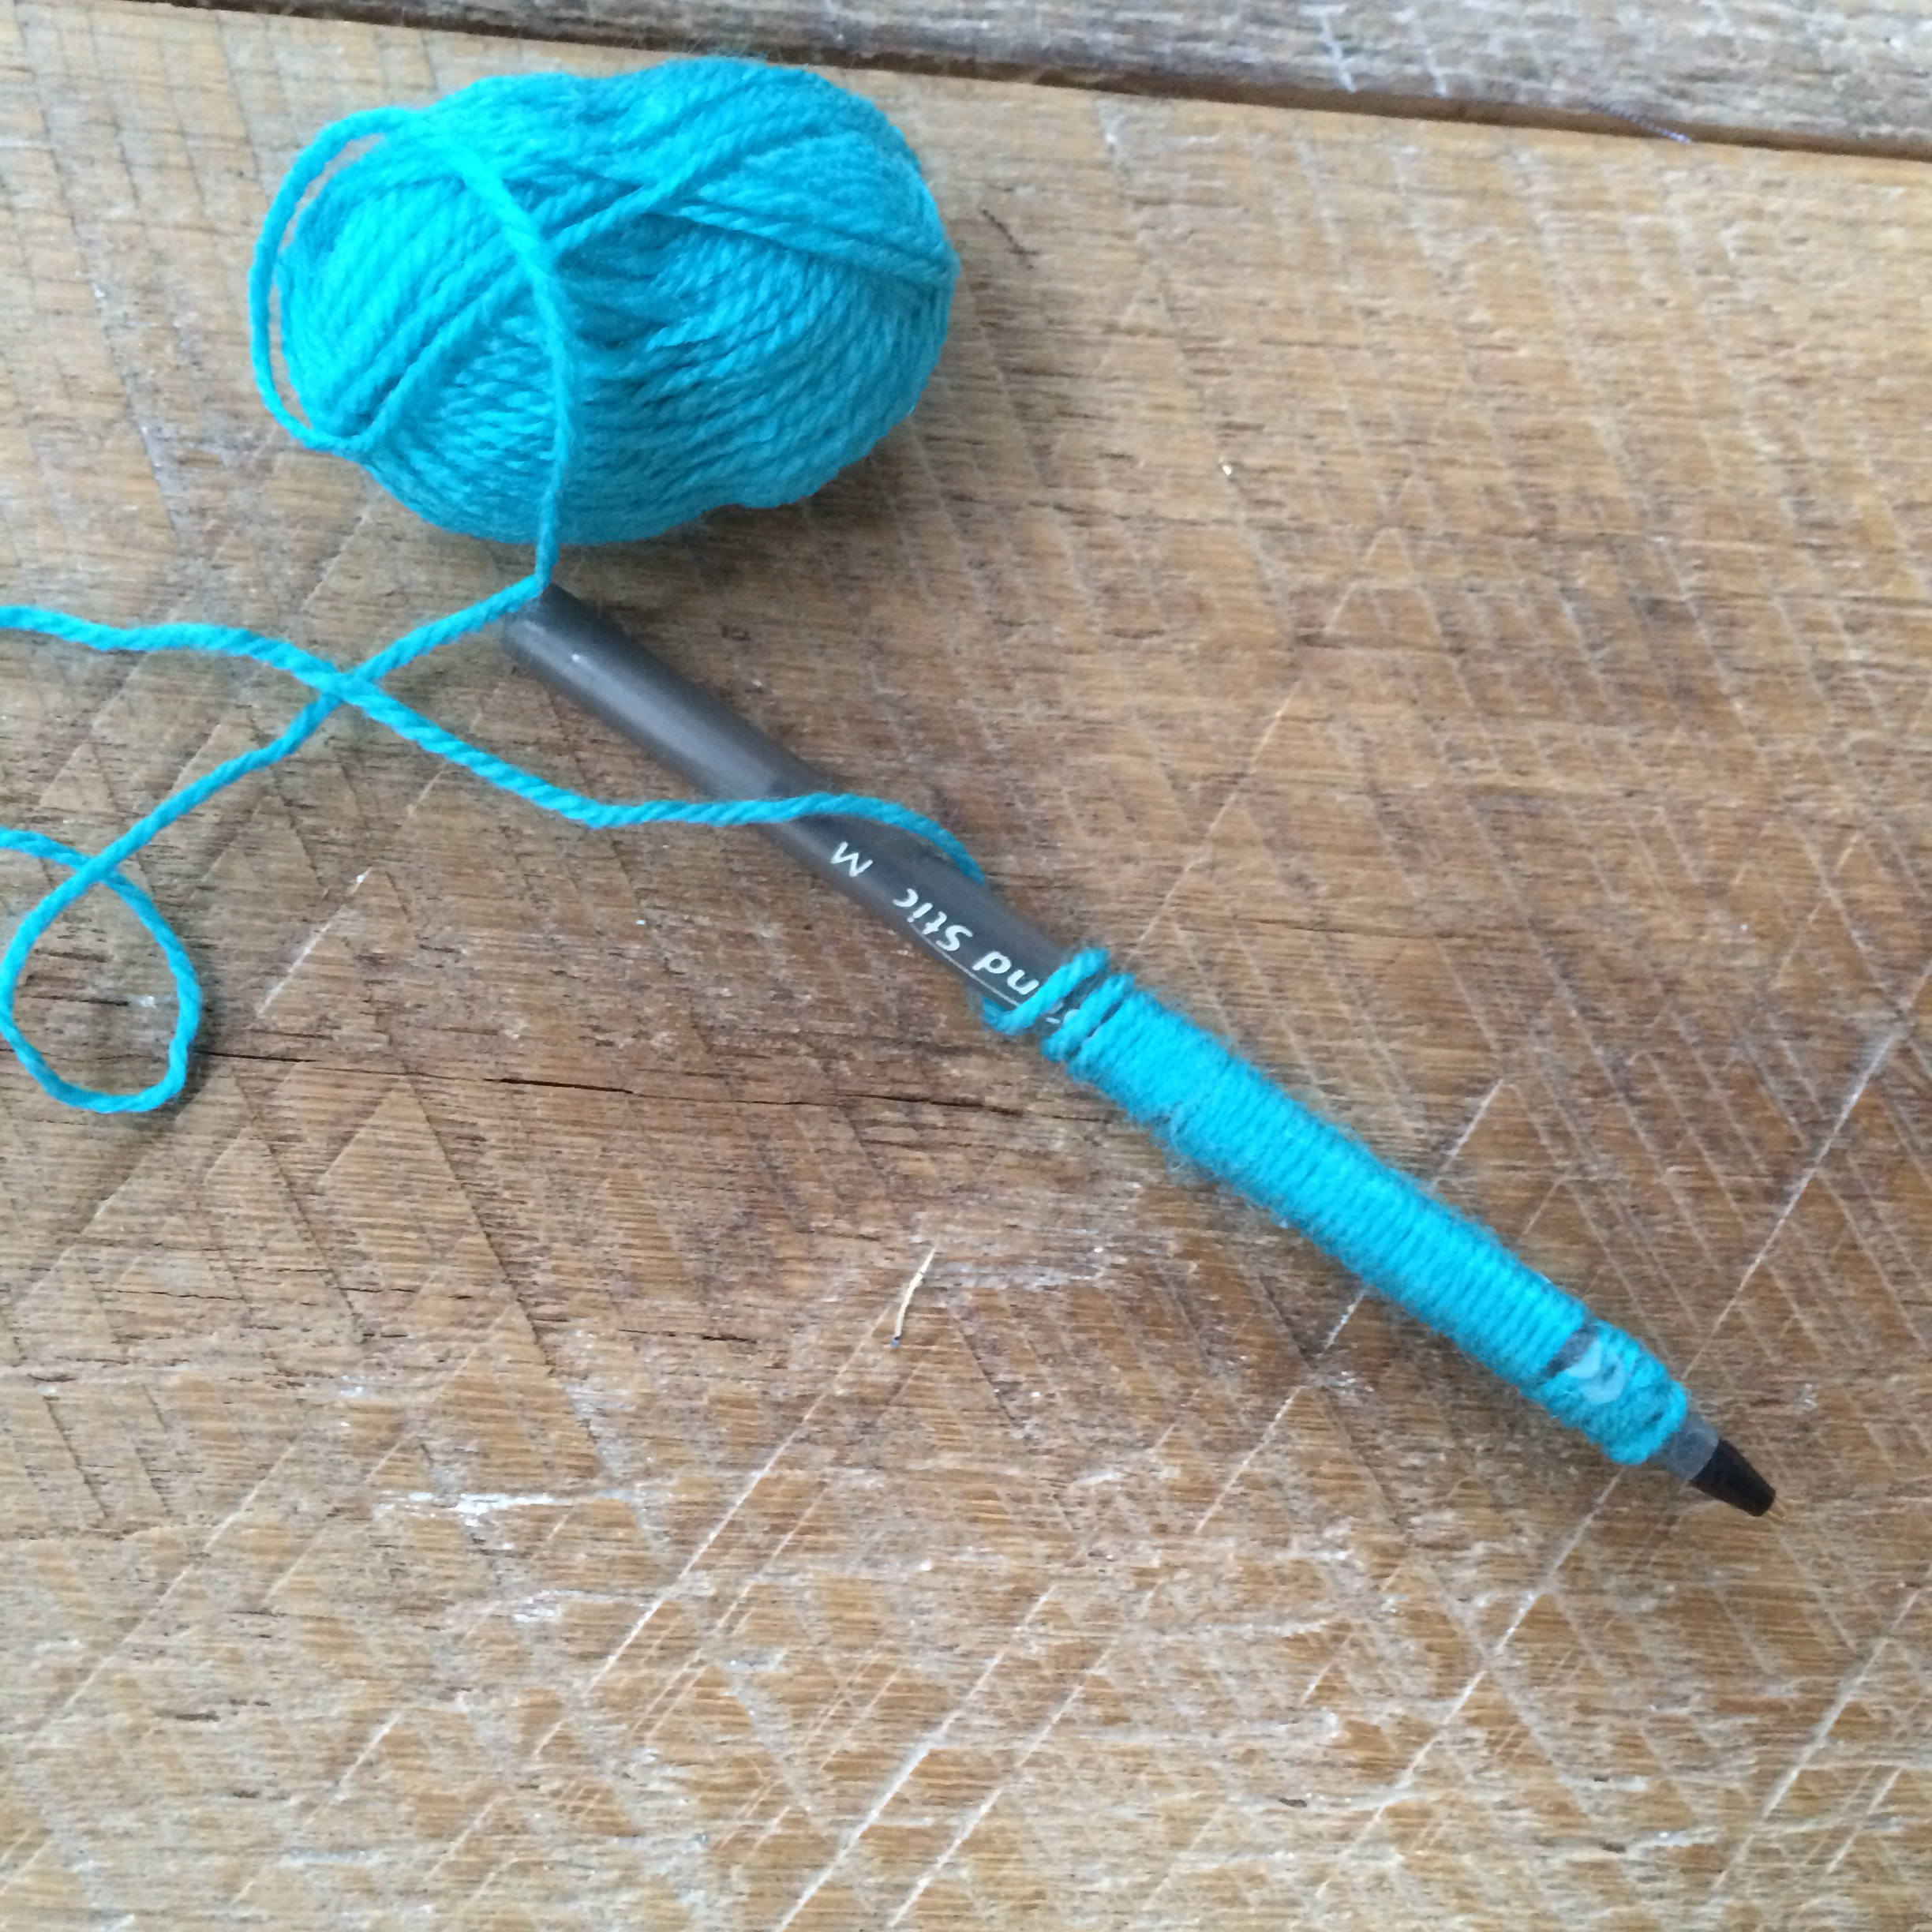
Begin by adding a dot of hot glue to the end of the pen to secure the yarn.  Wrap and wrap and wrap until you get to the other end of the pen and add another dot of hot glue.

flower power pom pom  3
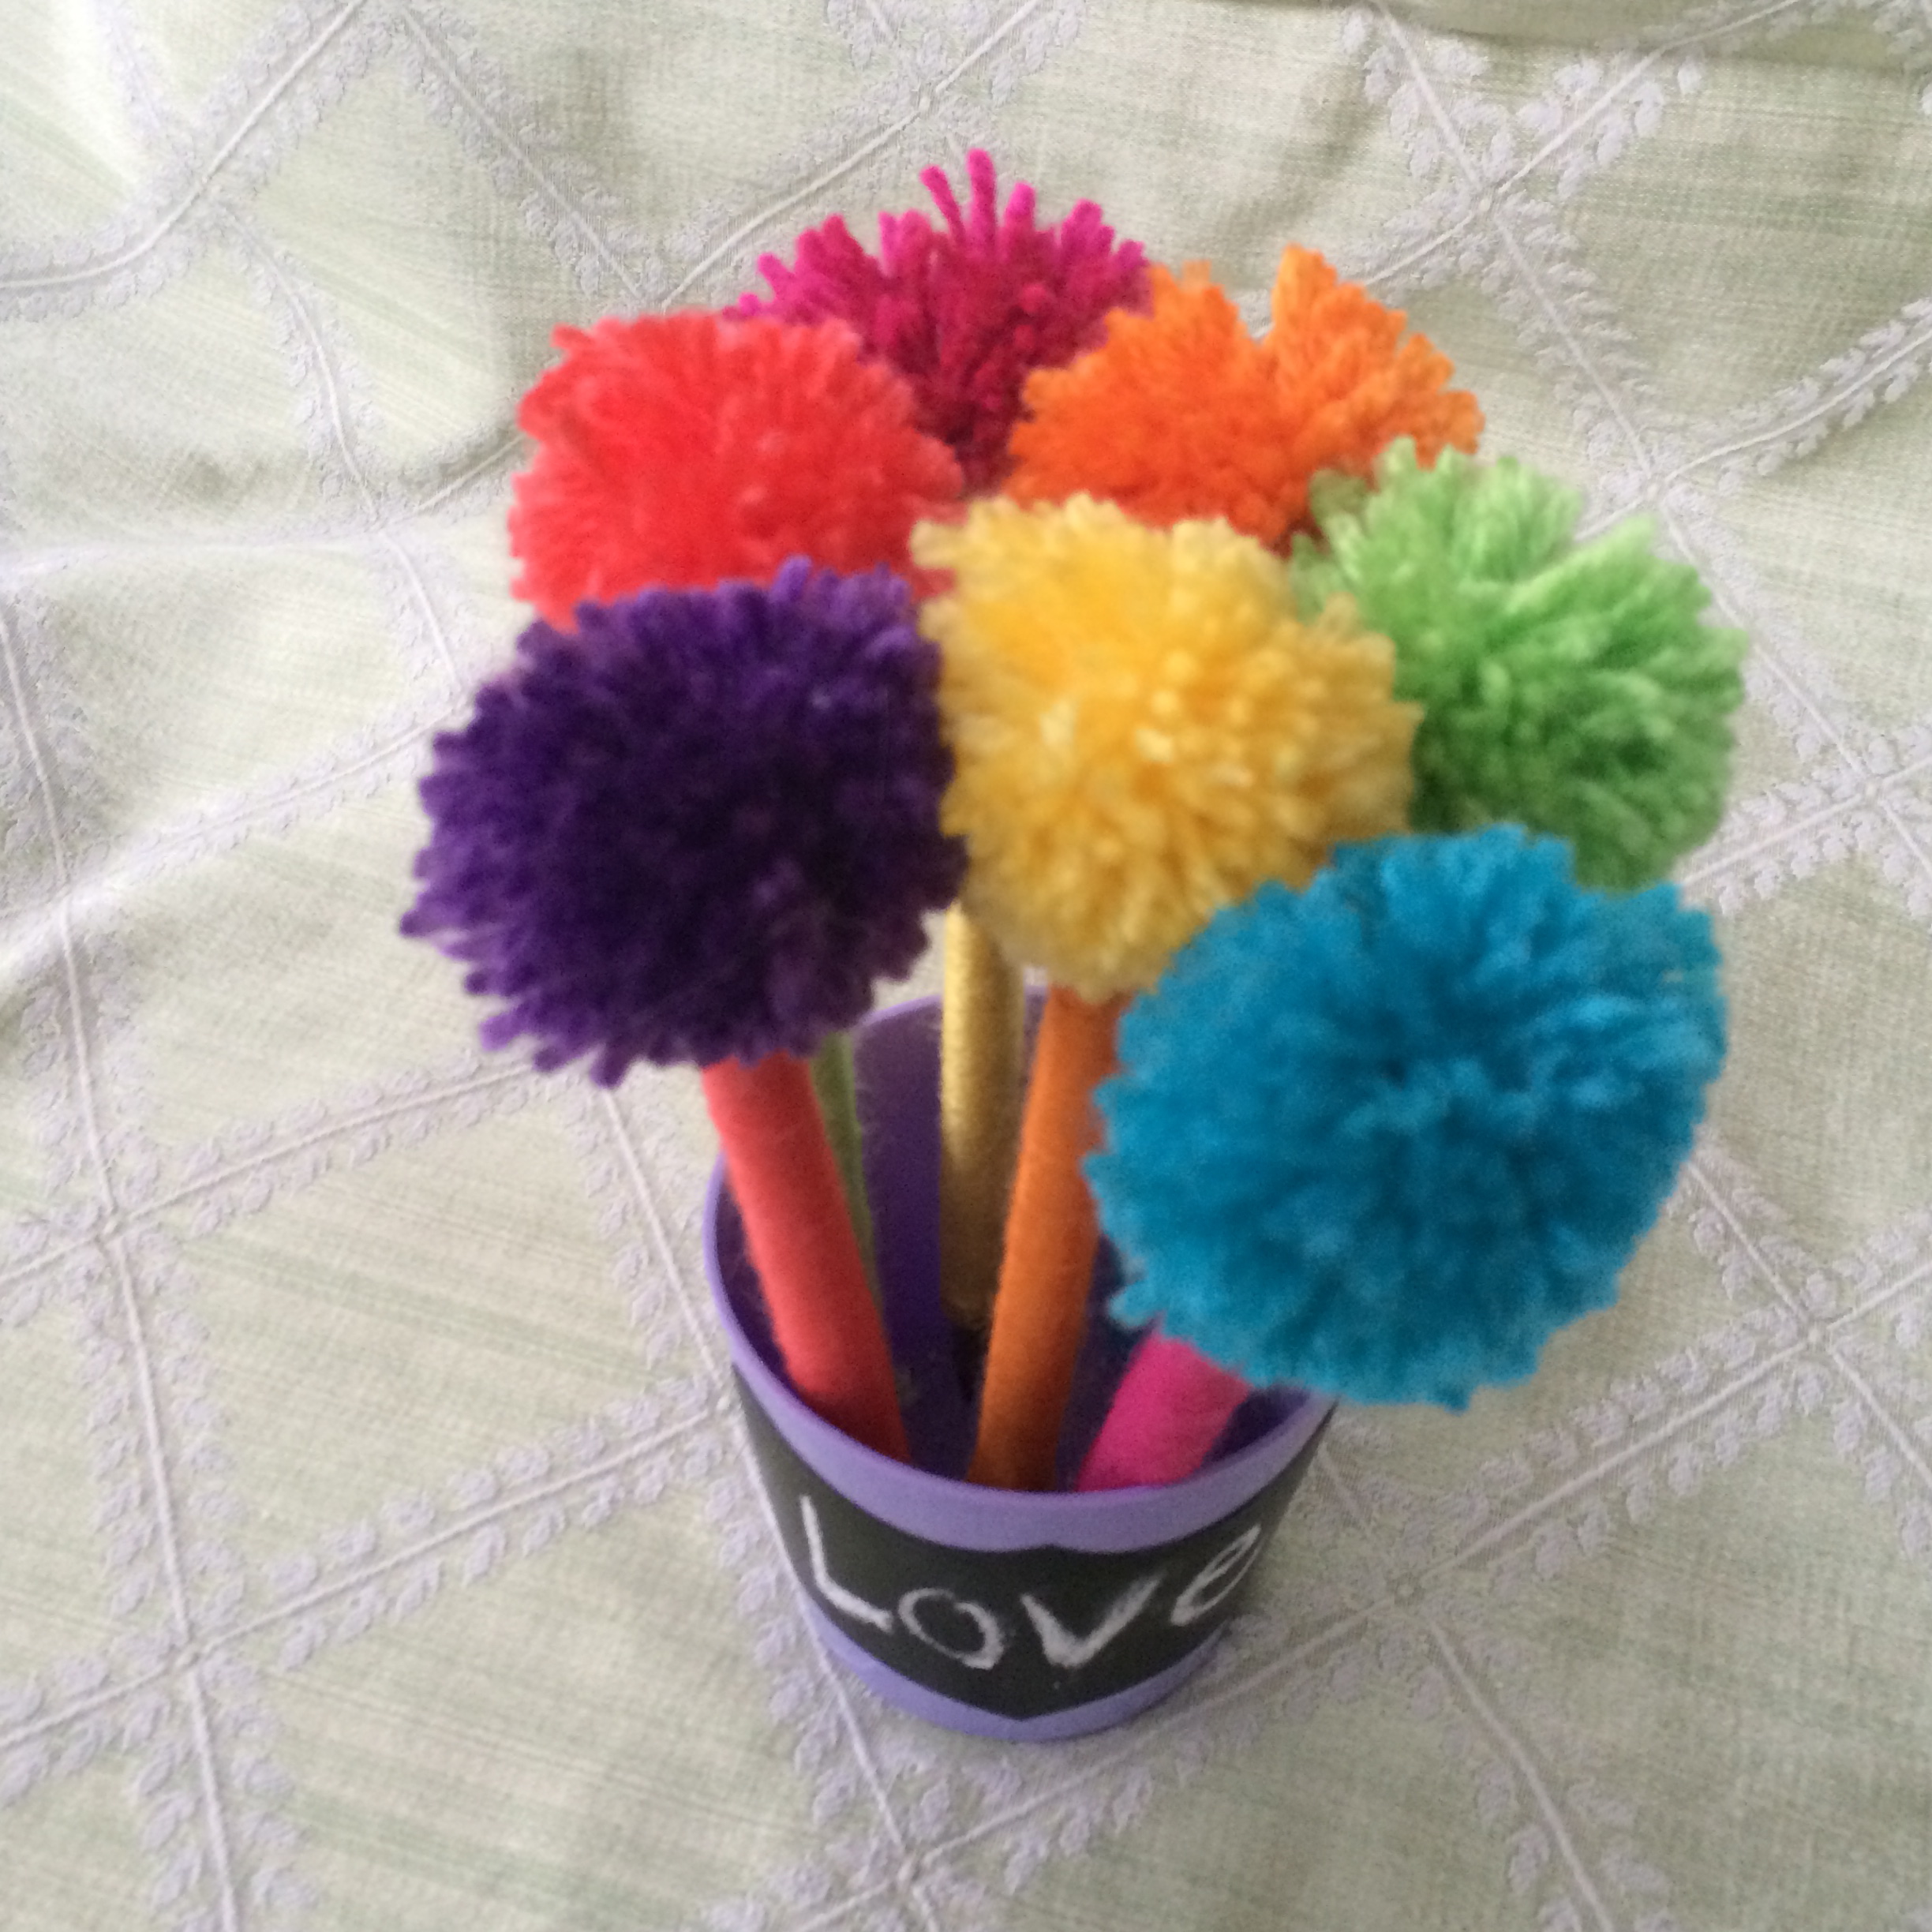
Take the yarn and make a small pom pom.  I love the pom pom makers you can buy at craft stores.  My daughter made all of them for me….easy peasy!  Hot glue a pom pom to the end of the pen.  Continue this process until you have 7 or so pens.

flower power pom pom

I first wrote the word “Love”, then changed it to “Mom”.
flower power pom pom  9

flower power pom pom  10

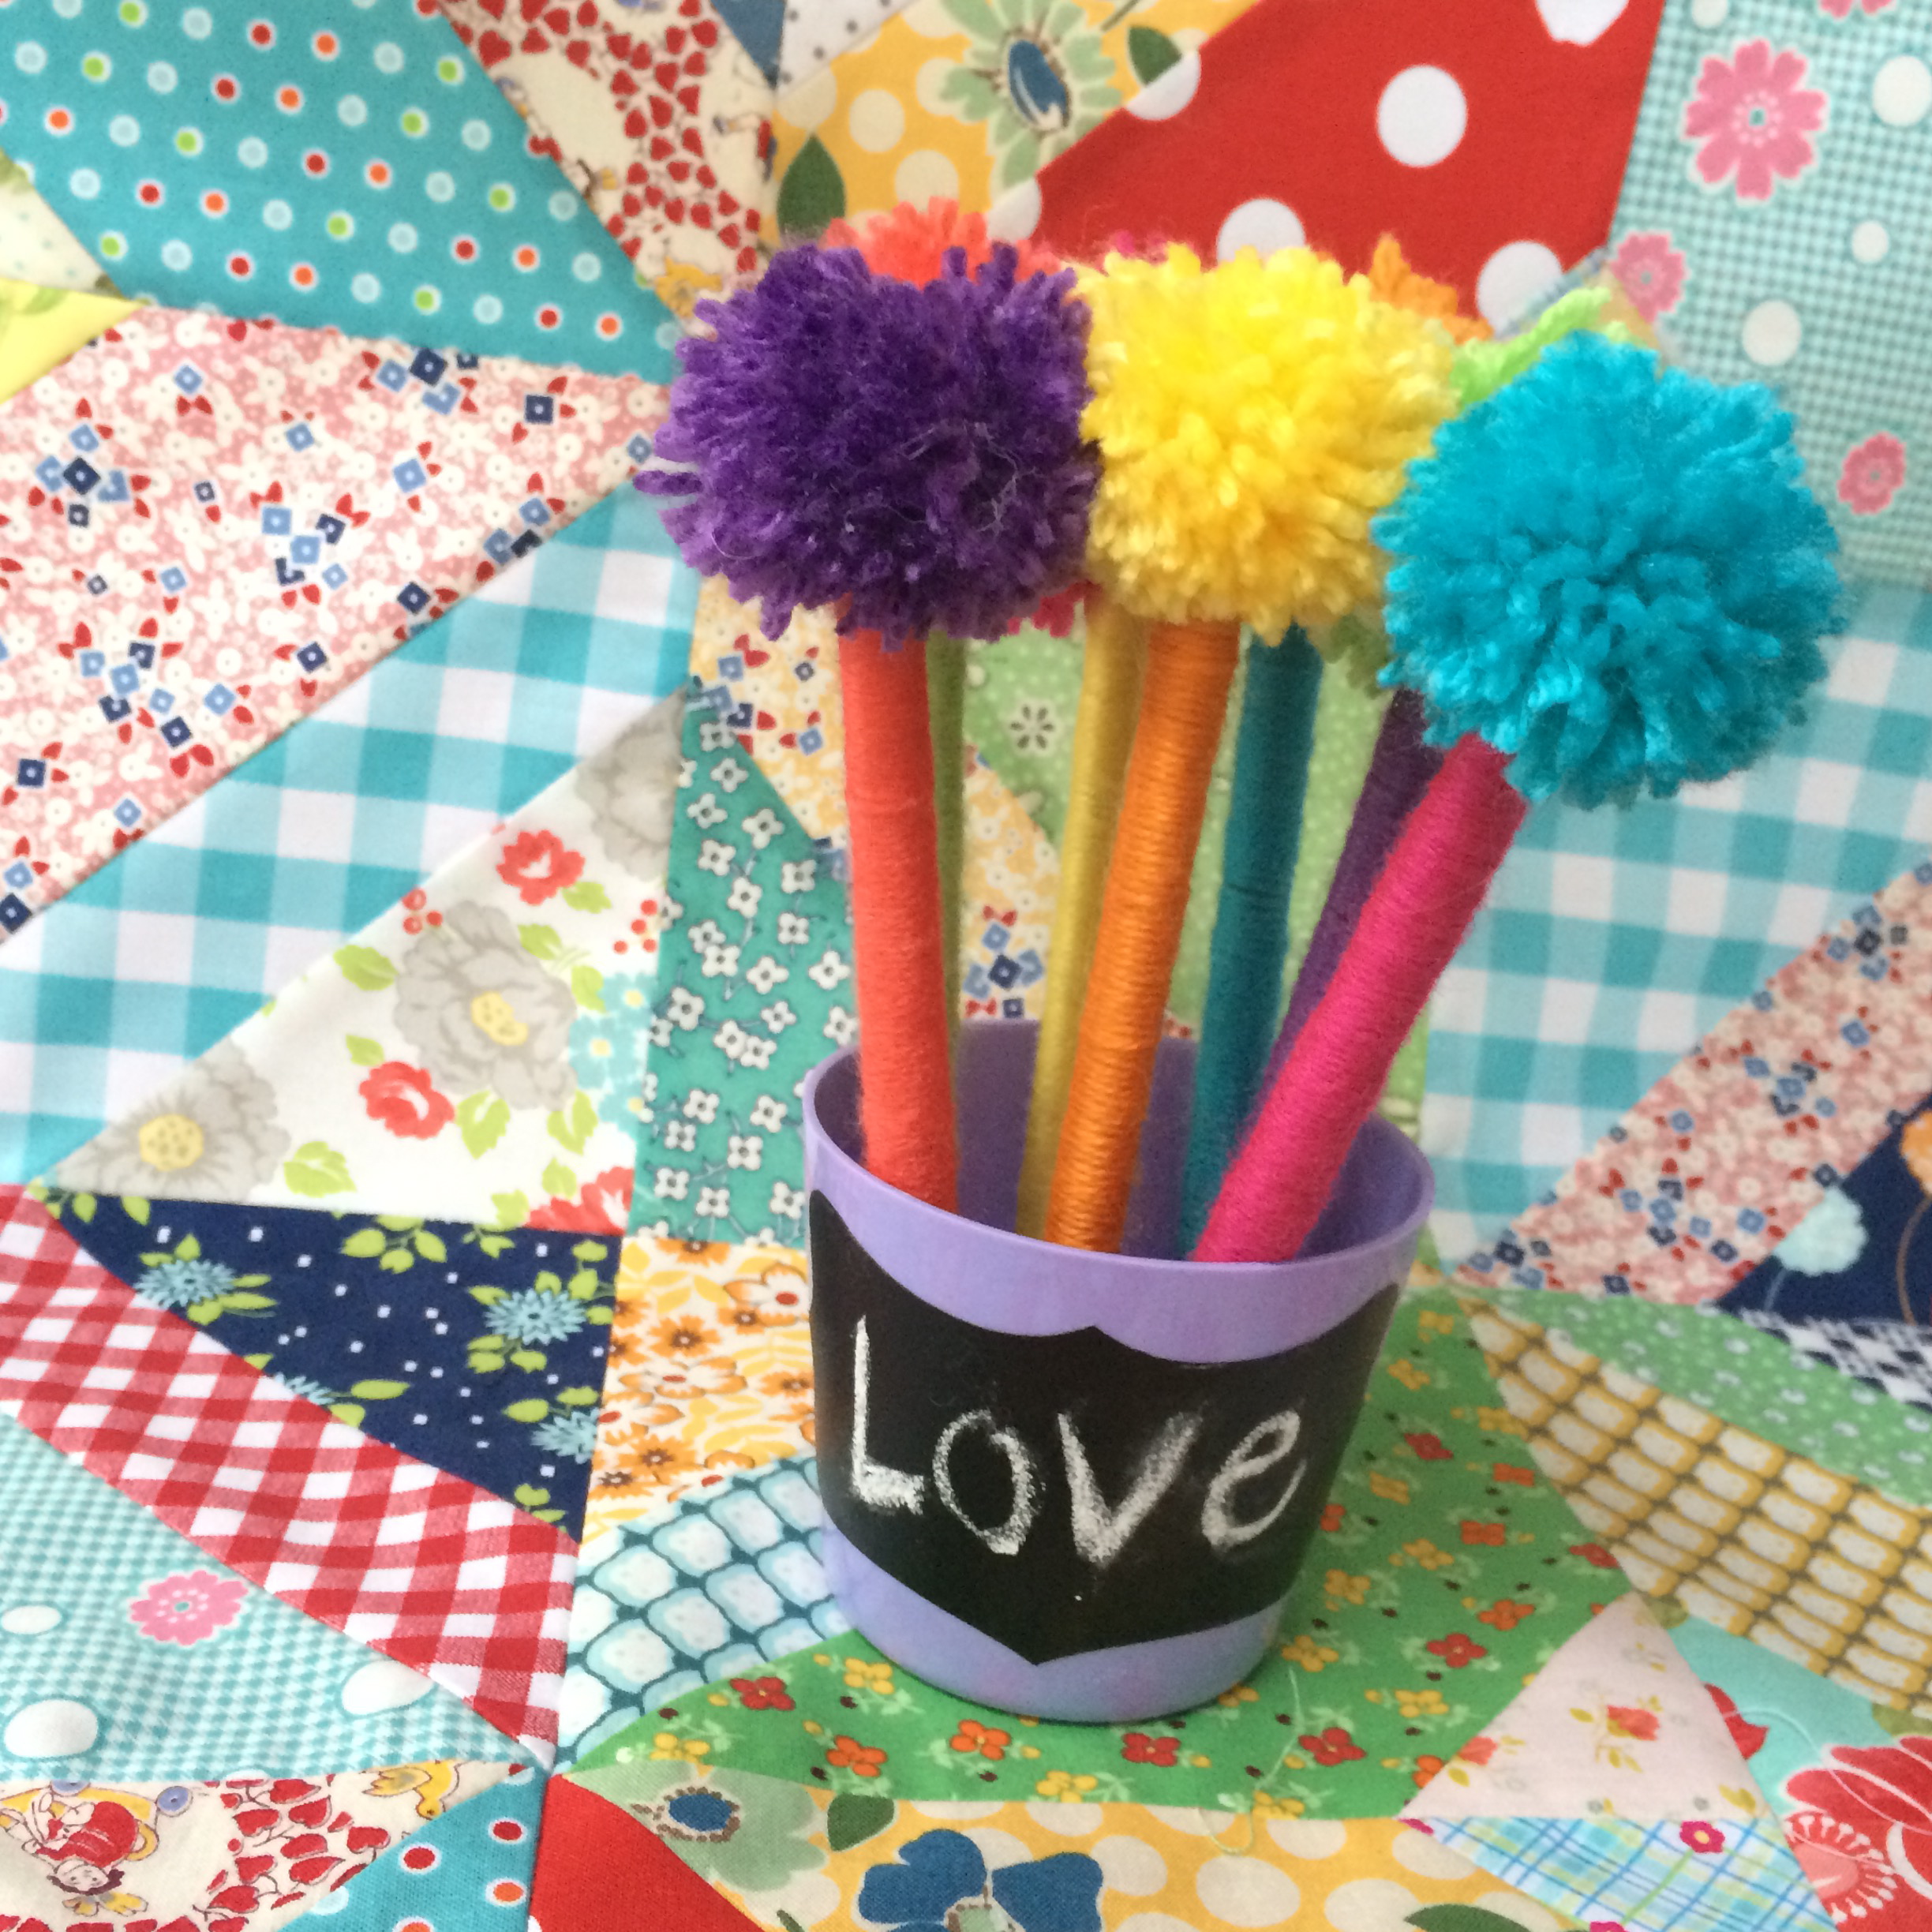
I think they are super fun!  And when your mom looses all the pens, she has a cute little vase to keep fresh cut flowers in!!!  They would also be super cute sitting on a teacher’s desk!  Or in my sewing room!  I need one!!!

flower power pom pom  12
logo
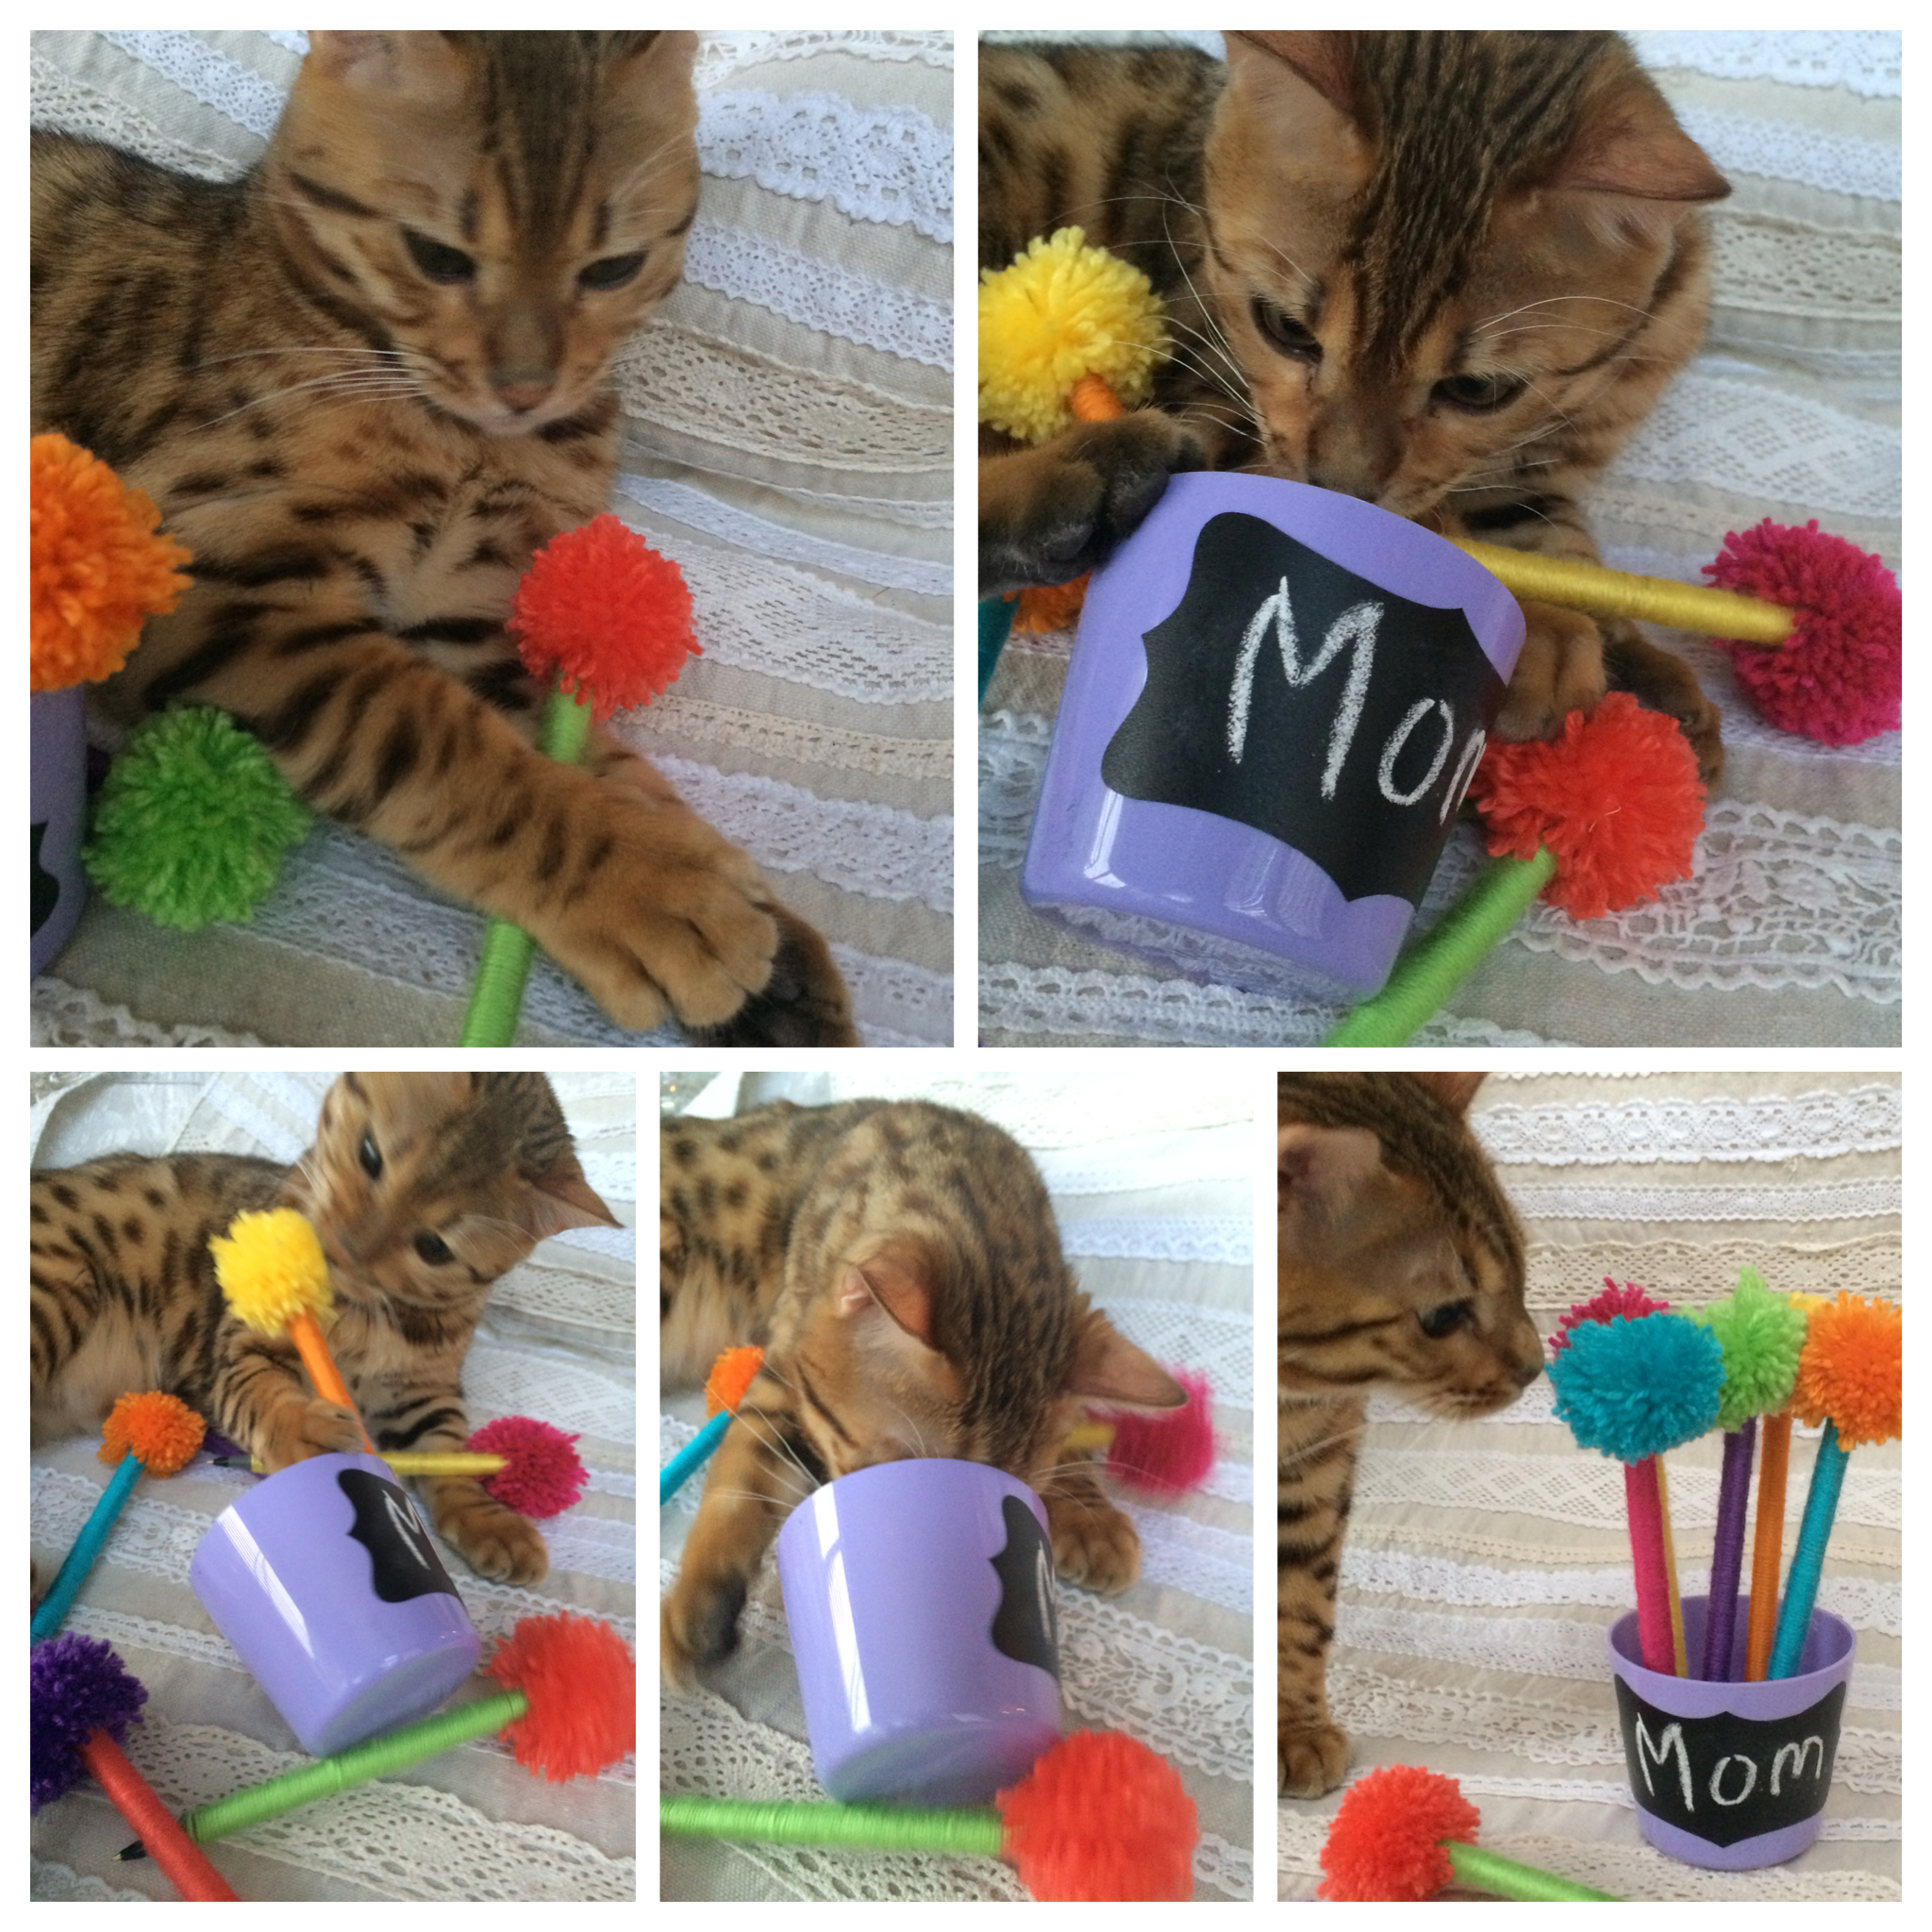
These also make GREAT cat toys!!!!!
IMG_6797

Sunglasses Zipper Pouch Tutorial

Today I am sharing my tutorial for a zippered sunglasses case over on the Therm O Web Blog.  What is great about this zipper pouch is the lining is made of flannel so it is soft on the lenses.  I love this fabric – it’s the “blue” version of the Clementine fabric by Blend.  It screams summer to me.


Here you can see the gray flannel inside the pouch:

For the zipper pull, I took apart some owl earrings and used a split ring to attach the owl to the zipper pull.  I always am on the look-out for cheap dangly earrings!


It’s not too late to sew up one of these in time for Mother’s Day.  It should only take about 30 minutes!
For a slightly different version……
 cut a 1″ square notch out of each corner of the bag when it’s in this stage:
Open the notches, and match the seams, sewing a 1/4″ seam.  This gives the bag a “bottom” and allows the pouch to stand up.  I can’t decide which one I like the best!   

Amanda

Bread Blankets: Flour Sack Towel Tutorial

I have had it in my mind to make these “Bread Blankets” for sometime.  I bake a lot of bread, rolls, and especially our secret family recipe Orange Rolls.  I like to cover my rising dough with a light weight flour sack towel.  The white towels are so plain and boring, so I decided to embellish the towels.  The Clementine fabric from Blend lends itself so well to my orange roll making – so I knew I wanted an orange on the towel.  Since the recipe is my mother-in-law’s, I decided to send her one of these Bread Blankets for Mother’s Day.
Supplies:
2 1/2″ x WOF strip of fabric for the ruffle
Small pieces of fabric for the appliqué
22″ lace
Heat n Bond Lite Fusible appliqué
Flour Sack Towel
Orange pattern, download HERE
When you open your flour sack towels, toss them in the wash and dry them, then press them.  They will be very wonky.
The towels are much larger than the cookie sheet trays or a bowl of rising dough.  Cut the towel as desired, I cut mine 26″ x 20″.  Sew a rolled hem on both sides, then sew a rolled hem on the top and bottom.
Cut your ruffle fabric 2 1/2″ x WOF

Sew a rolled hem in the bottom:

Gather the fabric using a ruffling foot – or you can gather by hand.

This will make extra ruffle.  Cut the ruffle 1/2″ longer than the towel on each side.  Fold the ends of the ruffle in 1/4″ and 1/4″ again and sew a little seam.

Pin into place.  You can position your ruffle where ever you like it, of course you can add more ruffles or change up the design.  Stitch along the gathering stitch.

Pin the lace into place and sew using matching thread.

Print the pattern and trace it onto the Heat n Bond Lite.  The pattern is already printed in reverse.  Iron the Heat n Bond to the wrong side of the orange, leaf, and stem fabric.  Cut out along the pattern line, peel off the backing and press into place.  Outline stitch in black thread 2 times around the shapes.

Perfect for covering a delicious tray of orange rolls!

Amanda

Citrus Churn Dash Table Quilt

Today’s Mother’s Day Tutorial is this cute Citrus inspired Churn Dash Table Quilt.  I made this little quilt for my mom (I hope she doesn’t read my blog between now and Mother’s Day!)  My mom is always asking me if I have a little quilt she can put on her table to decorate with and in my parent’s backyard are lemon, orange, and lime trees – sooooo when I saw this Clementine fabric from Blend I freaked out!!
I am so in love with this fabric – I want to rip out all my kitchen decor and replace with these fabrics.  Here is a little close up of some of the prints I used in this quilt.
Let’s get started – you can make this project in a few hours.
Supplies:
fat quarters of spoon print, stripe print, and small fruit print
1/4 yard large citrus print
1/4 yard for binding
3/4 yard for back
batting
Finished Quilt: 25″
Cut (2) 7 1/4″ squares of the gray
Cut (2) 7 1/4″ squares of the stripe
Cut (4) 3 1/2″ squares of the gray
Cut (4) 3 1/2″ squares of the stripe
Cut (1) 3 1/2″ square of the center square, fussy cut if desired
Draw a diagonal line on the back of the 2 stripe 7 1/4″ squares
Layer them right sided together and sew 1/4″ along both sides of the diagonal line.  Cut on pencil line.
Press toward the dark.  These half square triangle blocks finish slightly larger than the desired 6 1/2″.  This is so you can square the block up and it is nice and even.  Lay it on a rotary mat and align the diagonal with the diagonal line on the mat and cut so it measures 6 1/2″ square.  Do this to each of the 4 blocks.

Sew the 3 1/2″ squares in (4) sets like this:  Press toward the dark.

Lay out the churn dash block and sew together in rows.  Press seams.
Now all that’s left is to sew the boarders on.  Cut the small fruit into 2″ strips.  Sew sides, then press, then sew top and bottom.  You don’t need to measure on this part.  Use the block as your guide.
The large citrus print is cut in 4″ strips.  Sew those on in the same manner as the small fruit strips.
Quilt as desired and bind.

I love it!!!!!

Amanda

Mother’s Day Gifts: Zipper Pouch Set

These cute zipper pouches are a darling gift to give someone special this Mother’s Day.  This tutorial is written by my good friend Jennifer.  Jennifer is the one who takes me on crazy adventures to find fabric all over Southern California.   She is an amazing sewist and writes a blog called Jennifer Sews Again.
Her tutorial for these zipper pouches is great – I followed each step and my pouches turned out perfect!  These amazing fabrics are from Blend’s Modern Eclectic line.  I love the prints!!!

I love the lining!  What’s great about these zipper pouches is they unzip all the way so you can have full access to your items.  I always take mine when I travel.

I love that they nest too!

And they make a nice set when paired with a fabric keychain!

Amanda

Fabric Key Chain Tutorial

Everyday this week I will be featuring a Mother’s Day Gift sewing tutorial!!
I like to give my “Mom Friends” a little give on Mother’s Day.  I have seen these fabric keychains, or “Key Fobs”  all over blogland and I finally decided it was my turn to have a go at them.  They are a perfect little gift!  These yummy fabrics are Modern Eclectic by Khristian Howell for Blend Fabrics.

Supplies
Cotton belting or webbing – I purchased mine from the Etsy Shop, Everything Ribbons
Key Fob hardware – purchased from the same Etsy Shop
2″ strips of fabric
Therm o Web Heat n Bond Hem Tape
Cardstock
Fray Check
Pliers
Cut the fabric into 2″ x 10″ strips
Cut the cotton webbing 10″

Cut a piece of card stock 1″ wide.  This will be the pressing guide.  Center the card stock strip in the center of the wrong side of the fabric.  Press the sides in using the card stock to keep the folds nice and straight.

Using the hem tape, place a 10″ piece in the center of the webbing.
Place the pressed fabric piece on top of the fusible hem tape like this:
Press in place
Top stitch the fabric along both sides.  I like to use this Bernina foot #5 and move my needle over 3 or 4 spaces.  It works like a charm!

I took one of those sticky discs that you put on the bottom of chairs and cut it in half and adhered it to my pliers – this will prevent scratching on the hardware.  Fold the Keychain in half matching raw ends. Center the hardware and use the pliers to press in place.

Use the fray check on the sides to prevent fraying.

I think they are so cute!!  And also handy!!

Amanda

Mother’s Day Conversation Jar


 Each year I try and do a Mother’s Day craft in my son’s class.  This year he is in 4th grade.  (Click HERE for last year’s project)   This can be a challenge – something for 28 learners to make in about an hour…..hmmmmm.  I came up with this craft: The Mother’s Day Conversation Jar.  It is a little spin off journal jars.  Here’s how we made them:
 First, I punched out different size circles from tissue paper.  Note: we had to layer a regular piece of paper on the top and bottom of the stack of tissue paper so it wouldn’t rip in the paper punch.  The learners applied Mod Podge to the mason jars, arranged the dots how they wanted and Mod Podged over. 
 
 While the jars were drying, the children cut out conversation starters, folded them and put them in the jars.  Click HERE for the list I put together.  We tied this little tag around the jar:

The idea is that each day, or once a week, or when ever, the child and mother pick a paper out of the jar and have a little conversation about something they might not normally think to talk about – and hopefully learn a little more about each other.  I think it is fun!

When they were all done with the jars, we hot glued a flower to the top of the jar. 


Amanda