Bathroom Re Do

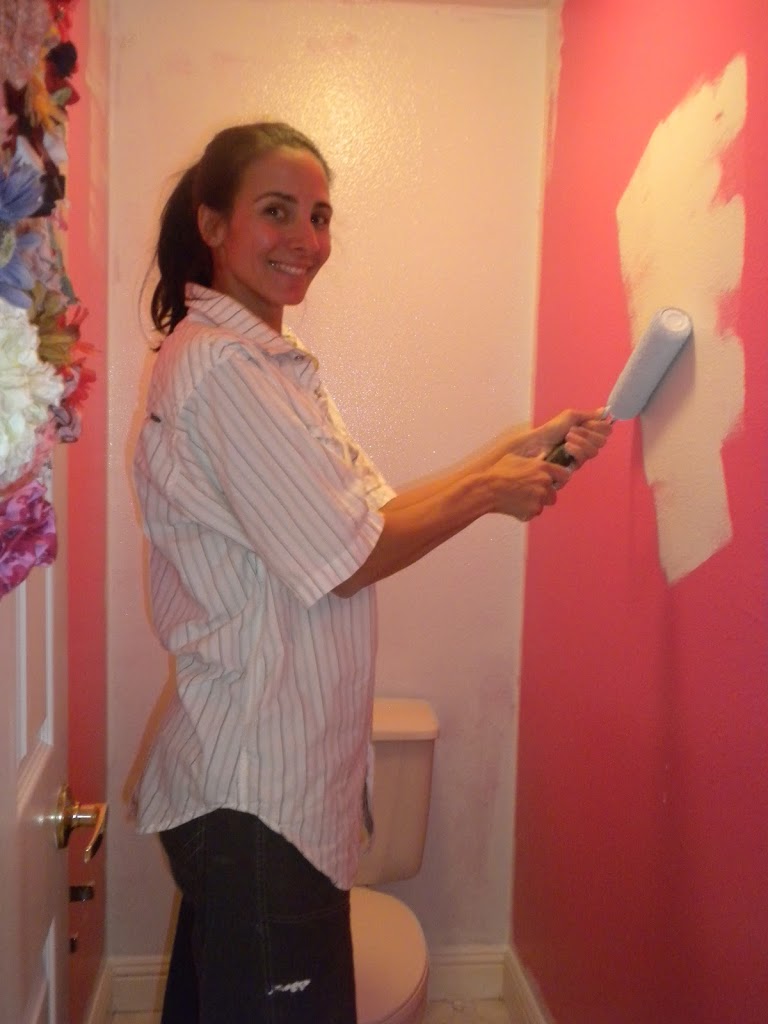
It’s 4 days until the entire family arrives for Thanksgiving.  I decided it would be a good idea to fix up the 2 bathrooms they will be using!!  This is a Jack & Jill bathroom (so not my favorite).  My two girls share it has been HOT pink for the last 4 years.  Time for a change!!!  I haven’t photographed the finished product – I will soon – but it looks amazing!

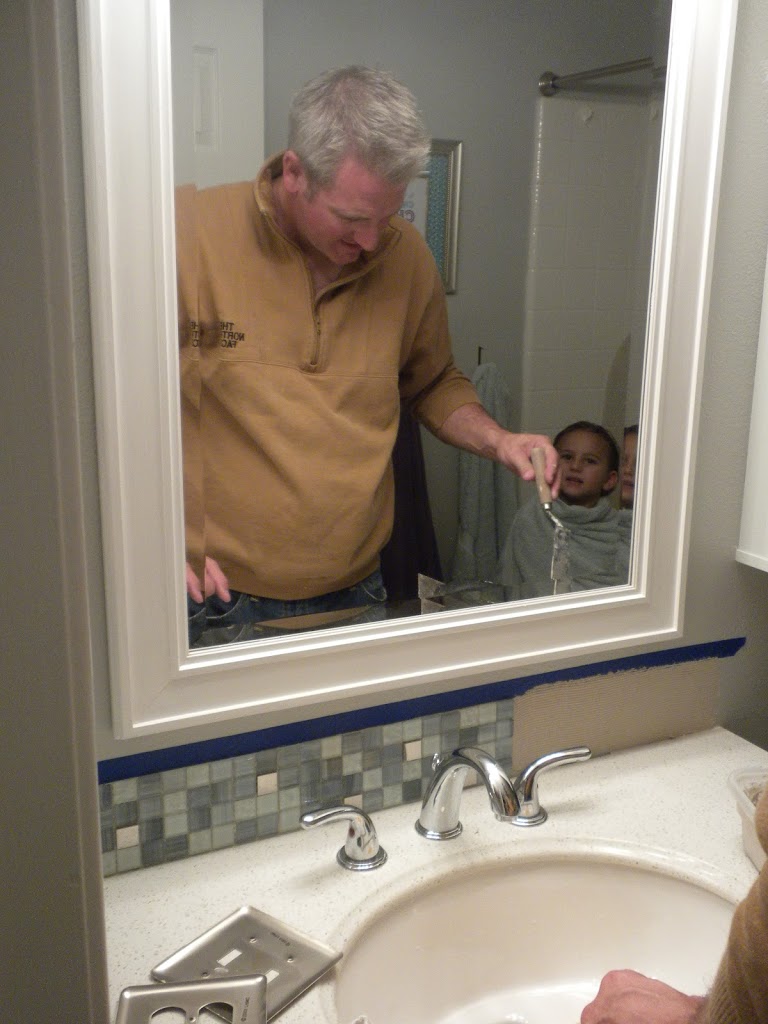
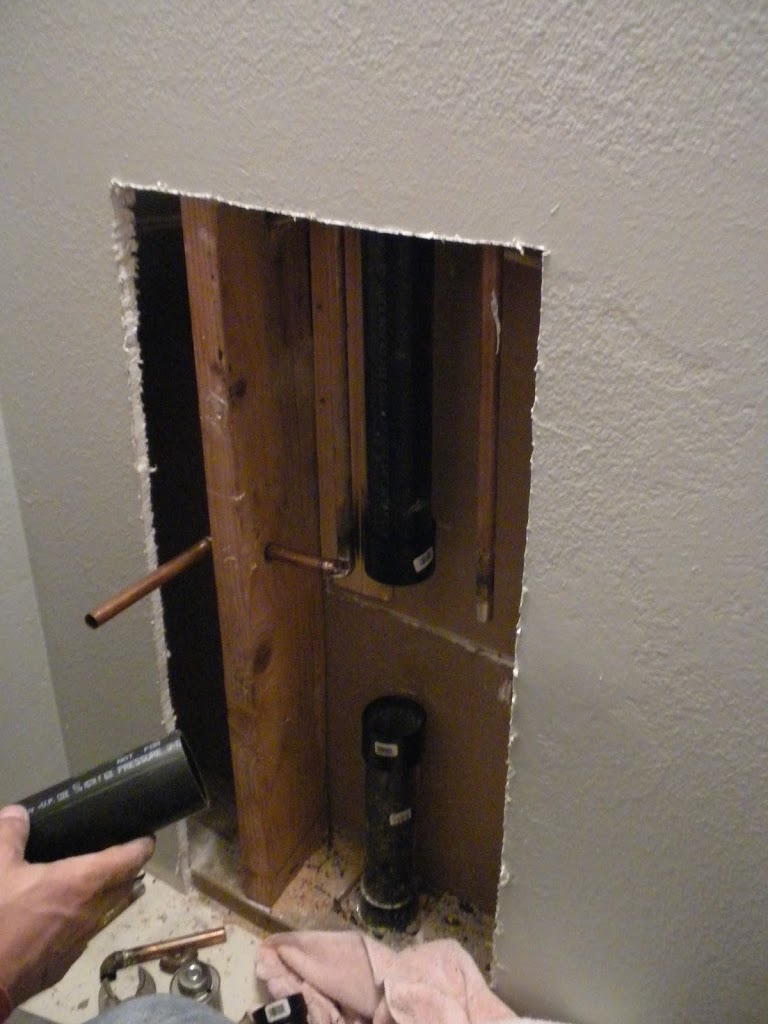
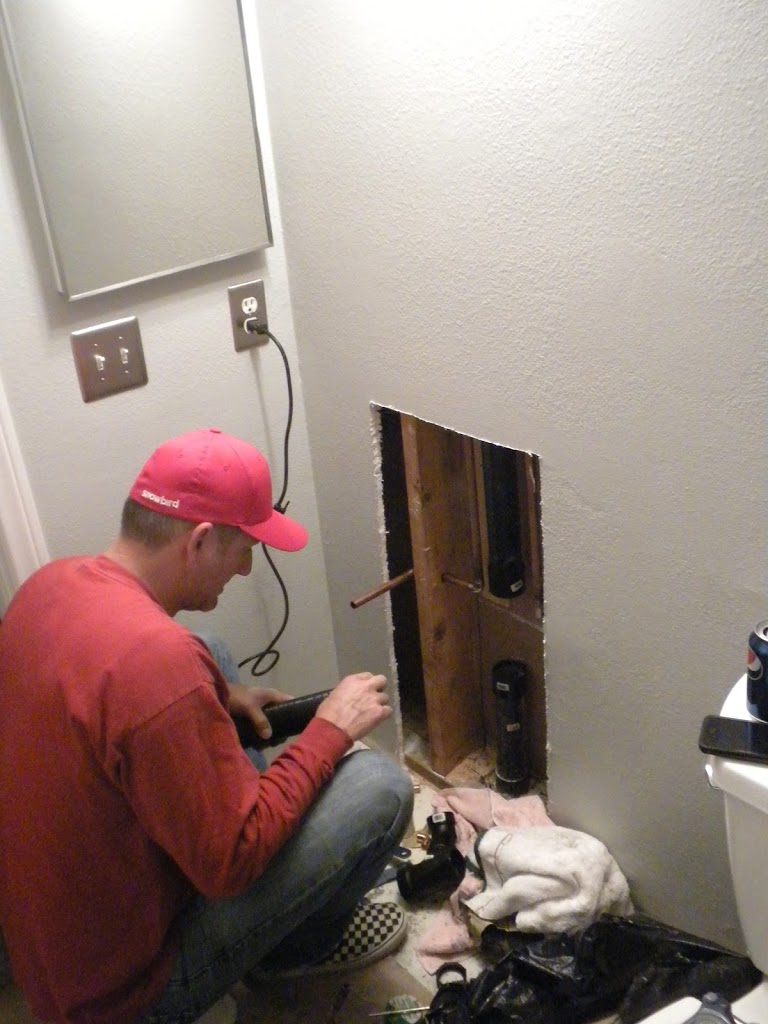
The downstairs bathroom was a little more involved.  We purchased a new vanity & counter top.  When we got home we realized the plumbing hit where the drawers were – oops!  David had to cut out the wall, cut all the plumbing, move all the plumbing.  It only took 12 hours and 3 trips to Lowe’s!!

We got it all fixed and patched and painted.  He was putting on the back slash minutes before the company arrived!!

Gold Spray Paint

 My new favorite Christmas decorating tip is Gold Spray paint!  I have all these red berry balls that I use on my main Christmas tree.  This year I decided no red….but Gold!


 So I got out the Gold spray paint and went over each berry ball lightly and now I have berry ornaments I LOVE!!!  This technique works in silver too.  I have tried it on regular greenery and old Christmas picks… it just gives it an extra sparkle. 

 I am looking through all my Christmas boxes wondering what I can spray paint next!!!!


Kitchen Table Re-Do

I bought this kitchen table (and 4 chairs which will be used in a different project) on Craig’s List for $25!  I was so excited for a new project.

 Right away I got to sanding it.

 Then I primed it with a dark primer.

 I painted it black.

 Then I painted over the black with white paint.  I used the same chalk paint method as I used on my coffee table.  The technique comes from I Heart Naptime.  I mixed 5 tablespoons of Plaster of Paris with 2 Tablespoons water.  Then added 2 cups of white paint.

My plan was to have the white paint look aged & like it’s chipping off with the black showing through.  Only I got so excited to paint I forgot to add Vaseline to parts of the table to make the paint scrape off easier.  I would definitely not forget this step!!

 Anyway, I painted 3 coats of white paint to the table.

 Next I sanded the edges so the black paint would show through & the table would look aged.  This is where the Vaseline would have been nice.  I didn’t get the big chunky paint chips that I wanted.  I am sure they will come over time!!

This Minwax Finishing Wax is my favorite stuff!!!  It gives such an amazing feel to your furniture – different then polyurethane.  You rub the wax on and then in 20 minutes you buff it out with a clean cloth.  It makes the paint feel like it’s been there for a long time!!  I even used it on my table top.  It won’t protect it as good as polyurethane, but I want the table to age naturally.

 This is our first meal at the table.  I love how it fits the space in my kitchen better than my rectangular table.

 Yea!  Now what can I paint next??

Boo Photo Art Thingy

I have so many Halloween photos through the years – it’s hard to display them all!  I came up with this idea to use photos to create the mat.  I bought this frame at a garage sale and the decorative mat was already in the frame.  I tossed the glass, painted the frame and then glued my favorite Halloween photos to the mat.  I also love the paper rosette – I can’t get enough of them!!

Burlap Halloween Banner

 I just discovered the fantastic world of spray painted burlap!  Where has this idea been all my life!!!  Here is how you can make your own super cute Halloween Banner:

Supplies:
Burlap (I bought mine at Joann’s – very inexpensive)
scissors
spray paint (white, orange, black)
sticker circles
double fold bias tape

Here is what you do:
 Cut your burlap into triangles.  I just used scissors.  I made a paper pattern and pinned it.  Not all of mine are perfect – burlap kind of stretches – but not to worry – it will still be cute!

Spray Paint White
I painted both sides of my triangles – I was worried they would blow in the wind & I wanted them to be colored on both sides.  Spray paint the burlap triangles white.  This helps the polka dots have a little more contrast.  My burlap doesn’t look bright white, it just looks not as brown.

Circle Stickers
Get your circle stickers (I got mine at Albertsons because that’s where I was).  Put dots all over both sides of the triangles.

Spray Paint
I painted half my triangles orange and half metallic black (that’s what was in the shed).  Paint one side, let dry, then flip over and paint the other side.

 Remove the dots and get really excited because they look so cute!

 Sew
 Measure your bias tape and cut it how long you want your banner – leaving extra to tie at the ends.  Open the bias tape and put the edge of the triangle inside and sew making sure to catch both sides of the bias tape.  I didn’t pin – just keep feeding the triangles in as you sew. 


 Hang as Desired!!!

 I Love it!!!

Angry Bird Boat

 We had the boy scout Rain-gutter Regatta tonight.  We had a fun time painting our boat to look like Angry Birds.  We spray painted the whole thing blue then hand painted the face, outlining it with a sharpie.  I cut the “Angry Birds” writing out on the cricut using the font Feast of Flesh from dafont.com.  We didn’t win, but it looked really cute!!

Coffee Table Re-Do!

 I bought this coffee table at a garage sale over 6 months ago – I paid $2 for it!  I didn’t really know what I wanted to do with it – I figured I would paint it or something.  So, it sat in the backyard for months and months.  After reading I Heart Naptime’s post on DIY Chalk Paint, I was inspired to paint something.  This coffee table was the perfect candidate!

 Step #1
Have your husband kill the black widow spider that is living in the underside of the table.  YIKES!!!

 I loved the tutorial from I Heart Naptime.  She does an amazing job of explaining each step and her piece of furniture came out fabulous.  You should check it out!!  I followed her steps pretty closely.

#2 Sand

This table had spots of glitter glue all over it from it’s previous owner.  I felt that a good sanding would help my table get off to a good start.  I didn’t sand down to the grain – just till it was smooth.

 #3 Base Color
My goal in this piece was to distress it.  I wanted a black color showing through (you can use any color – or even have the wood show through)  I used some black paint and painted the edges and spots on the surface.  Looking back, I would have given the entire table a coat of black because I couldn’t remember where I put my spots on the top!!

#4 Vaseline

This is a technique to help the base color show through the top color.  I have also seen it done with candle wax.  Rub the Vaseline along the edges and parts where you want the black to show through – this will give it a shabby chic or rustic look depending on how much sanding you do. 

#5 the Chalk Paint Mixture

This is where we will get that worn, vintage feel to our paint.  I went to Lowe’s and purchased latex paint in a light aqua color.  I asked for Satin finish and when I got home I noticed it was semi-gloss.  I was a little miffed, but it worked fine anyway. 

Mix 5 Tablespoons of Plaster of Paris with 2 to 3 Tablespoons water in a small container
Then measure 2 cups of paint in a separate container and stir the plaster mixture into the paint until it’s smooth.  This was the right amount for the size of table I was painting.

#6 Paint Paint Paint

I gave my table 3 coats of paint with a paint brush, letting it dry completely between coats.  Some items may only need 2 coats of paint.

#7 Inspection
Make sure your cat inspects your work, getting his paws, tail and back in the paint!!

#8 Sanding
Take a light weight sand paper and sand where ever you want the black to show through.  I sanded all the edges, curves, and random areas on the top.  This is where the Vaseline helps so you don’t have to sand like crazy – especially with 3 coats of paint!  It worked great!!

 #9 Finishing Wax
This is my favorite part of the project!  Use Minwax Paste Finishing Wax.  Get a rag and rub it all over your piece of furniture.  Then let it sit for 20-30 minutes.  Take another cloth and buff or polish the wax.  The wax gives it a vintage look as it is not glossy or too shiny, yet not flat.  It’s the perfect finish for this project.  If you are finishing a piece that needs to be durable, such as a kitchen table, I suggest polyurethane or polycrylic – it will be more durable.  You can get those in satin finish so they aren’t too glossy.

 Ta Da!!!!
It’s done & I LOVE it so much!!!

 I would totally paint furniture using this technique again.  When I bought the $2 table I was thinking $4 of spray paint and it’s done.  This process was lots more $$ but still cheaper than buying real chalk paint.  Plus I have plenty of Plaster of Paris and finishing wax to do several more projects – YEA!!!


I saw this idea on Pintrest and thought I would make my own!  I found this country checker board at a garage sale for 50 cents.  It sure beat waiting for hubby to cut wood for me!!
I sanded it, primed it & spray painted it yellow.  I cut the vinyl on the cricut and added some scrapbook paper to the clothespins.  I used epoxy to adhere the clothespins to the board.  Added a little fabric to the bottom & drilled in a decorative knob.  I love it!  Now maybe I can keep all the socks together!


https://www.jedicraftgirl.com/2012/05/i-saw-this-idea-on-pintrest-and-thought.html

Bunny Jars

Instead of packing for our camping trip, I have been obsessing about these:
Yesterday I saw this tutorial for Bunny Jars from Torie Jayne. For the past 24 hours all I could think about was making the jars. I went through all the children’s toy animals only to find not one bunny. (If I want to make dinosaur jars sometime, I am set!) I went to a few stores keeping my eyes open. Finally at Pier One I found these porcelain bunny ornaments – they were the closest thing so I bought them.

Last night I cut off the hangers (which I wish they didn’t have) and epoxied them to my jars. (I save every jar I come across. I even emptied out a bottle or pickle relish because I liked the jar!)


This morning I got out the spray paint. I first primed them then painted them what ever colors I had on hand. I filled them with paper grass (which was also hard to find this late in the season) and then put the malted milk eggs in. I think they are cute.
Now I can start packing for our camping trip!!!