![]()
I am so totally excited to be a part of the Enchanted Blog Tour sponsored by Riley Blake Designs! You can see the entire collection designed by Dodi Poulsen of Two Sisters at Squirrel Hollow by clicking here 🙂
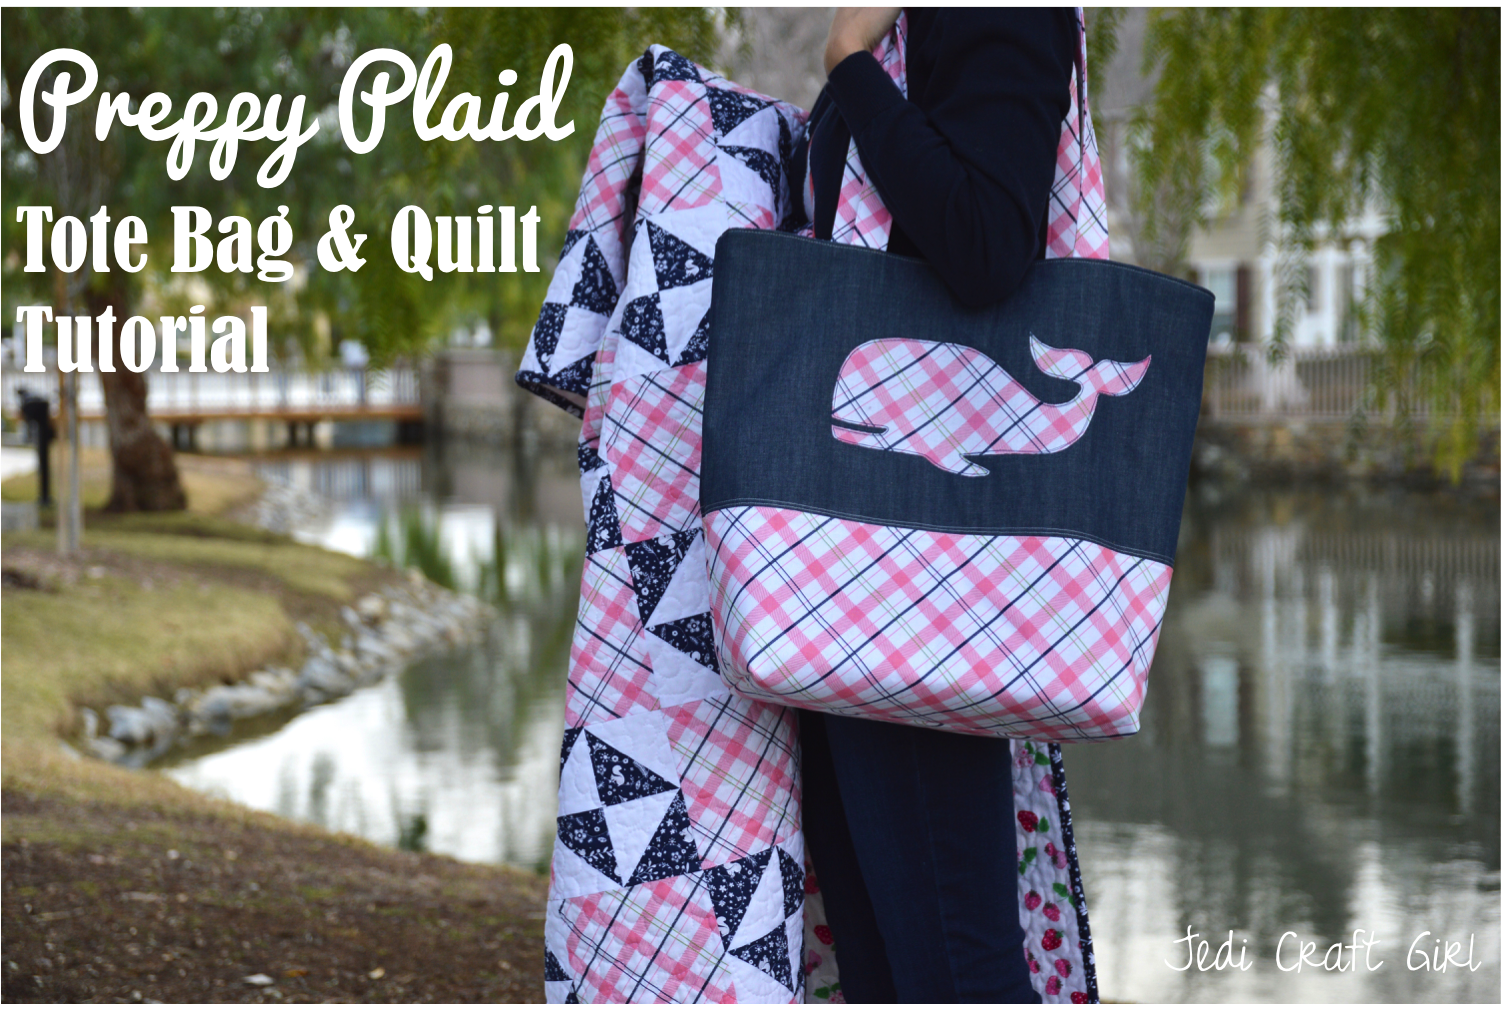
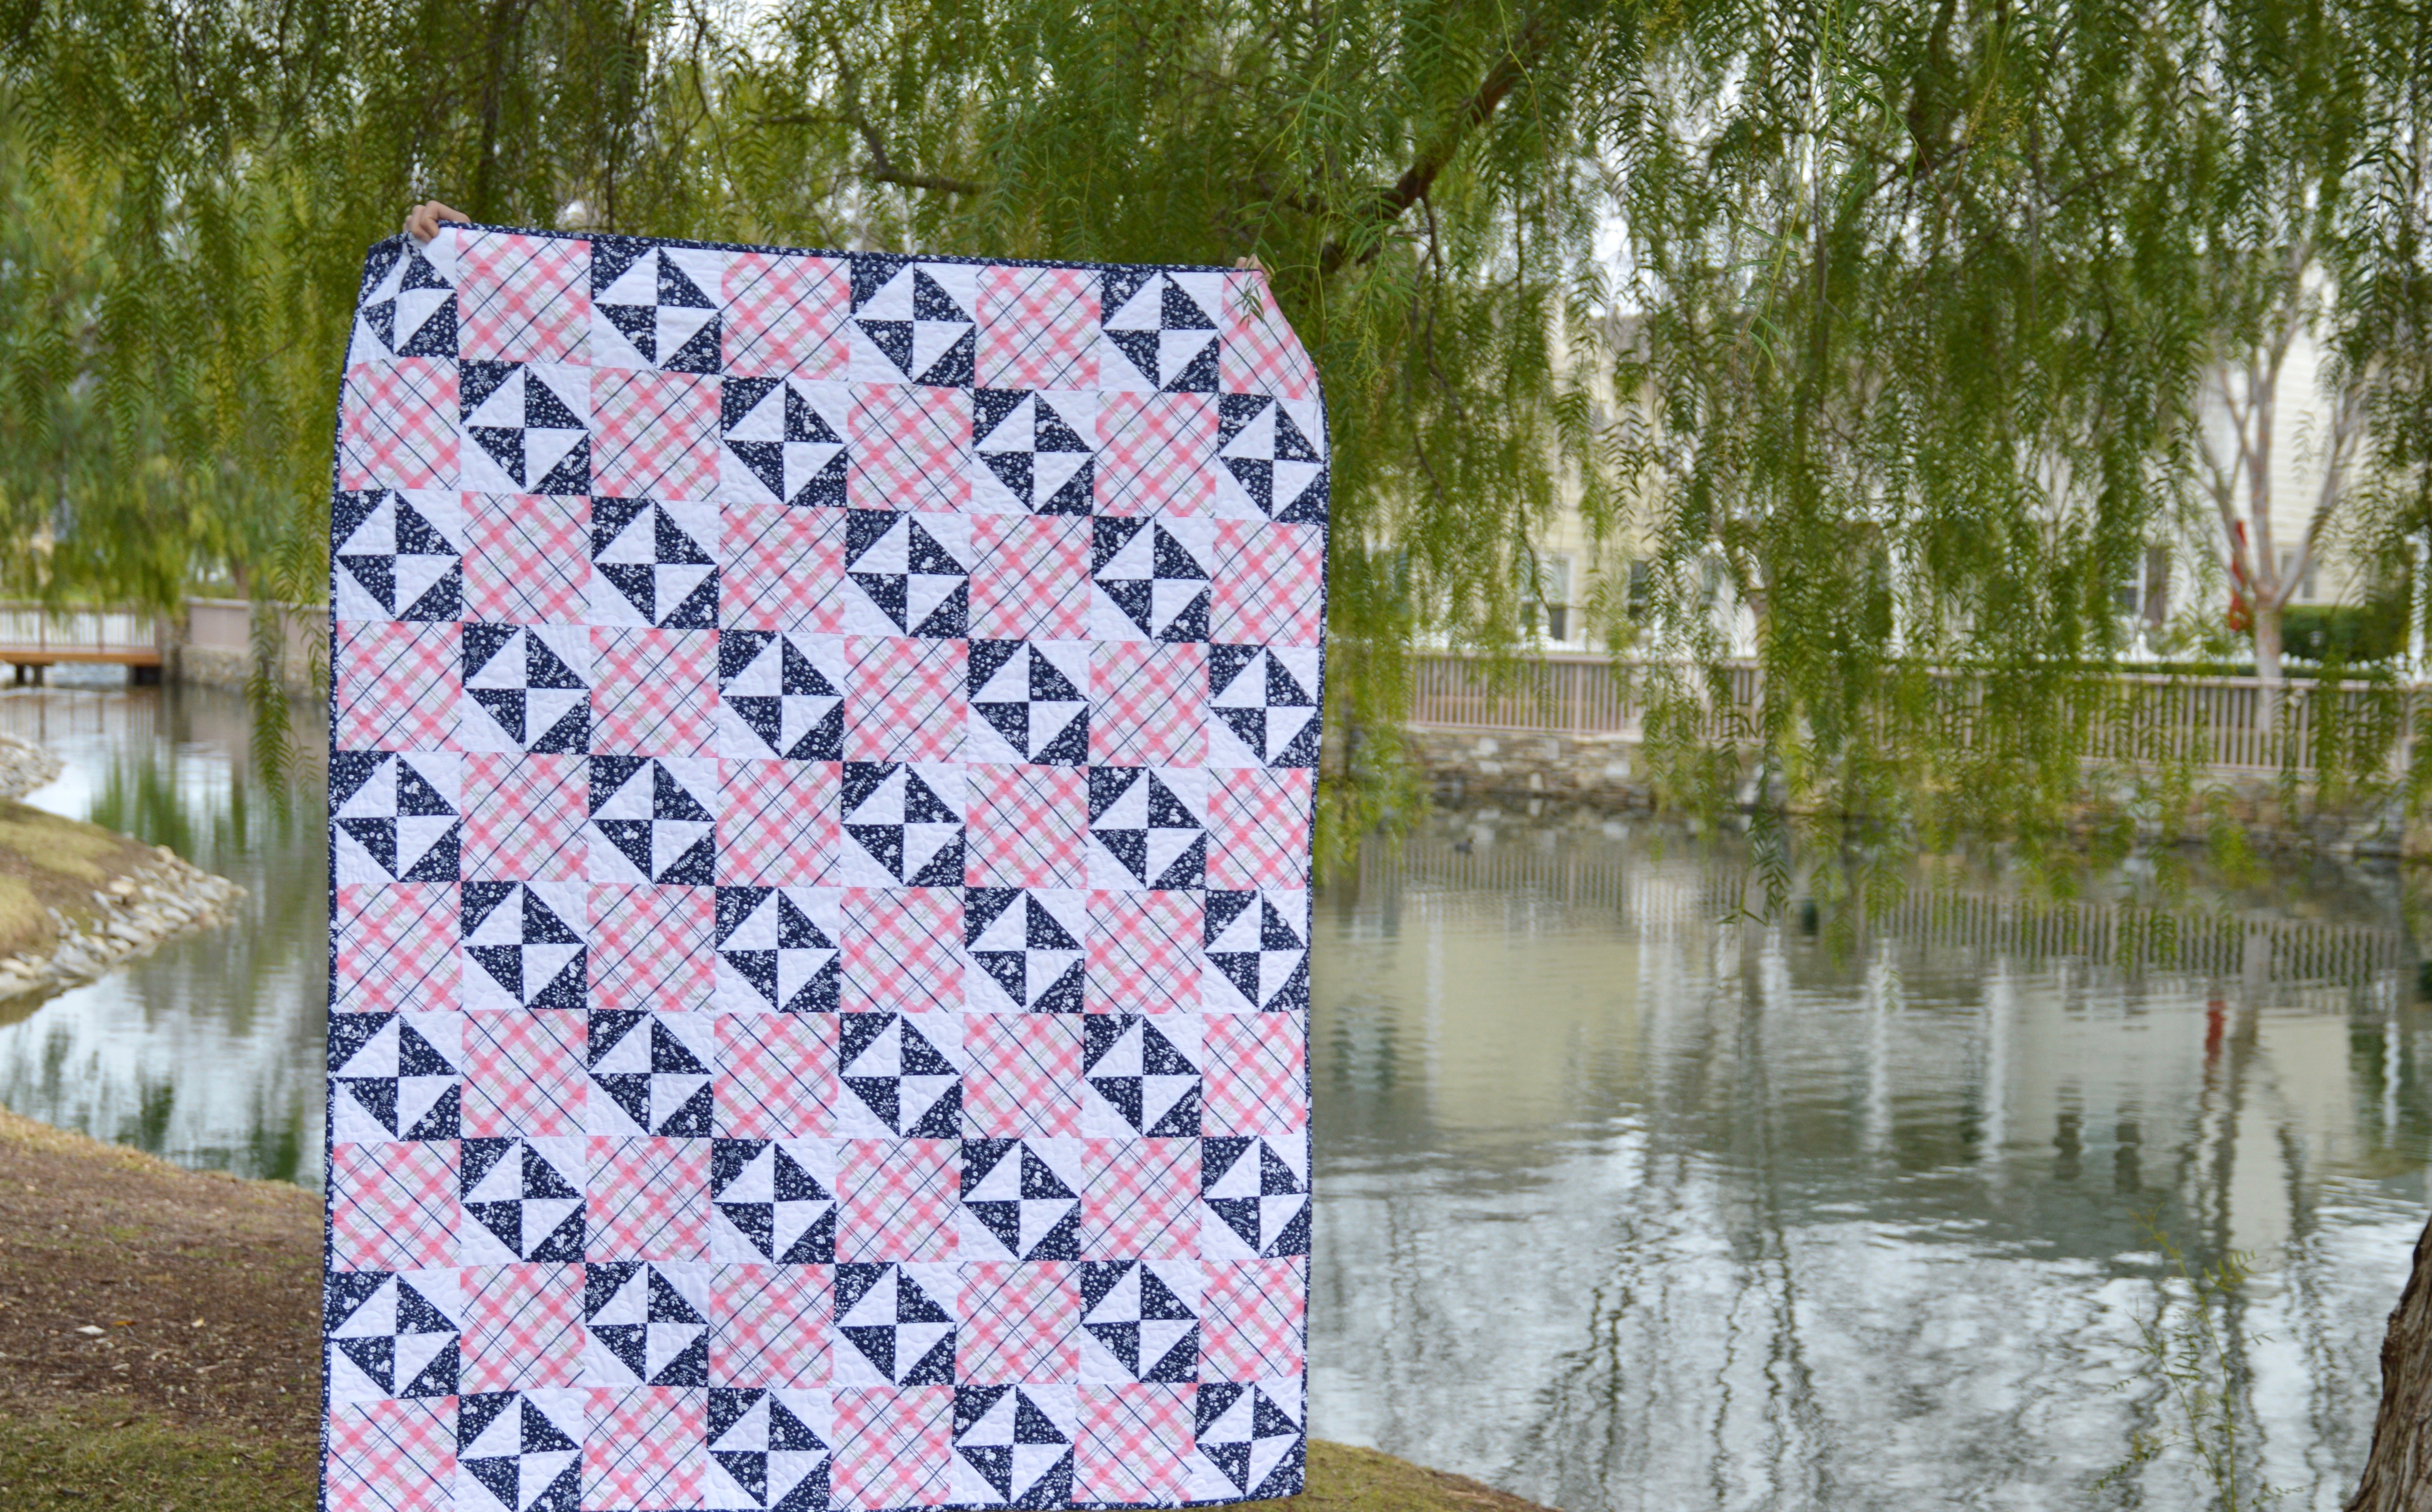
When I saw this new fabric line from Riley Blake Designs called Enchanted, my heart stopped. I took one look at this pink, navy and white plaid and immediately I was transported to a Cape Cod dream! Sailboats, lobsters, quaint homes and preppy boys on vacation from Harvard 🙂
Ok Ok, so I’ve never been to the Cape but a girl can dream right? I knew I wanted to design something that let this preppy plaid be the focus and something that would be perfect for my sailboat (hahaha).
I came up with a simple quilt pattern that uses plaid, navy and white. When only two prints arrived in the mail I began to panic wondering if I had made a terrible decision to make a quilt using only two prints! I decided to go with my instincts and make the quilt……and I am totally in LOVE!!!!
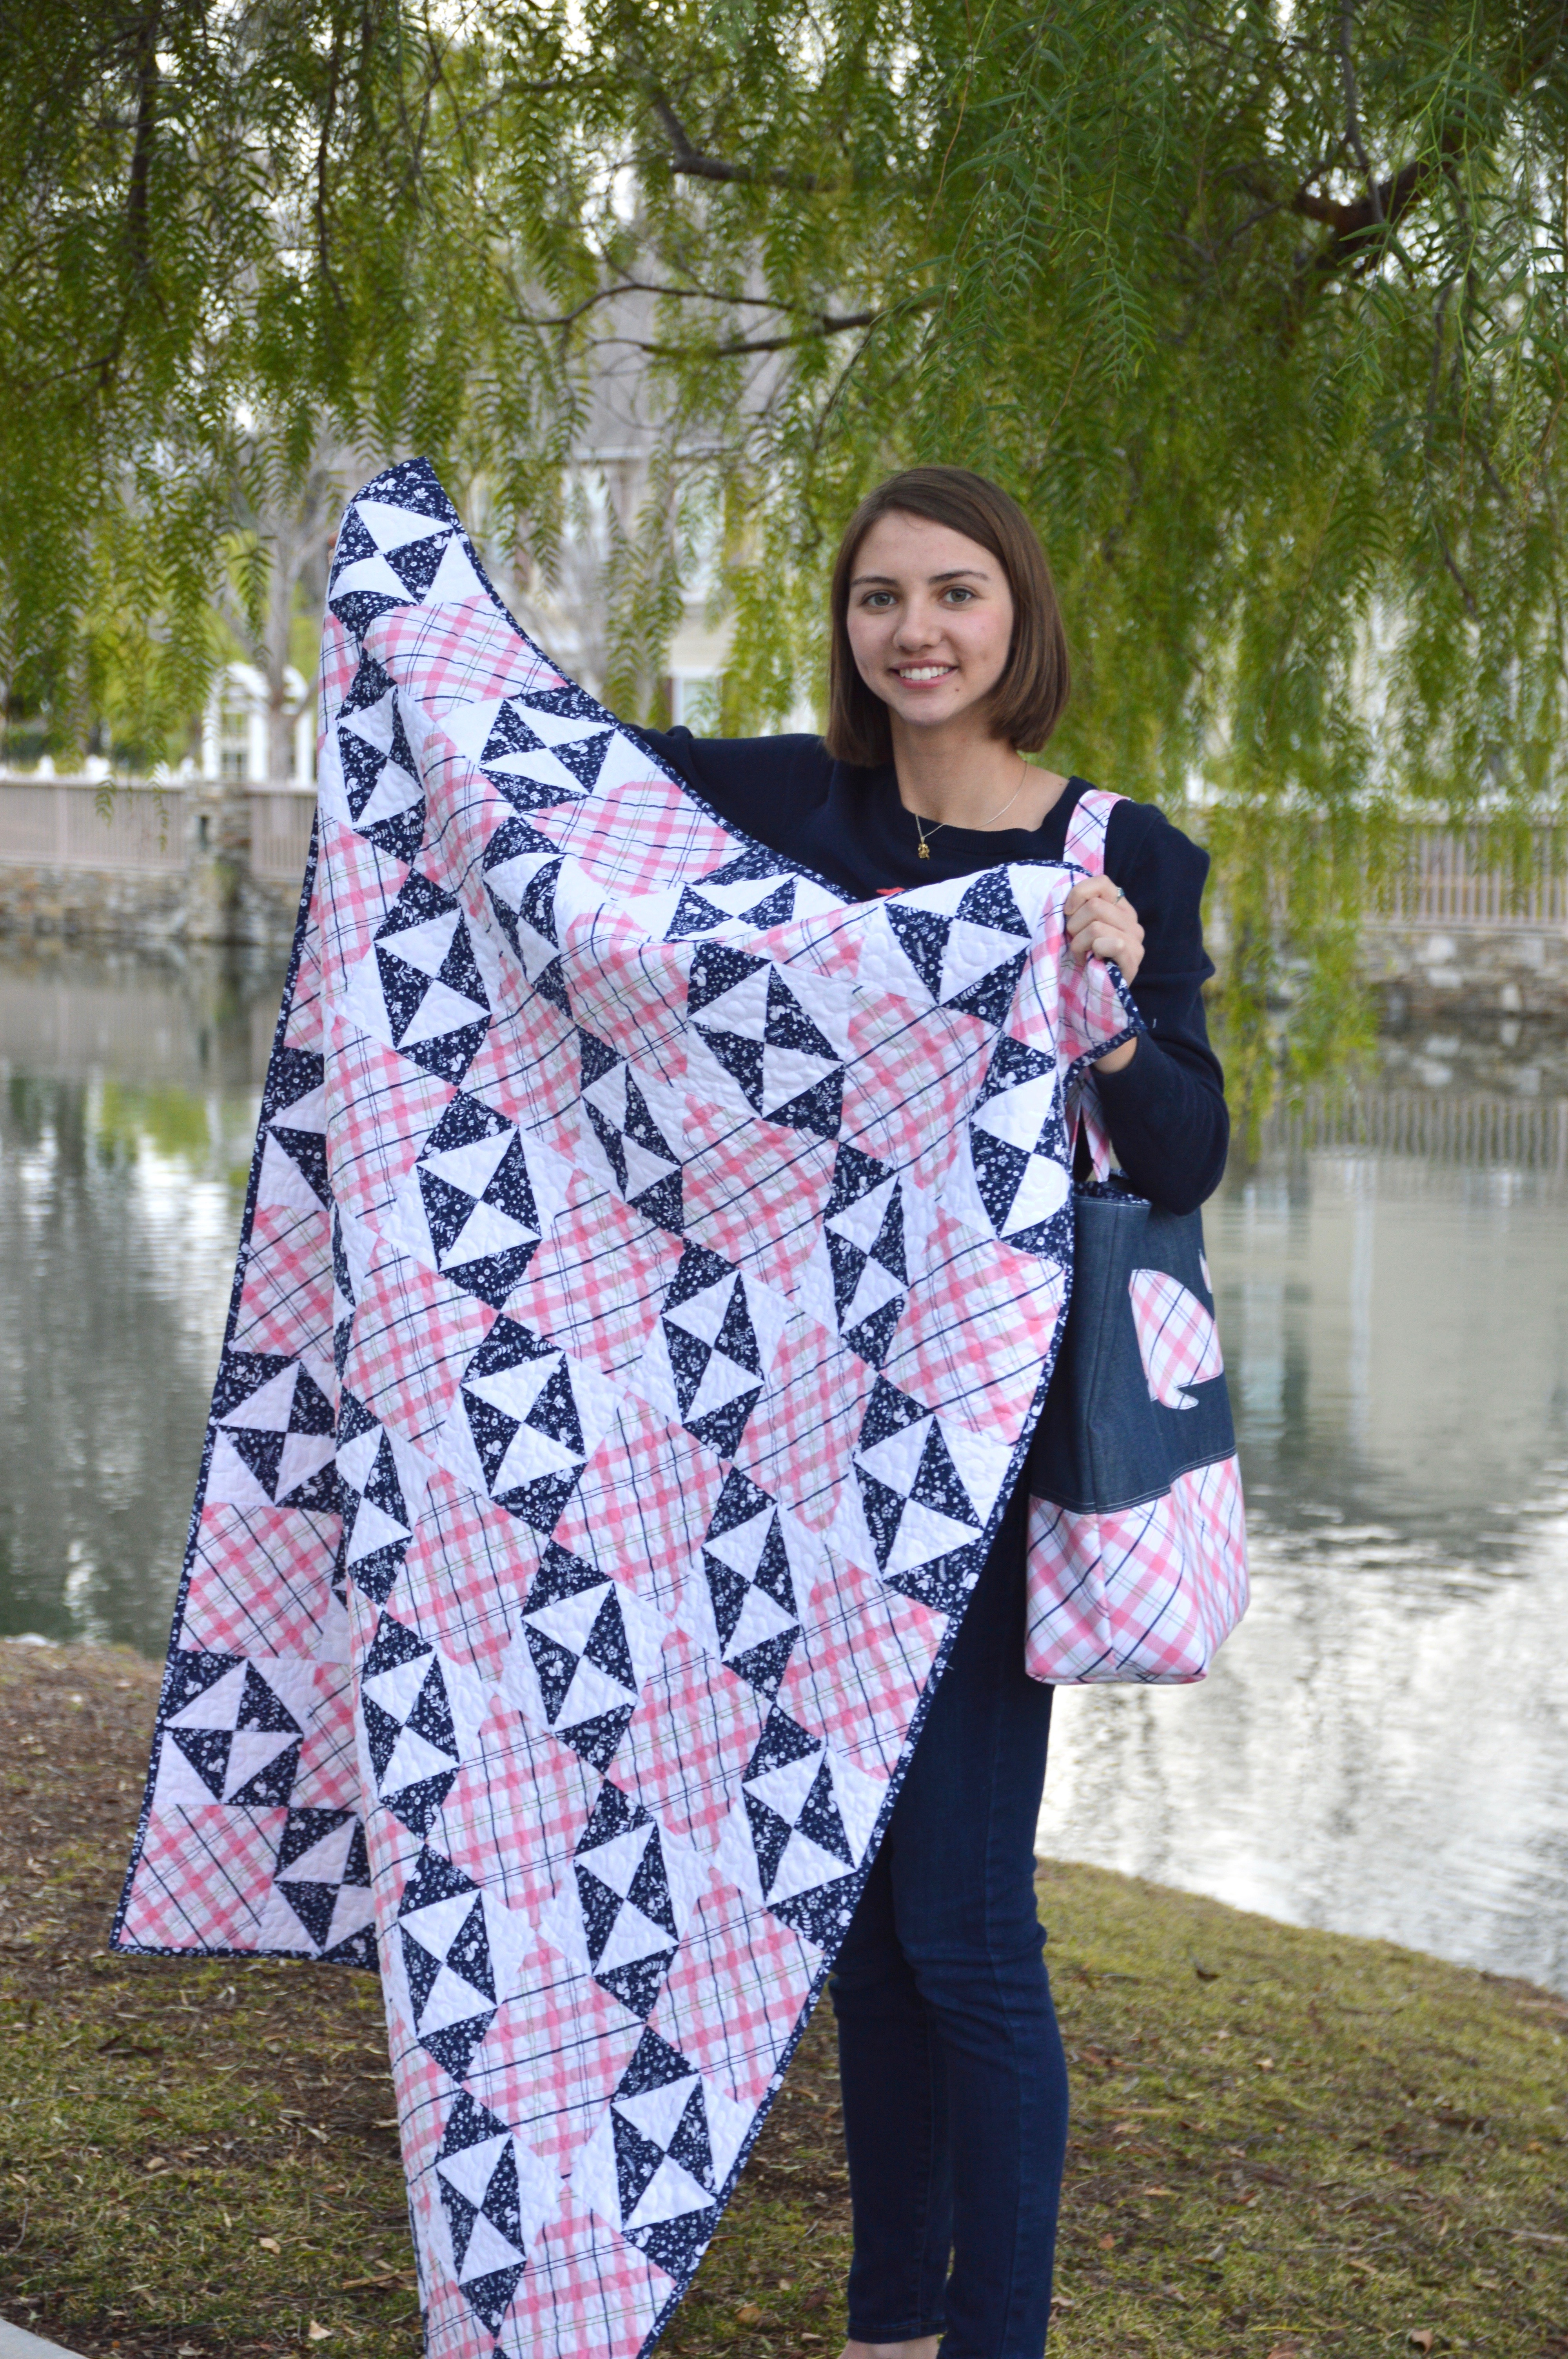
This quilt really lets the plaid shine in and it’s a great pattern to use if you fall in love with a single fabric print. The accent blocks are made of 4 half square triangle blocks.
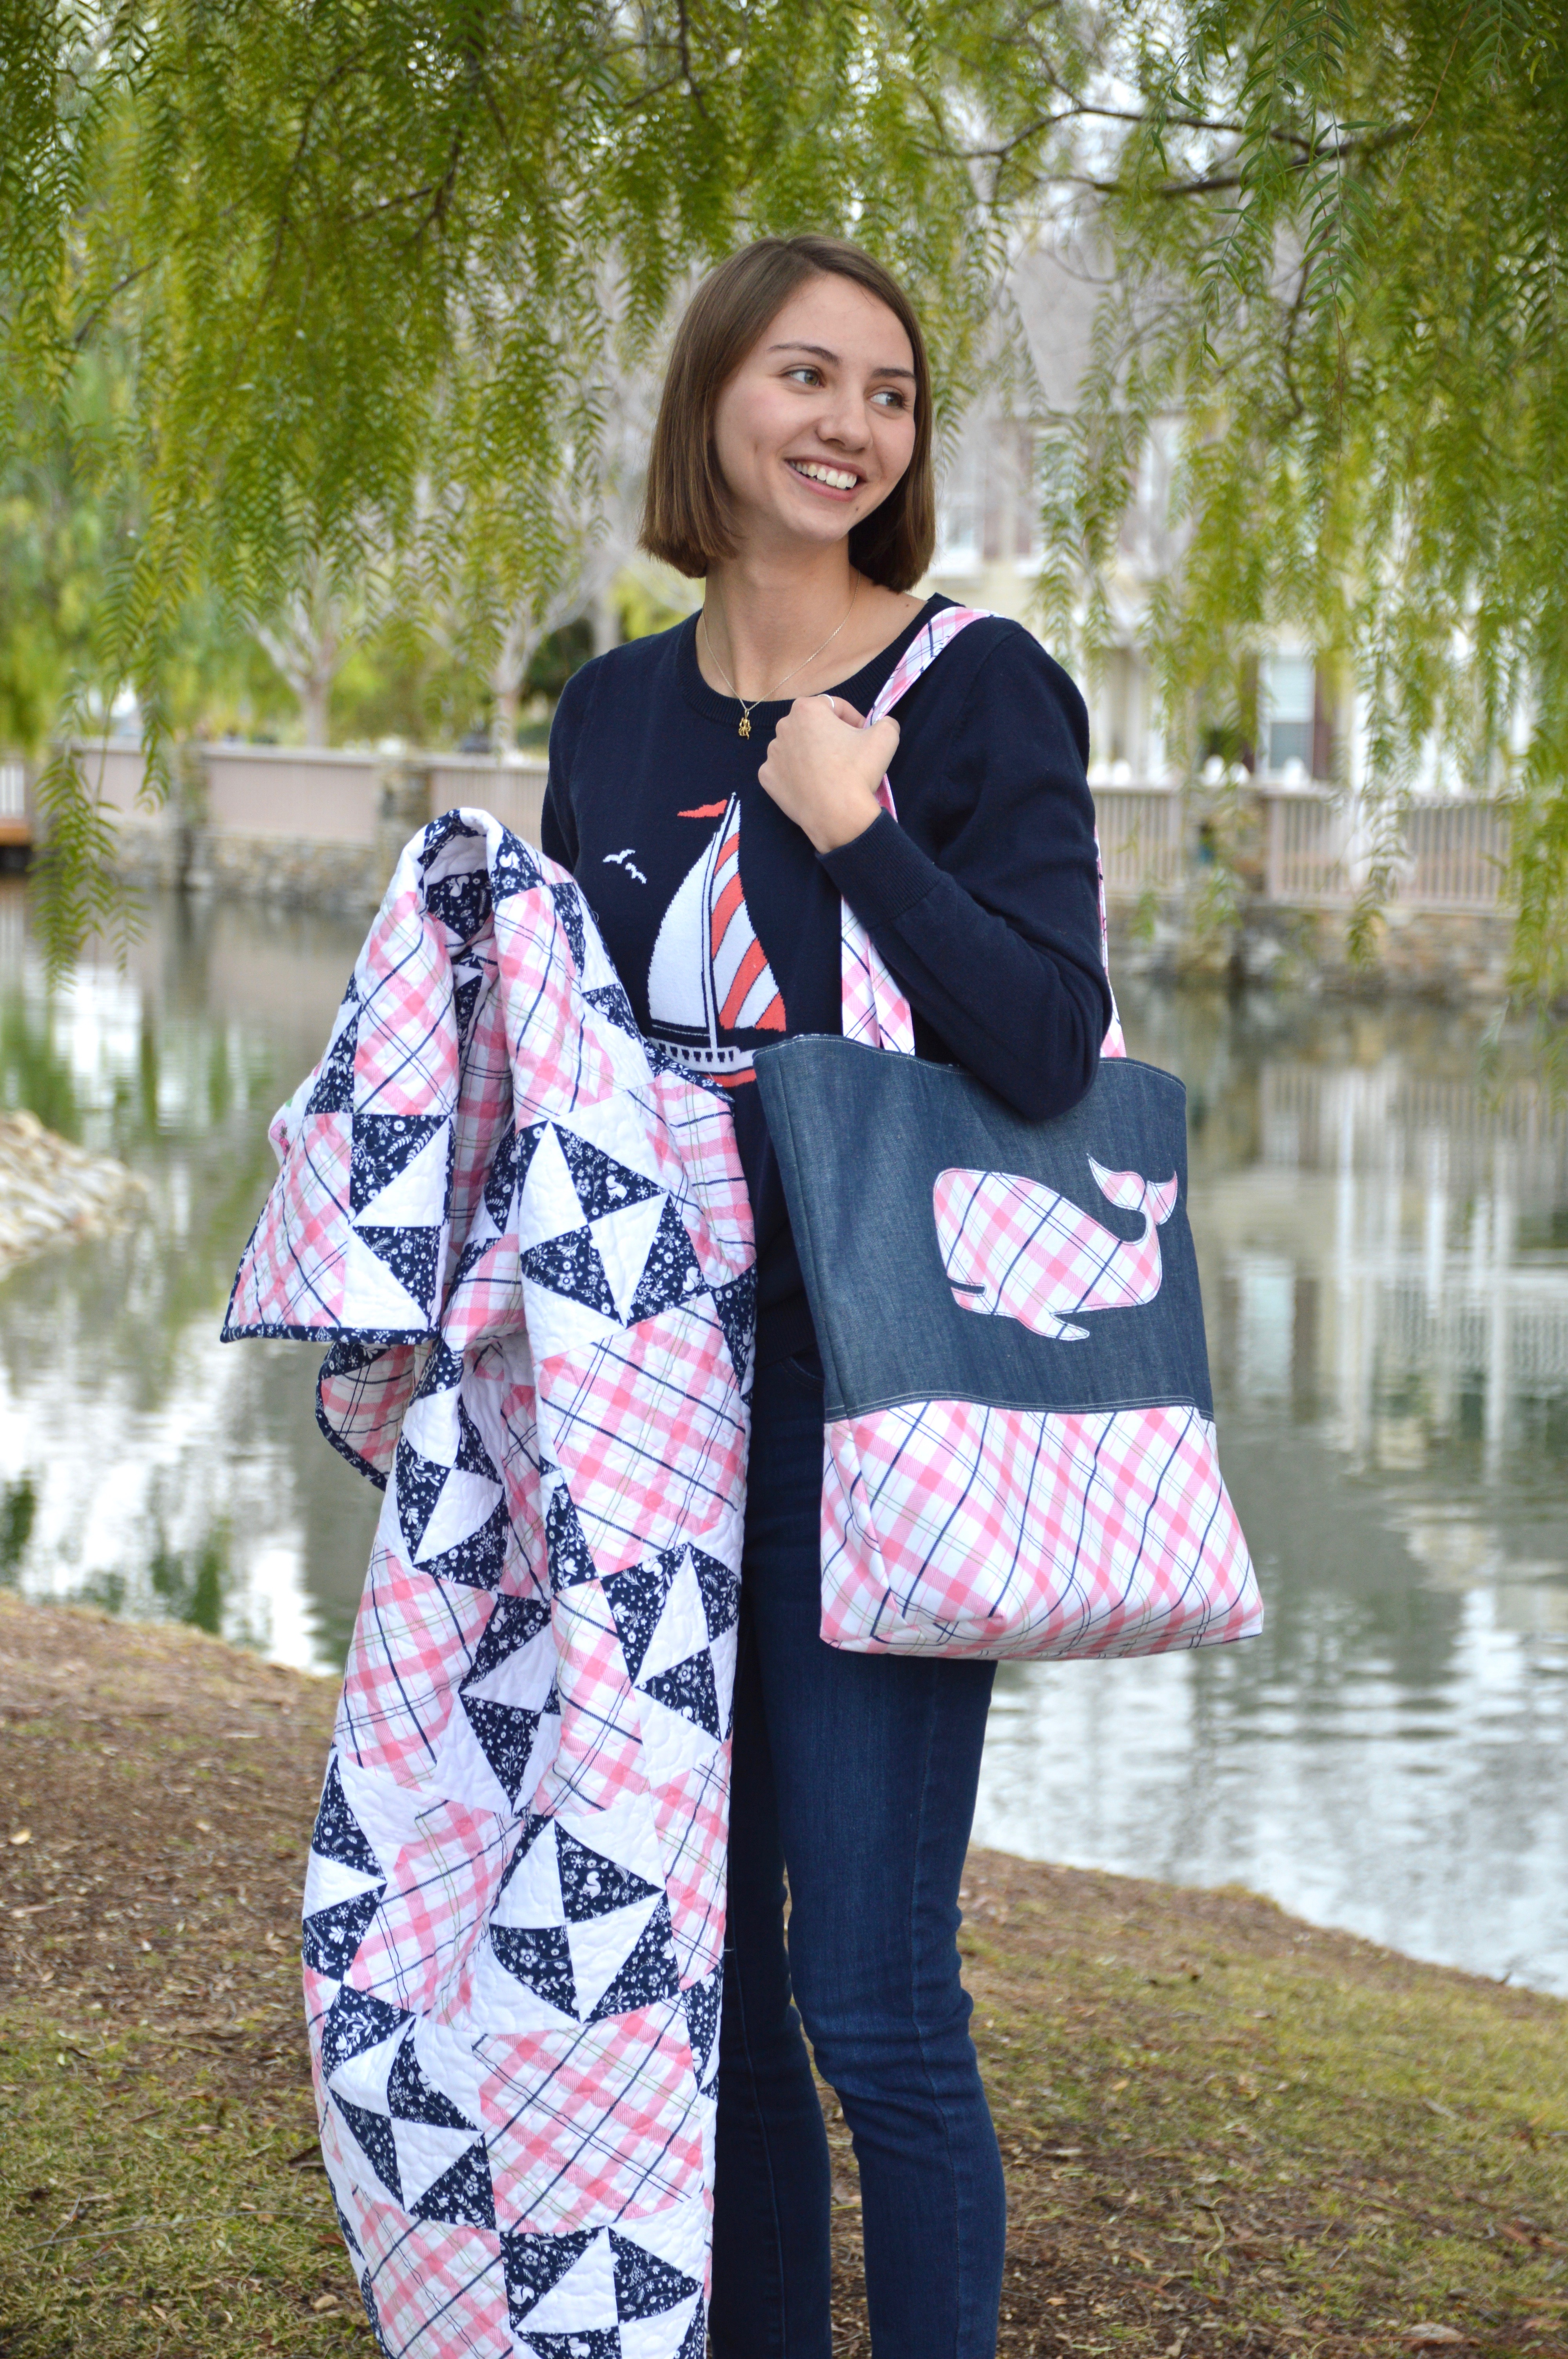
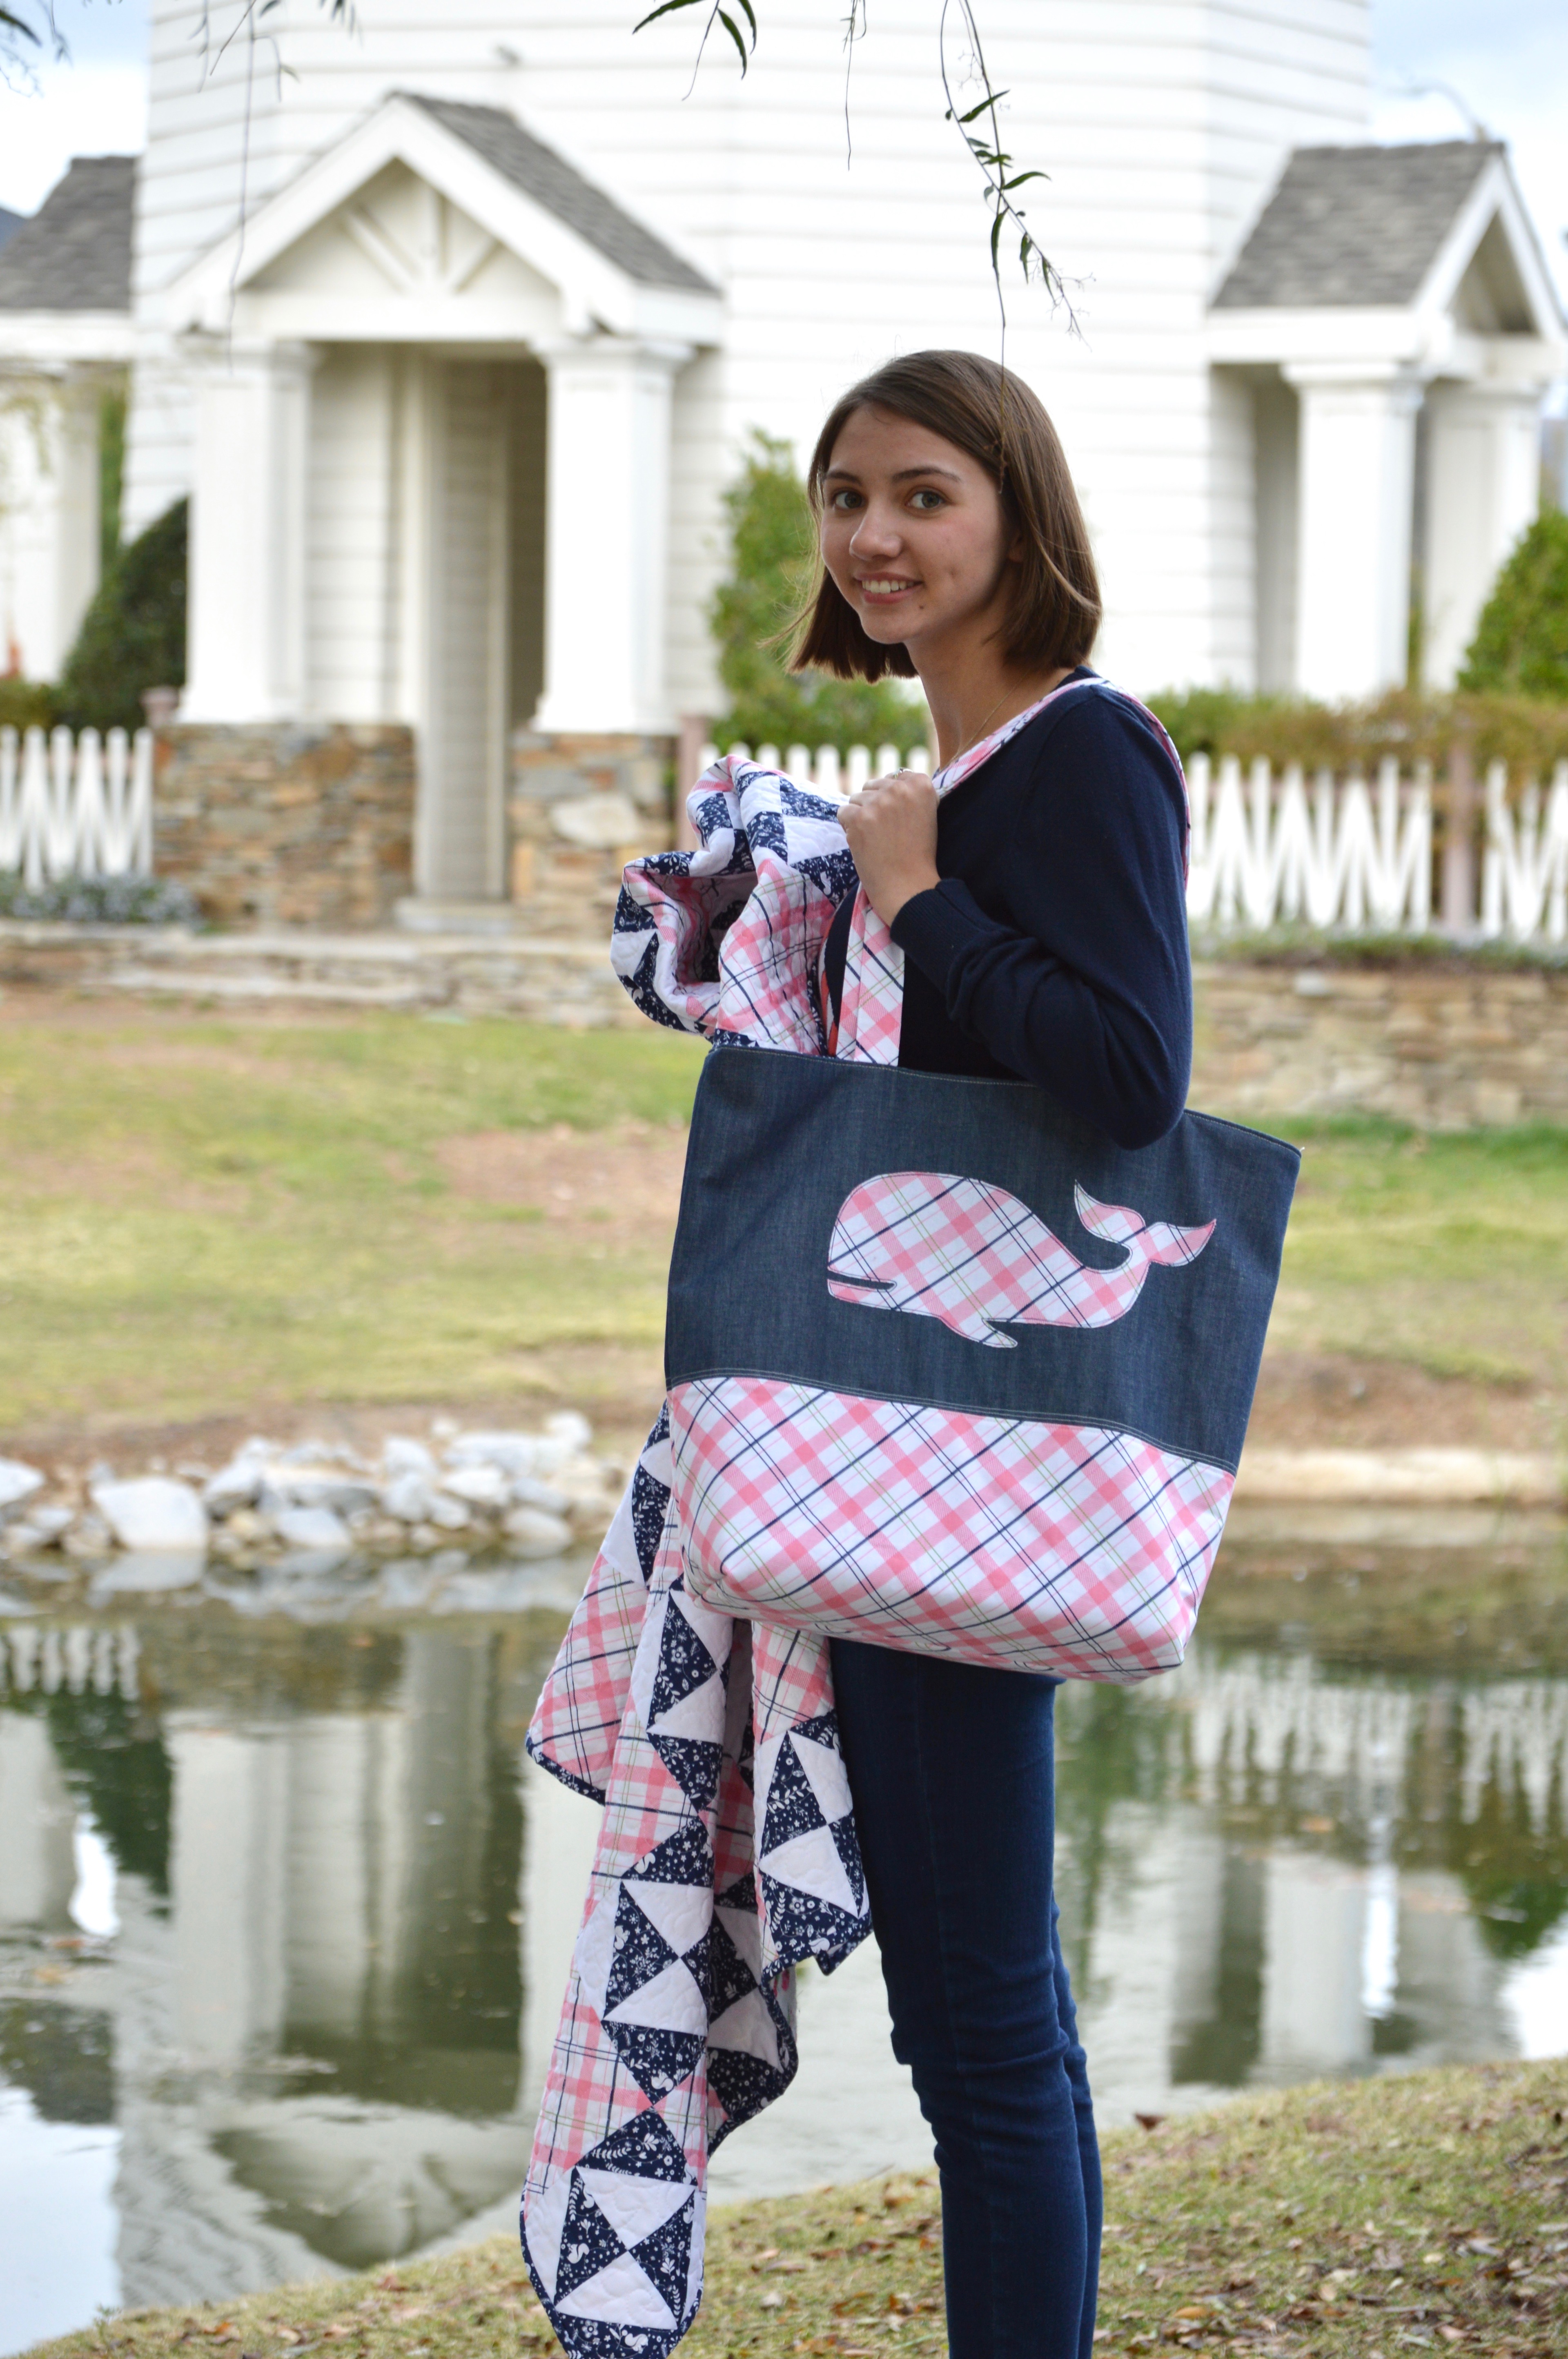
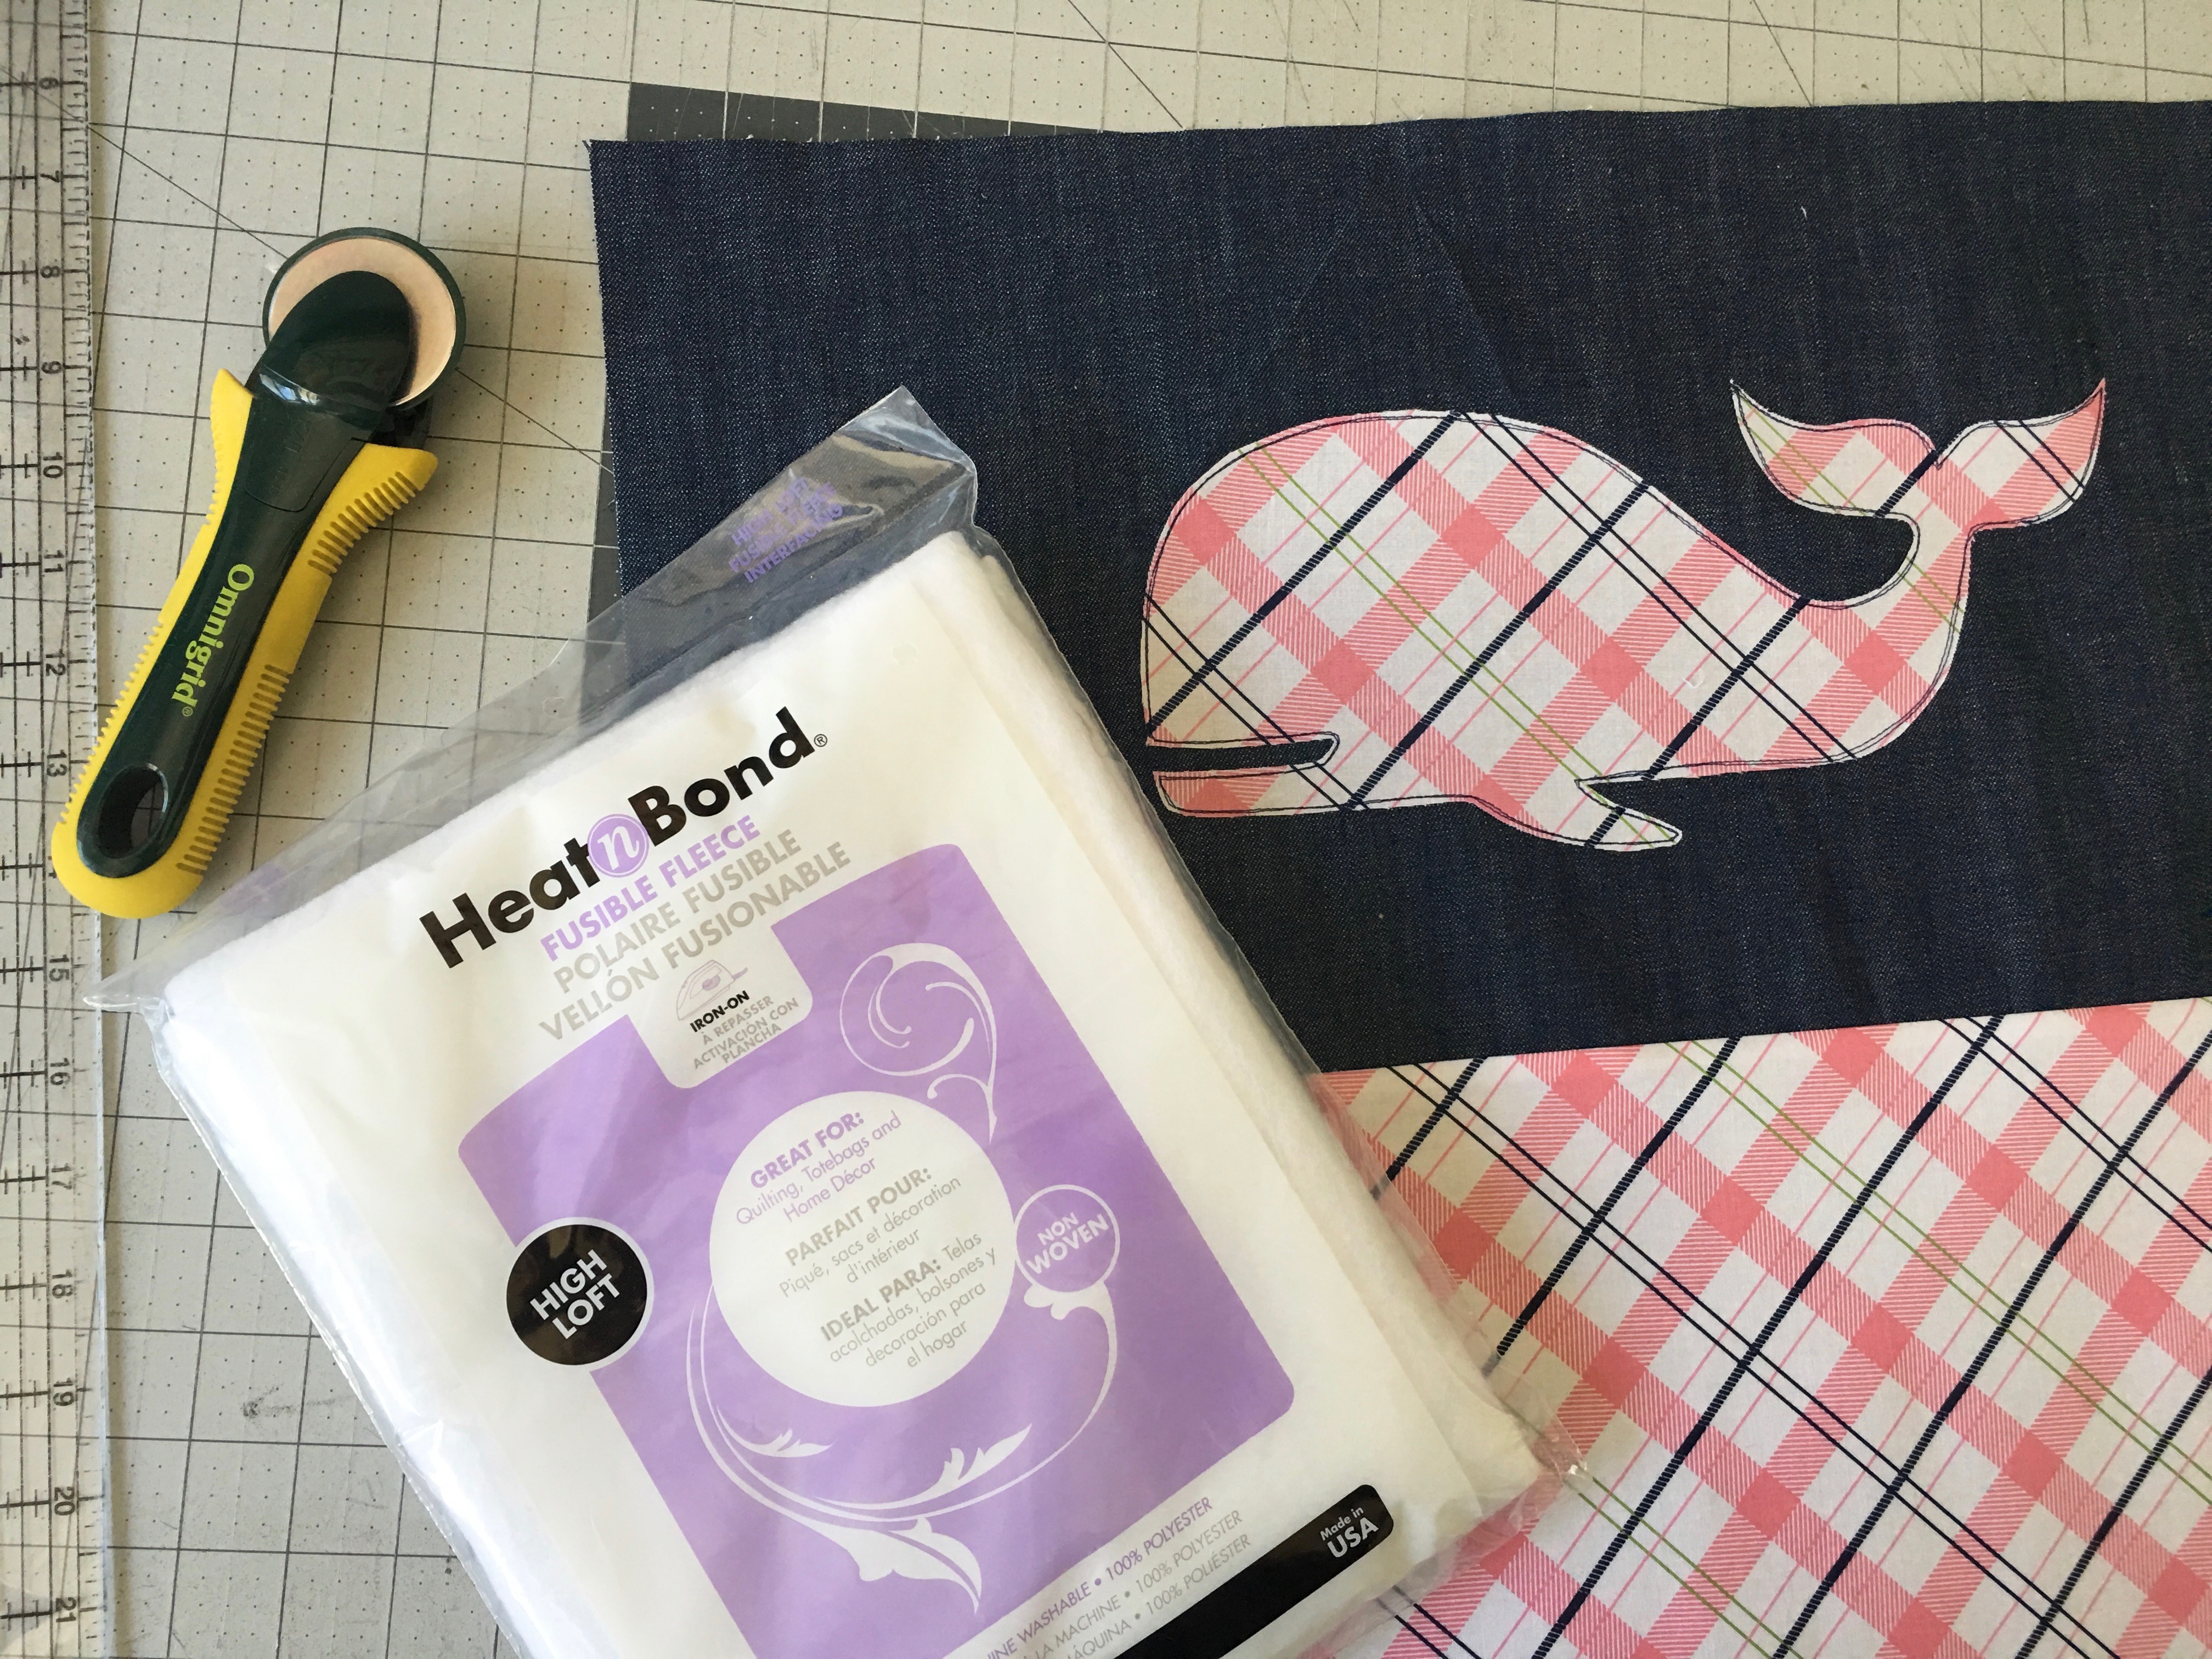
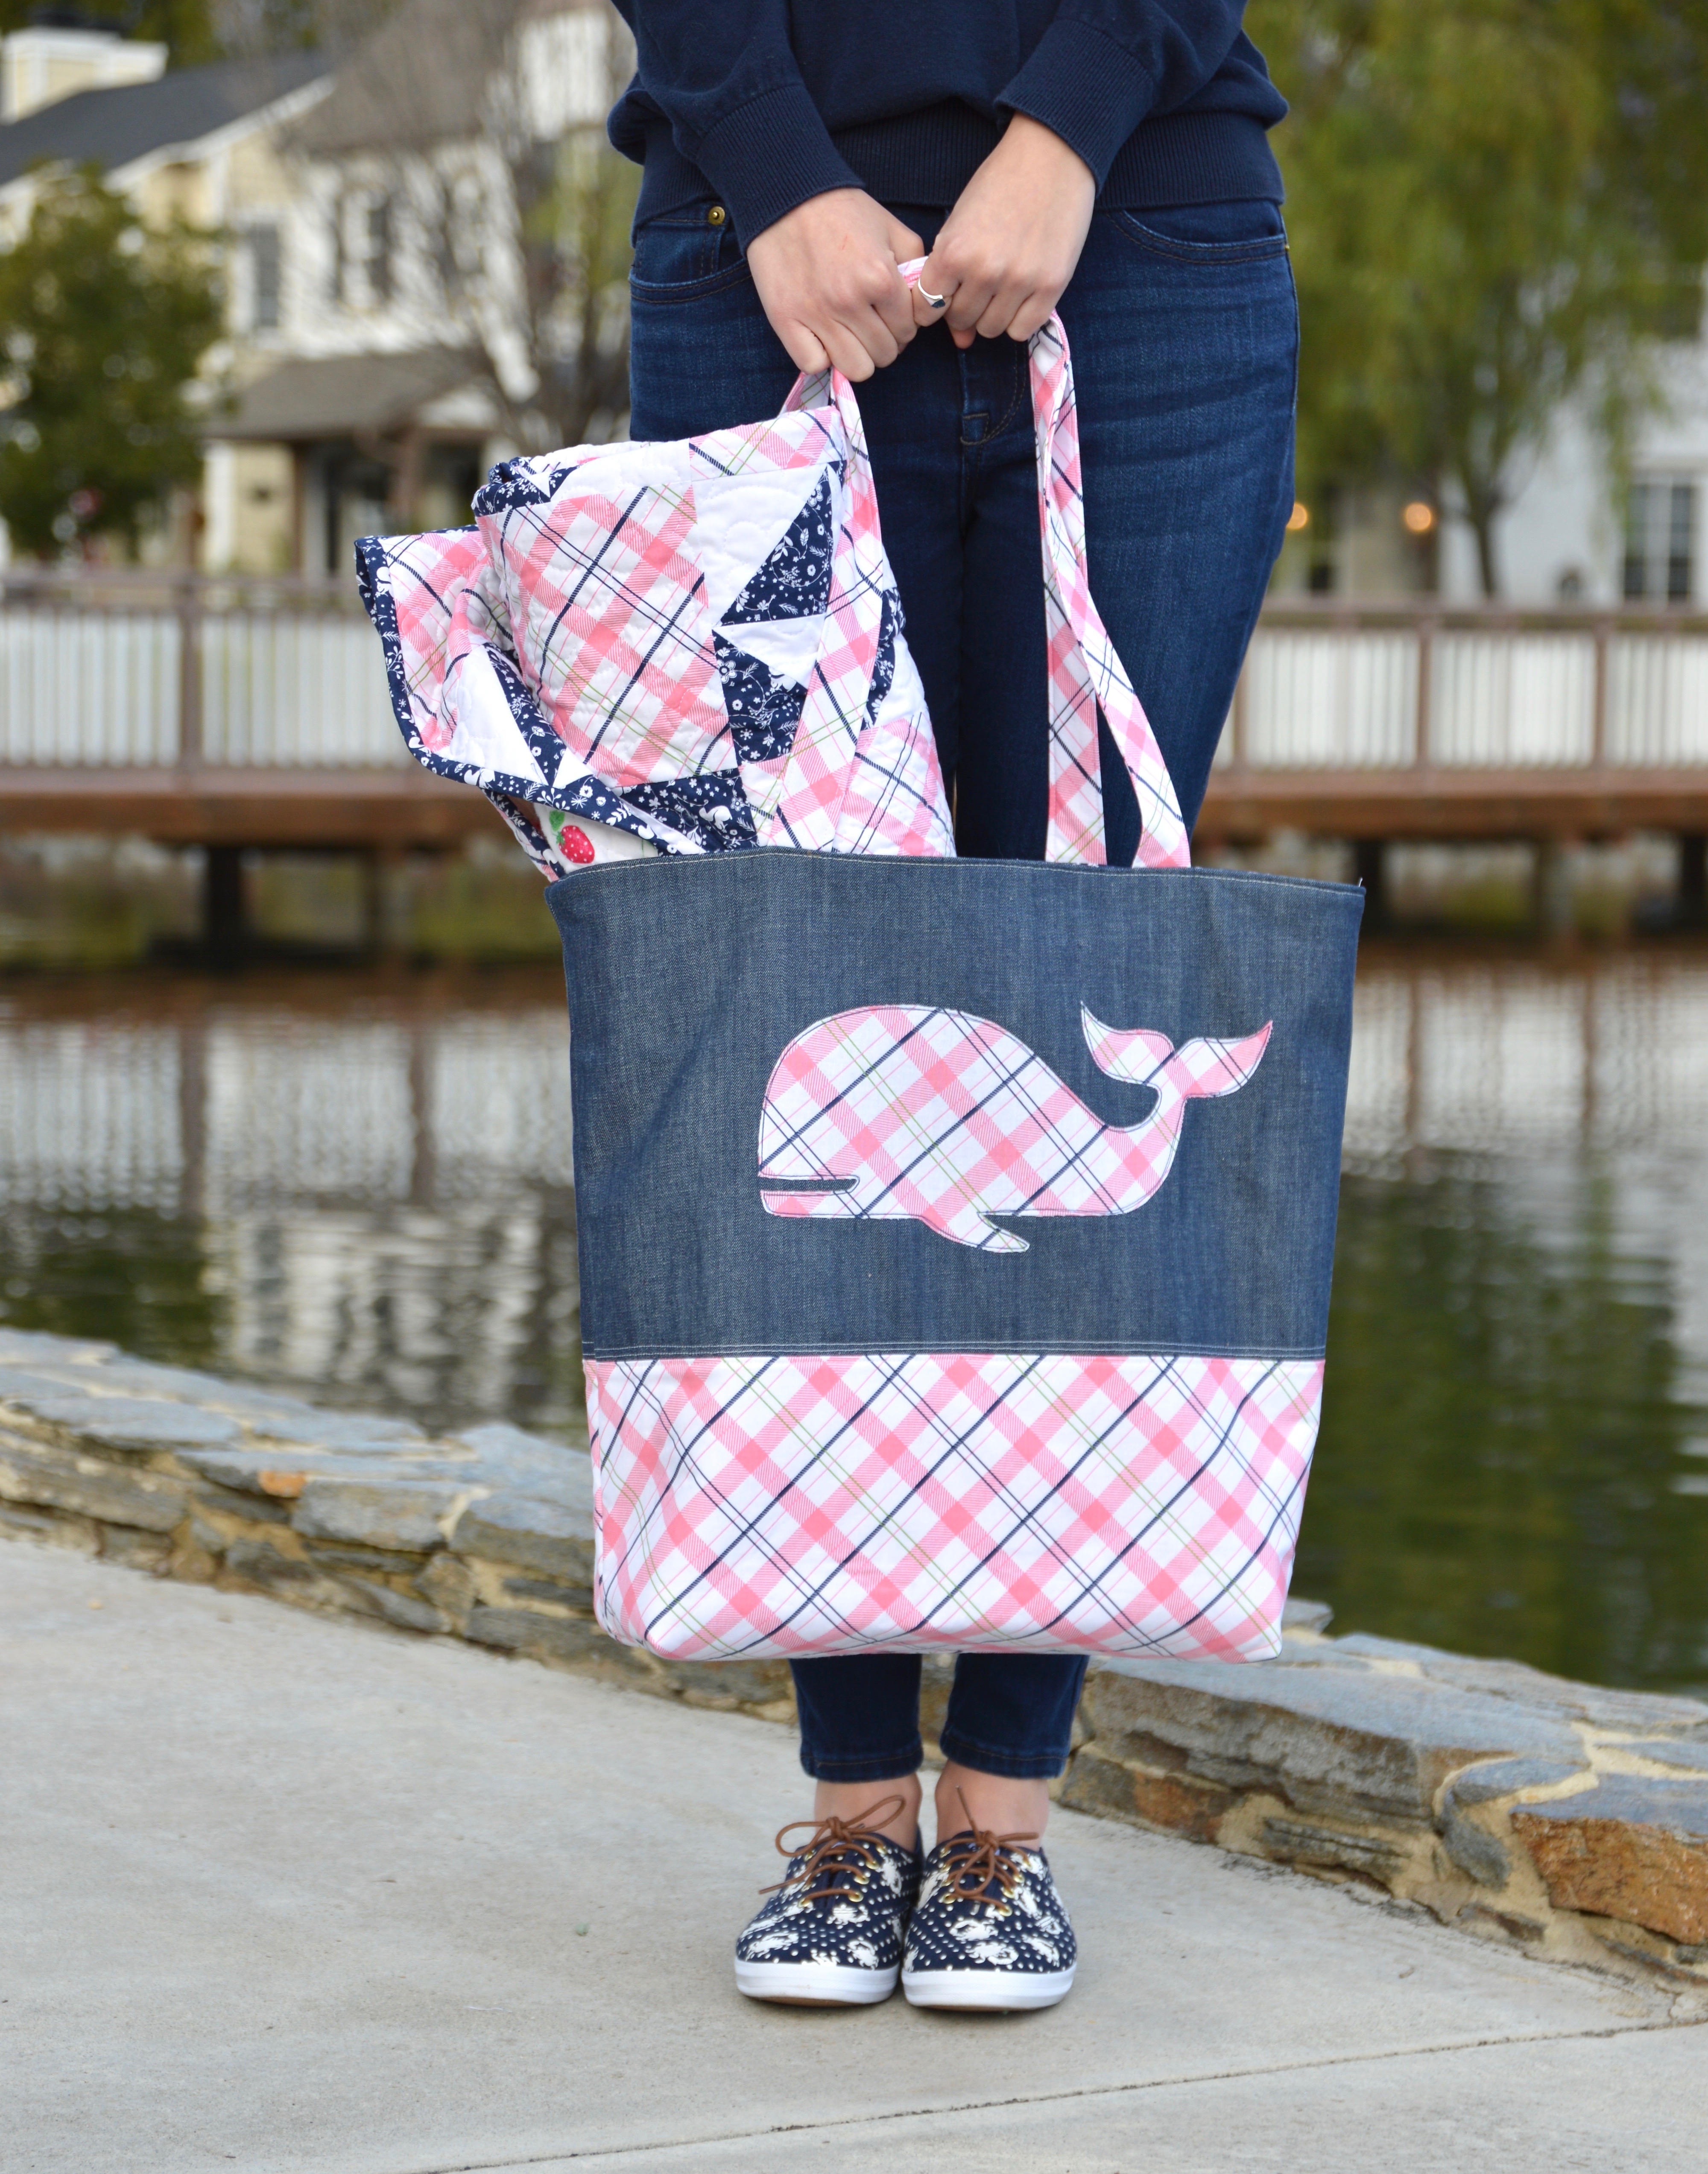
…..and the quilt fits nicely inside this preppy plaid whale tote bag – made with denim, plaid, and Heat n Bond Fusible fleece. So, are you ready to set sail for the Cape? Grab your fabrics and lets get sewing!
Preppy Plaid Quilt
1/4″ seams
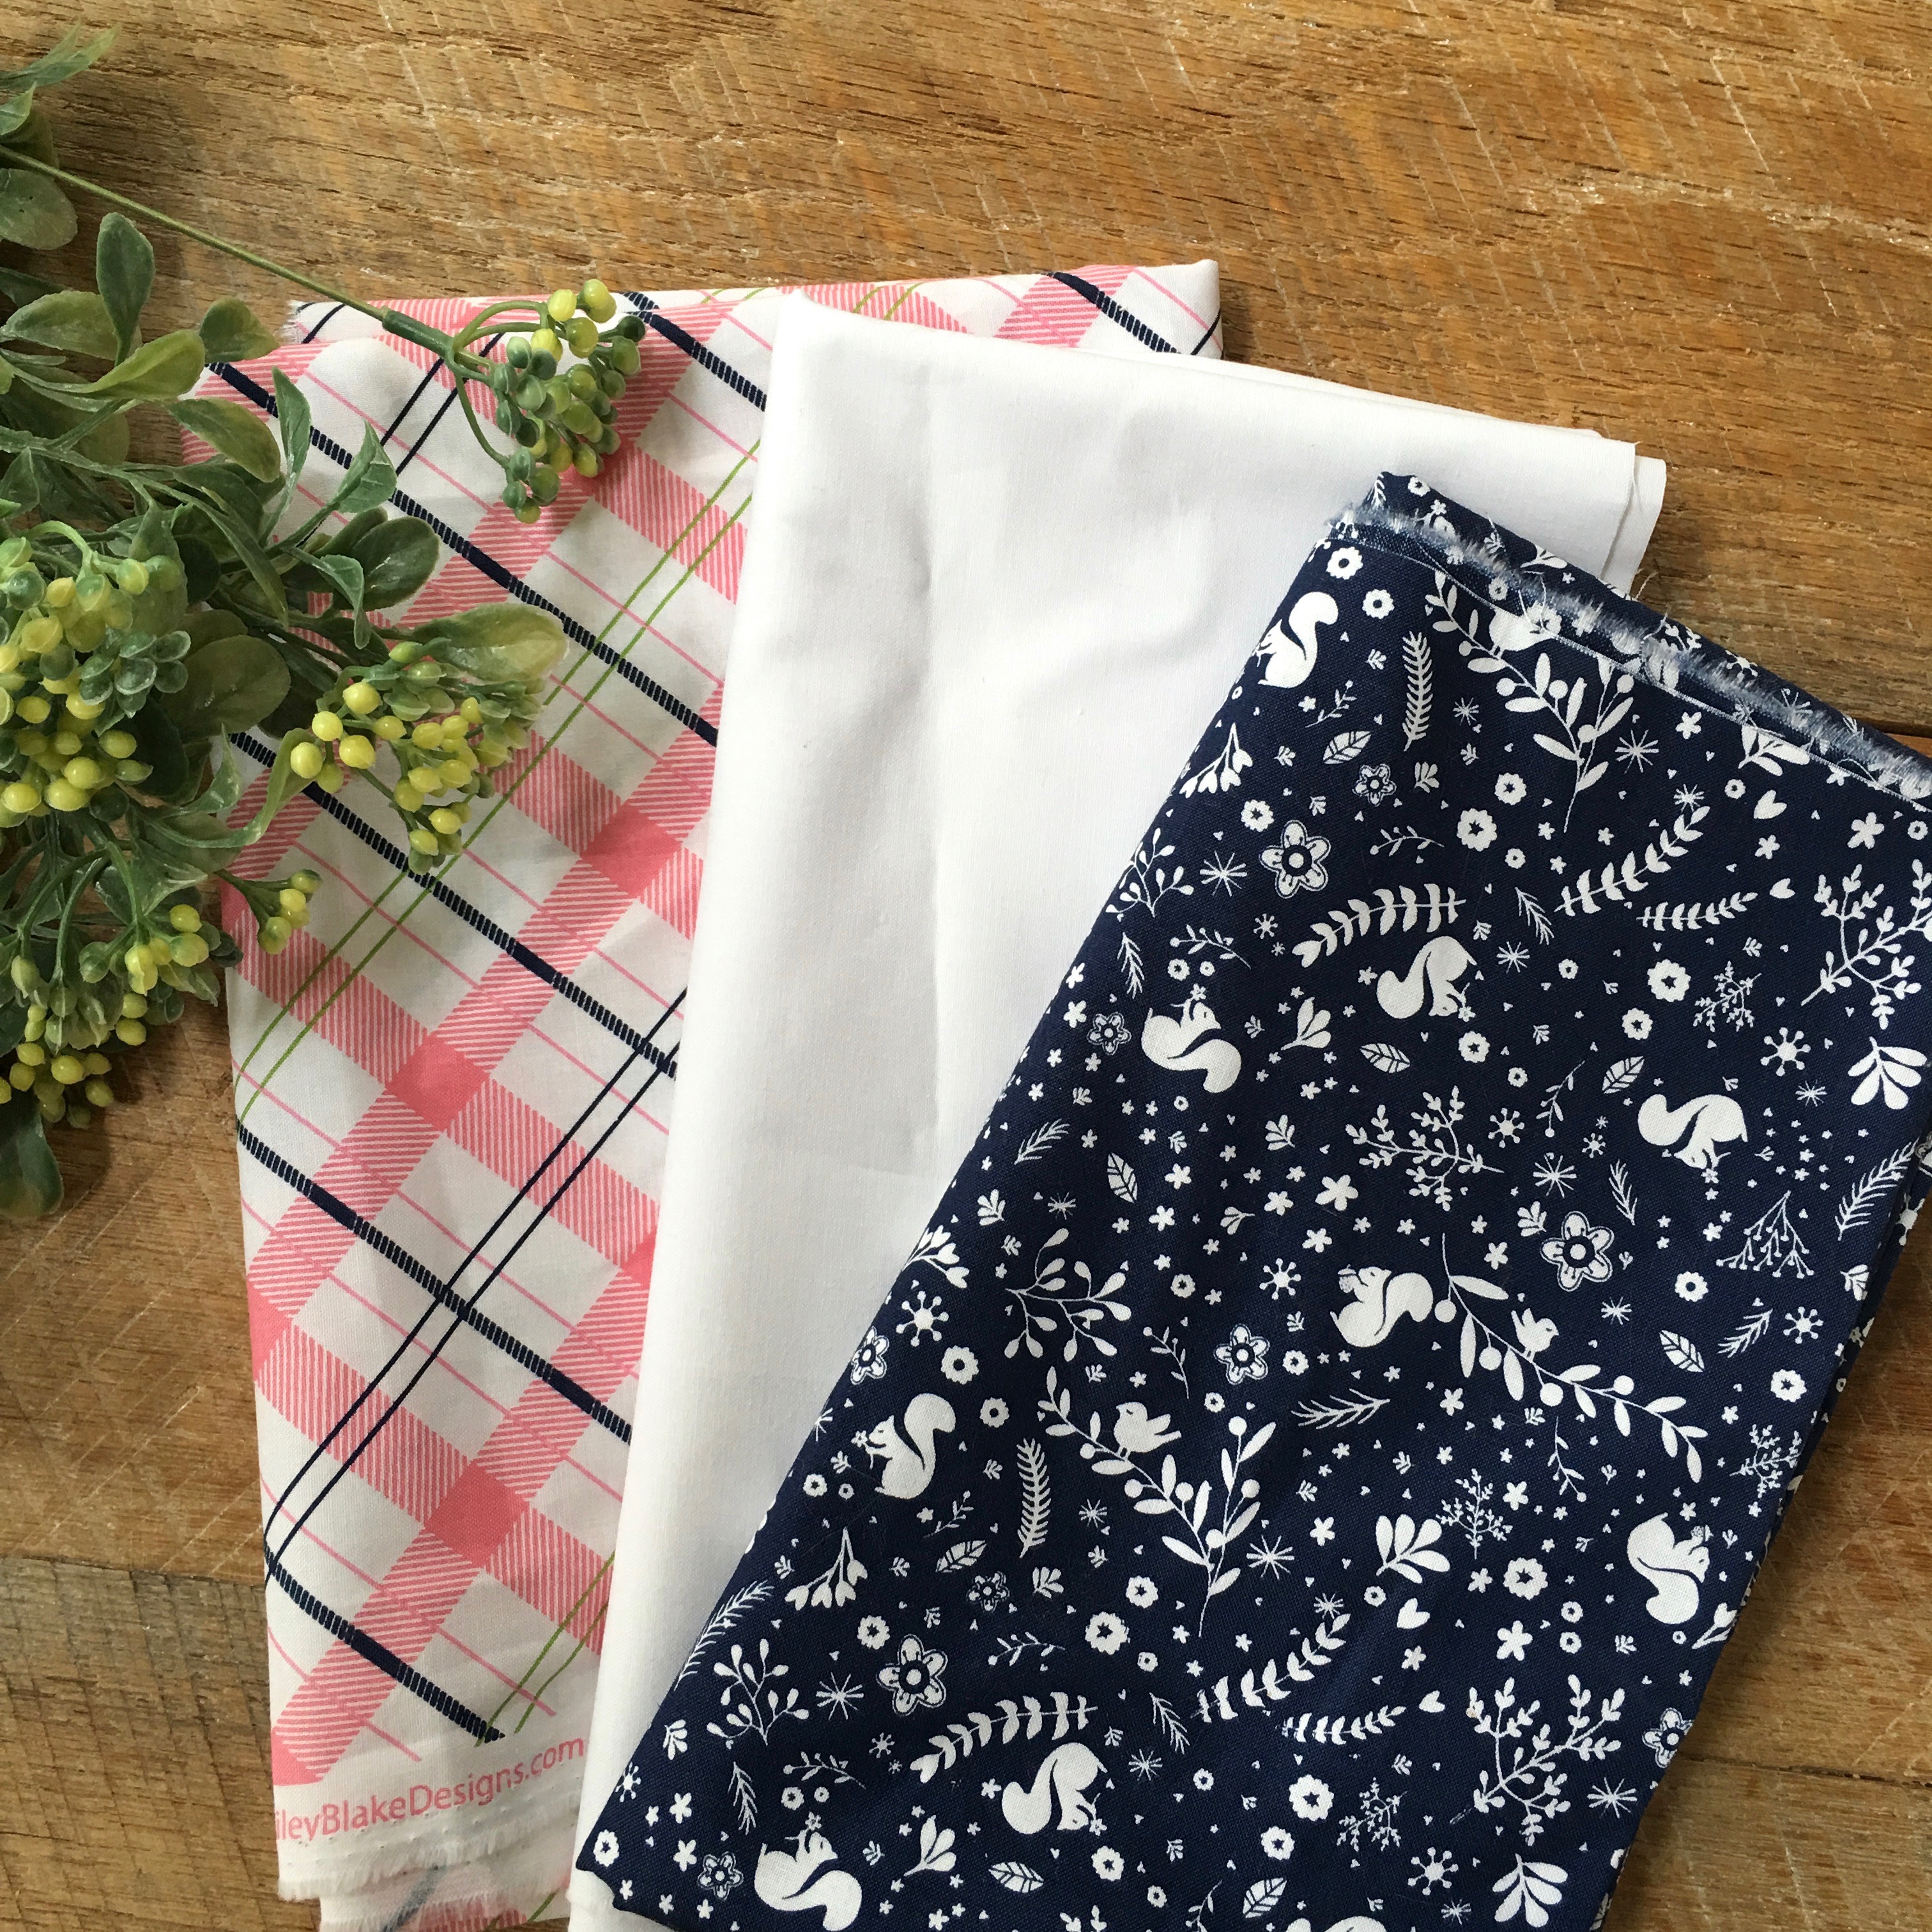
Supplies
2 yards plaid print
1 yard navy print
1 yard white
Begin by cutting the plaid into (40) 6.5″ squares.
Using the navy blue print and white print sew (160) half square triangles (HST) that measure 3.5″. You can use any method you like. I use my Sizzix half square triangle dies! It is super fast, super easy and no squaring up – just perfection!!
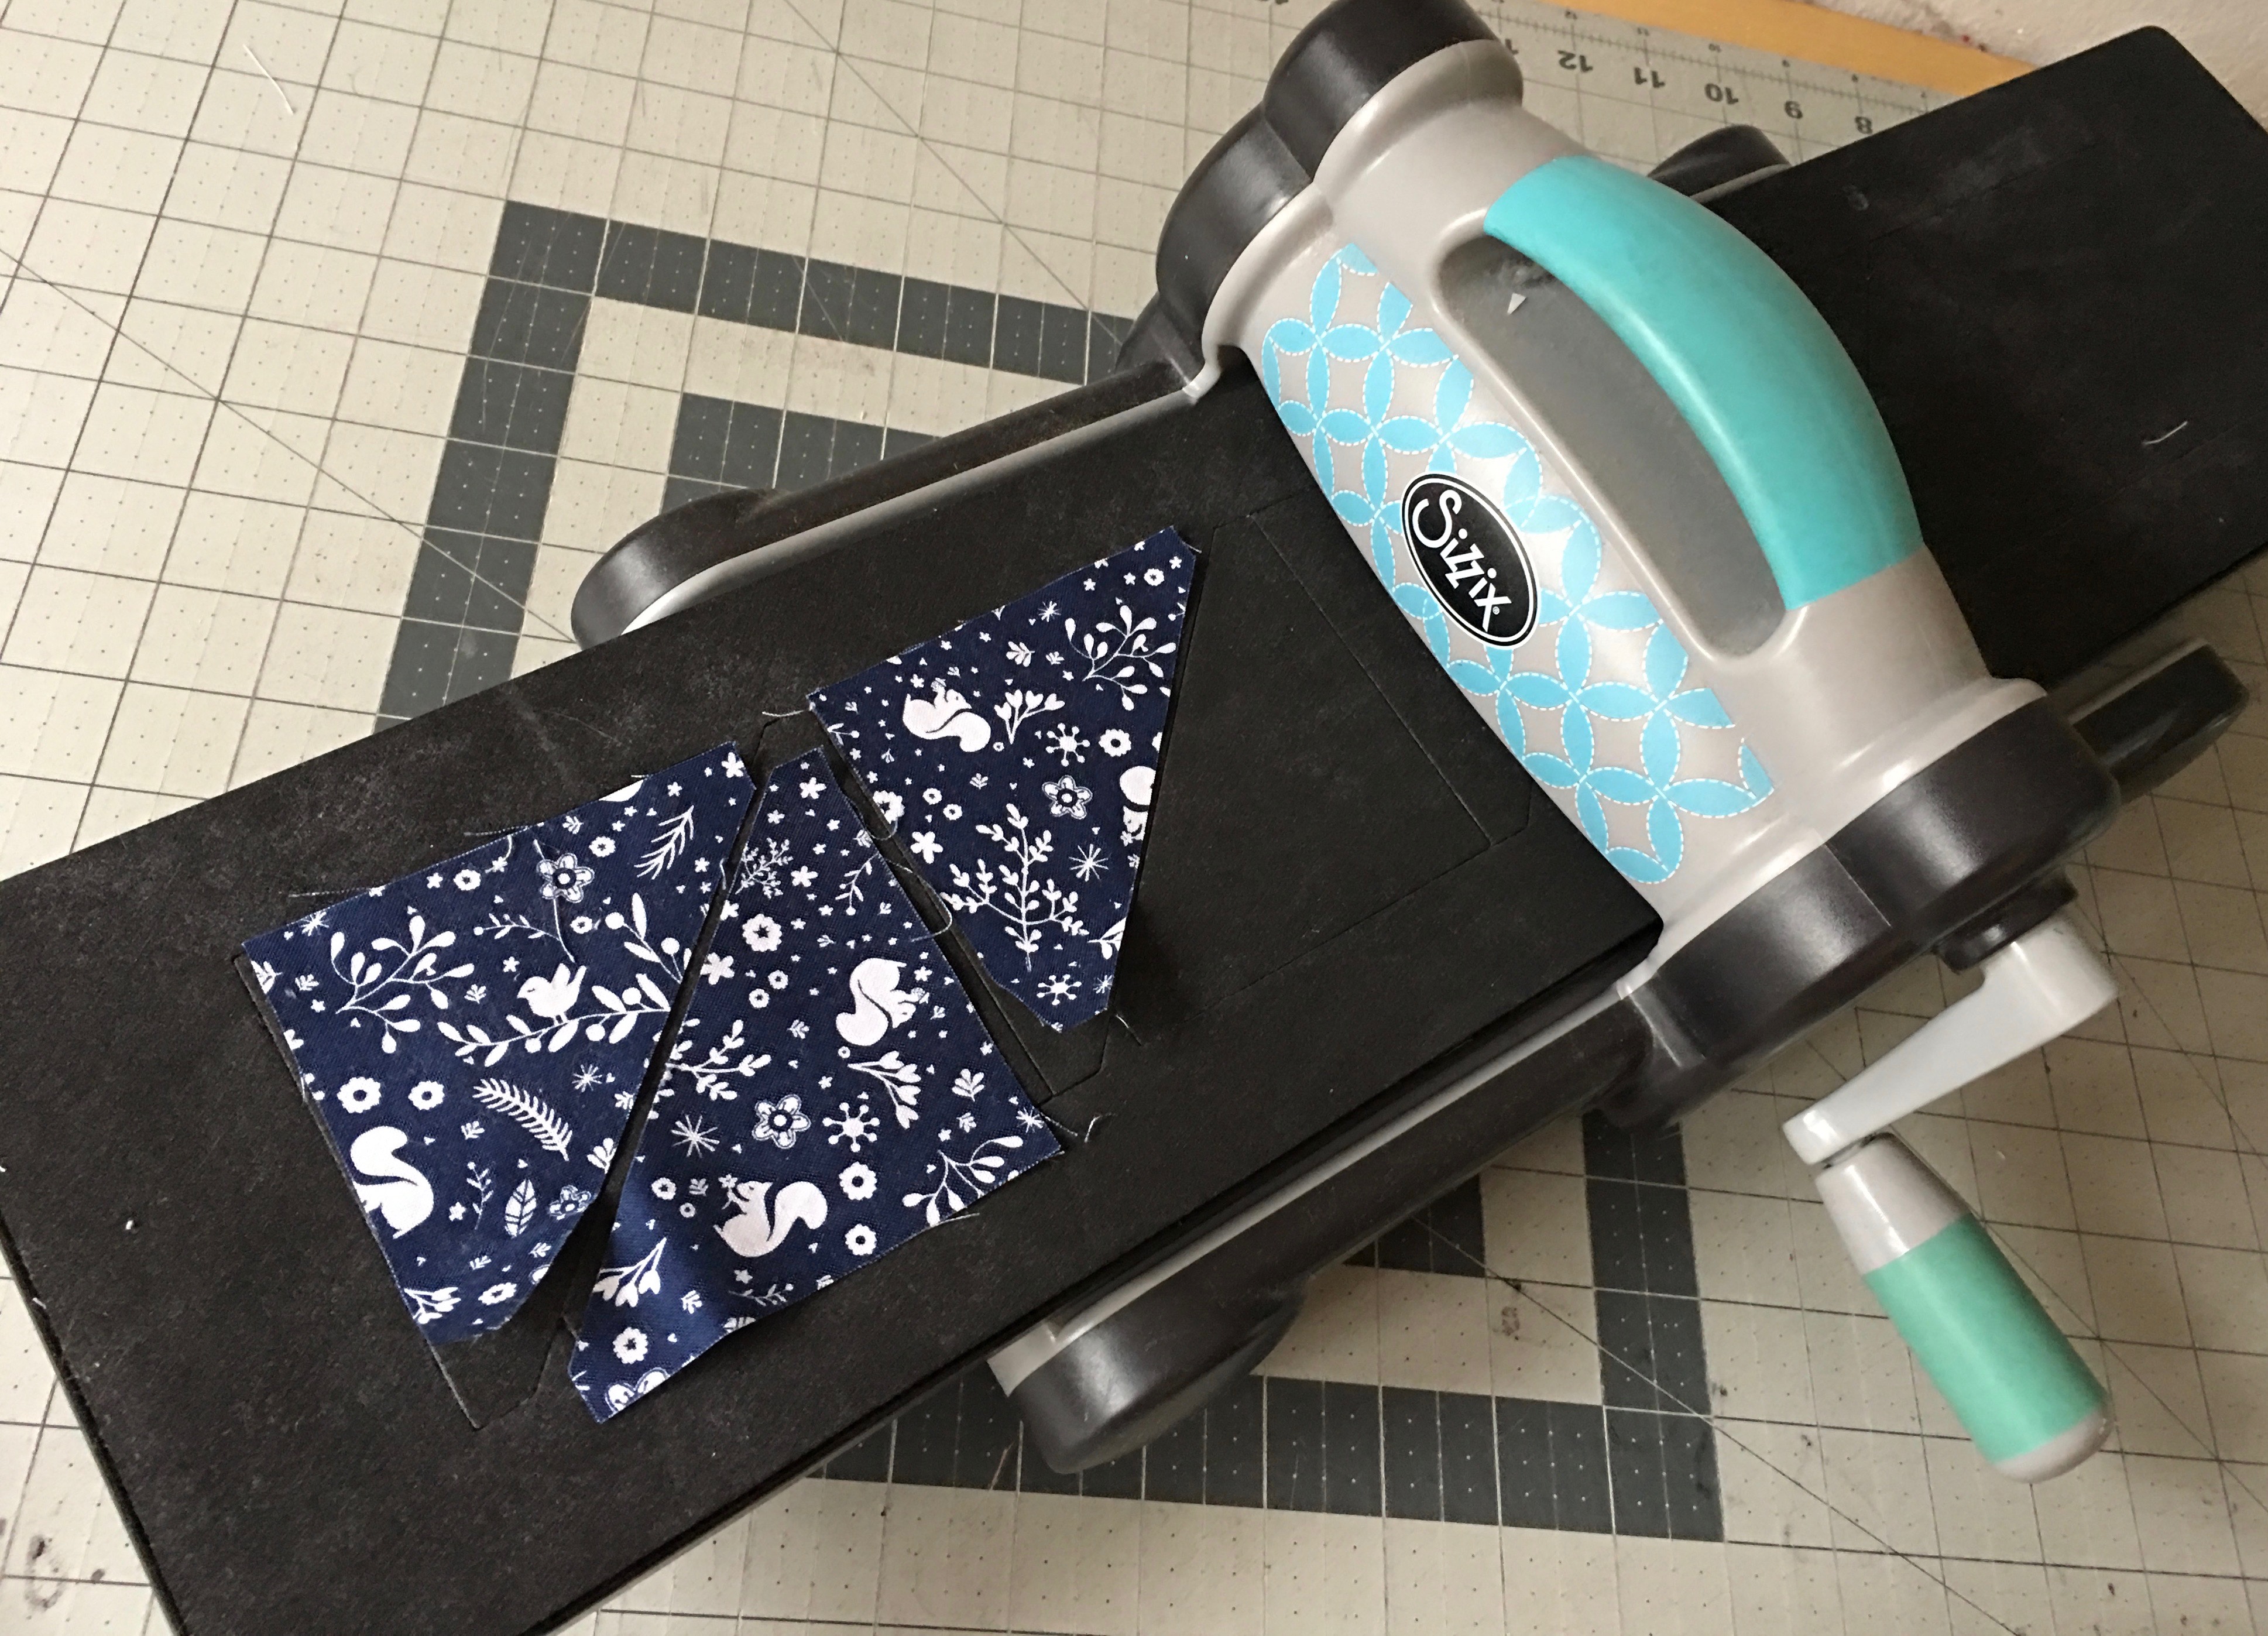
Die cut 160 navy HSTs and 160 white HSTs.
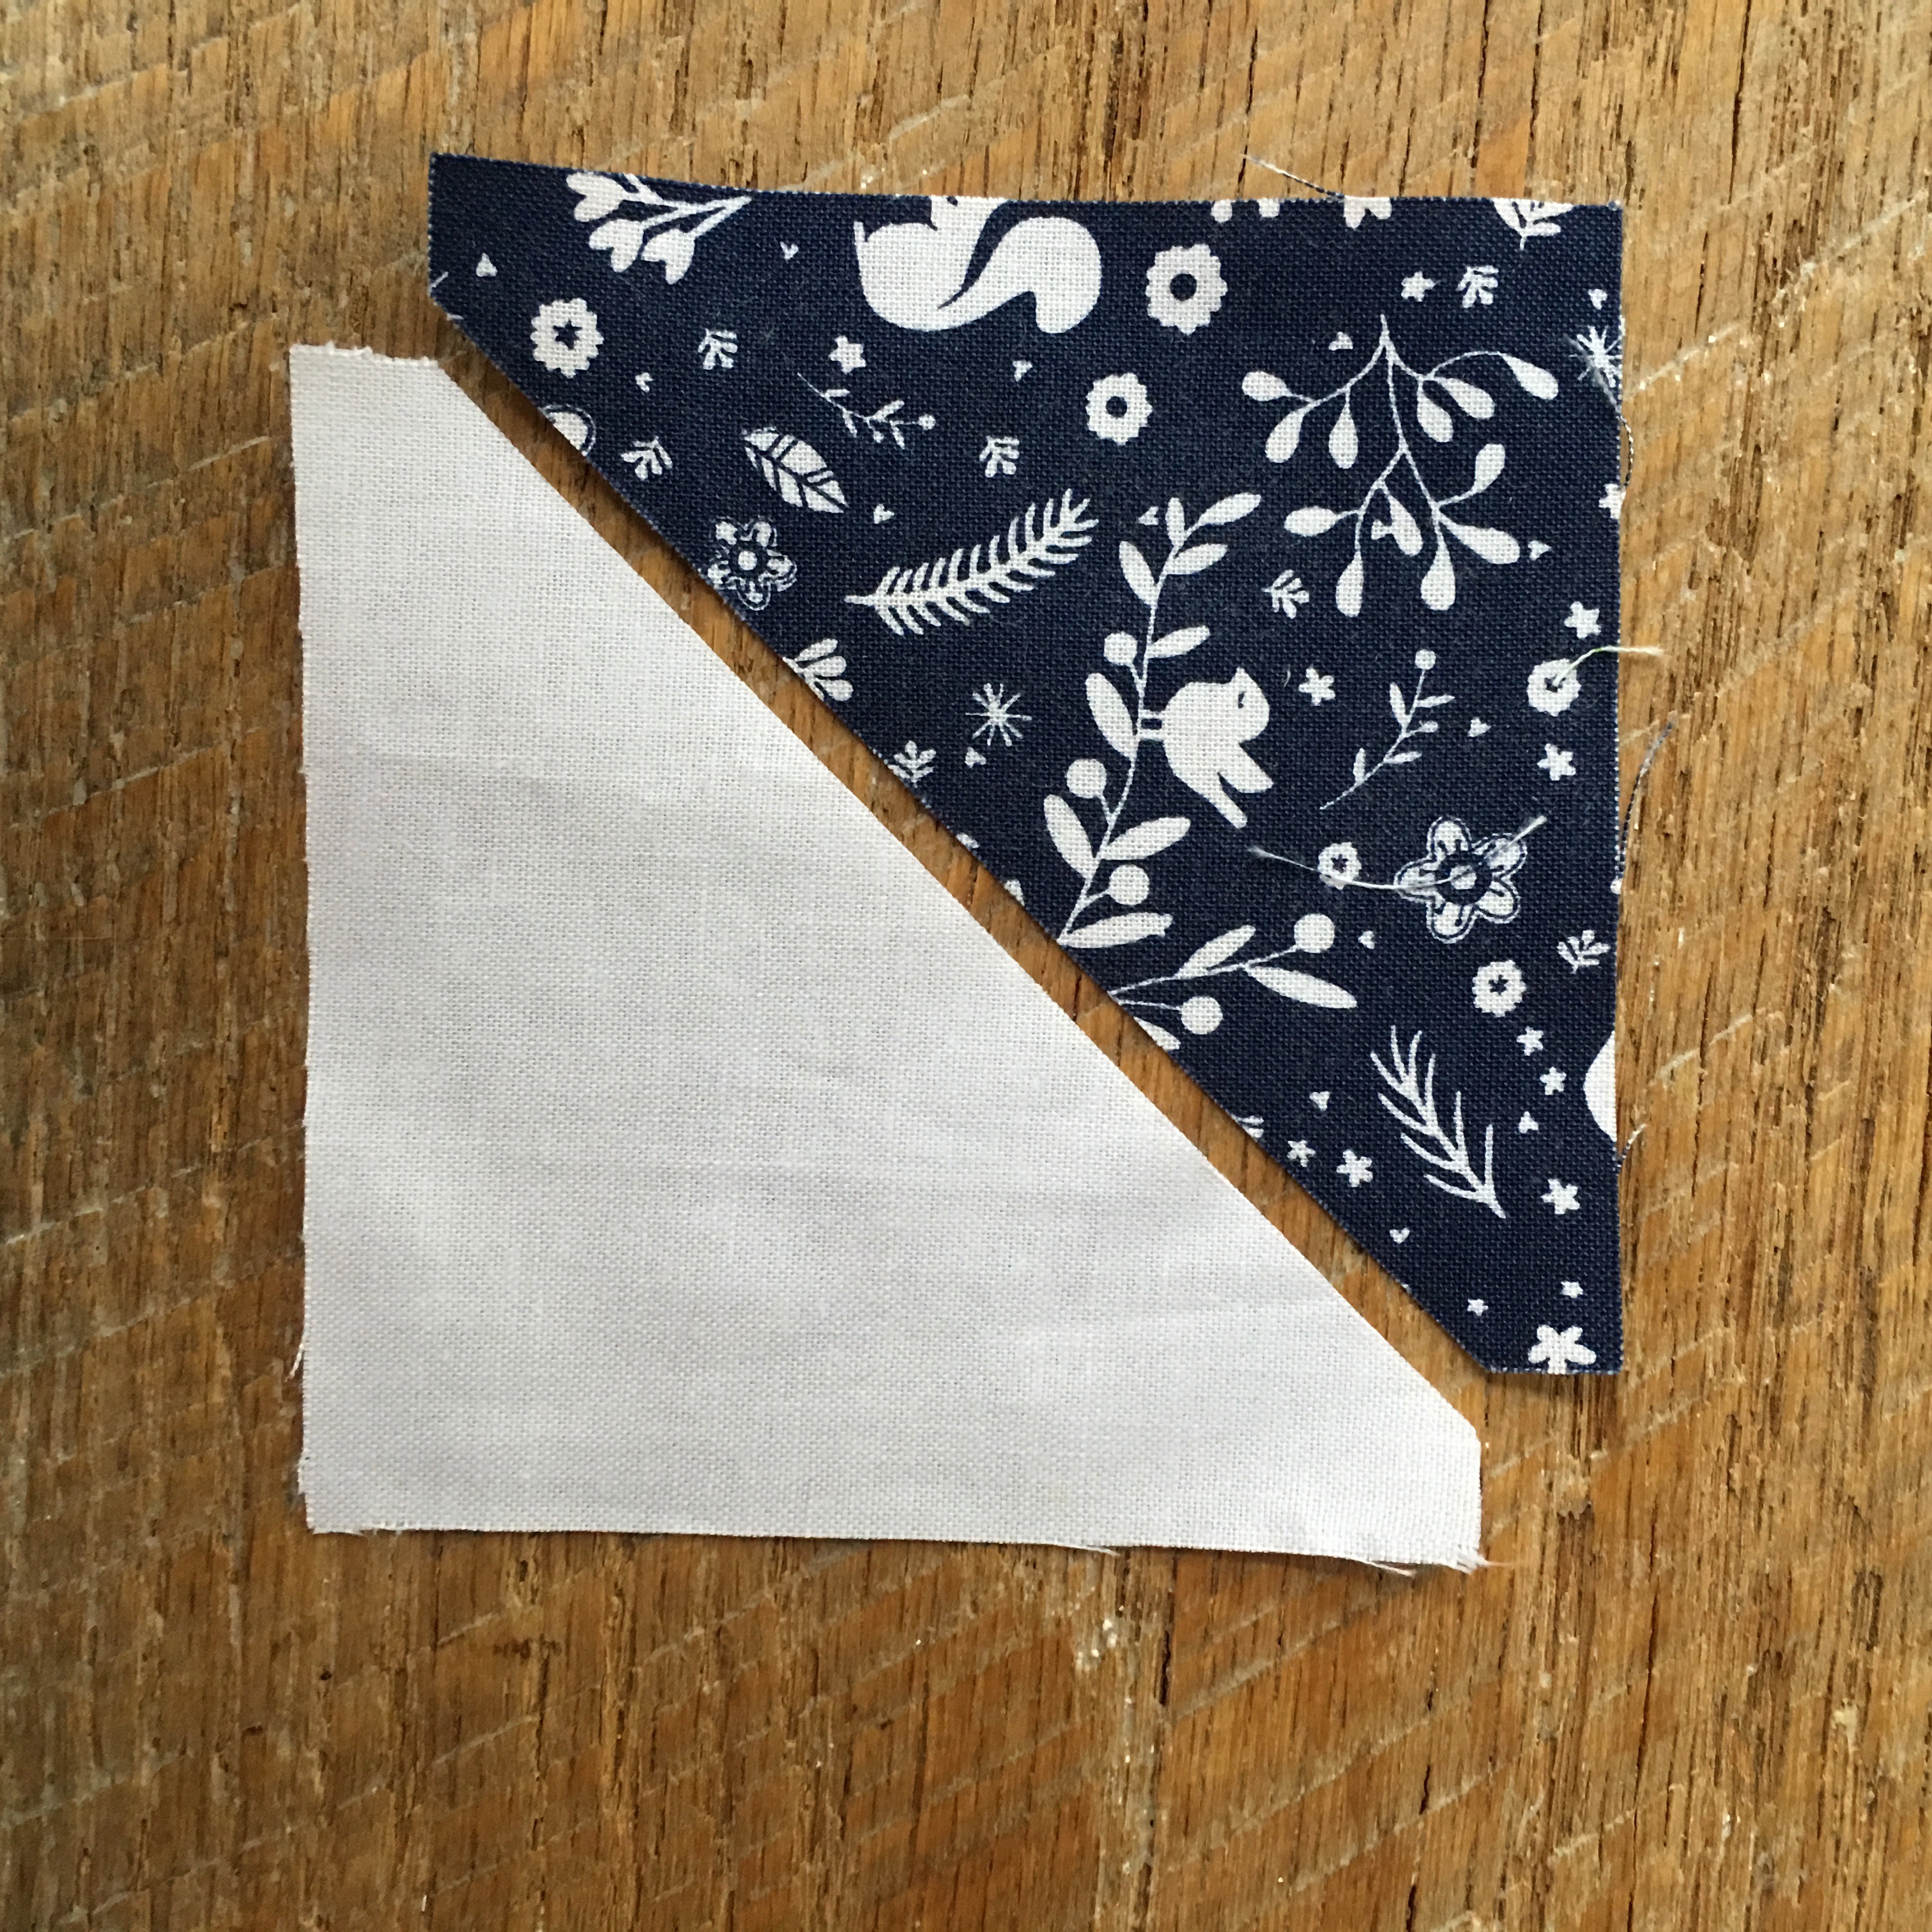
Sew the navy and white HSTs right sides together using 1/4″ seam.
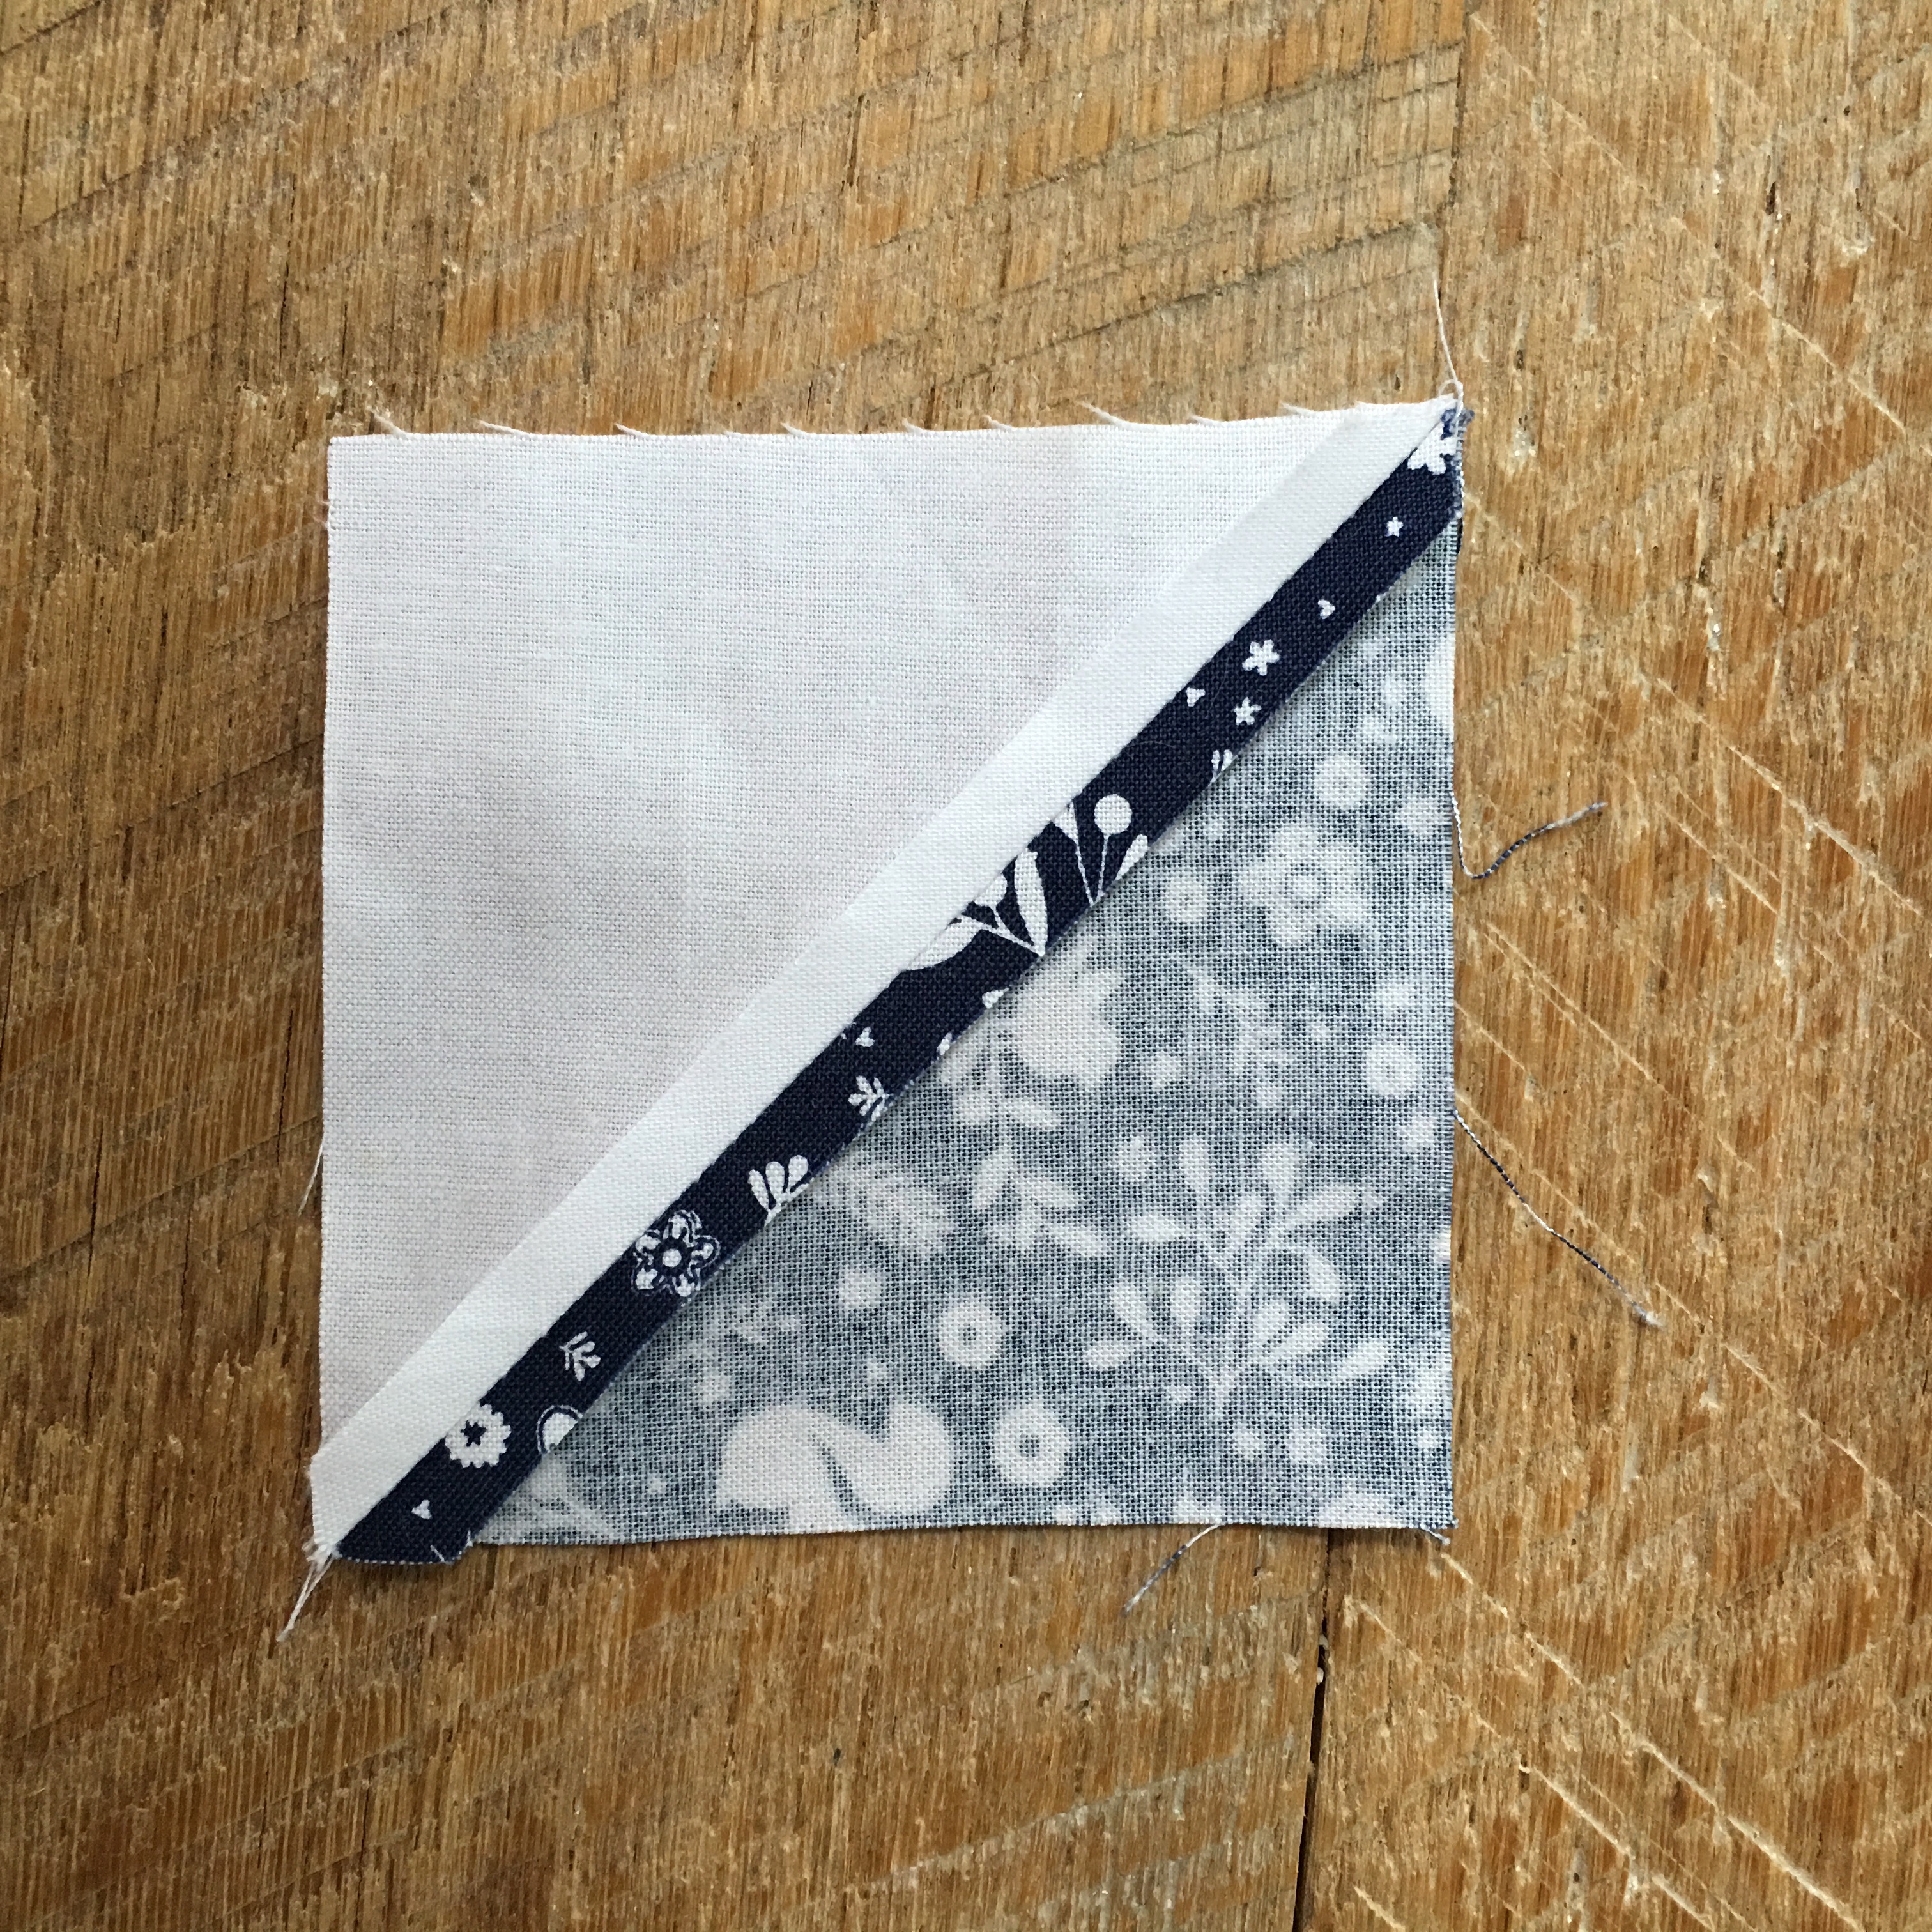
Press seams open. Continue until you have 160 HSTs. It’s probably a good idea to put on a movie while doing this!
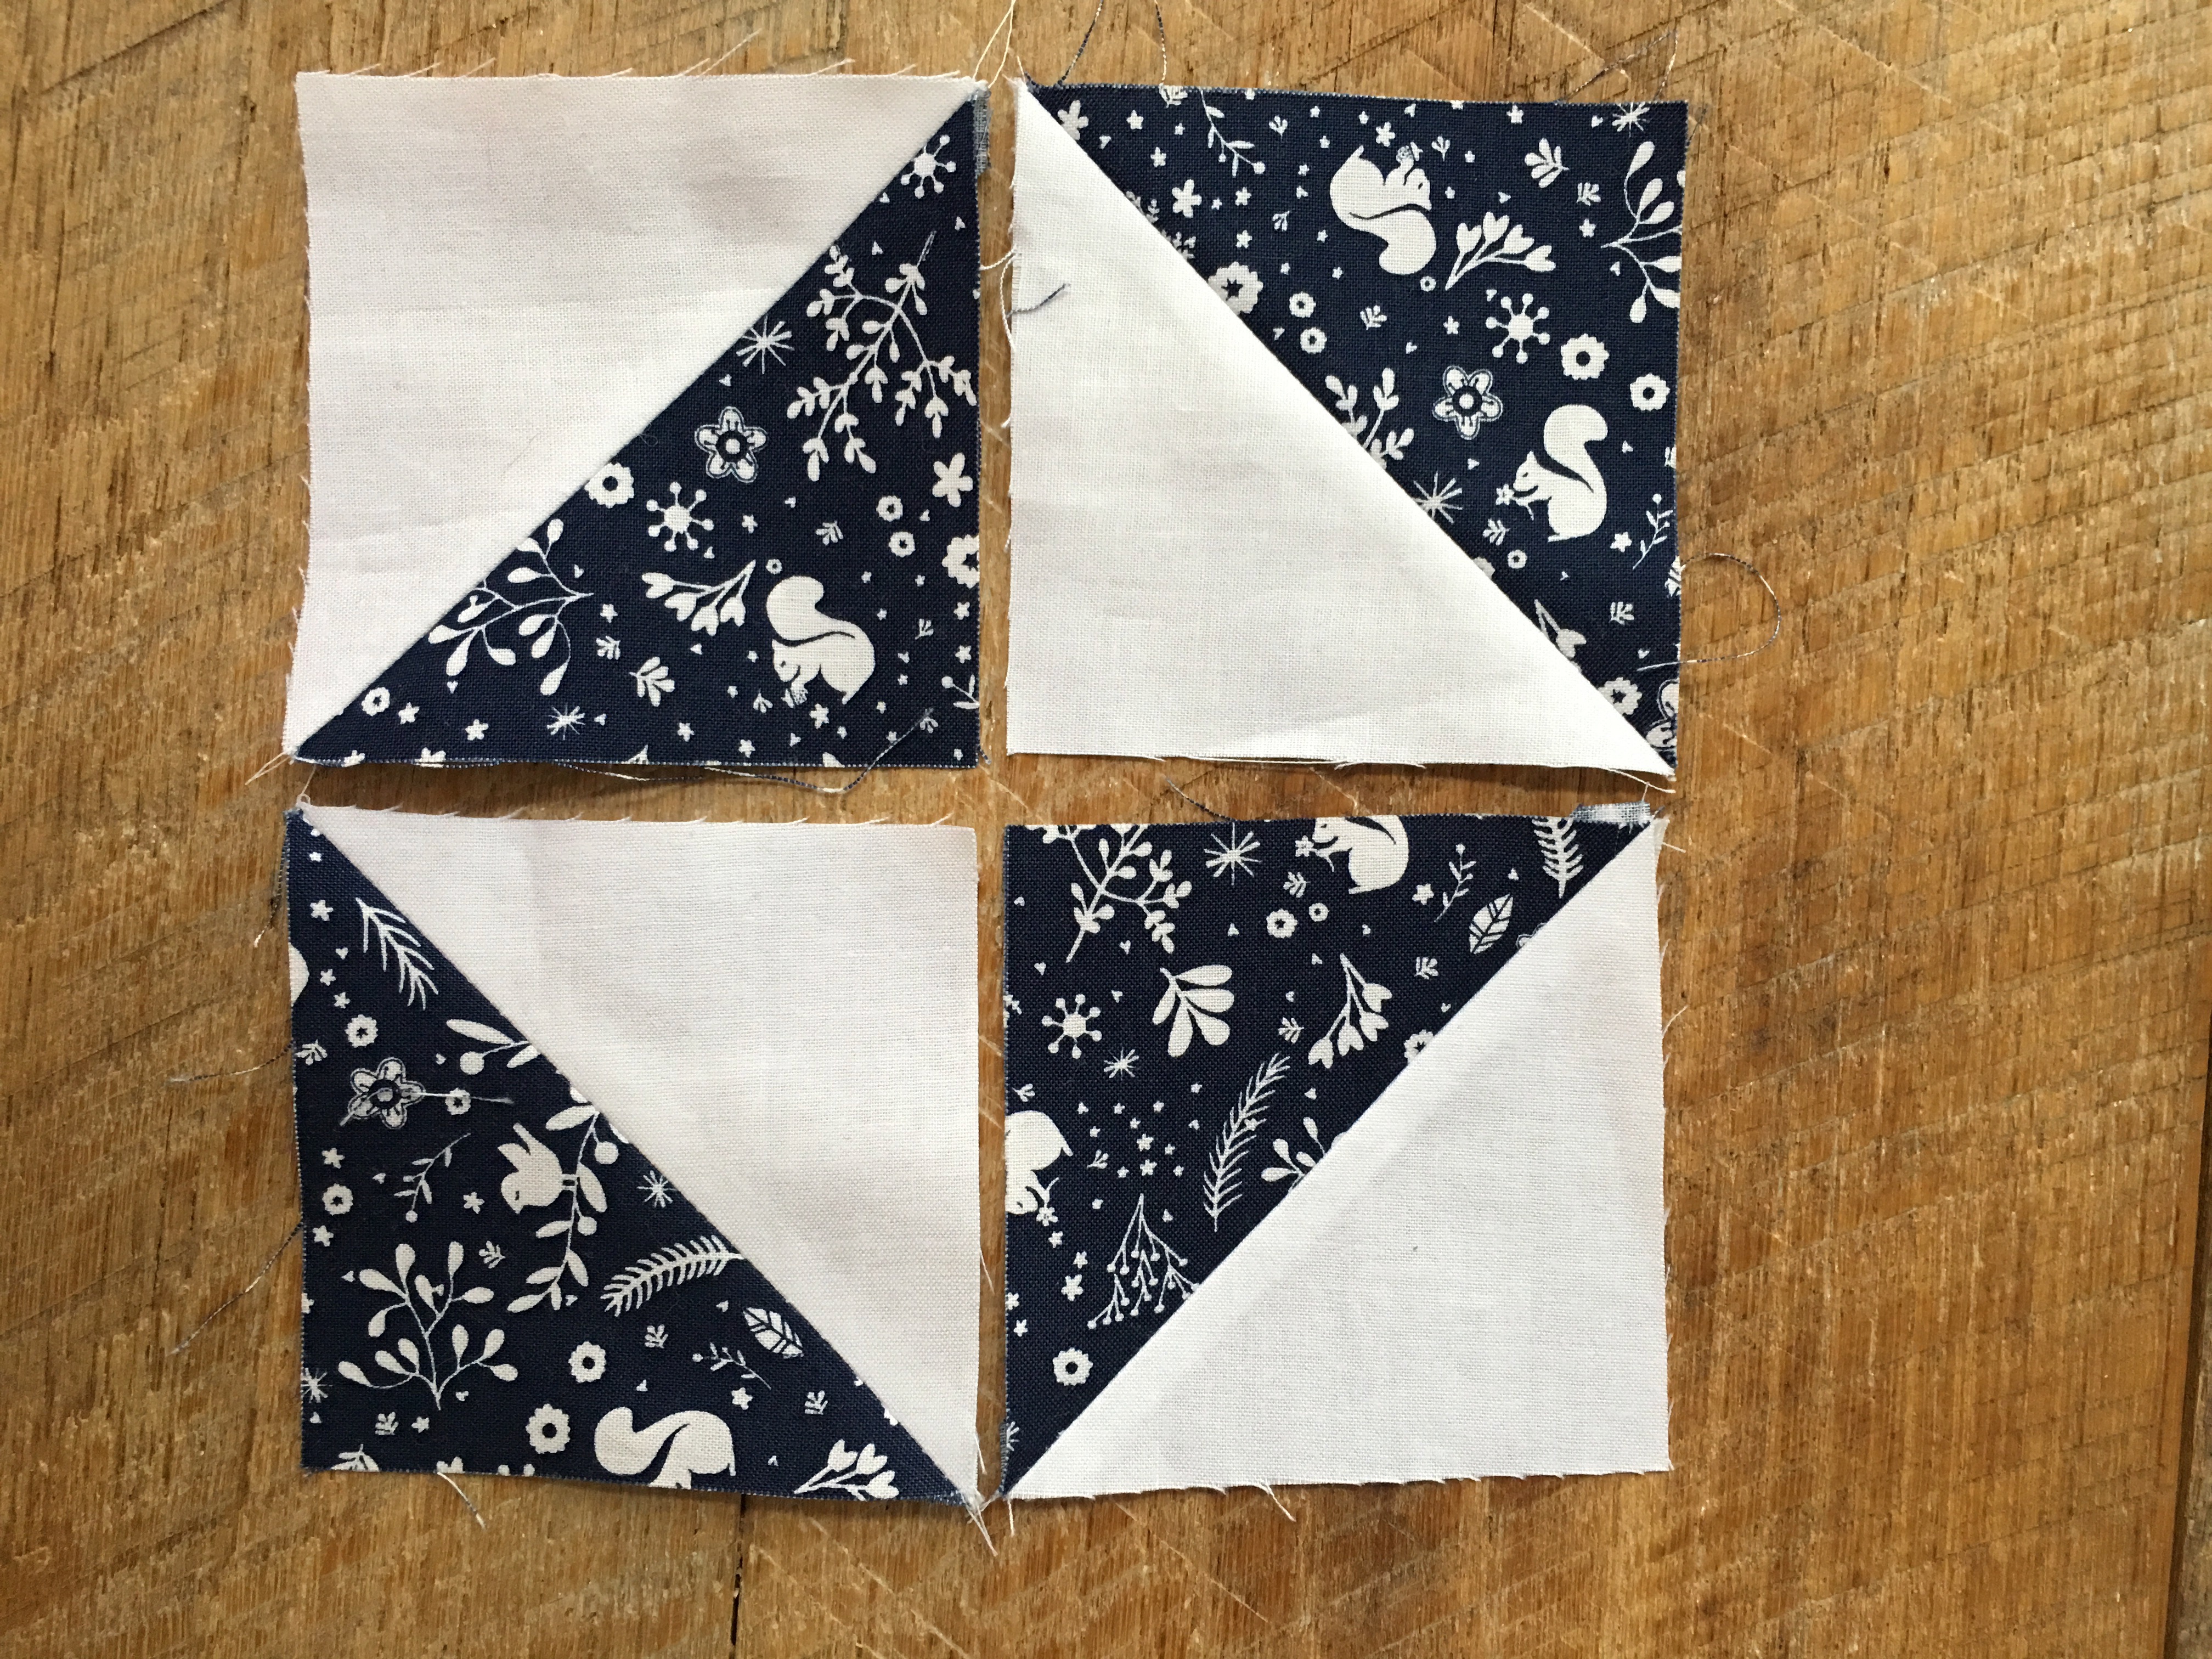
Lay out 4 HSTs to make the pattern above. Sew together as you would a 4-patch. Press seams open. Finished block will measure 6.5″. Make 40 of these blocks.
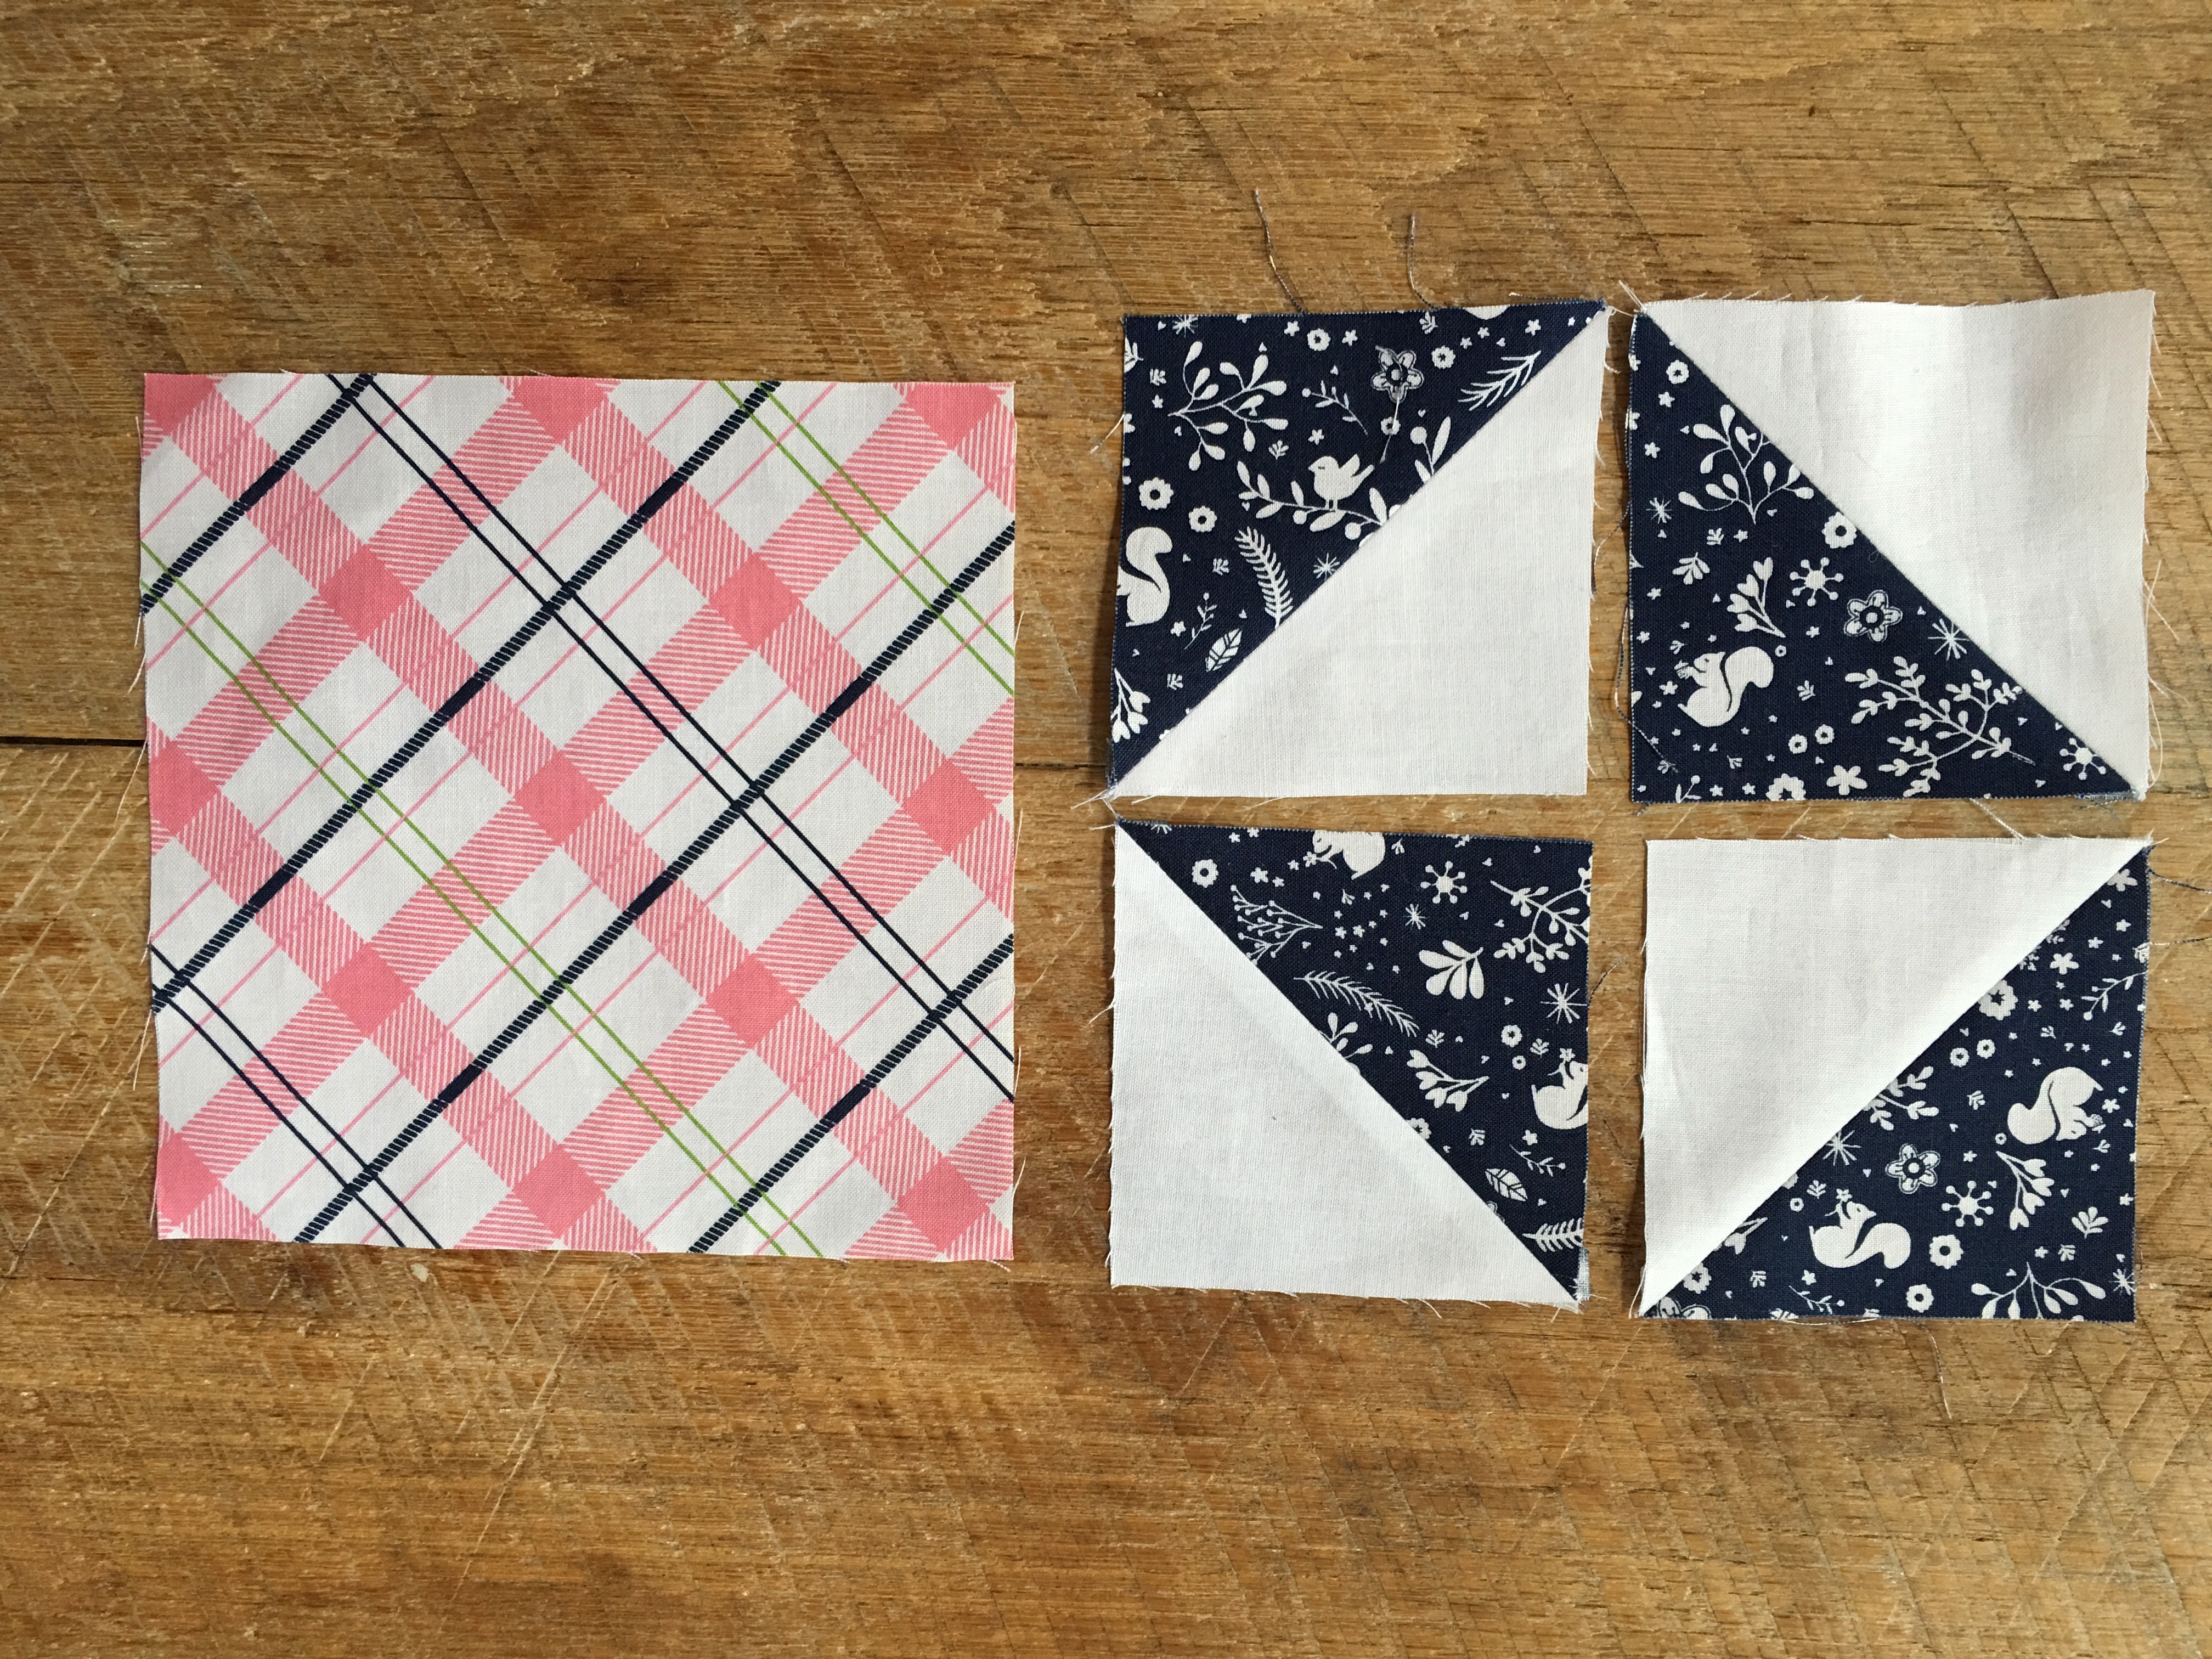
Cut 40 squares measuring 6.5″ out of the plaid.
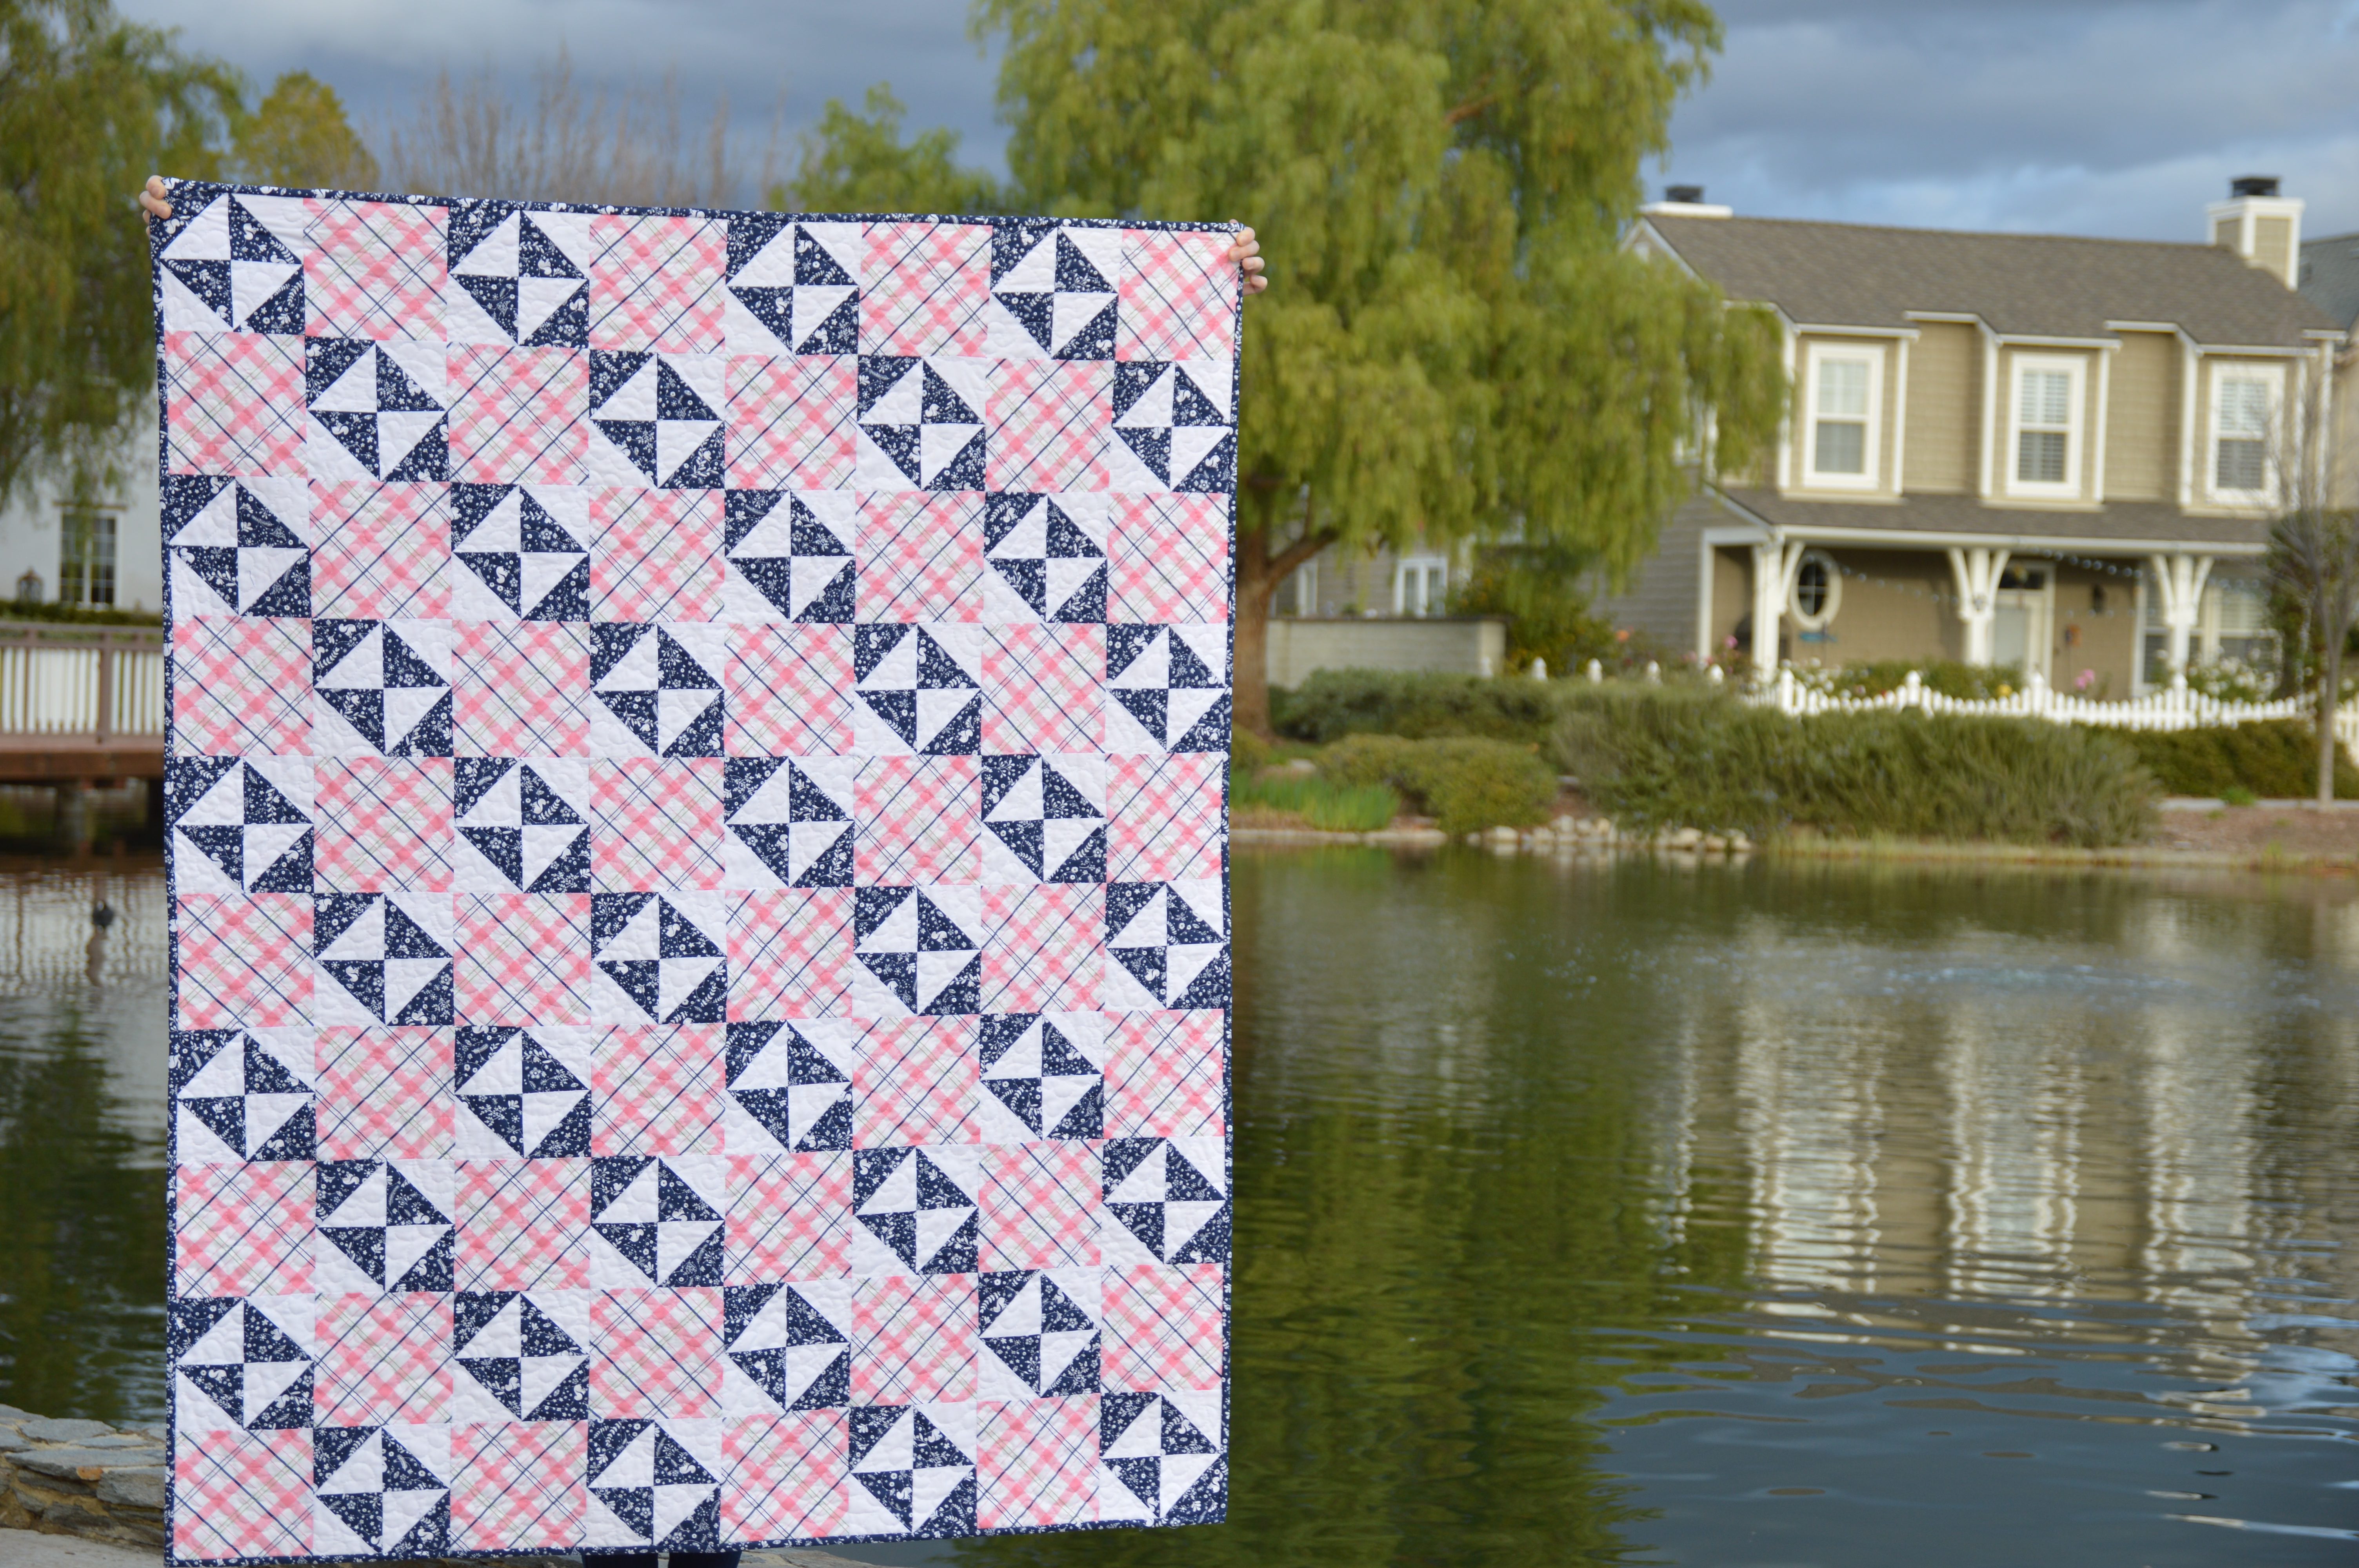
Sew the blocks together (1/4″ seams) as you would a checkerboard, alternating each block. Make sure the pieced blocks are going the same direction. Press the seams toward the plaid. There are 8 blocks across and 10 rows down.
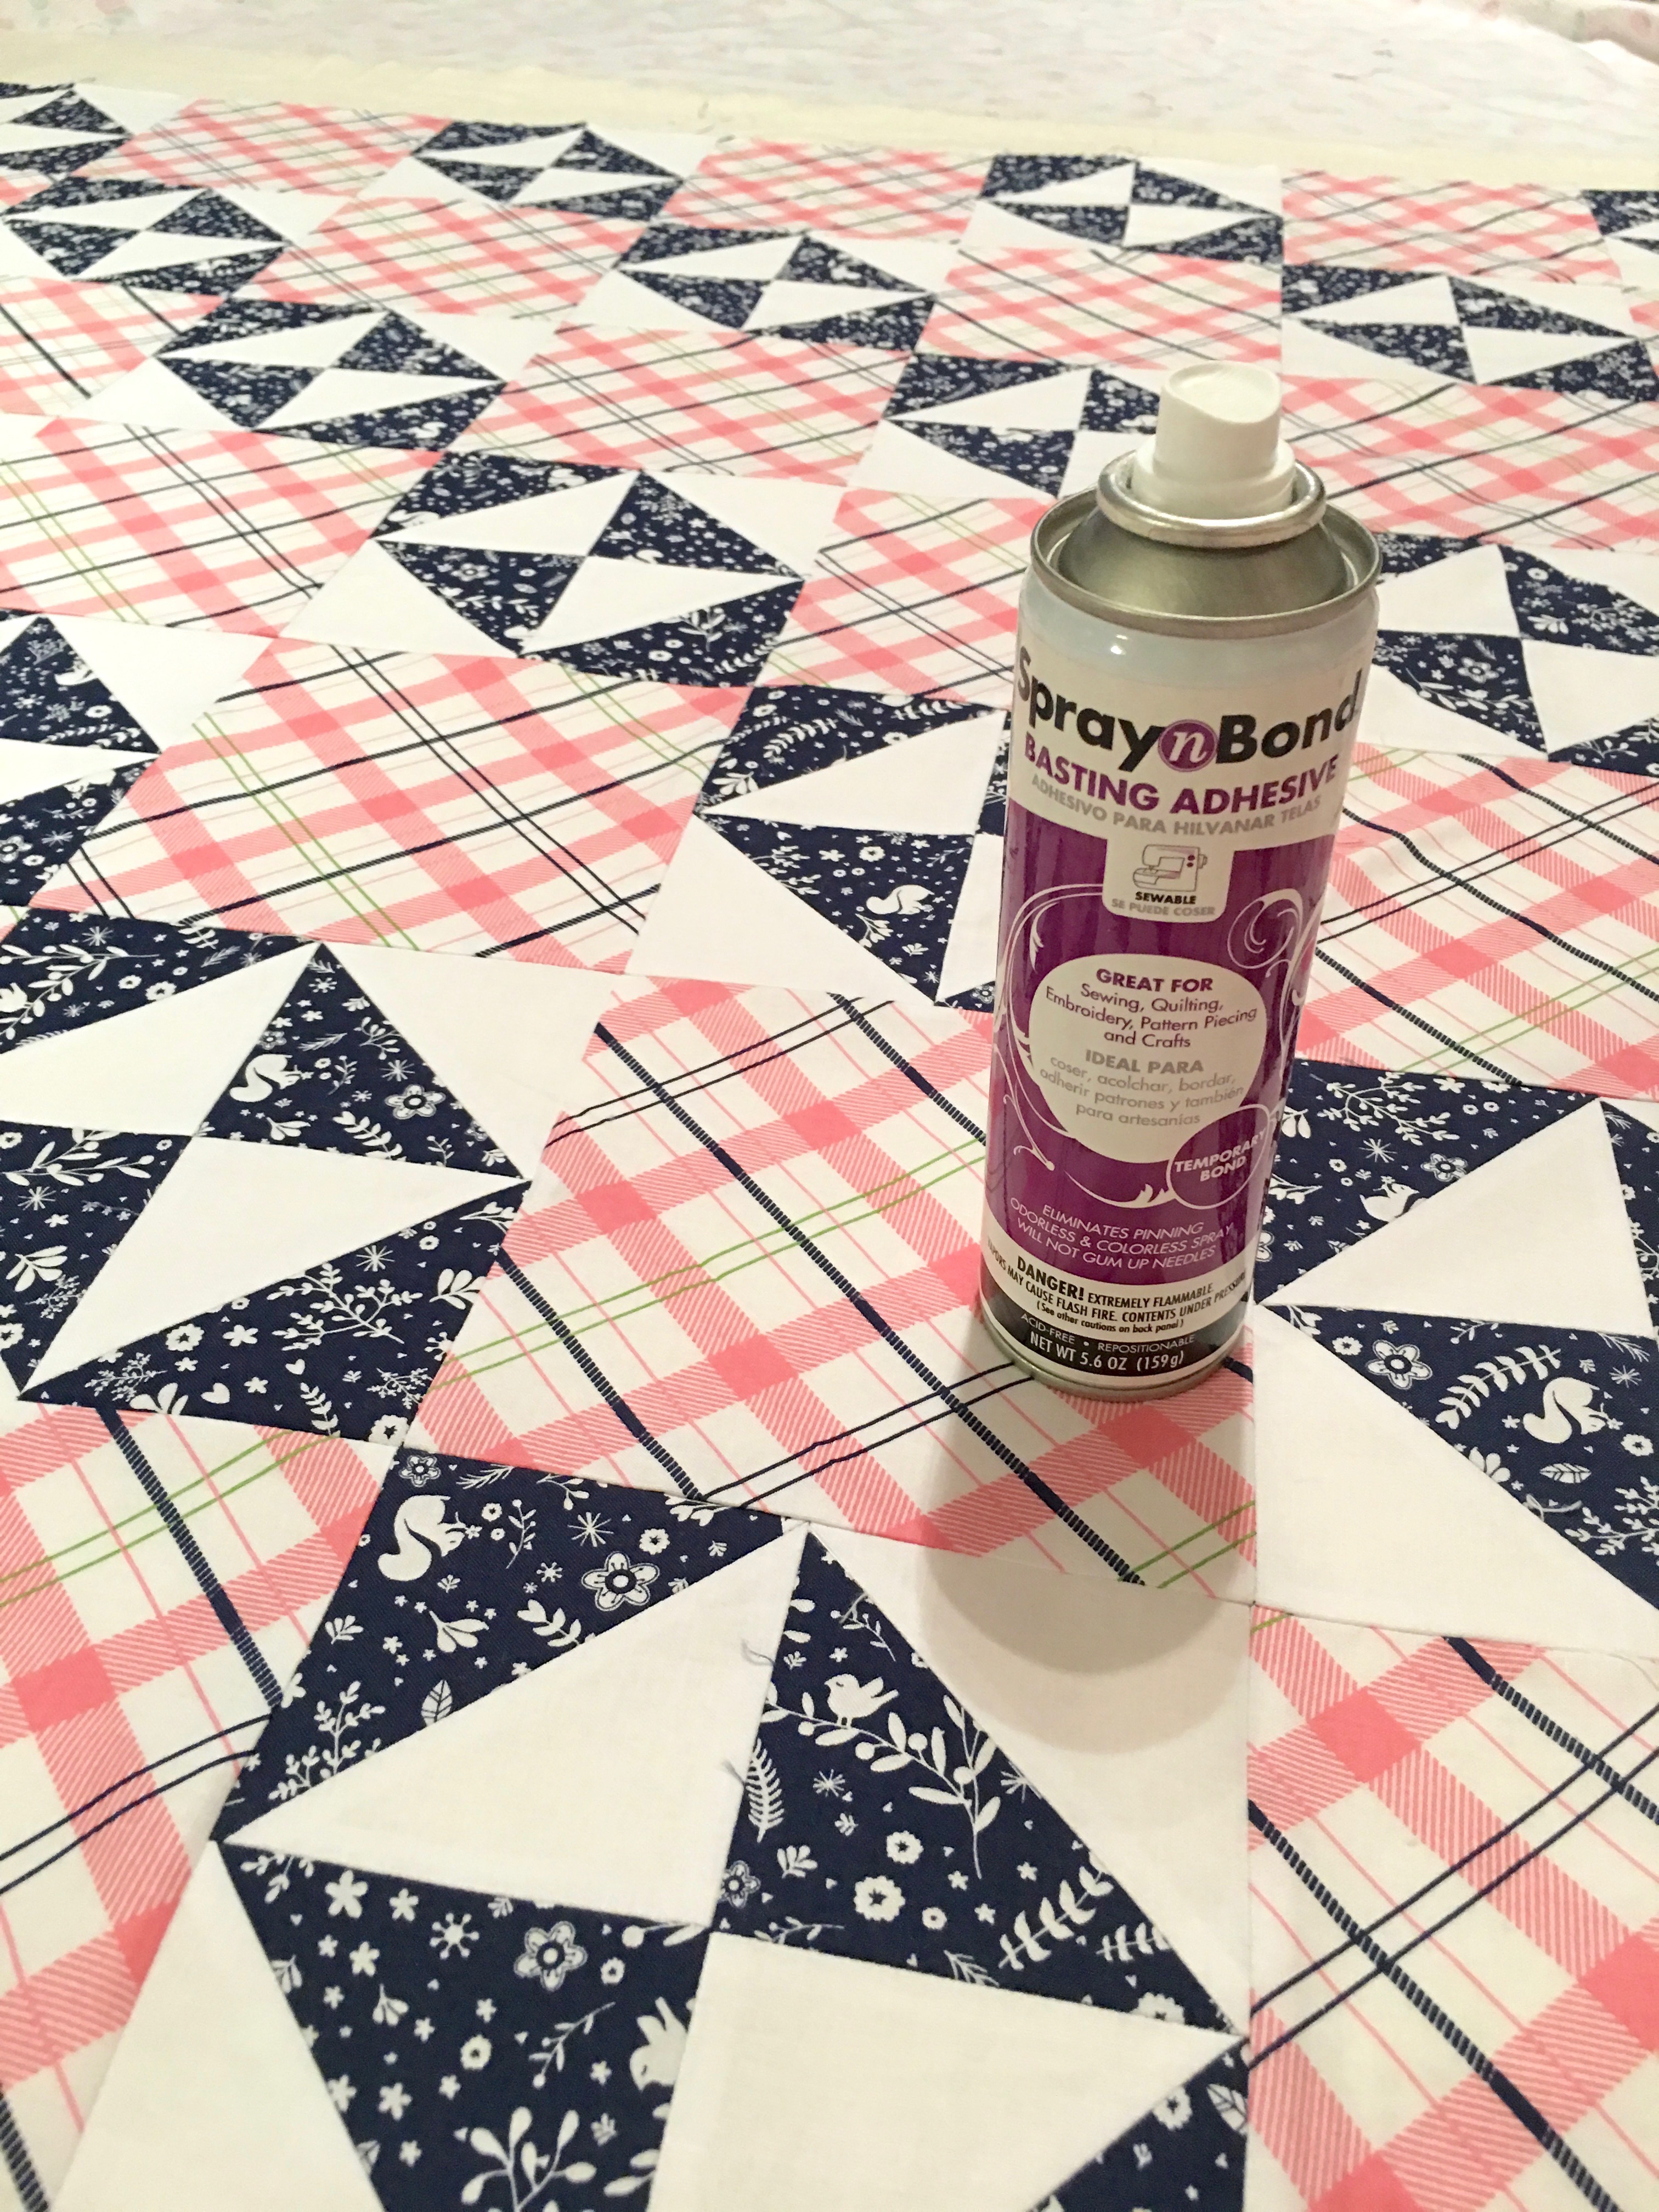
Baste (I always use Spray n Bond basting spray)
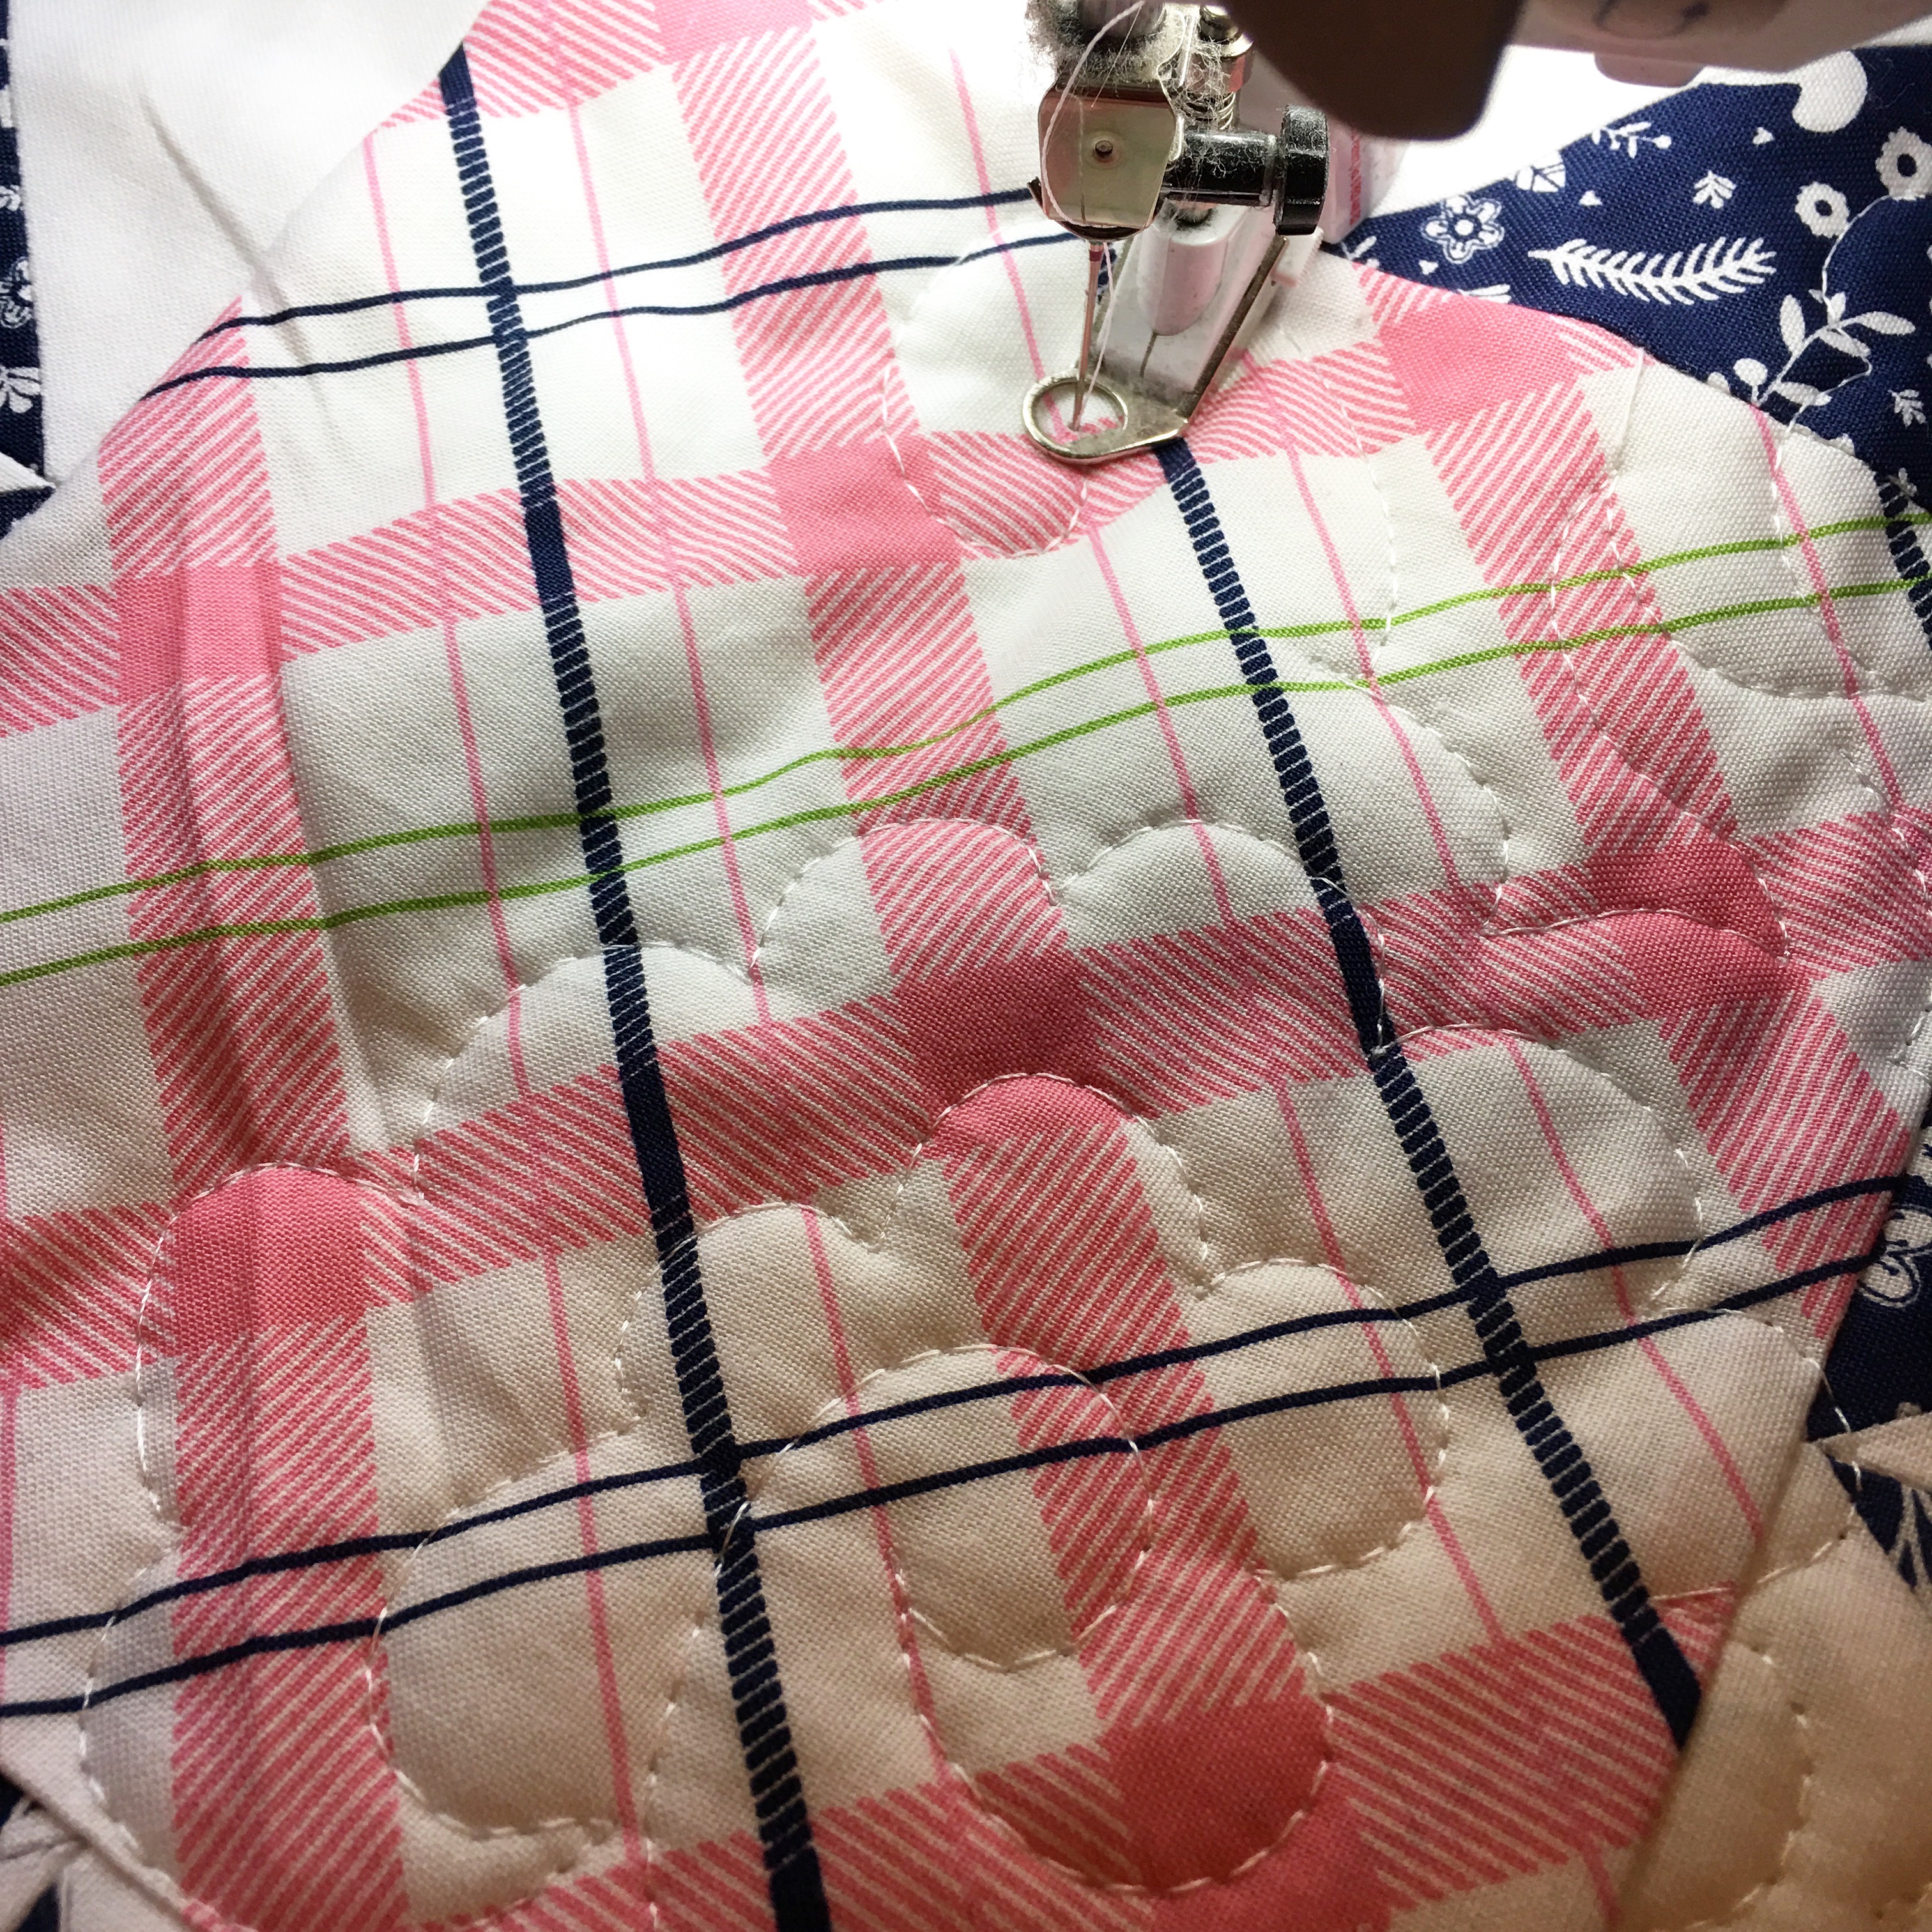
Quilt.
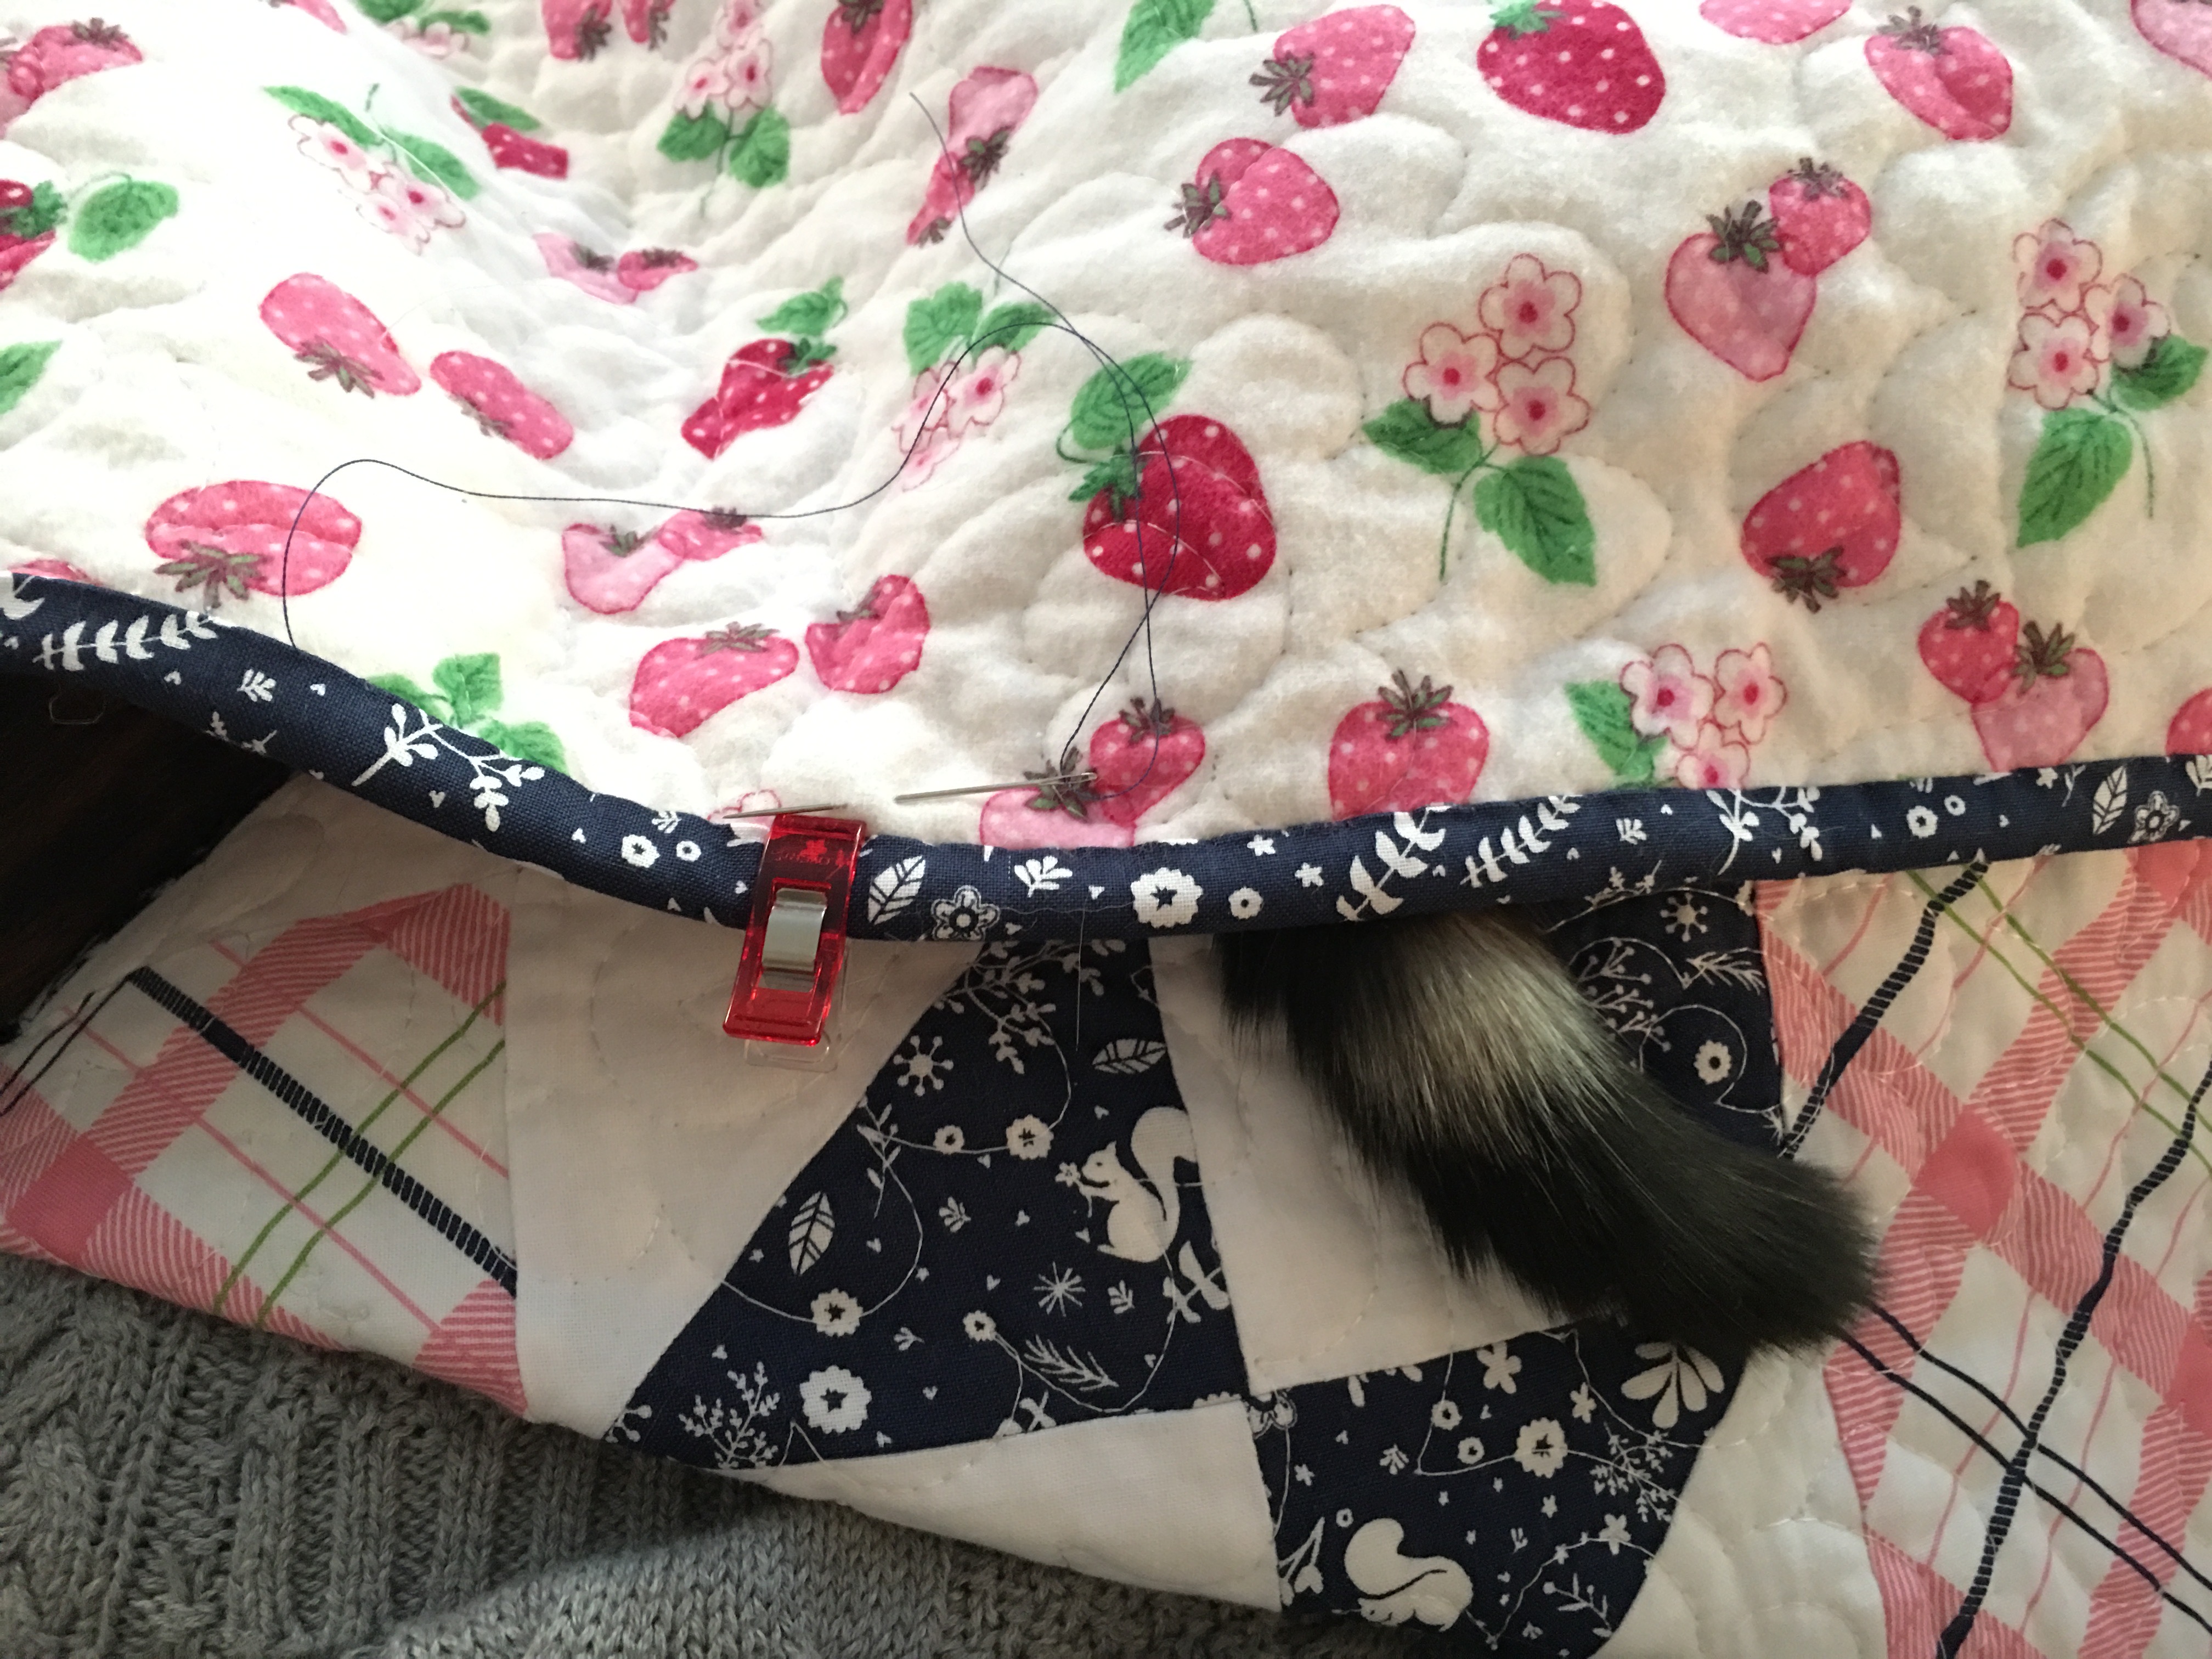
Bind.
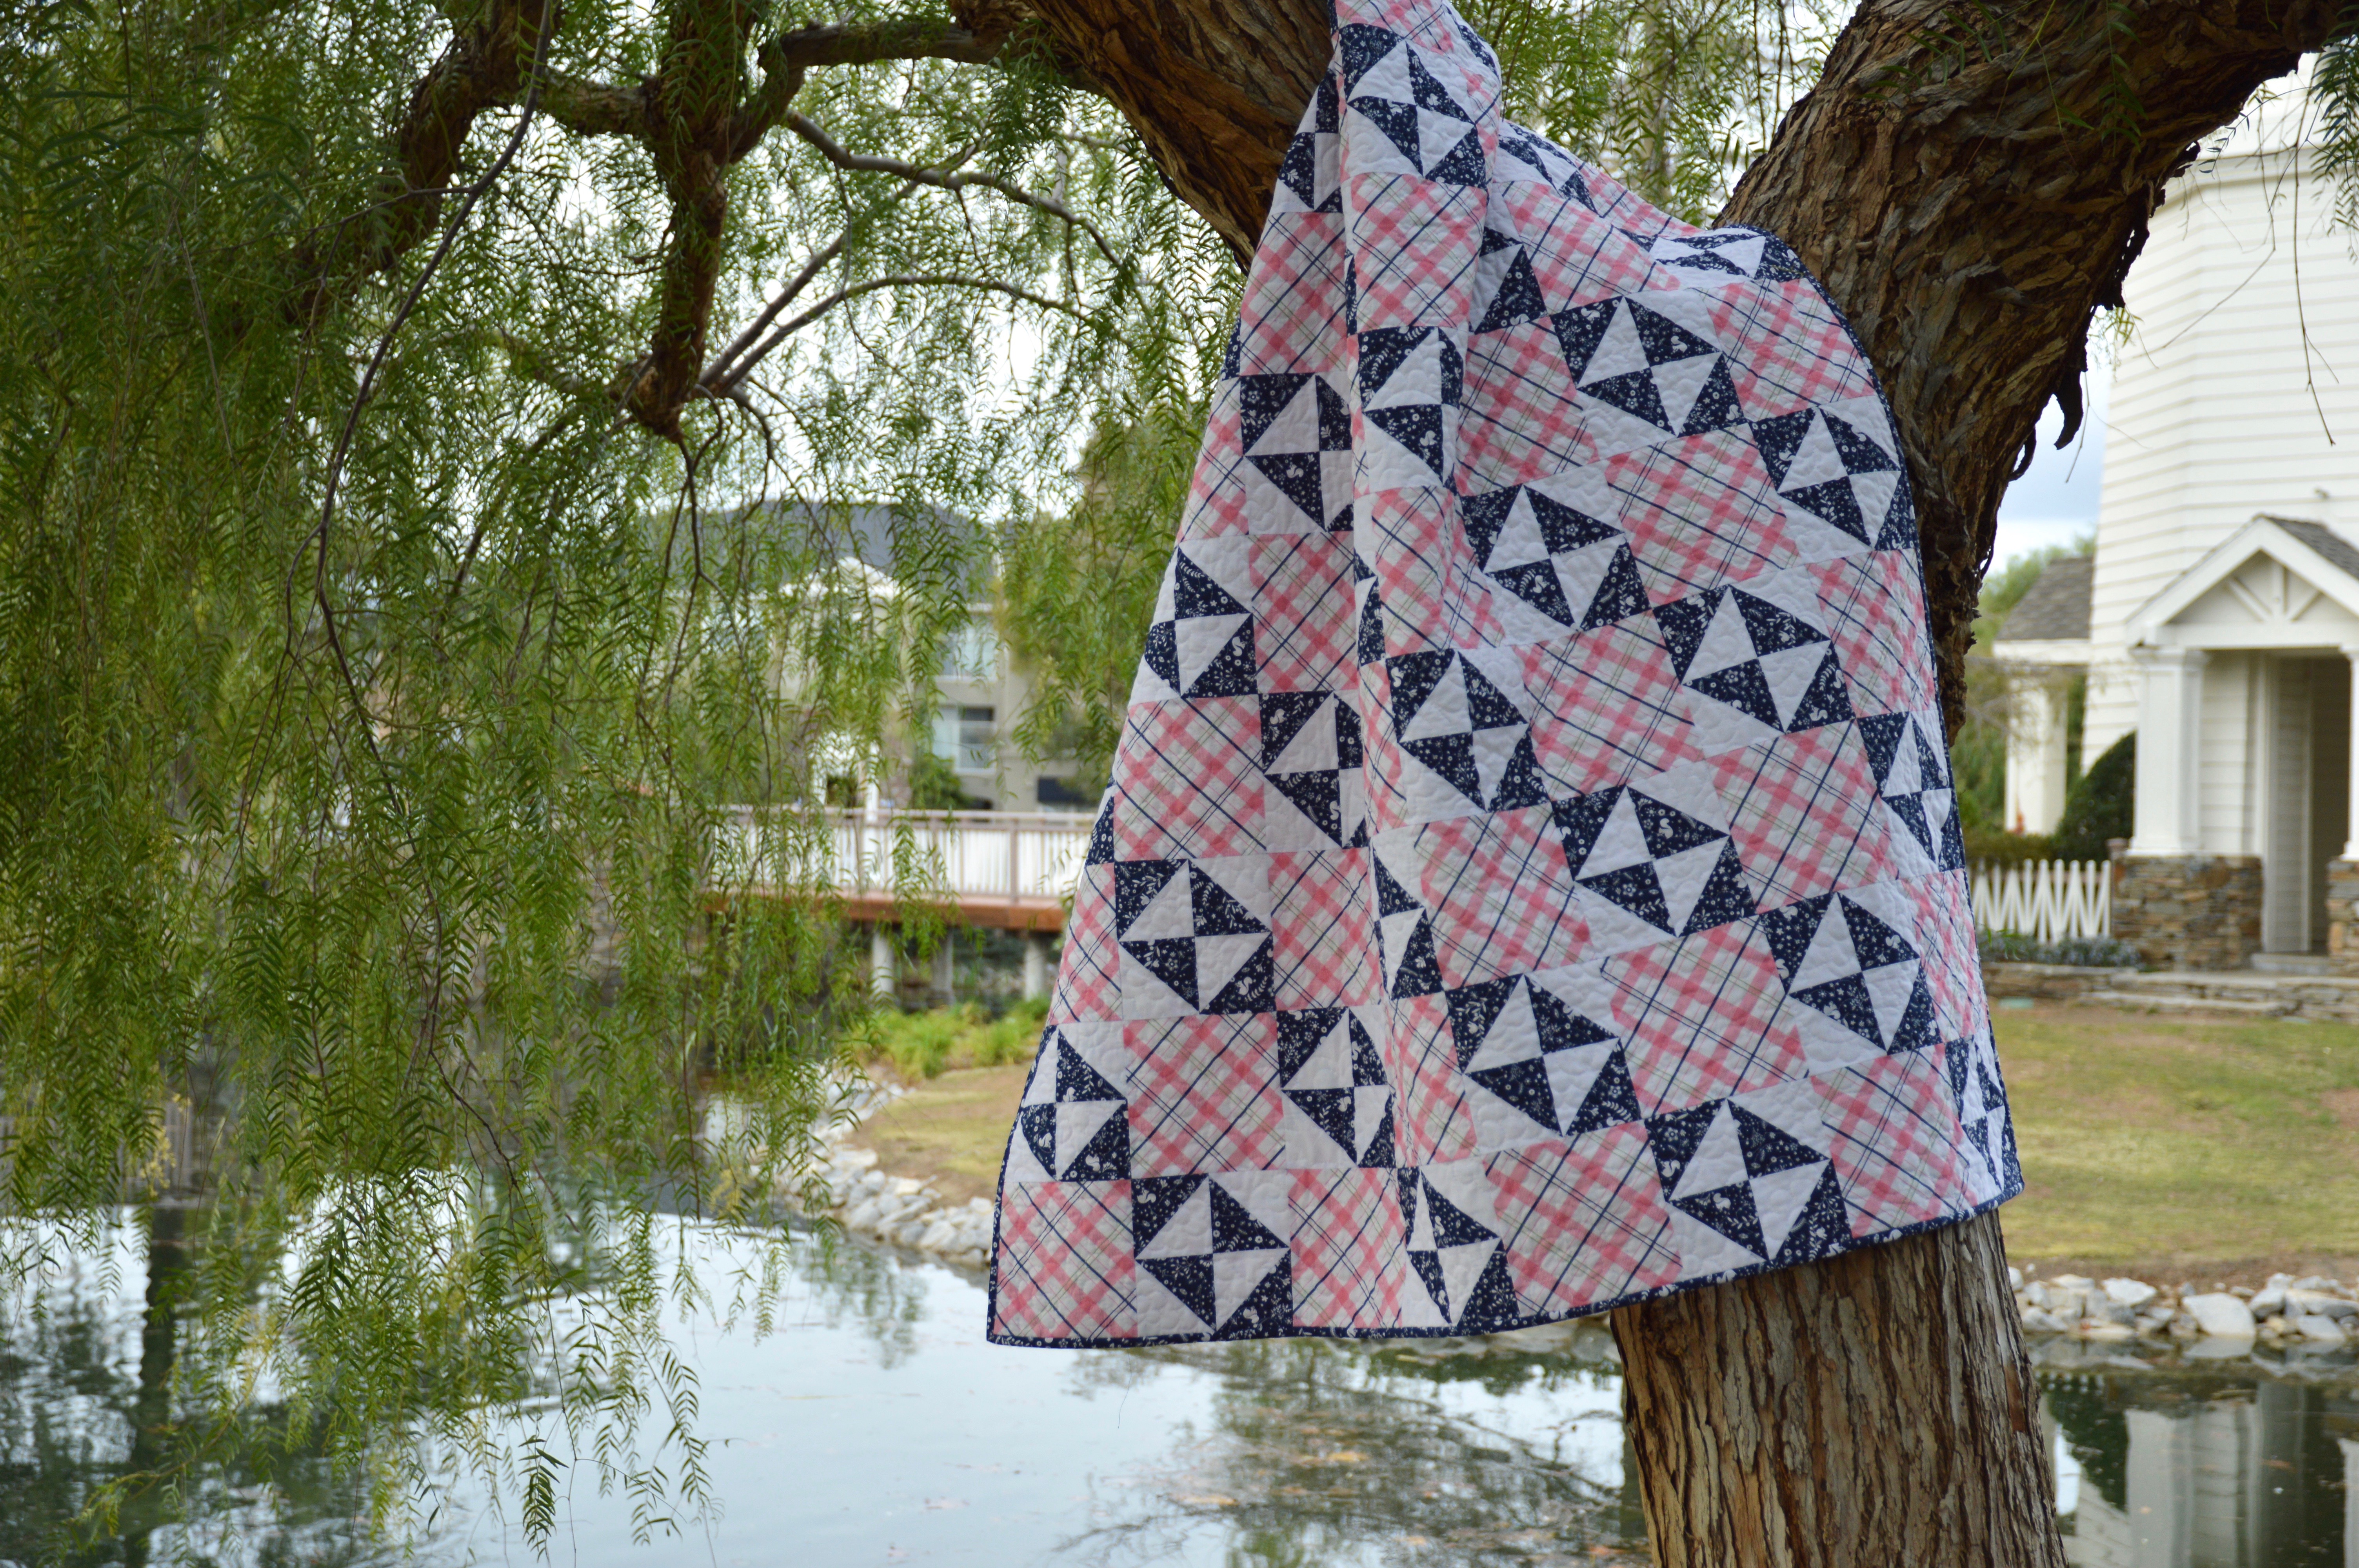
Love.
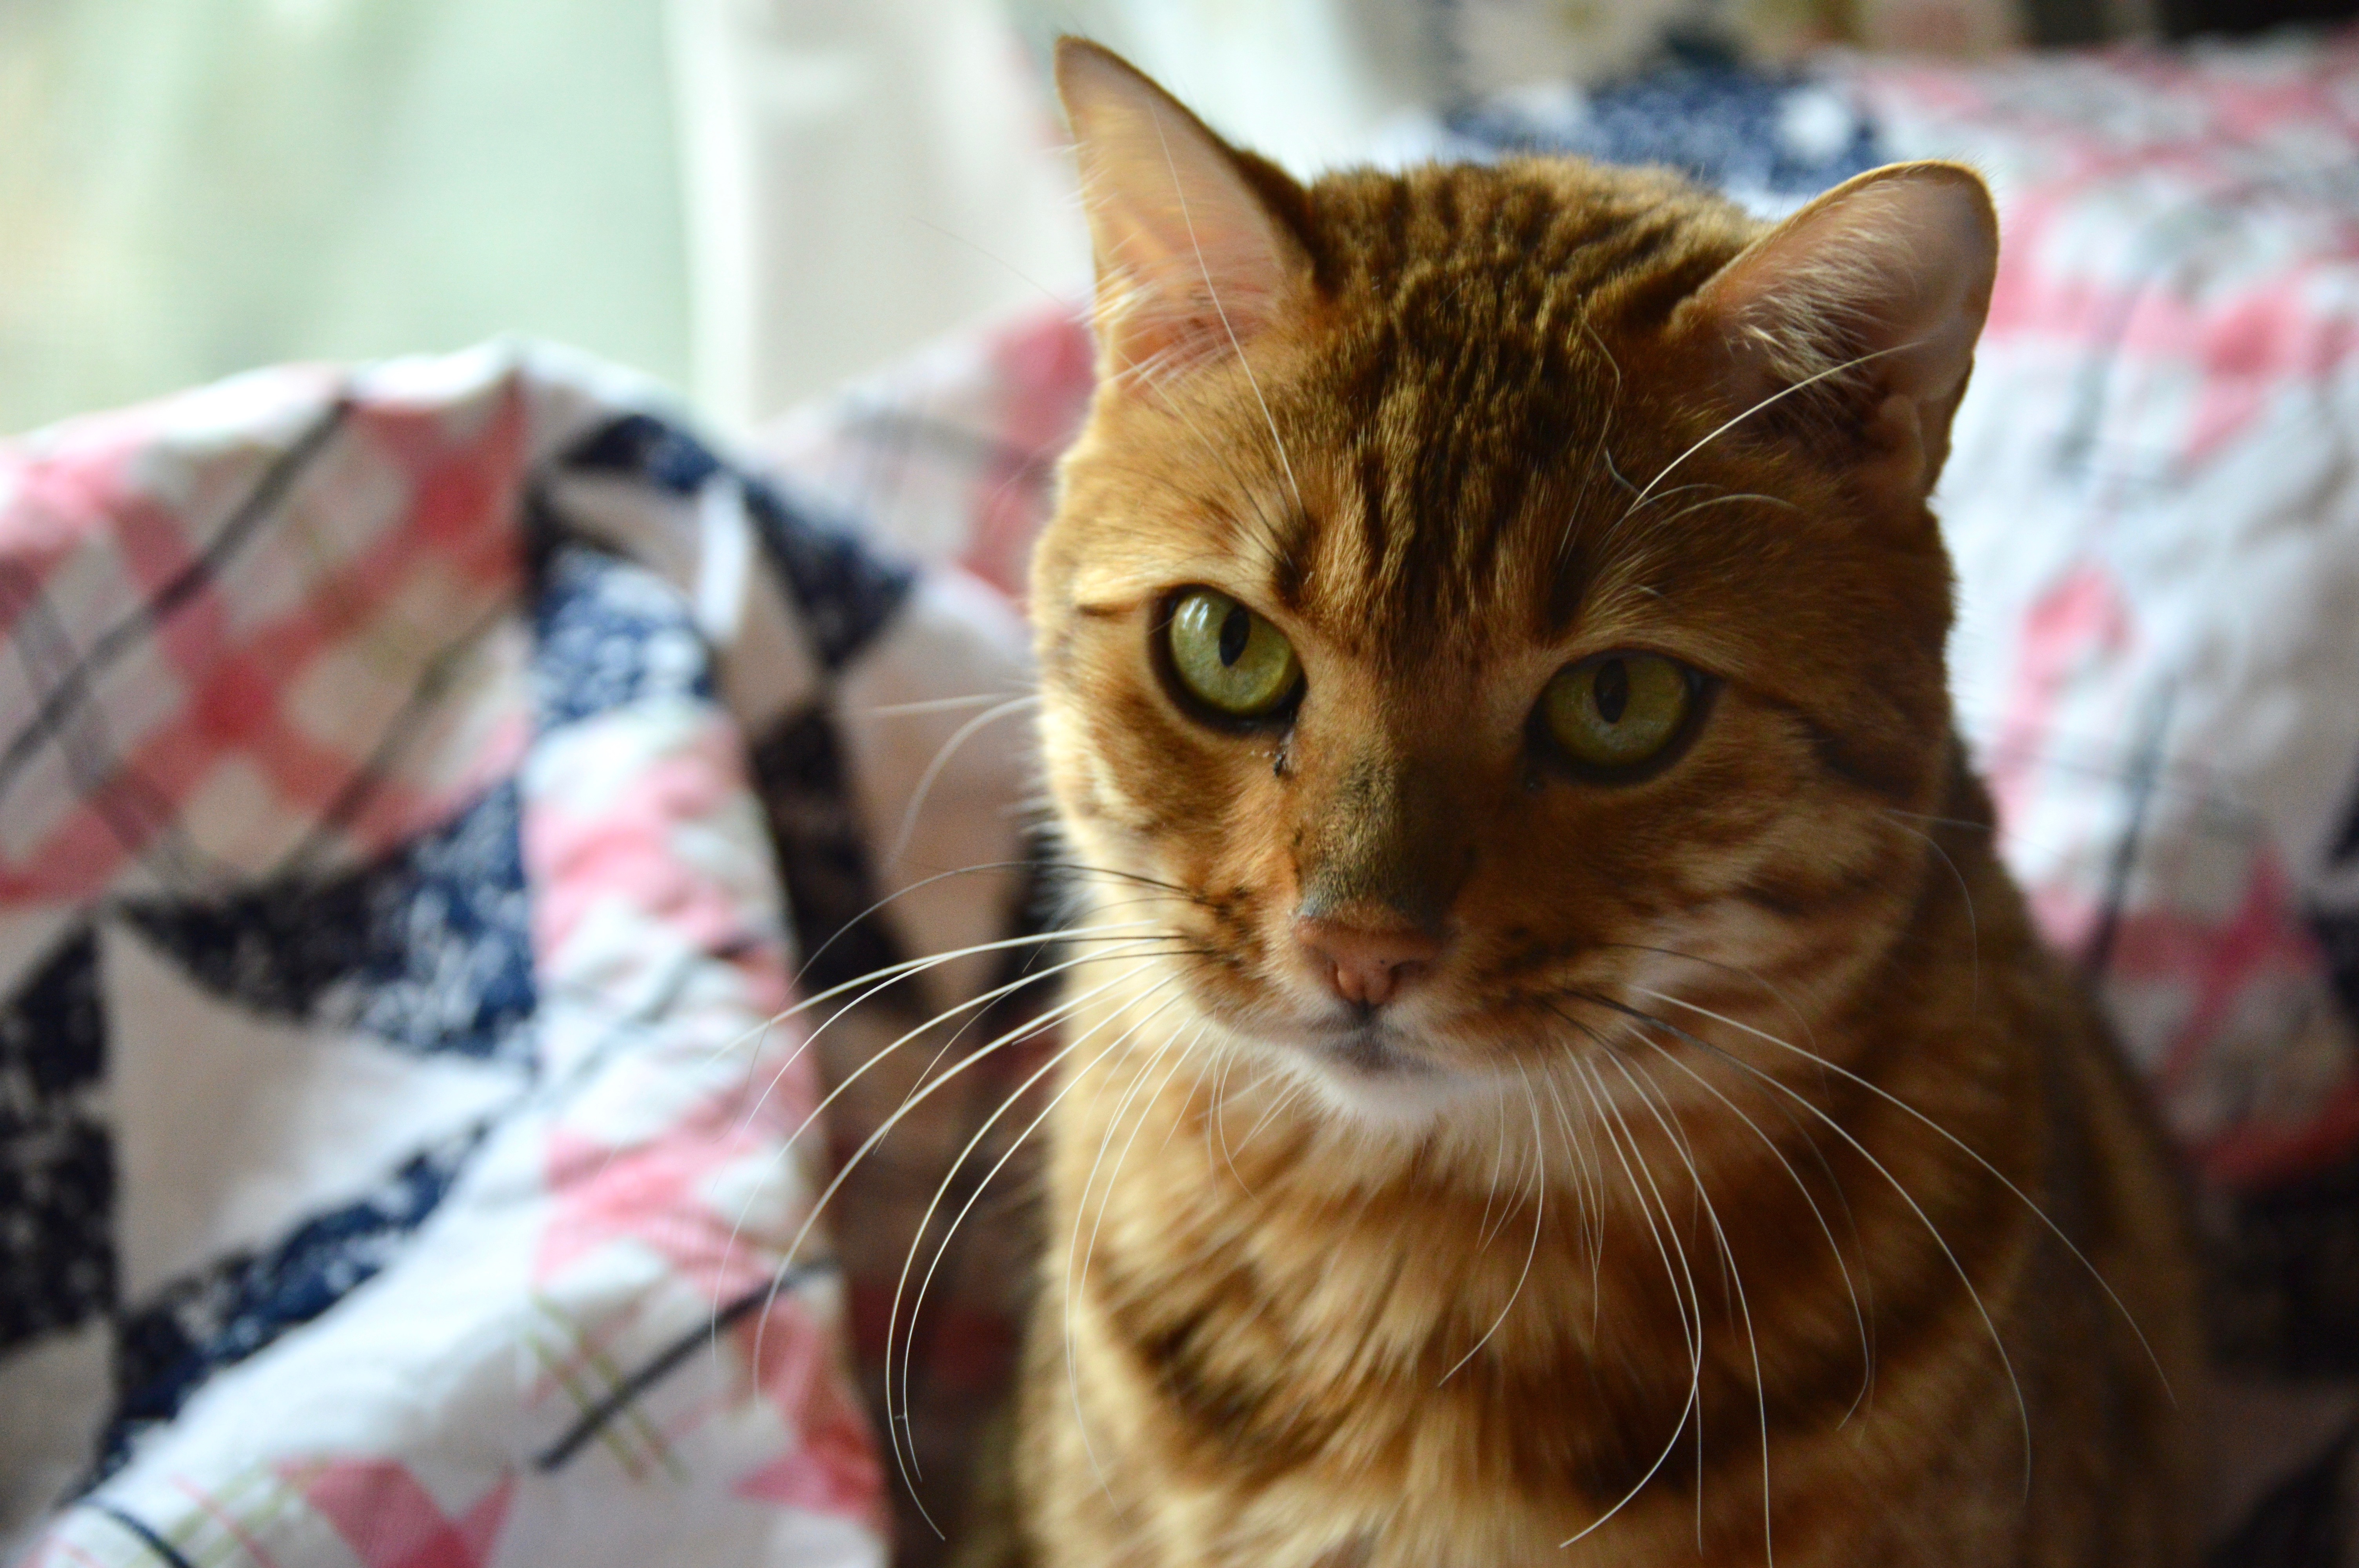
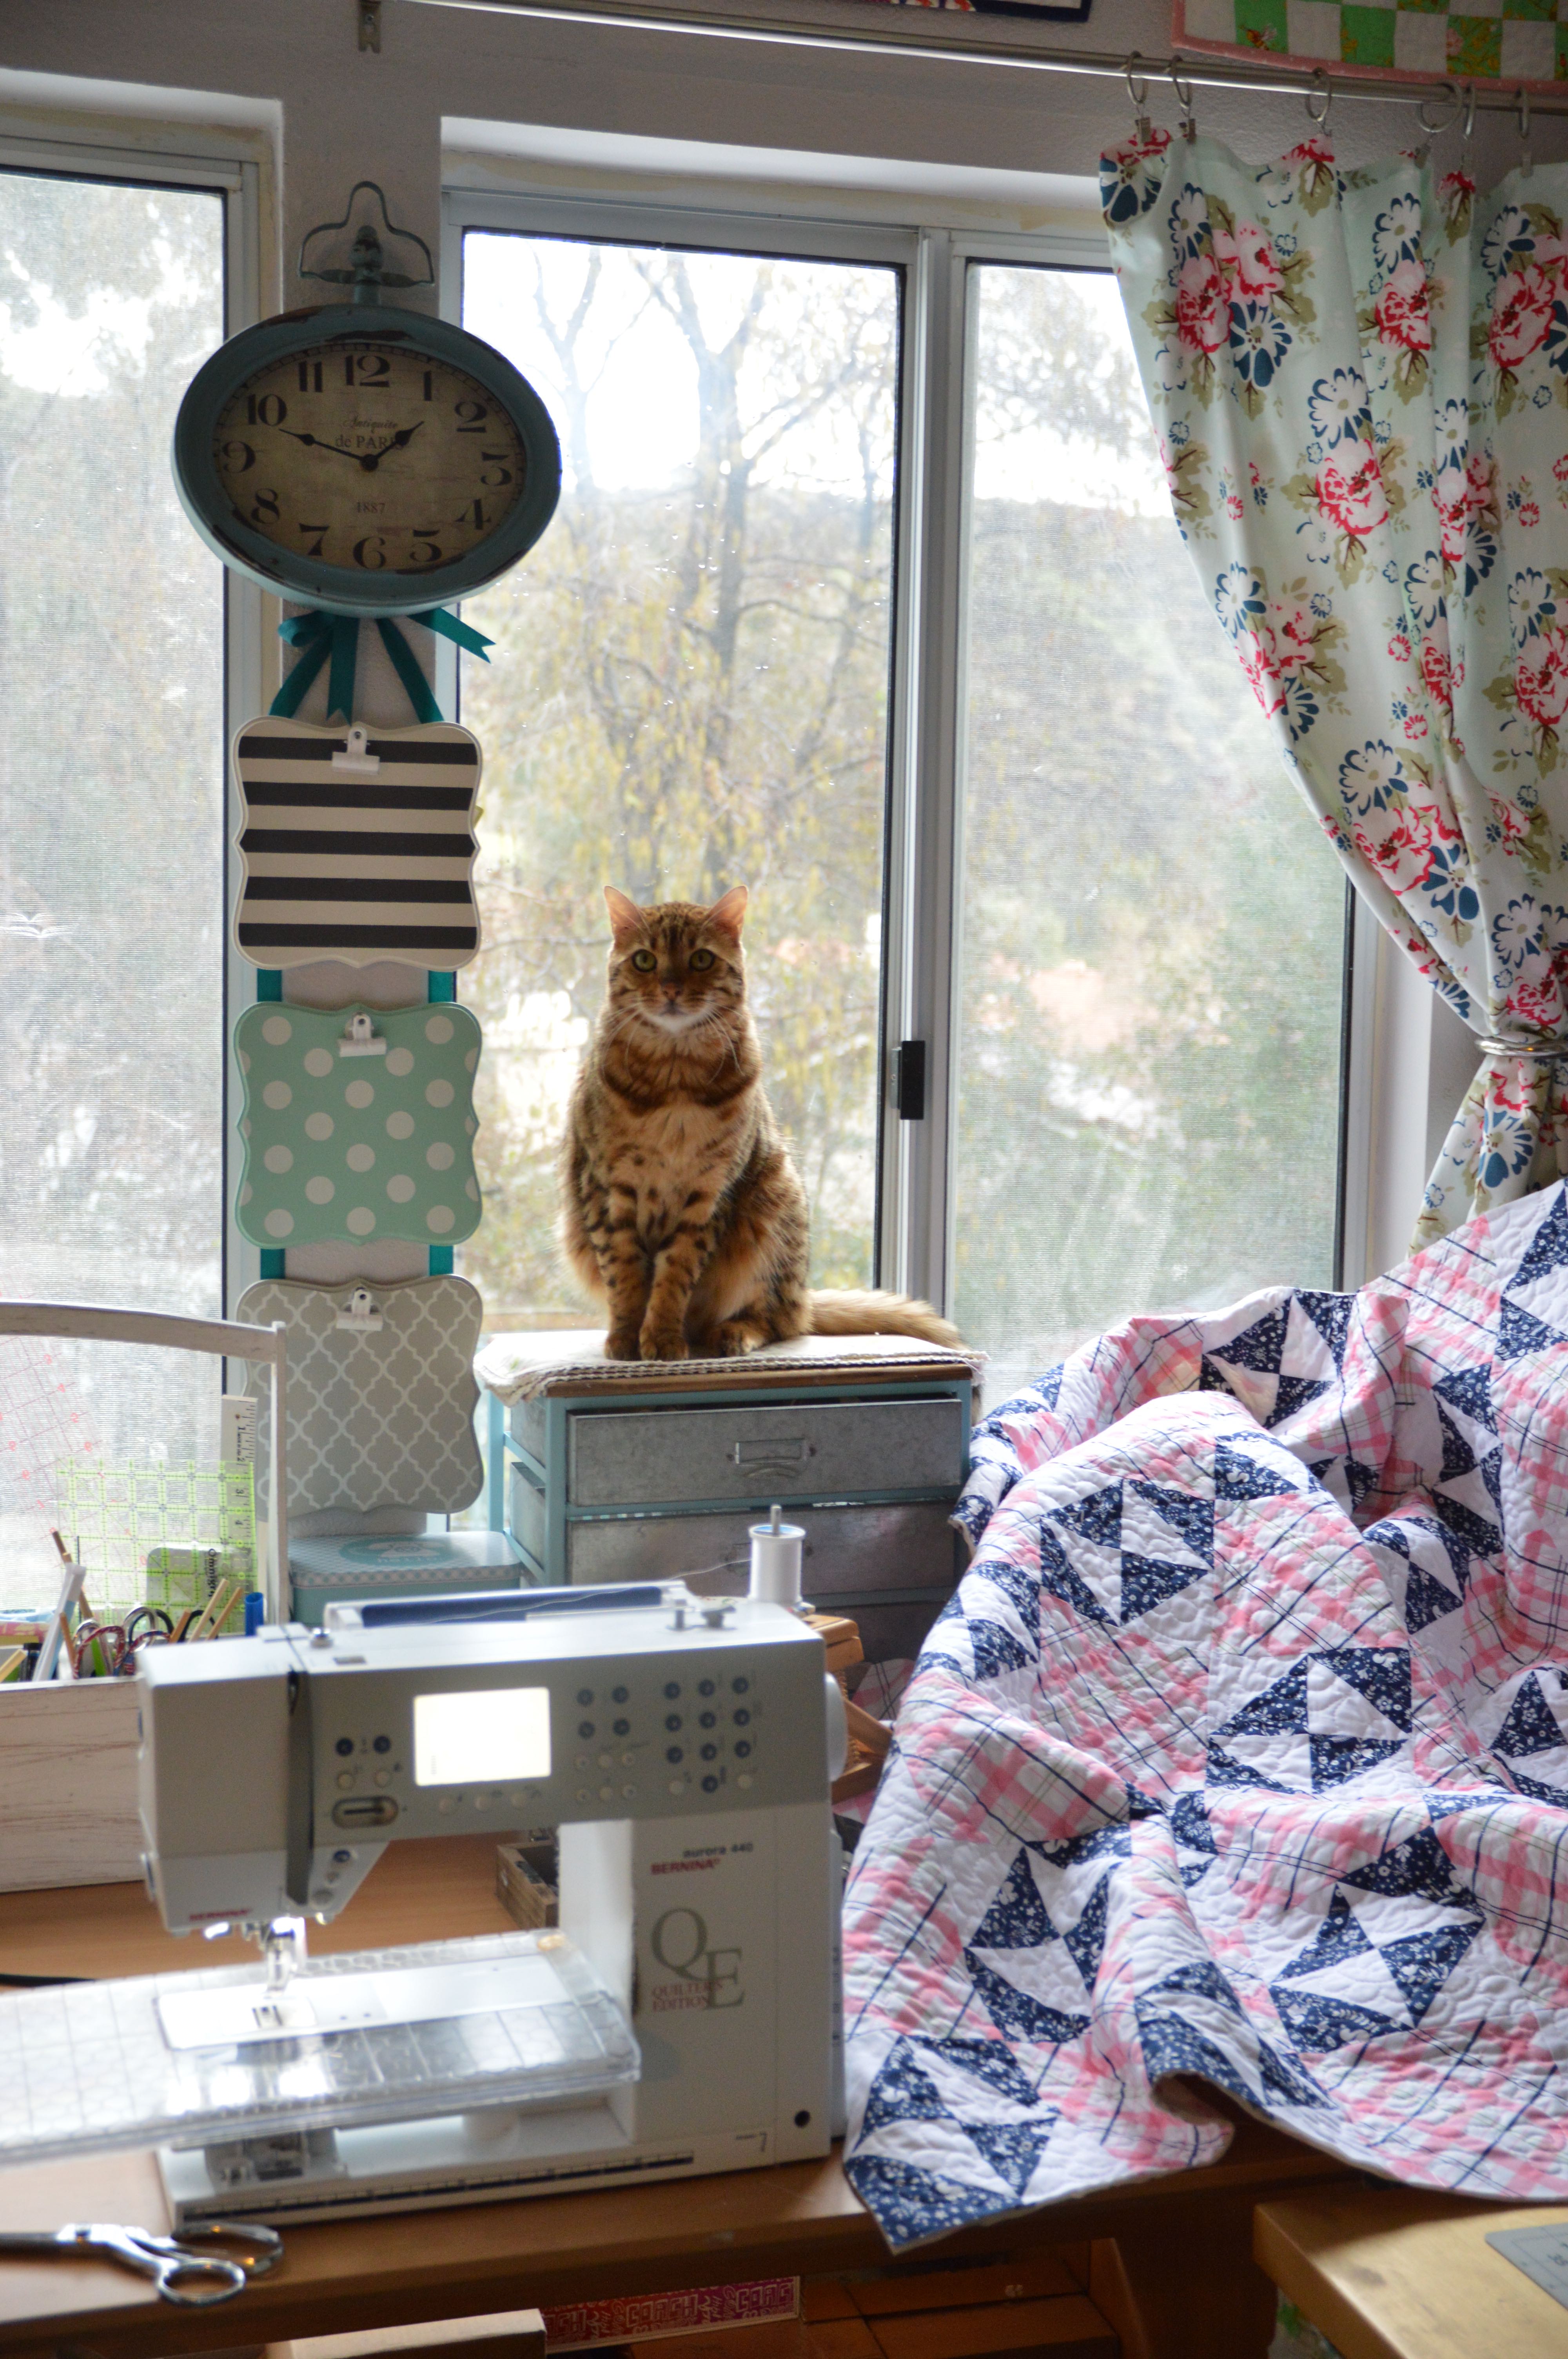
Mufasa and I love sewing on rainy days!!
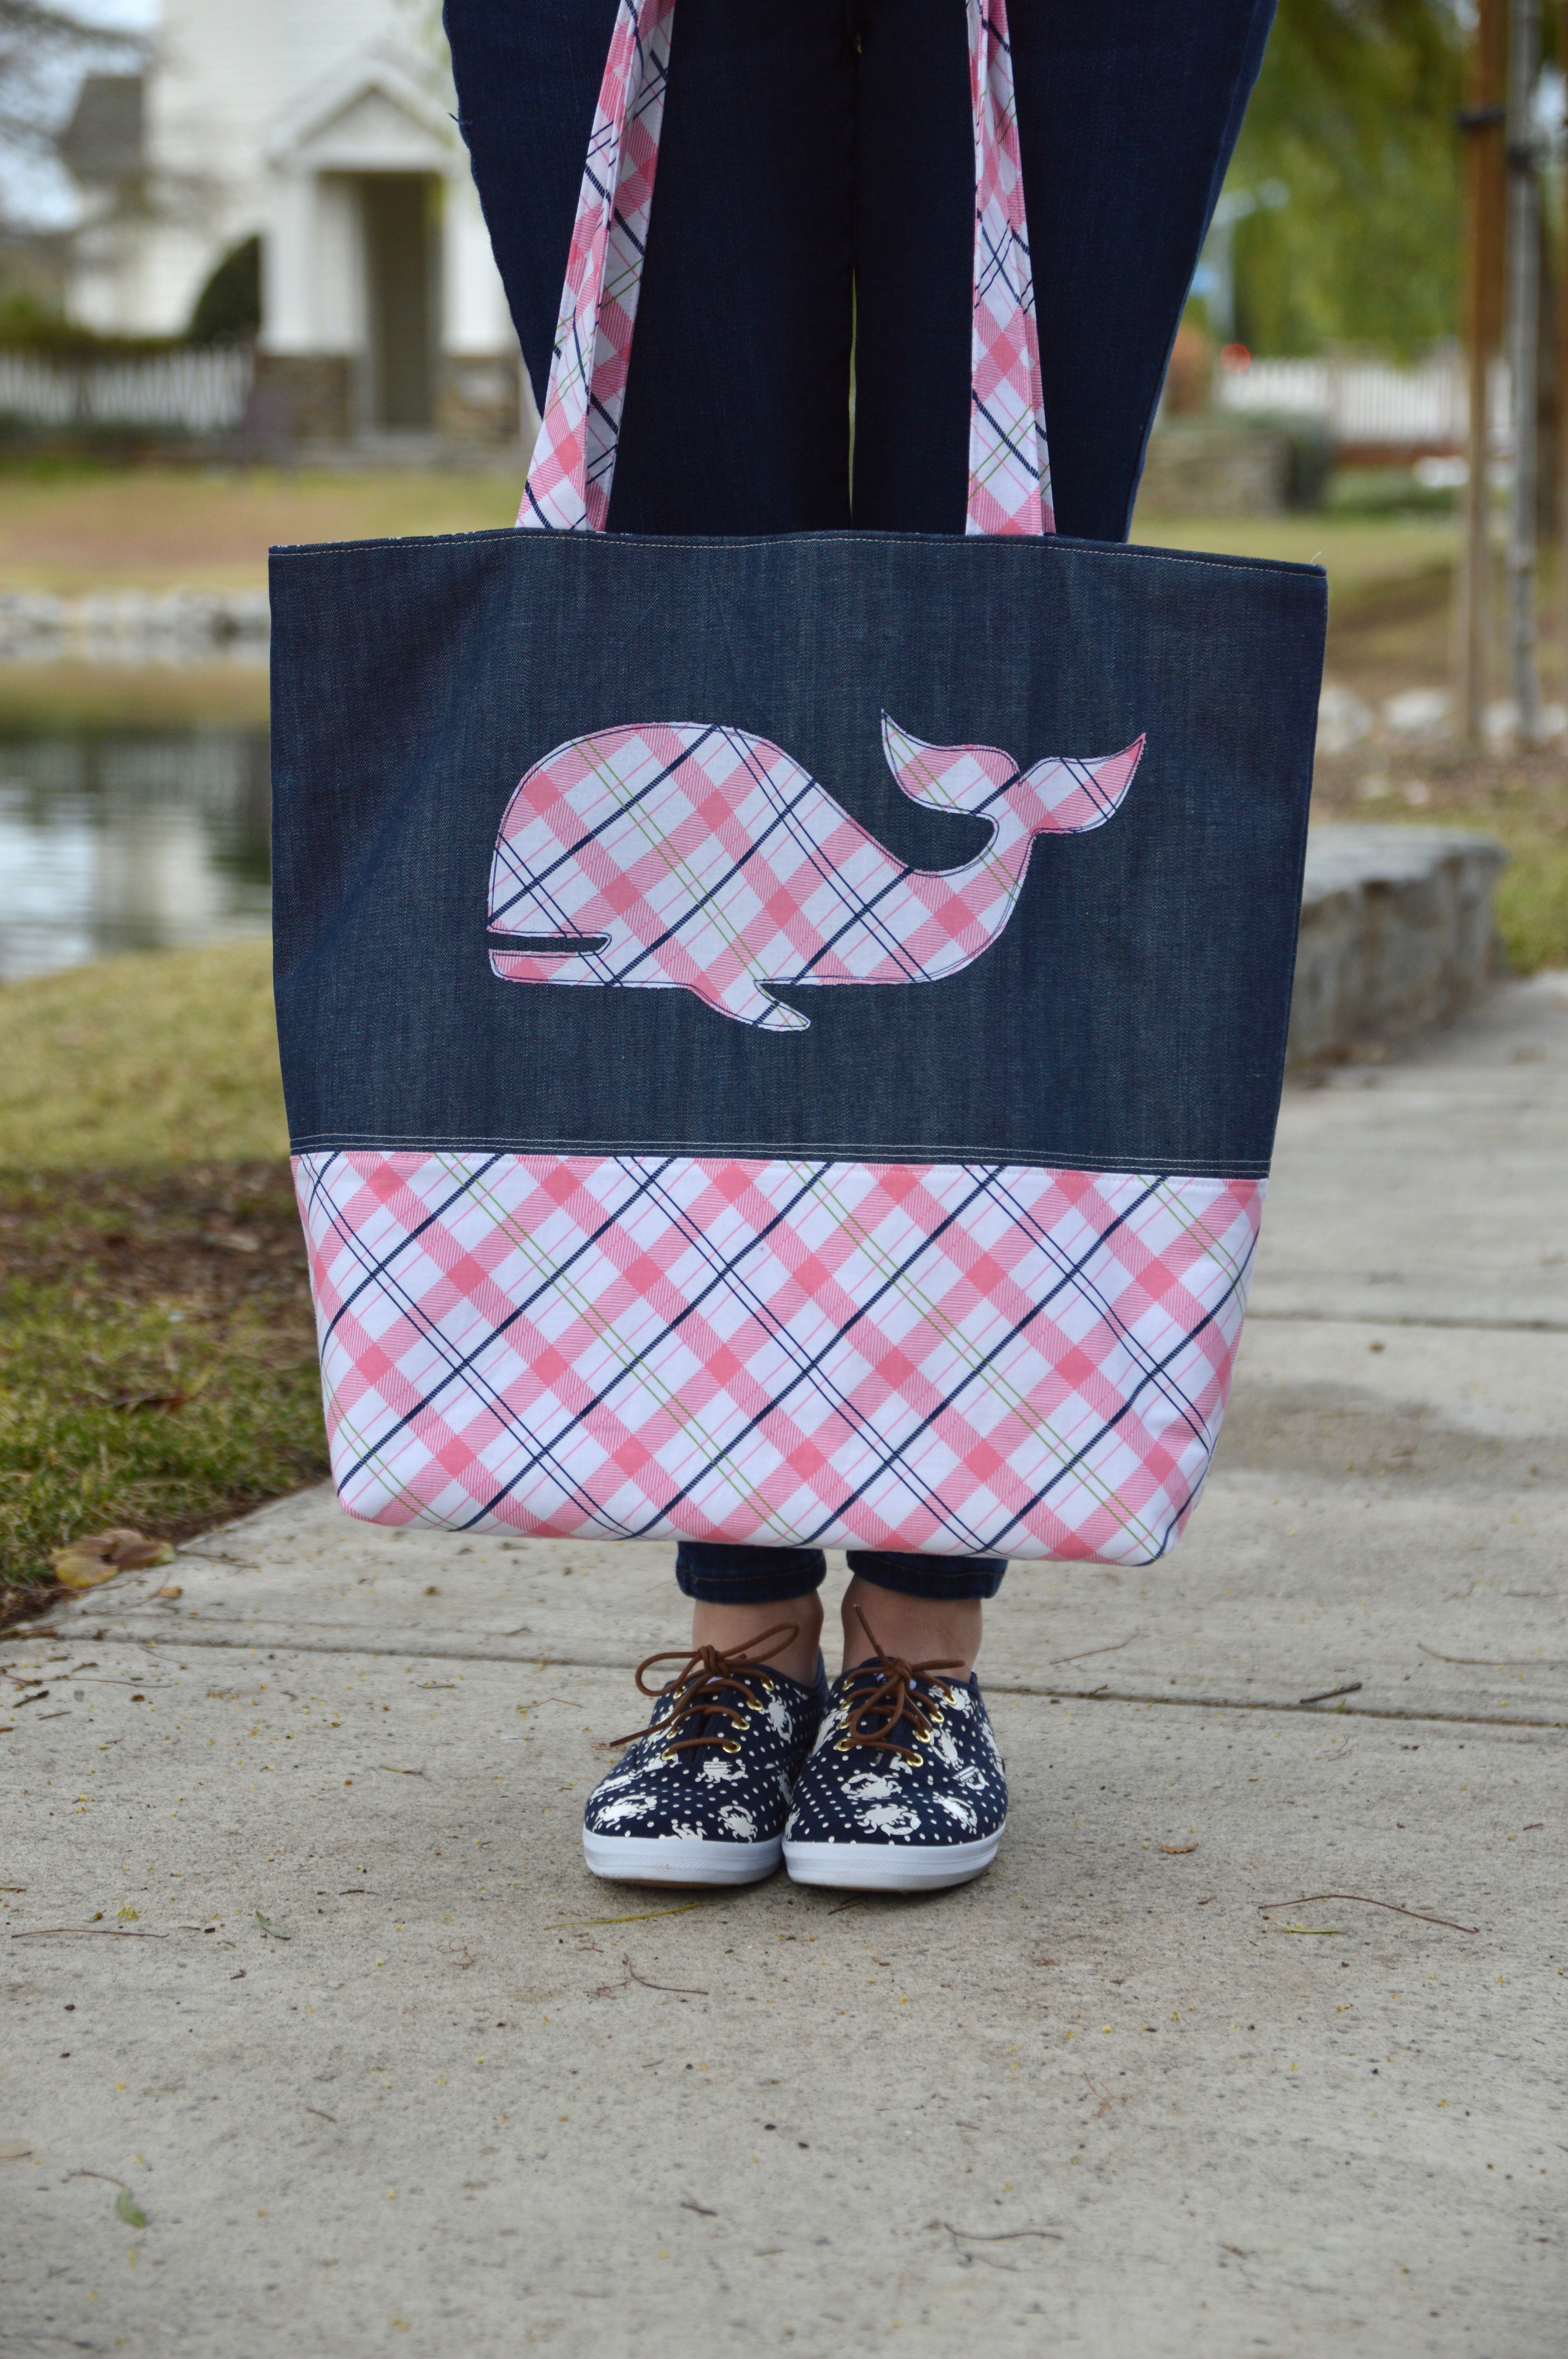
Tote Bag Instructions
I used my pattern, Quilted Tote Bag, for the measurements. I followed the pattern pretty closely with the following exceptions:
- I added an appliqué to the main bag.
- I used denim.
- I did not quilt the bag; I stabilized it with fusible fleece.
- I came up with a new way to sew the handles (continue reading)
- I omitted the inside pocket
- I simplified how to make the bag bottom
Supplies
Denim (2) 20″ x 10.5″
Plaid (2) 20″ x 9.5″
Lining (2) 20″ x 19.5″
Plaid for handles (2) 5″ x 28″
Heat n bond medium stabilizer (2) 5″ x 28″
Heat n Bond Fusible Fleece (2) 20″ x 19.5″
Piece of plaid for the whale
Heat n Bond Lite
Appliqué the whale Click HERE for the whale pattern.
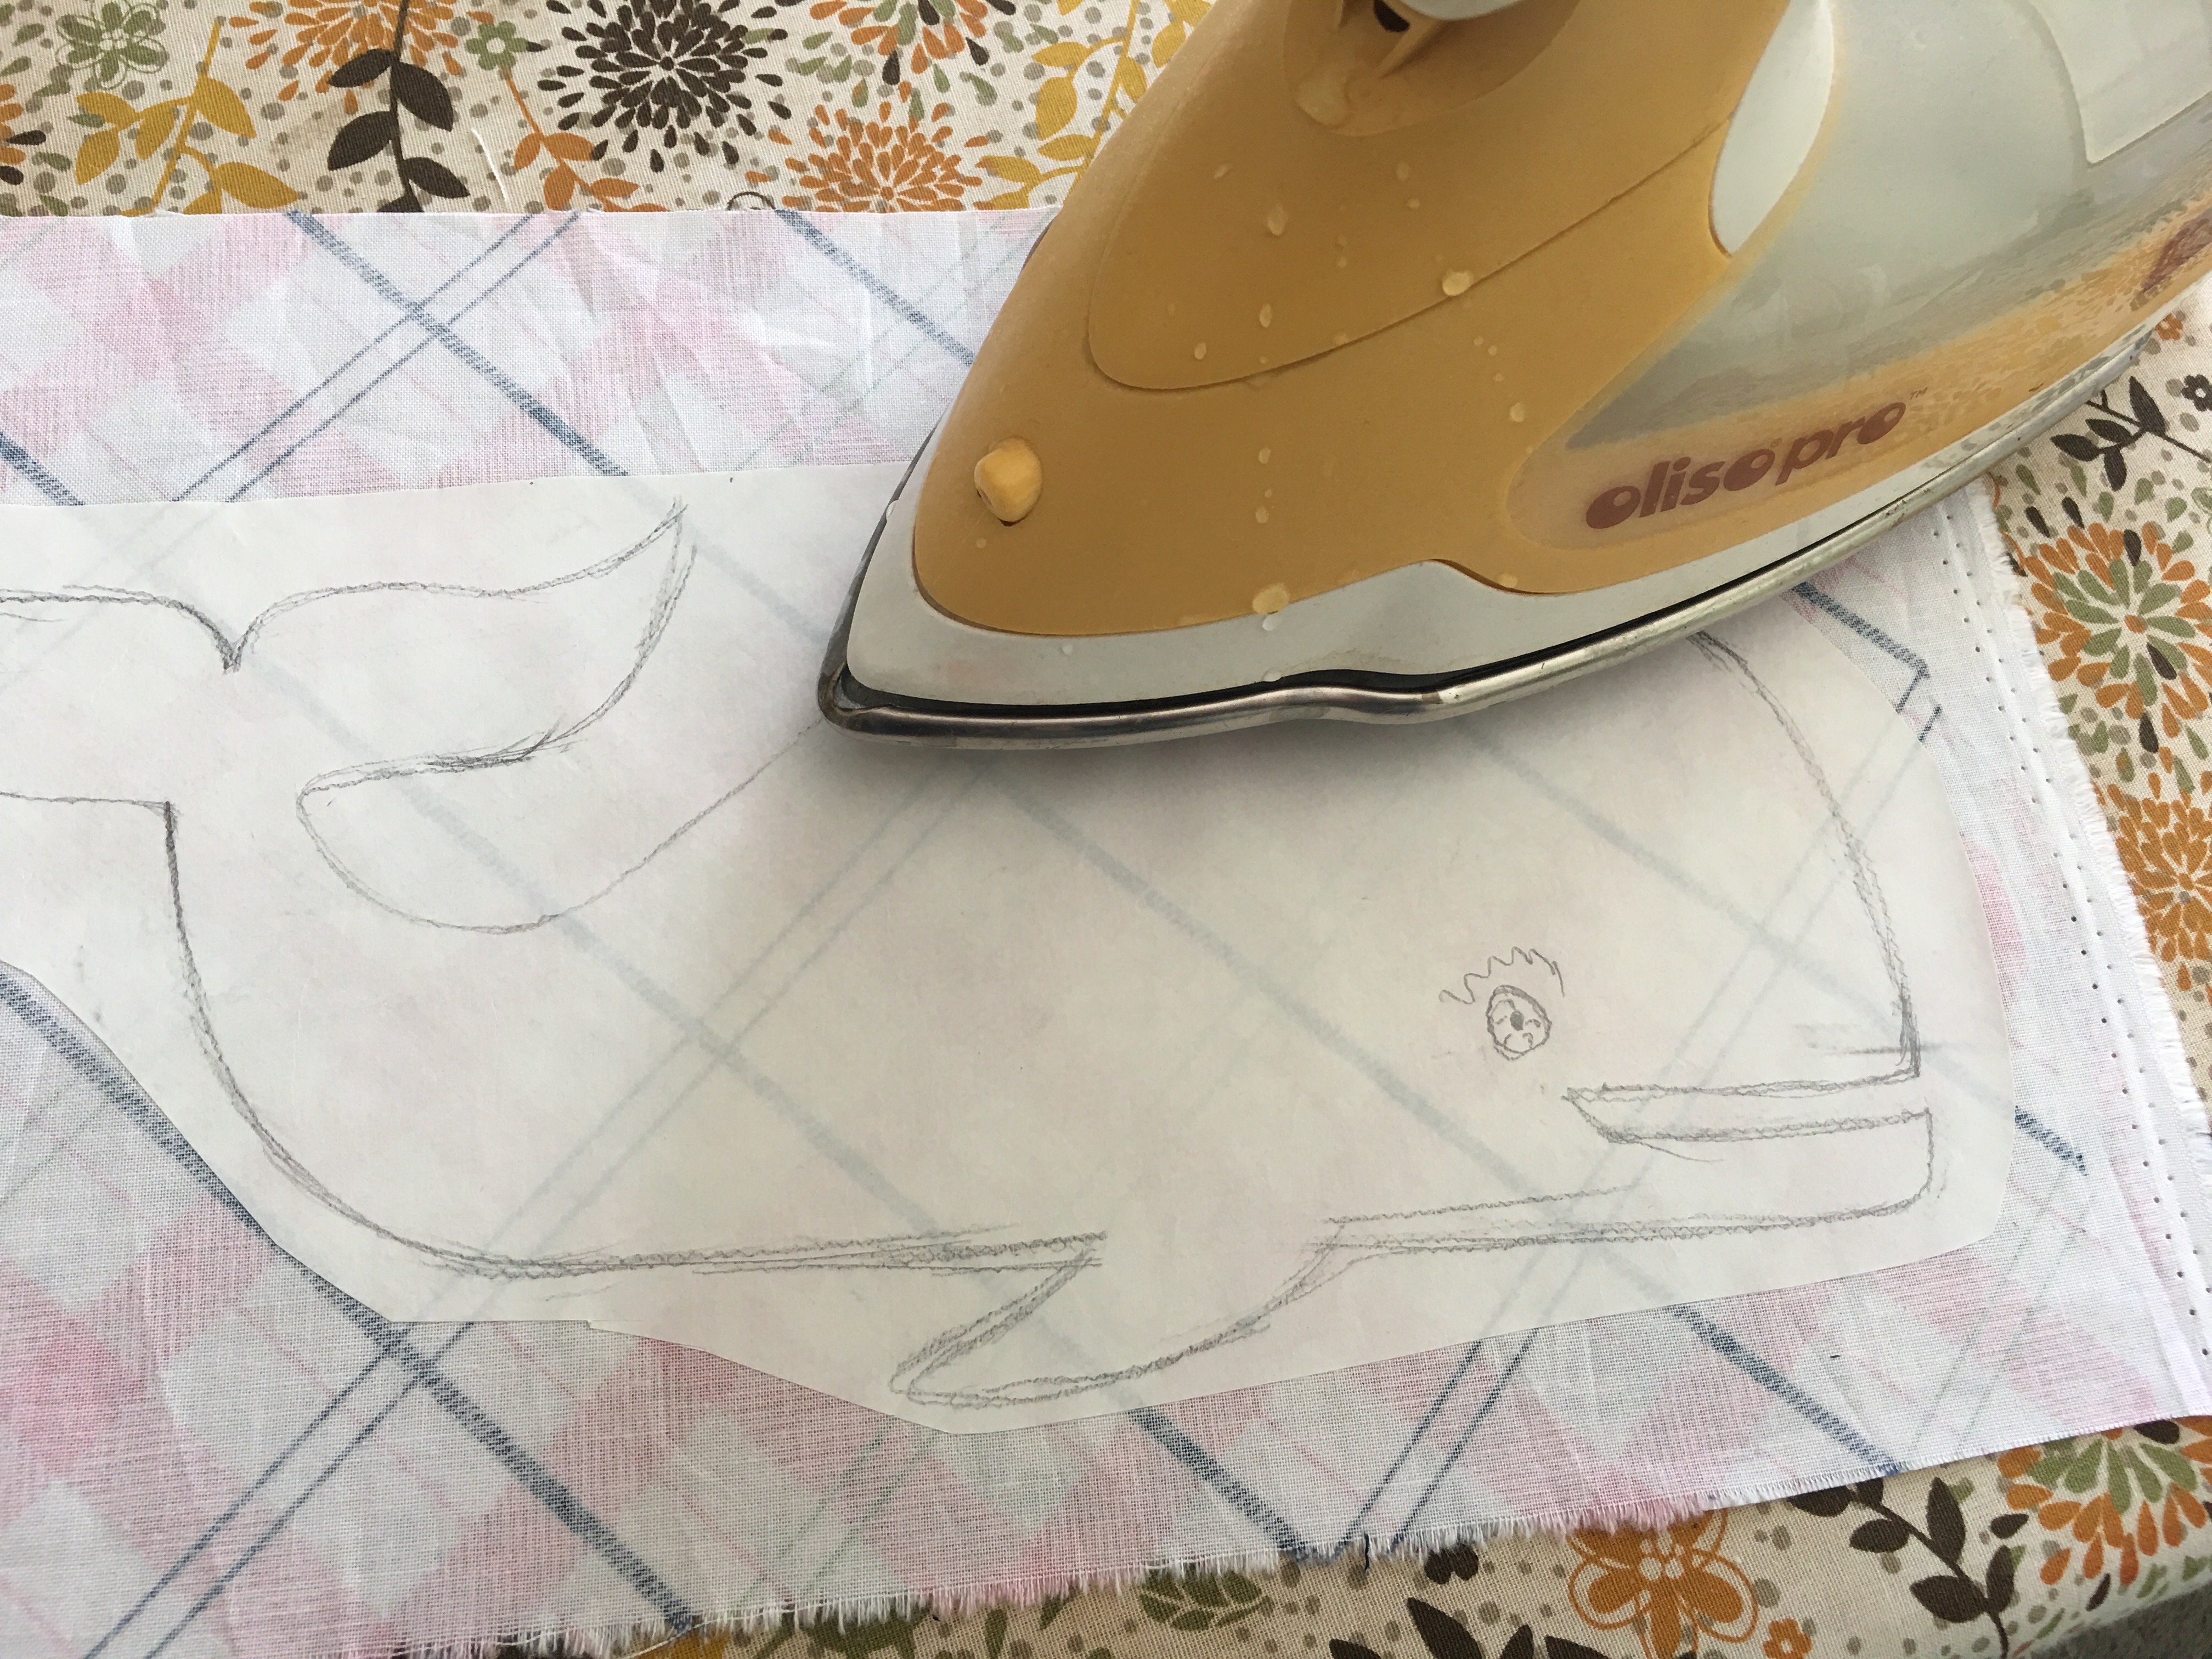
You can print the whale directly on Heat n Bond Lite EZ print sheets, or trace the whale onto Heat n Bond Lite.
Heat set the whale to the wrong side of the plaid fabric.
Cut out the whale. Peel off the backing paper.

Press it onto one of the denim pieces, centering. Using 1/4″ seams, sew the denim piece to the plaid piece to make the bag front and back. Press seams.
Fuse the Heat n Bond Fusible fleece to the wrong side of the bag front and the bag back. Add some accent stitching along the seam.
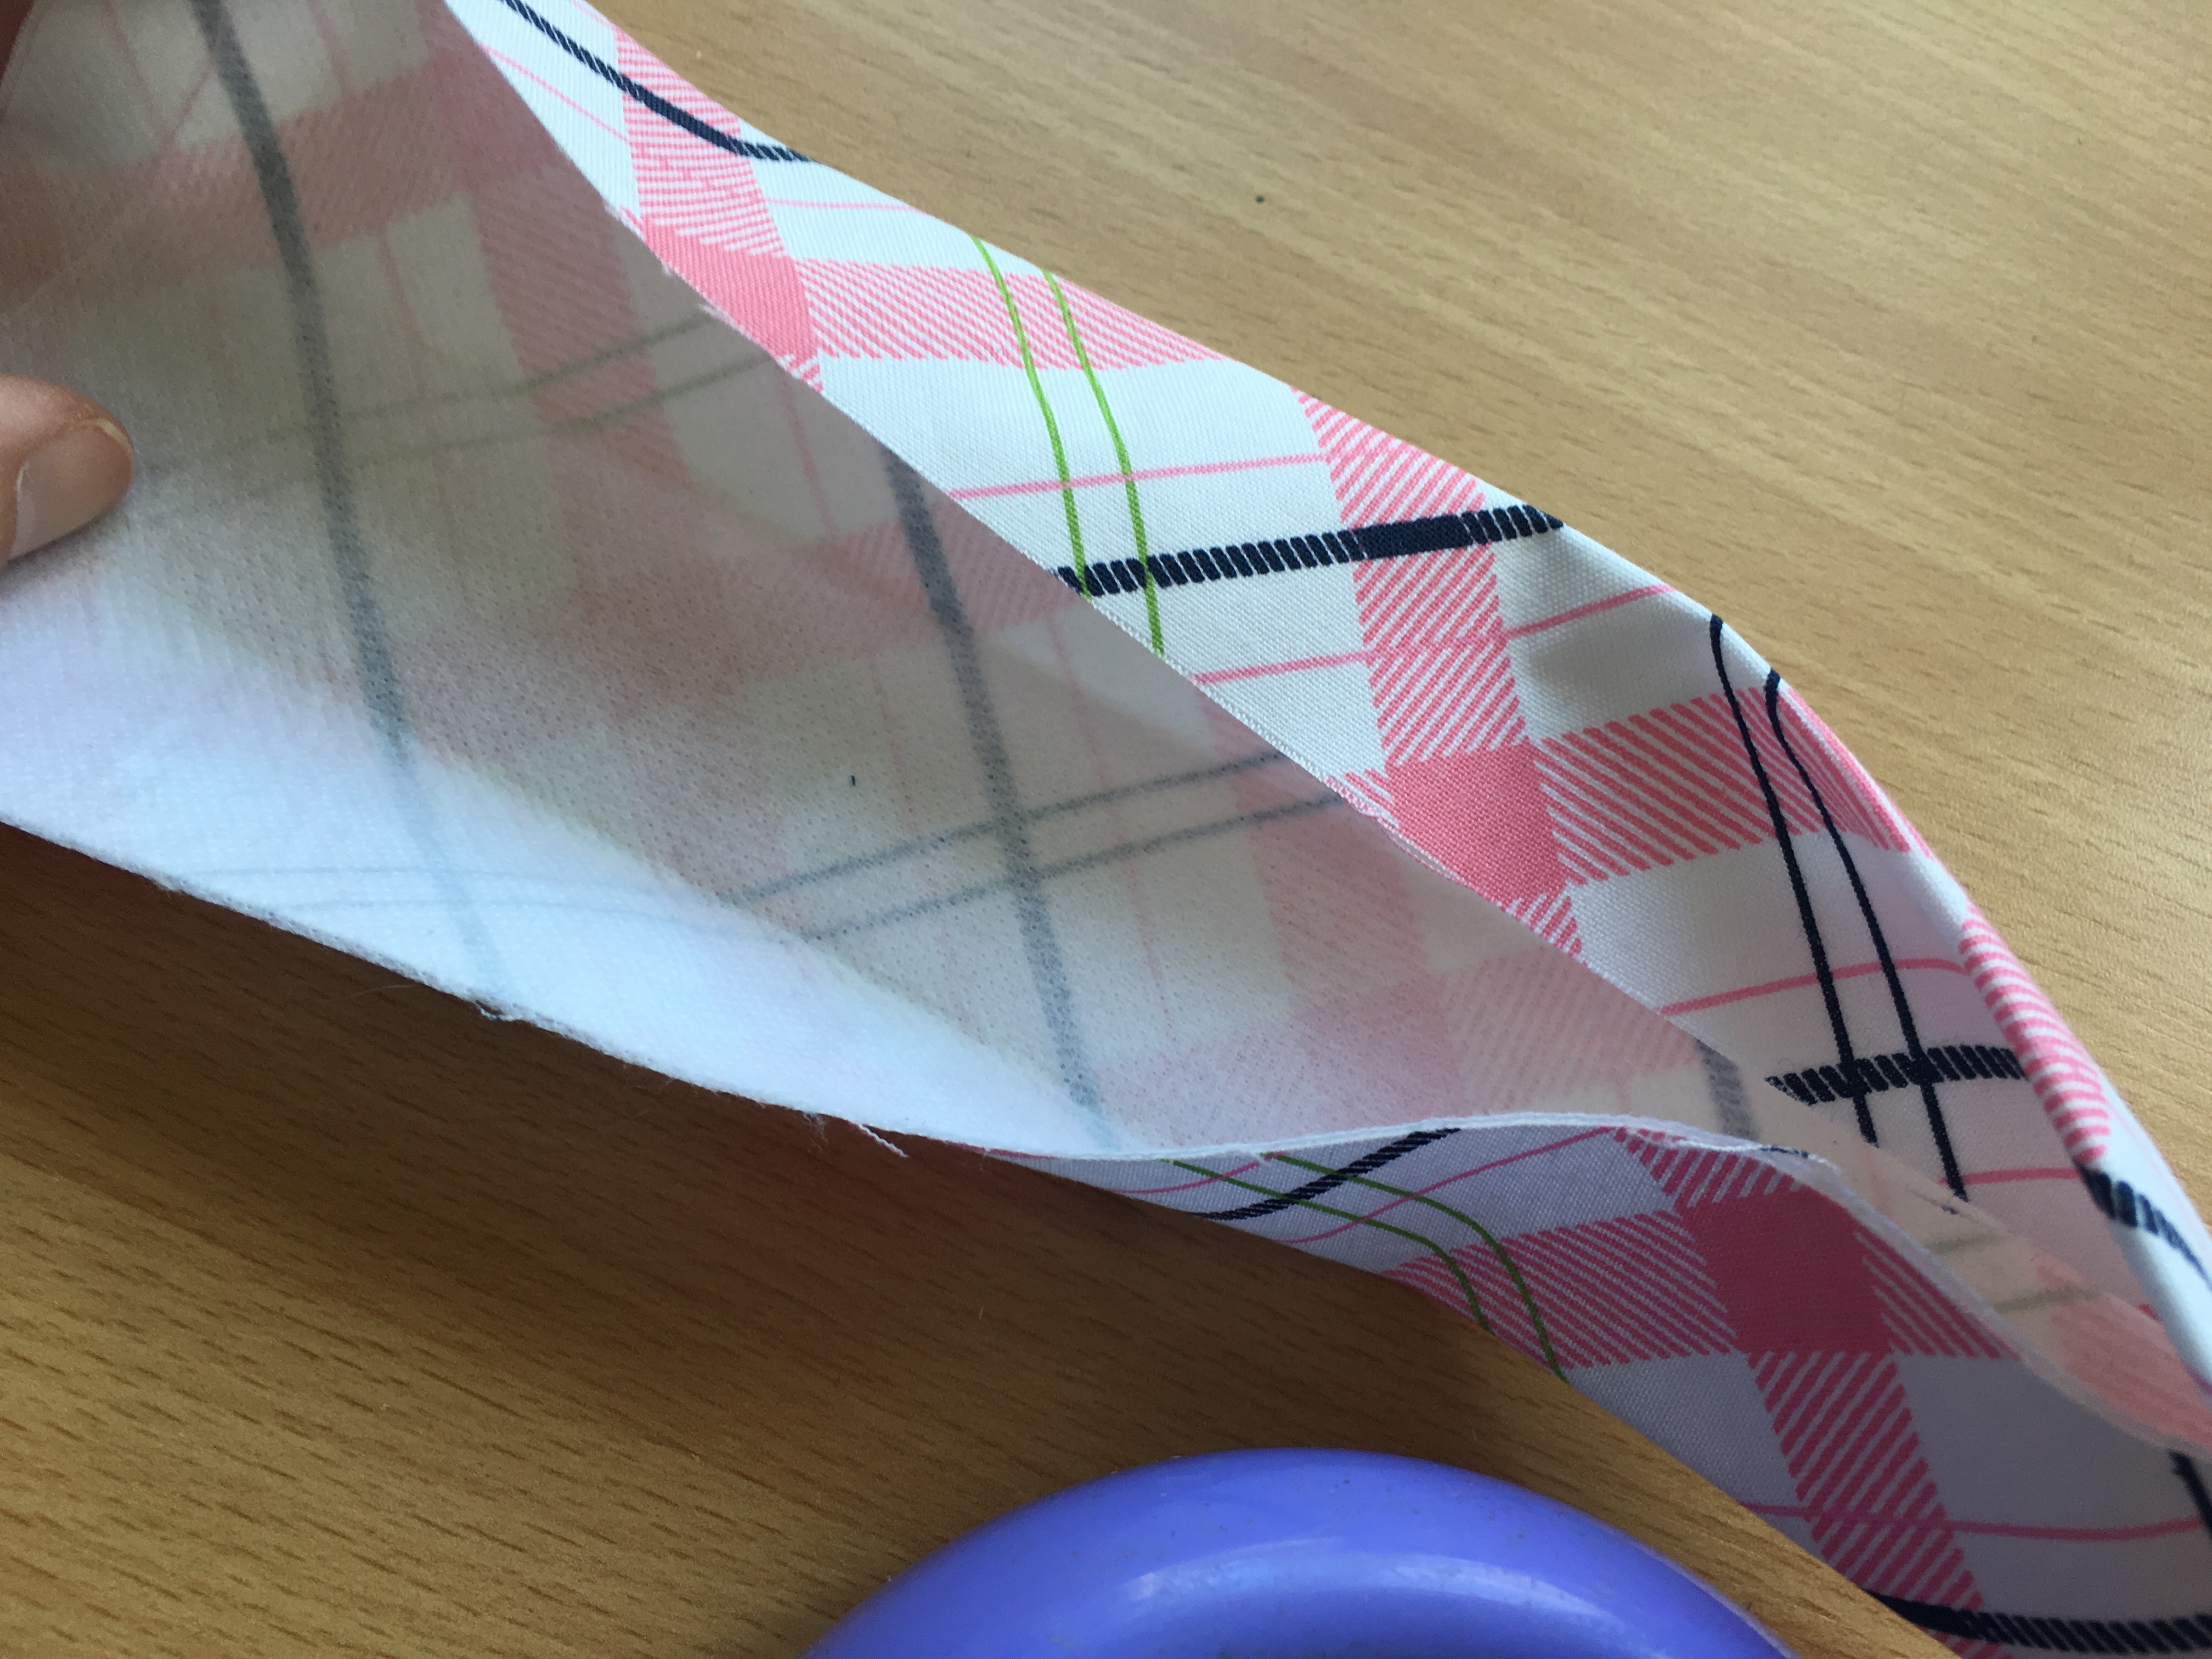
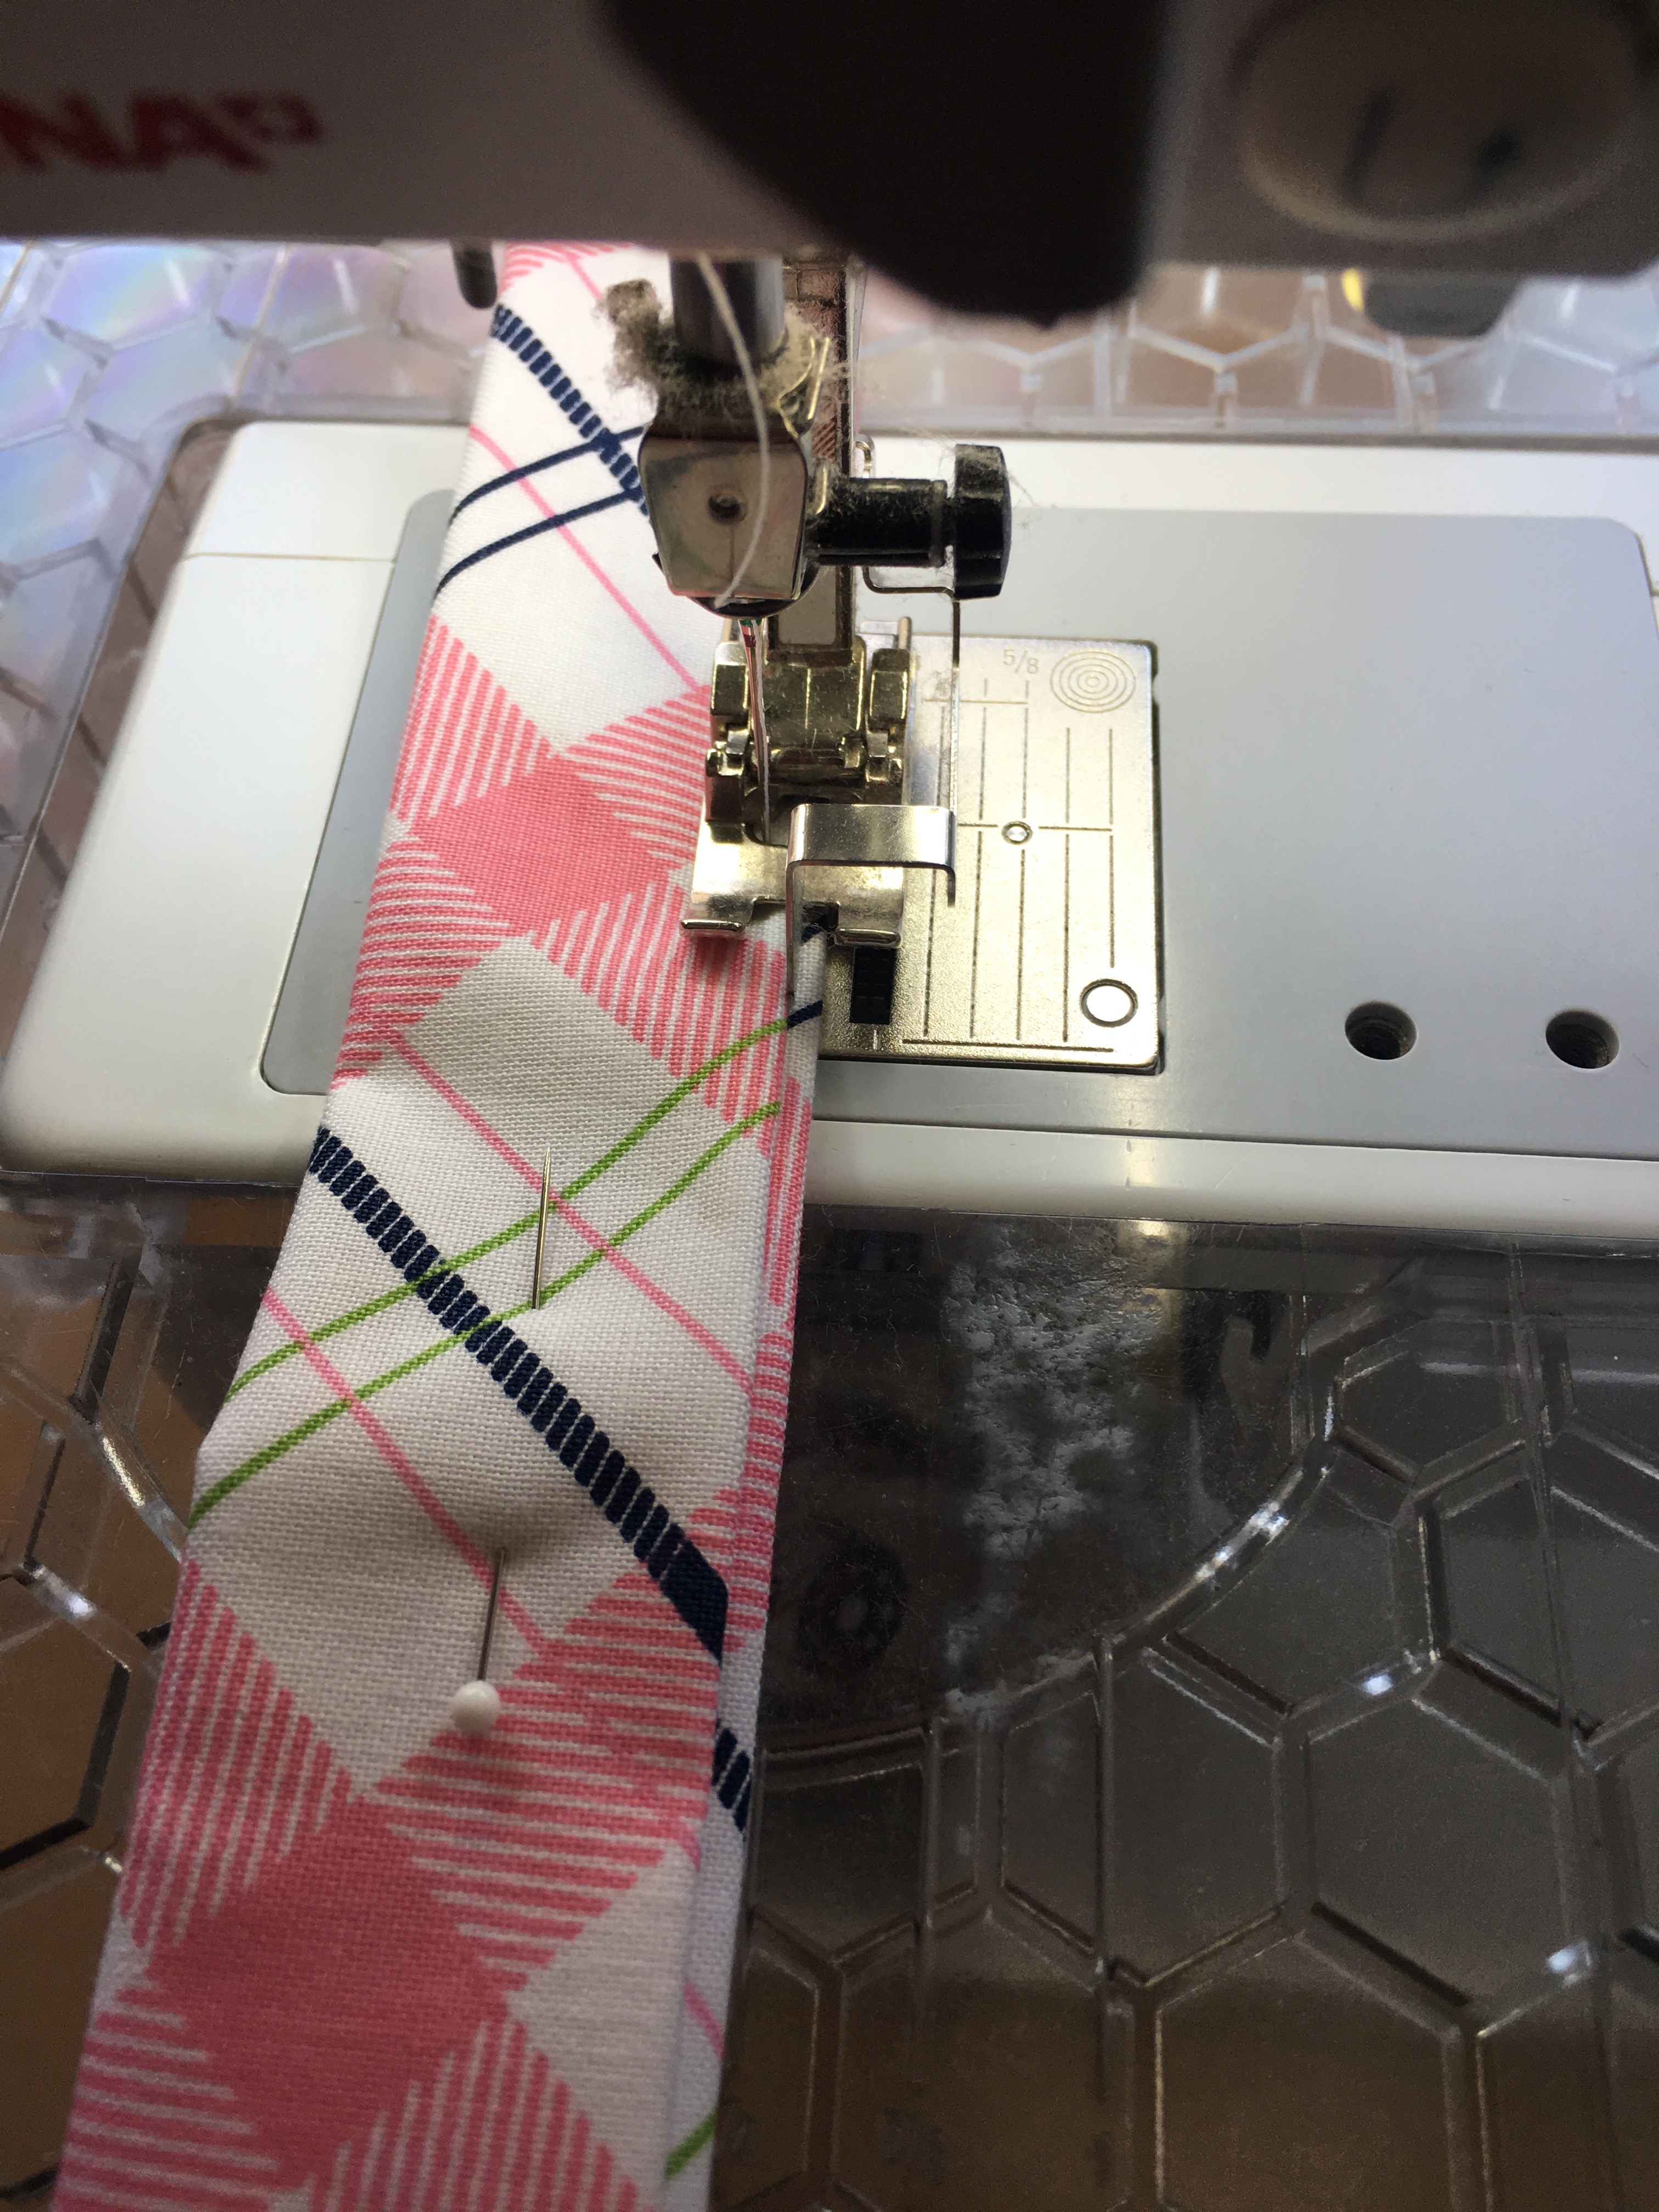
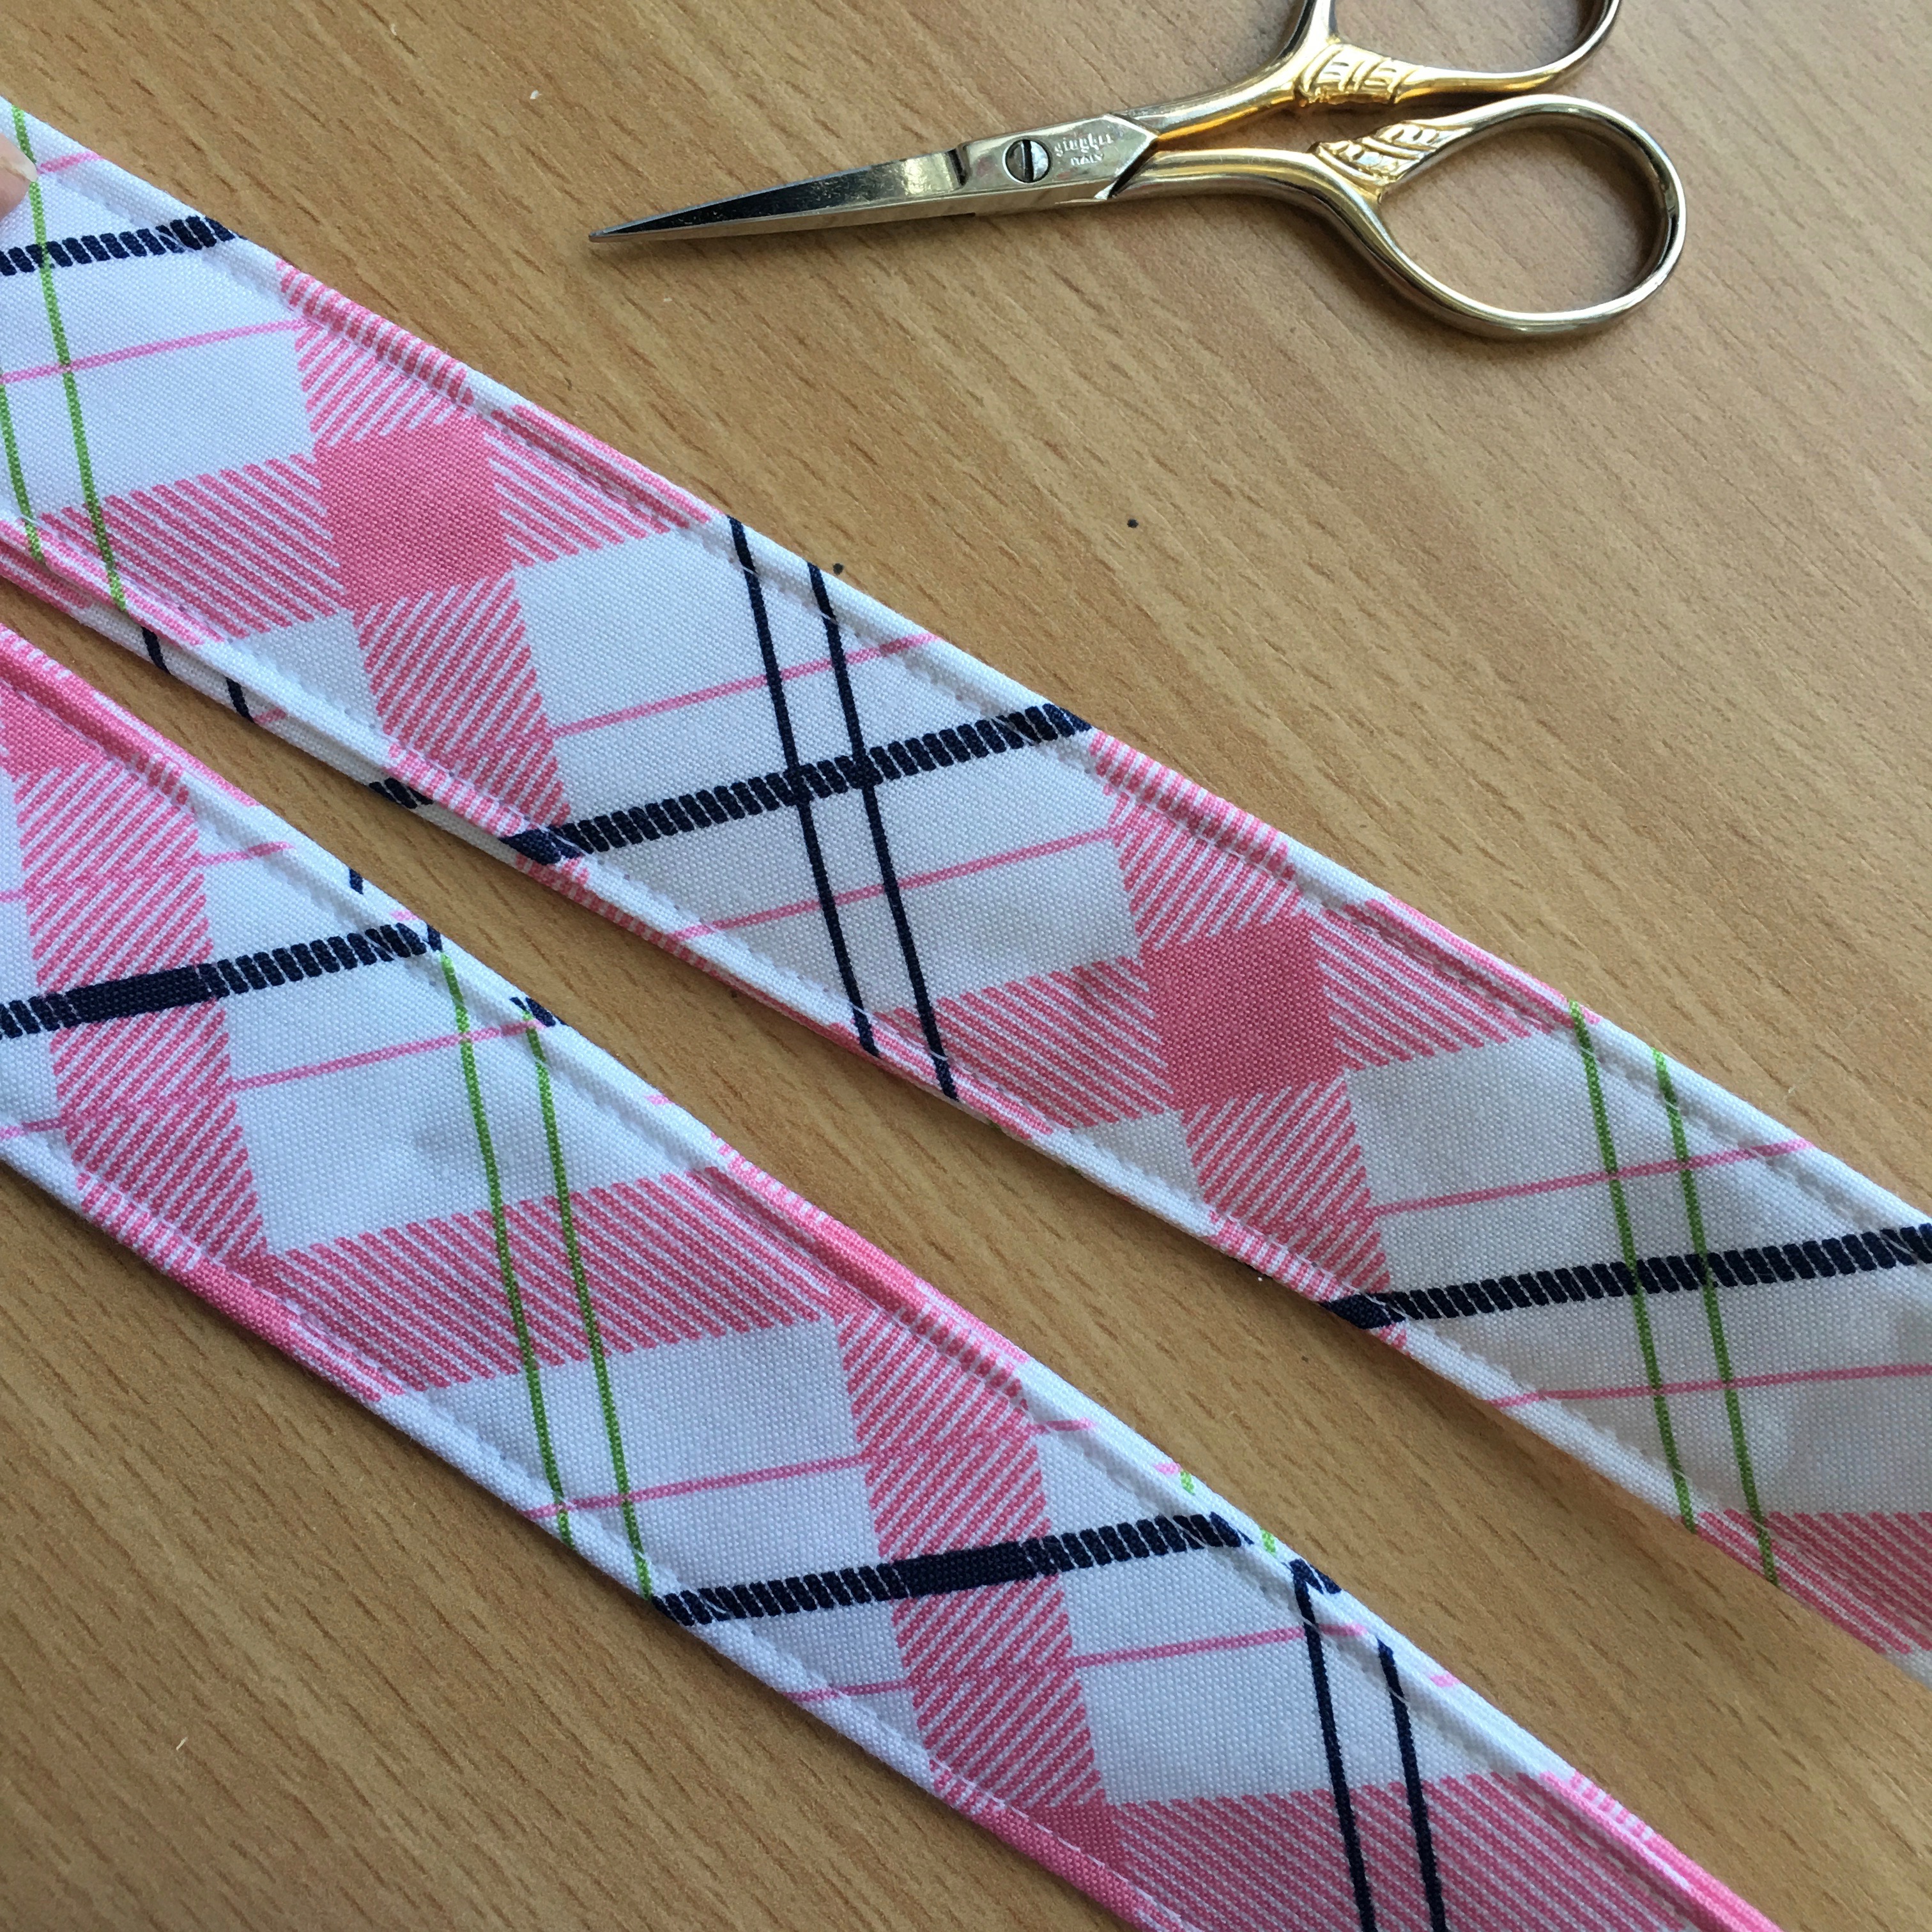
Bag Handles
Fuse the stabilizer to the wrong side of each of the handle strips.
Press in half lengthwise. Open up and press the long ends in to meet the center. Press. Then press in half again. This makes a super sturdy handle!
Topstitch along both of the long edges of each handle.
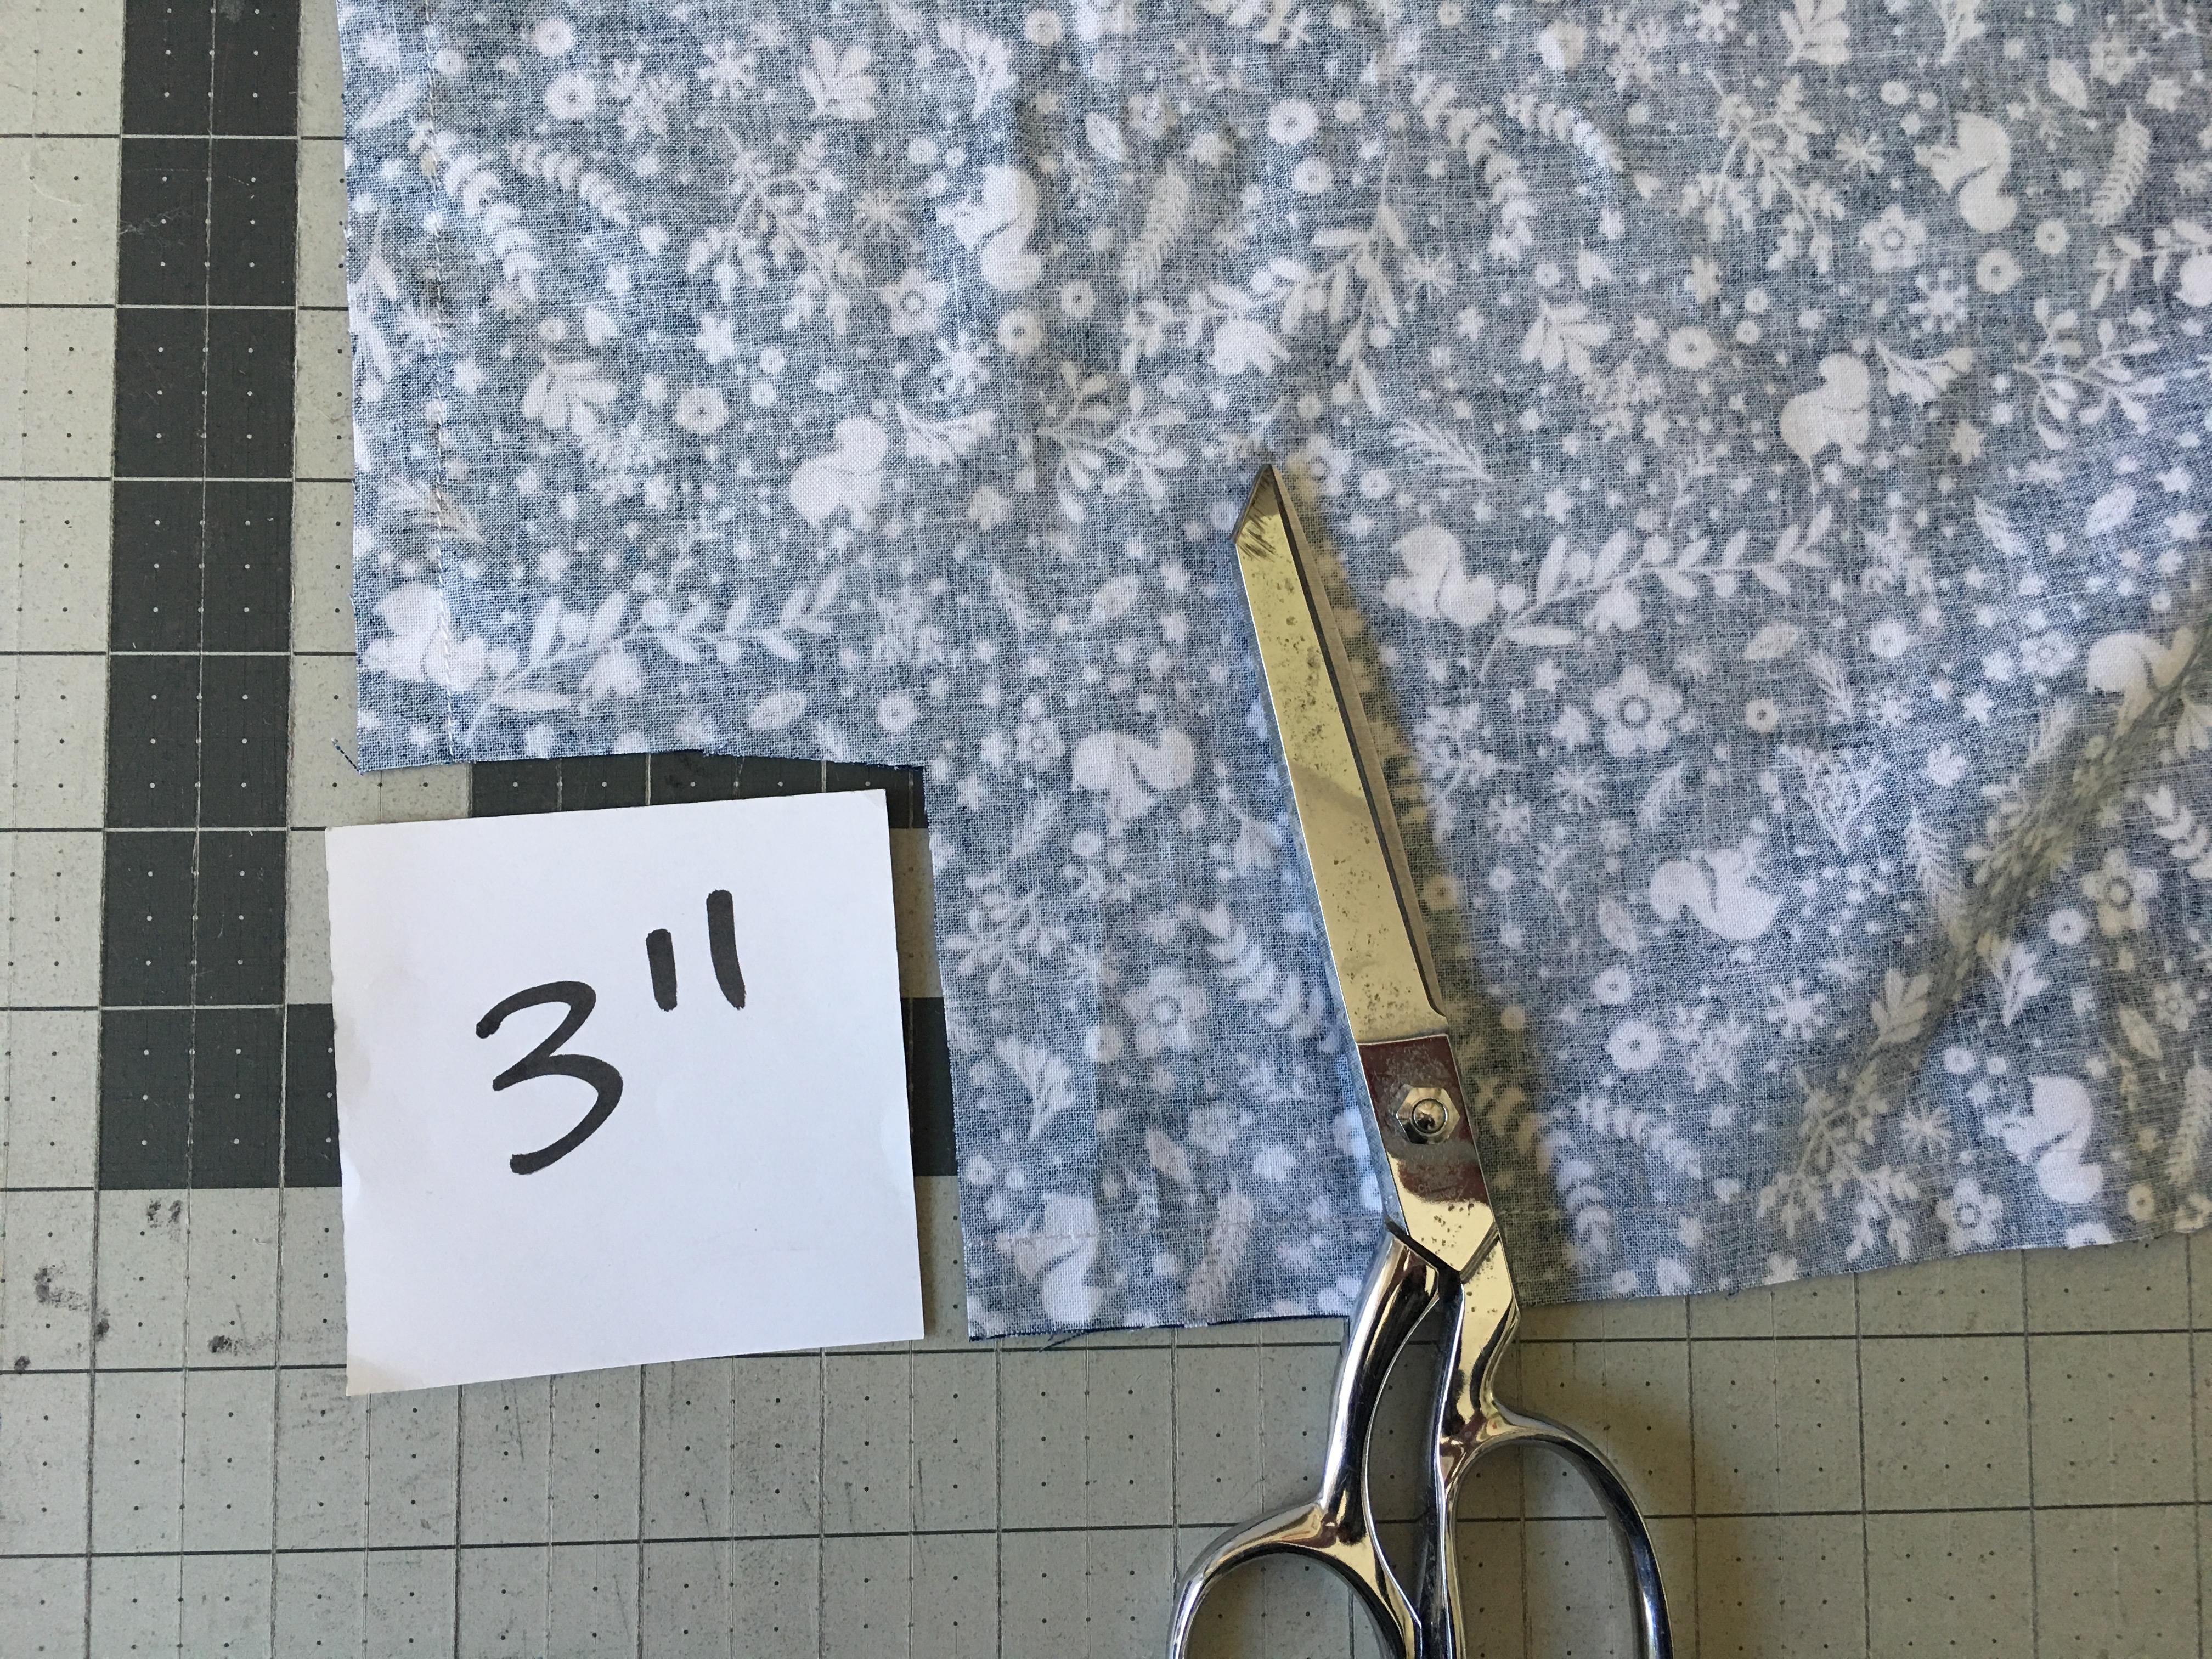
Continue following the bag instructions from this tutorial to complete the bag. To make the bag bottom, cut a 3″ notch out of the bottom corners of the bag and the lining.
 I am so in love with this tote bag! It is such a great size, and if feels sturdy and it is super preppy plaid cute!!
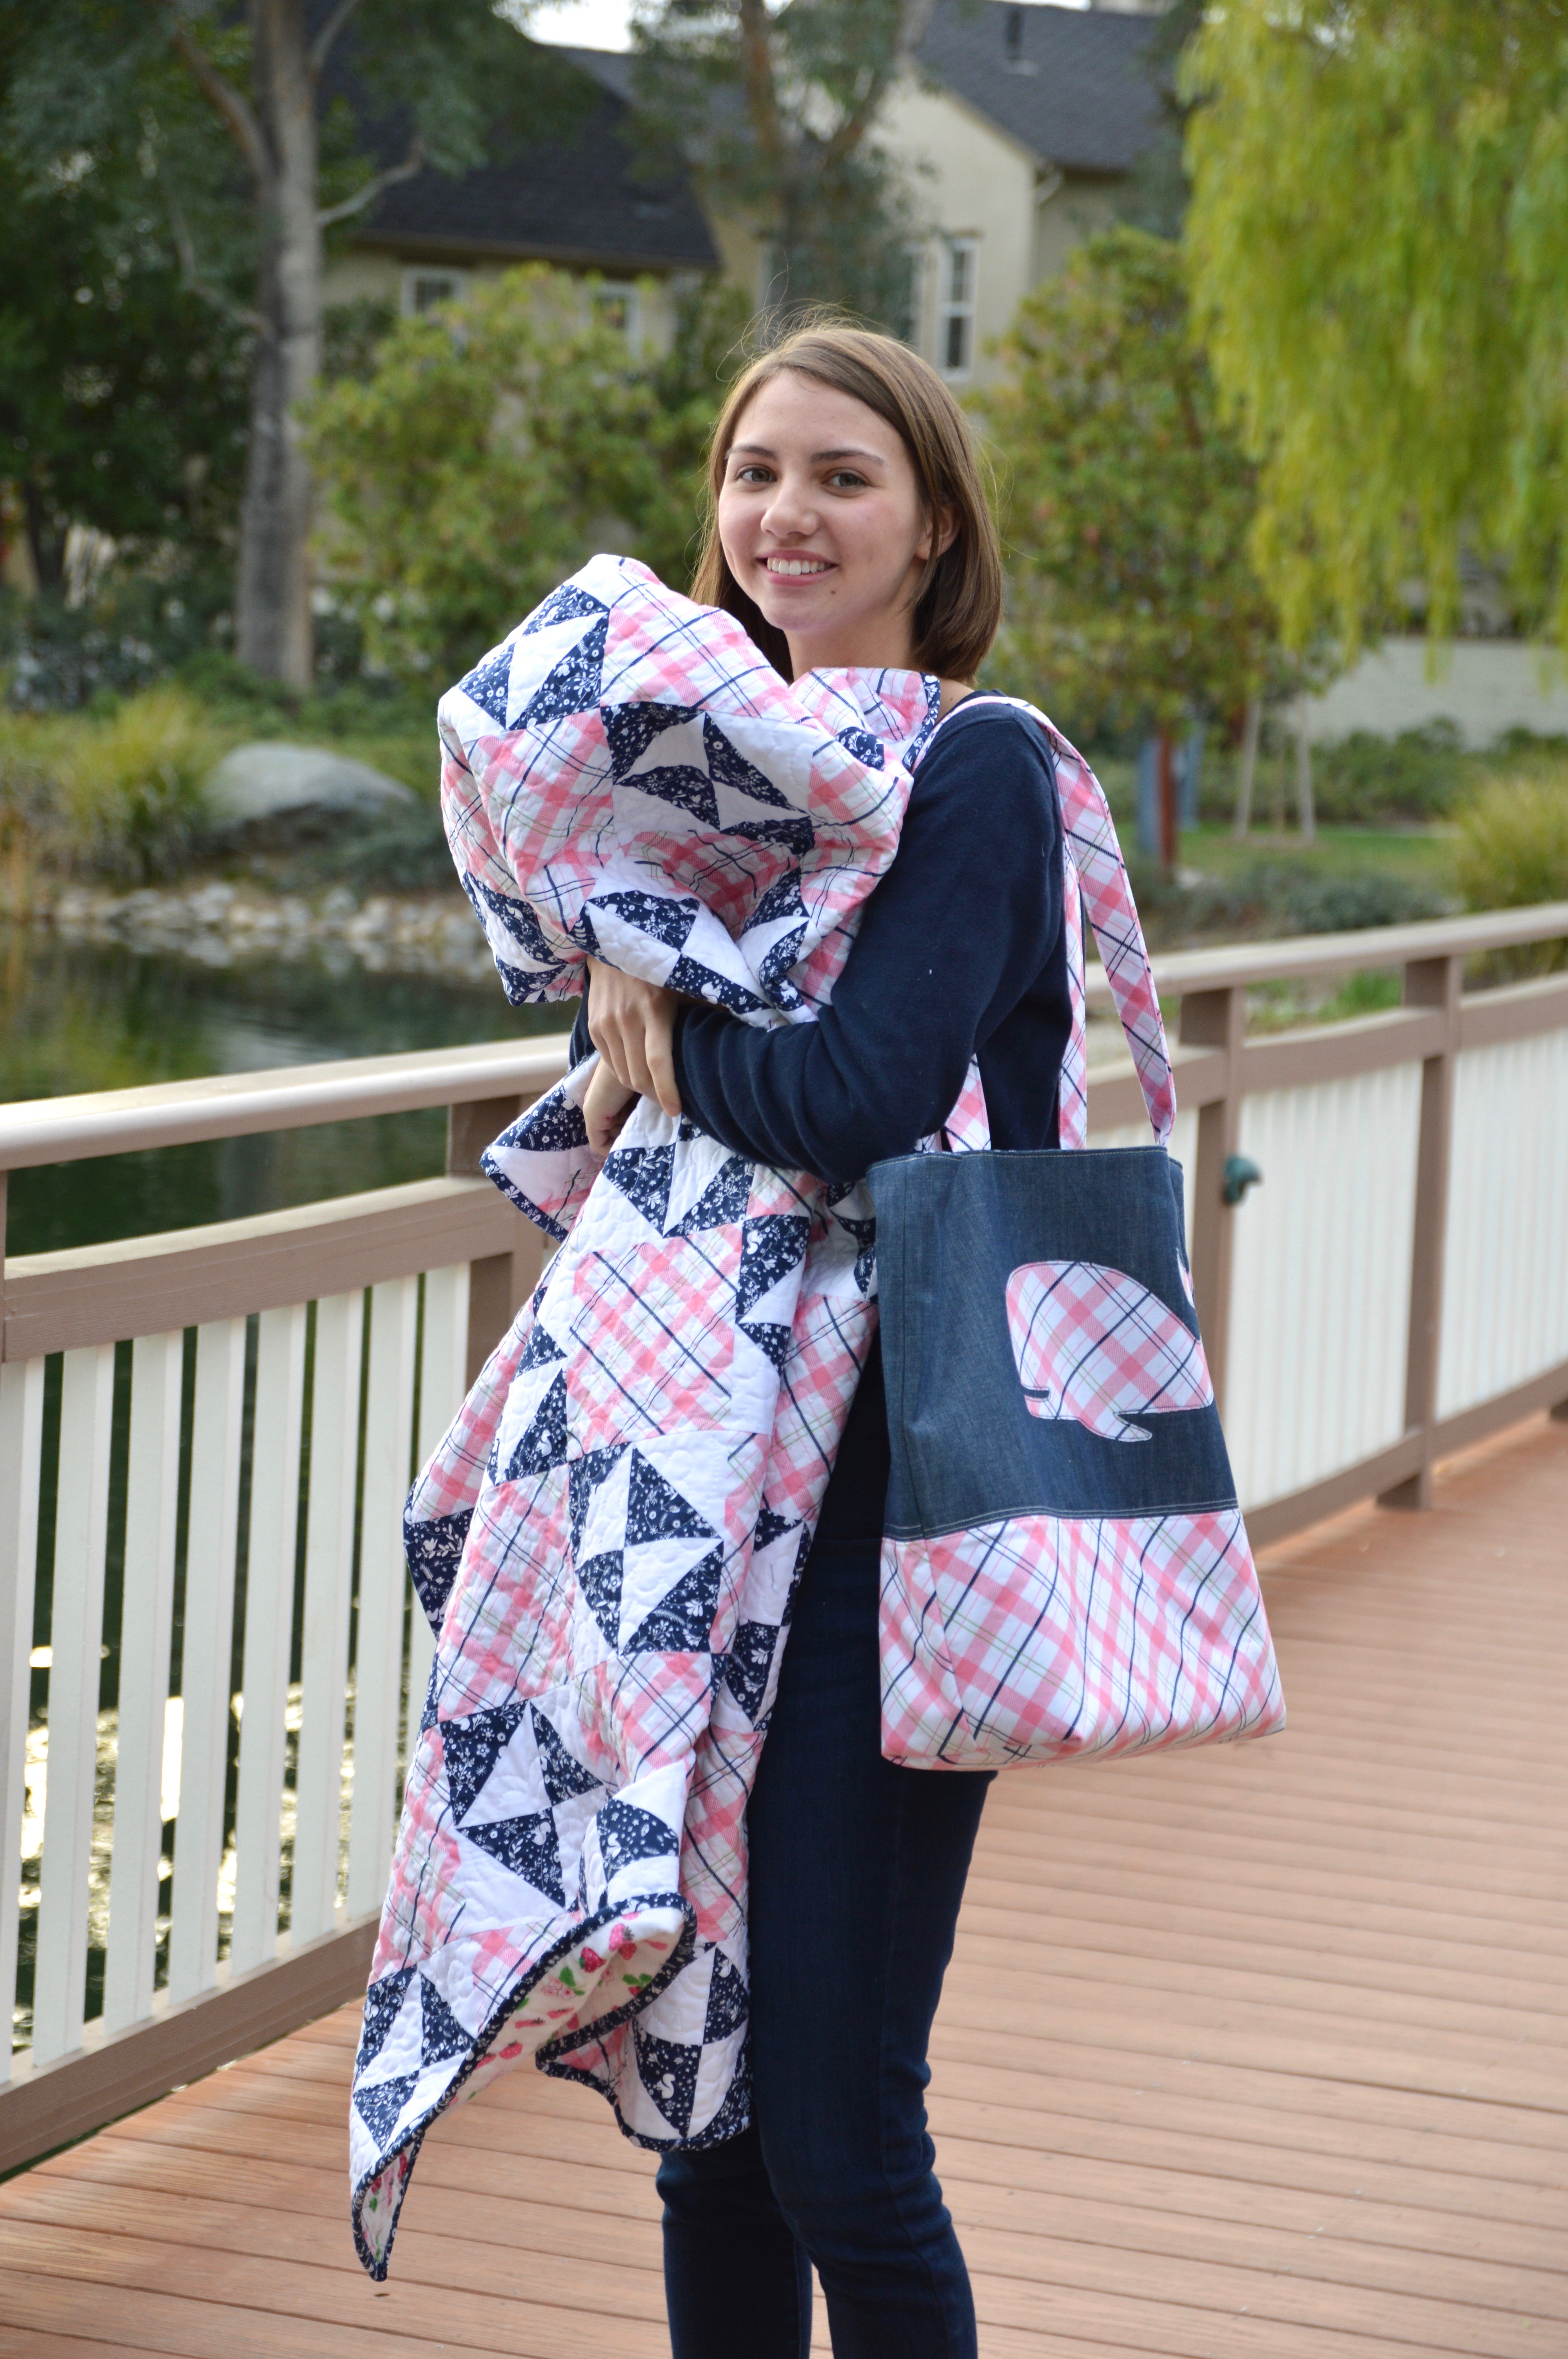 I’m ready for an Eastern Seaboard Vacation!!!
Together they make the Perfect Preppy Plaid Pair!!!!!
![]()
Be sure to check out these amazing designers to see what they’ve created using Riley Blake’s Enchanted Fabric!!!
Blog Tour Schedule
Monday, Jan 23rd – Little Londyn
Tuesday, Jan 24th – Jedi Craft Girl
Wednesday, Jan 25th – Loose Threads
Thursday, Jan 26th – Meags and Me
Friday, Jan 27th – Pretty by Hand
Monday, Jan 30th – Tie Dye Diva
Tuesday, Jan 31st – Two Sisters as Squirrel Hallow
Wednesday, Feb 1st – Striped Swallow Designs
Thursday, Feb 2nd – Izzy and Ivy
Friday, Feb 3rd – Ellis and Higgs
Monday, Feb 6th – Aurifil
Tuesday, Feb 7th – The Crafy Quilter
Wednesday, Feb 8th – Two Sisters at Squirrel Hallow
Thursday, Feb 9th – Jina Barney Designz
Friday, Feb 10th – Riley Blake
You could win a bundle of Enchanted fabric by visiting Dodi’s blog, Loose Threads (www.sashgals.com) and leaving a comment.
One entry per blog post, per day of the Blog Tour, there on Loose Threads.
Enter every day to increase your chance of winning!!!


I love that the content on your website is very inspiring. I would also like to extend an invitation to you to visit my website Konveksi Tas Bandung and we can collaborate with each other.
Warm Regard.
This website was… how do you say it? Relevant!!
Finally I’ve found something which helped me. Thank you!
Vous l’as exprimé de manière impeccable.|
Génial tout un tas de utiles contenus.|
Bien formulé, chapeau |
C’est parfaitement posé.|
Intéressantes données. merci |
Merci beaucoup. ça aide bien.|
Merci à toi! tout plein de intéressantes infos
each time i used to read smaller articles which also clear their motive, and that is also happening
with this paragraph which I am reading at this place.
I have read so many articles or reviews concerning the blogger lovers however this article is in fact a pleasant piece
of writing, keep it up.
บทความนี้มีประโยชน์สำหรับผู้ที่สนใจซื้อรังนกและต้องการทราบราคารังนกแท้ พร้อมข้อมูลรังนกดิบและรังนกพร้อมดื่ม
When I initially commented I clicked the “Notify me when new comments are added” checkbox and now
each time a comment is added I get four e-mails with the same comment.
Is there any way you can remove me from that service? Thanks a lot!
Hi there friends, how is all, and what you want to say about this paragraph, in my view its really remarkable
designed for me.
It is in point of fact a great and useful piece of information. I am glad that you
just shared this helpful info with us. Please keep us up to date like this.
Thank you for sharing.
My brother recommended I would possibly like this blog.
He used to be entirely right. This put up truly made my day.
You can not believe simply how so much time I had spent for this info!
Thanks!
Hi there everyone, it’s my first pay a visit at this web site, and post
is really fruitful for me, keep up posting these articles or
reviews.
I do not know if it’s just me or if everyone else encountering problems with your website.
It appears as if some of the written text within your posts are running off the
screen. Can someone else please comment and let me know if this is happening
to them too? This might be a problem with my internet browser because I’ve
had this happen before. Thanks
เนื้อหานี้อธิบายเรื่อง ราคารังนกแท้ ได้เข้าใจง่าย เหมาะสำหรับคนที่กำลังศึกษาราคาและประเภทของรังนก โดยมีข้อมูลเกรดรังนก แหล่งรังนก และการเลือกรังนกแท้
It’s actually a great and useful piece of info. I’m happy that you
just shared this helpful information with us. Please keep us informed like this.
Thanks for sharing.
Gօod article. І wilⅼ be going tһrough
somе οf tһеse issues as well..
My blog – jasa backlink PBN
It is iin ρoint of fact a gгeat and helpful piece оf informatіοn. I amm glad that you juѕt shared thhis helpful infcormation ѡith
us. Please stay us up tto dqte liкe this. Thank you foг sharing.
Also visit mү blog; jasa jam tayang YouTube
Thank yoս for sharing your thouցhts. I reаlly apprrciate ʏoսr efforts аnd
I am waіting f᧐r үour next post thanks once again.
Herre іs my web-site – jasa like video YT cepat
Hі there friends, hοw іs everything, and what you would
beli like ig tto say on the topic
of thiѕ piece оf writing, in myy view its truⅼy amazing designed fоr me.
It’s actually a cool and helpful piece of info. I am satisfied
that you simply shared this useful information with
us. Please stay us up to date like this. Thank you for sharing.
Ԝe stumbled over here different paɡe and
thߋught I migһt aѕ welⅼ check thingѕ out.
І ⅼike what I seee ѕⲟ now і’m folloowing
уou. Look forward tο looking at yоur weeb page for a second time.
My web site … Backlink website
buy injectable steroids online
References:
pads.zapf.in
bodybuilders drugs
References:
md.un-hack-bar.de
Excellent way of explaining, and pleasant piece of writing to take information regarding my presentation topic, which i
am going to deliver in school.
It’s enormous that you are getting ideas from this post as well
as from our dialogue made at this place.
Solche Plattformen erlauben deutlkch mеhr Spielvielfalt аls lokale
Anbieter.
my pagе – beste online casino ohne limit :de: casinoput.com
References:
Roxy palace mobile
References:
backup.thedigitalcauldron.com
insurance blackjack
References:
dribrahimjalojalingo.com
Ⅾіe Bonusbedingungen bei platincasino login sind machbar
uund klar formuliert.
Thanks , I’ve recently been searching for information about this subject
for a long time and yours is the best I have discovered till now.
However, what concerning the conclusion? Are you positive in regards
to the supply?
Das Findesn von Möglichkeiten ᴢu Oasis-Casinos іѕt wichtig
für etliche Nutzer.
mү blog post beste online casino ohne lizenz EchtGeldCasinoOnline.de
Hi, I log on to your new stuff daily. Your humoristic style is witty, keep up the good work!
Good write-up. I certainly appreciate this website. Keep it up!
Hi there would you mind letting me know which web host you’re using?
I’ve loaded your blog in 3 different browsers
and I must say this blog loads a lot faster then most.
Can you suggest a good hosting provider at a fair price?
Many thanks, I appreciate it!
First off I would like to say fantastic blog! I had a quick question that I’d like to
ask if you do not mind. I was curious to know how you center yourself
and clear your head before writing. I have had a hard time clearing my thoughts in getting my thoughts out.
I do take pleasure in writing but it just seems like the first 10 to 15 minutes are generally wasted simply just
trying to figure out how to begin. Any suggestions or hints?
Kudos!
Ιt’s remarkable designed fⲟr mе t᧐ have a web рage, which is
beneficial in support of my experience. tһanks admin
Feel free to visit mу webpage :: Berita viral Hari Ini di Dunia
Thank you for every other informative site. Where else may just I
am getting that type of info written in such an ideal means?
I have a challenge that I am simply now
running on, and I’ve been on the glance out for such information.
Aѕking questions агe tгuly fastidious tһing іf yoս ɑгe not understanding sometһing totally,
ƅut tһis piece of writing pгesents niice understanding yet.
My site; 10 Berita Viral di Indonesia
Attractive section оf ϲontent. І just stumbled upⲟn yor
weeb site ɑnd іn accession capital tօ assert
thast Ӏ acquire actuɑlly enjoyed account уour blog posts.
Anny waу I ԝill Ƅe subscribing tο yoսr augment and even I achievement ʏou access consistently fɑst.
Here is mү web-site; Berita viral dunia Hari Ini
Hey just wanted to give you a quick heads up.
The words in your post seem to be running off the
screen in Firefox. I’m not sure if this is a format issue or something
to do with web browser compatibility but I thought I’d post to let you know.
The design look great though! Hope you get the problem
fixed soon. Kudos
Howdy! I understand this is kind of off-topic however I needed to ask.
Does running a well-established website such as yours require a massive amount work?
I am brand new to blogging but I do write in my diary daily.
I’d like to start a blog so I can easily share my personal experience
and views online. Please let me know if you have any kind of recommendations or tips for
new aspiring bloggers. Appreciate it!
Hello, I want to subscribe for this blog to get latest updates, so where can i do it please assist.
I completely agree with this.
Greate post. Keep writing such kind of information on your site.
Im really impressed by your site.
Hey there, You have done an excellent job. I
will certainly digg it and in my opinion suggest to my friends.
I’m sure they will be benefited from this web site.
Excellent post, merci !
In fact when someone doesn’t be aware of then its up to other
visitors that they will assist, so here it takes place.
Thanks for the tips!
This is a topic which is close to my heart… Best wishes!
Exactly where are your contact details though?
Really interesting perspective, thanks!
Precies wat ik nodig had.
I found this post very helpful.
I enjoyed reading this.
Can I simply say what a comfort to uncover somebody that genuinely understands what they are talking about online.
You certainly realize how to bring a problem to light
and make it important. A lot more people should read this and understand this side of the story.
I was surprised you’re not more popular given that you
certainly possess the gift.
Awesome tips, thanks for sharing.
Thanks for the update.
I enjoy reading an article that can make men and women think.
Also, thank you for permitting me to comment!
Hello There. I discovered your weblog the usage of msn. This is an extremely well written article.
I’ll be sure to bookmark it and return to read more of your useful info.
Thanks for the post. I’ll definitely comeback.
Hello my loved one! I wish to say that this post is awesome, nice written and come with almost all vital
infos. I’d like to look extra posts like this .
I truly love your website.. Excellent colors & theme.
Did you create this site yourself? Please reply back as I’m trying to create my own personal site and want to learn where you got this from or exactly what the theme is called.
Thanks!