Men’s Shirt Re-Fashion

menshirt


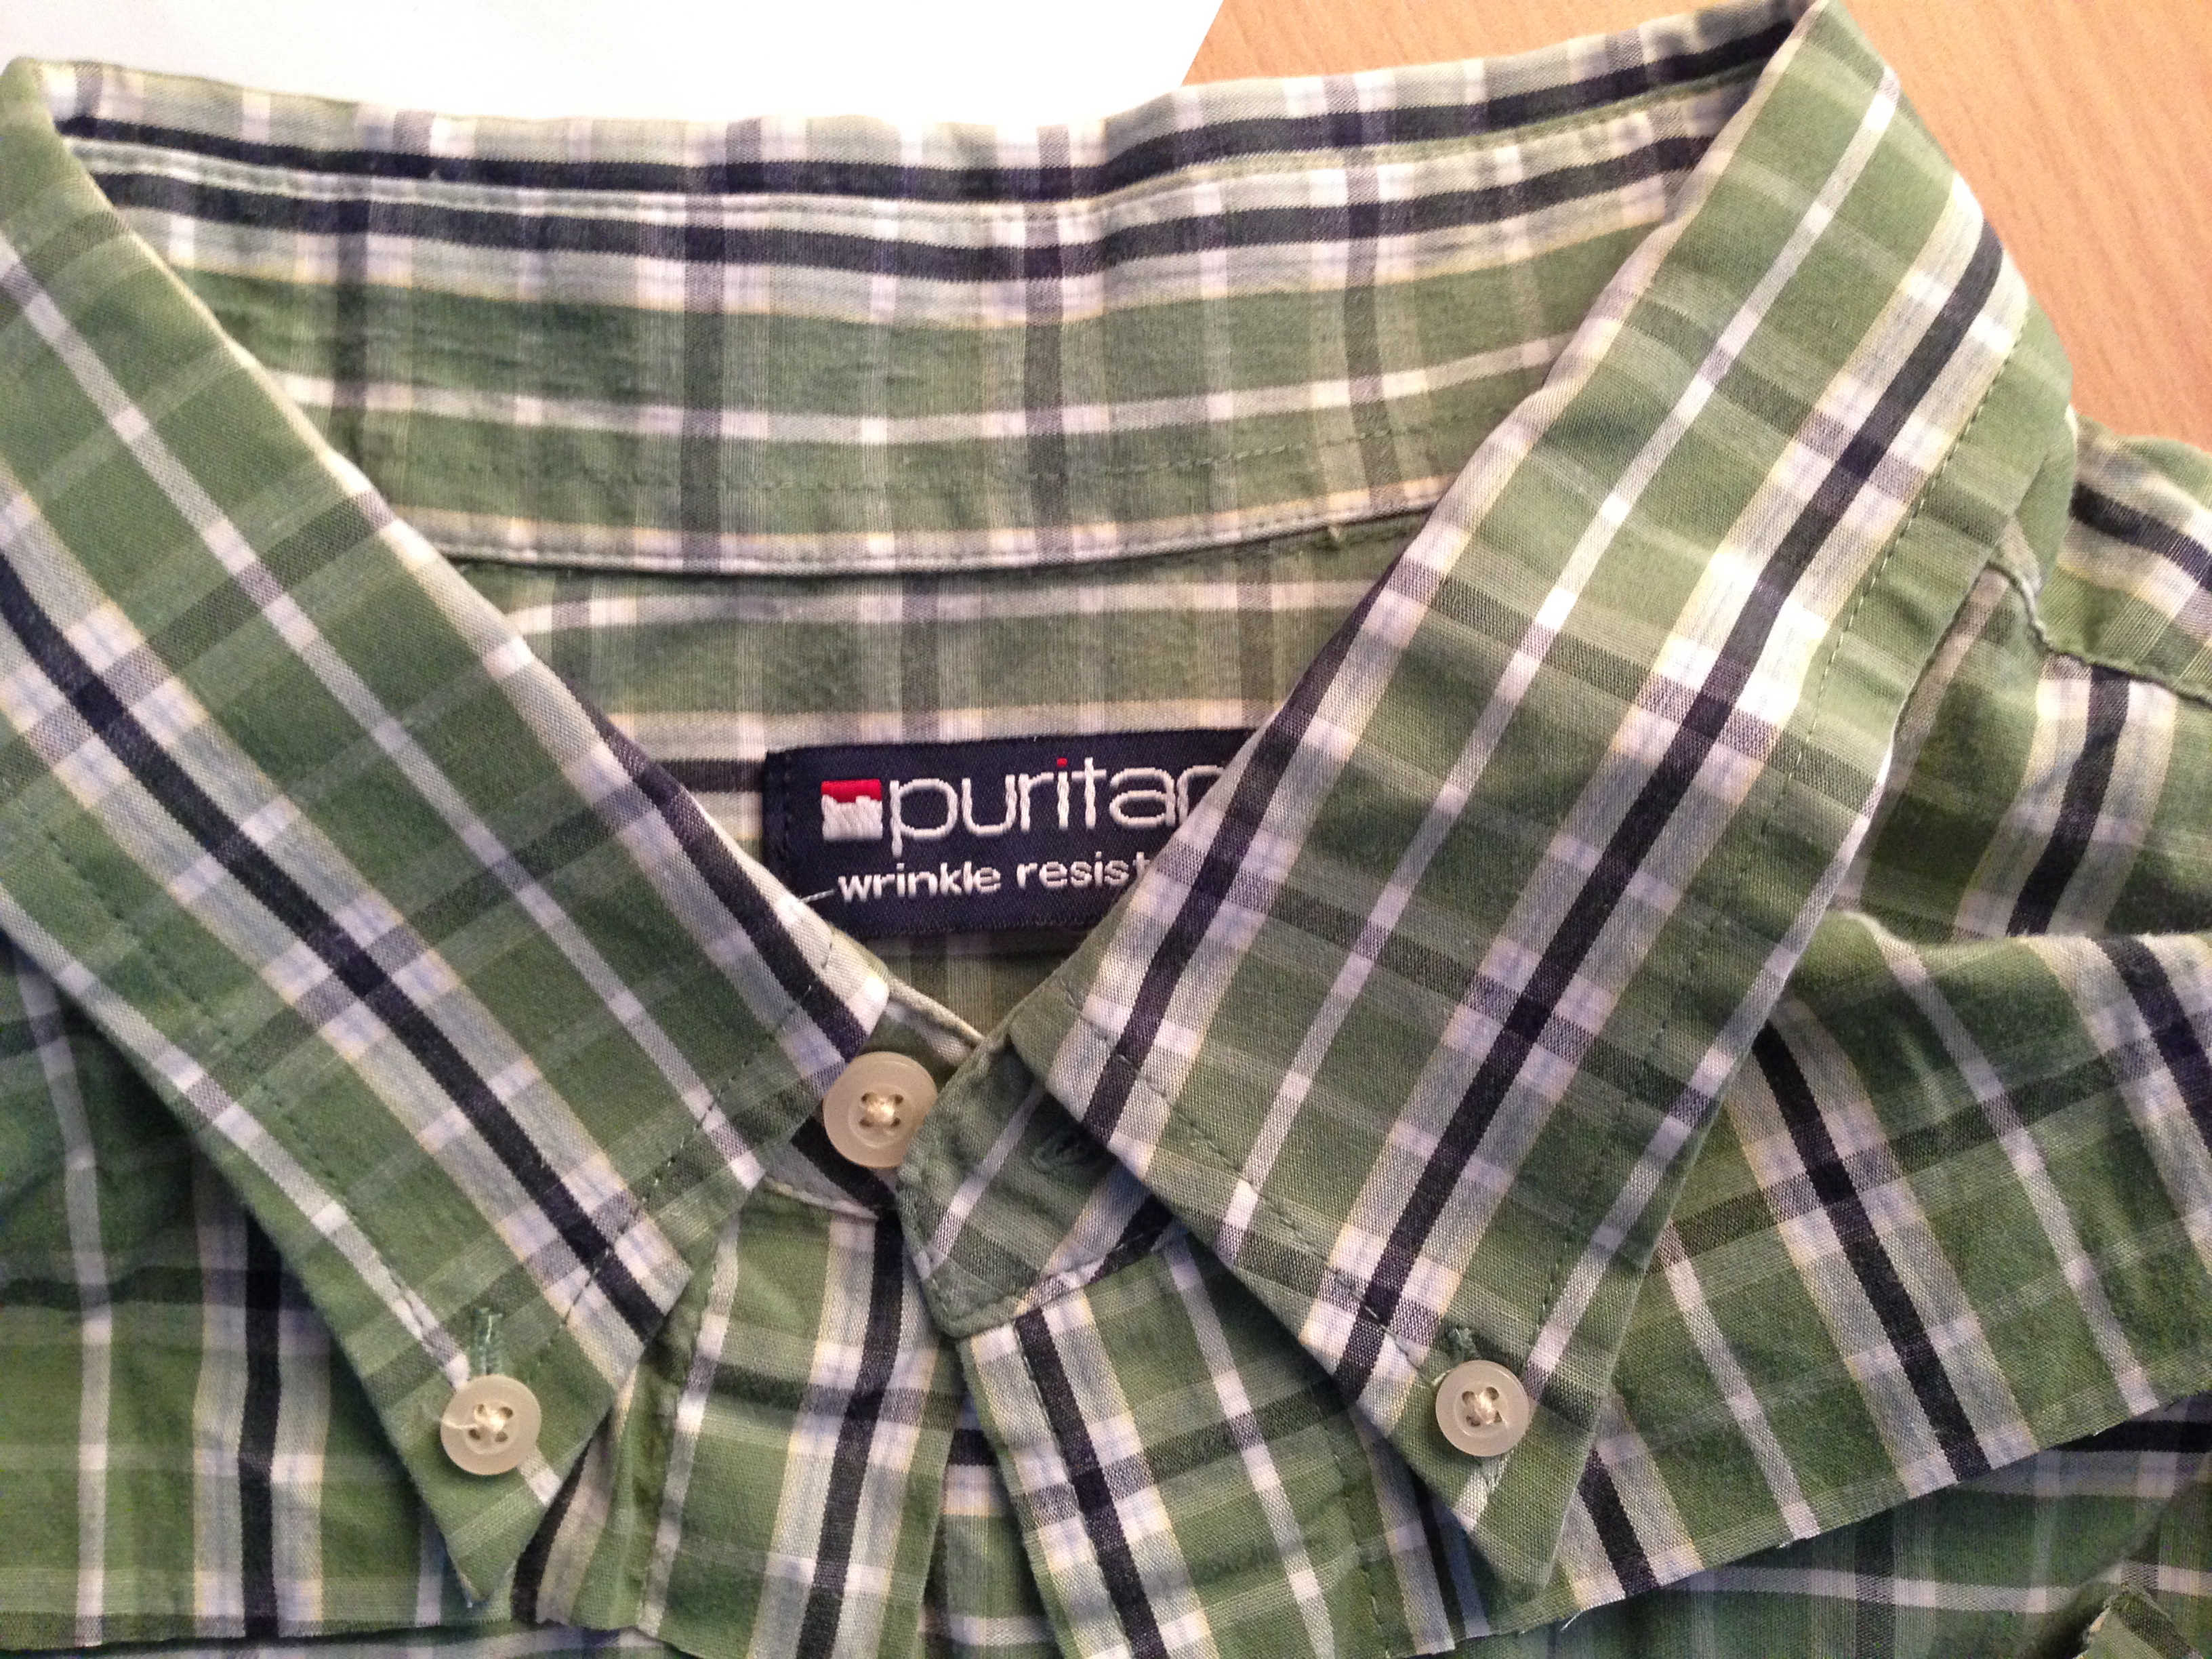
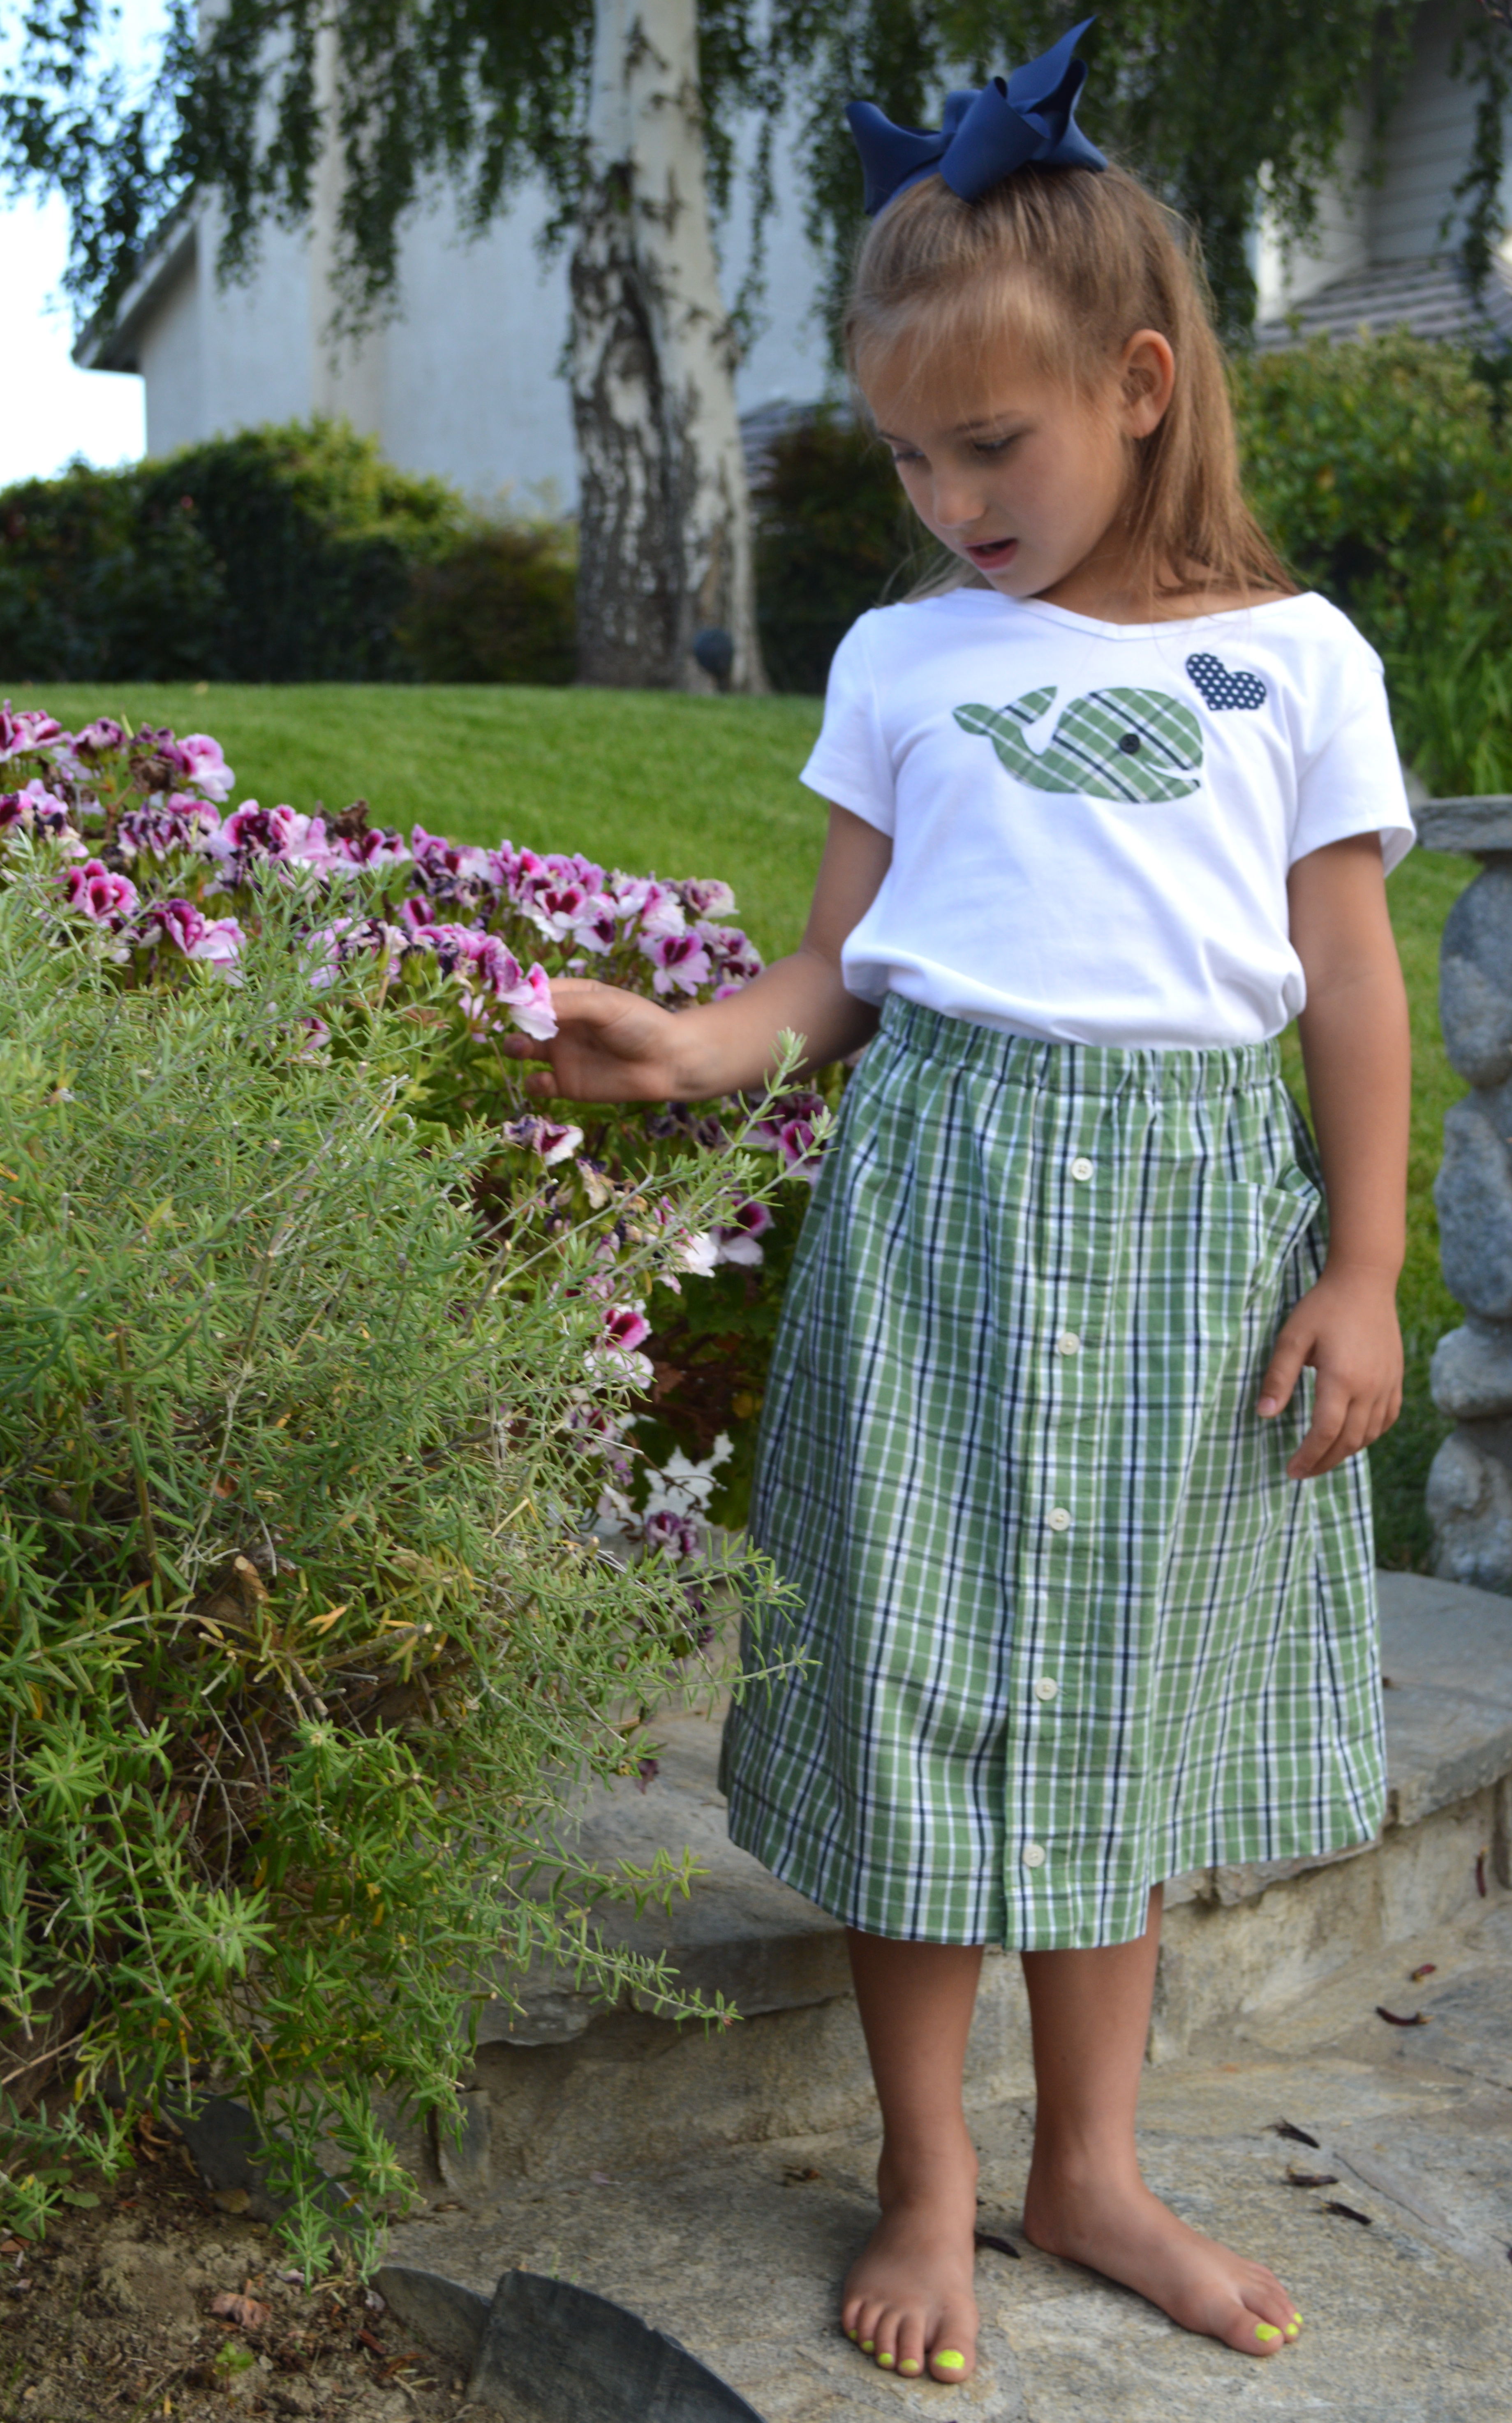
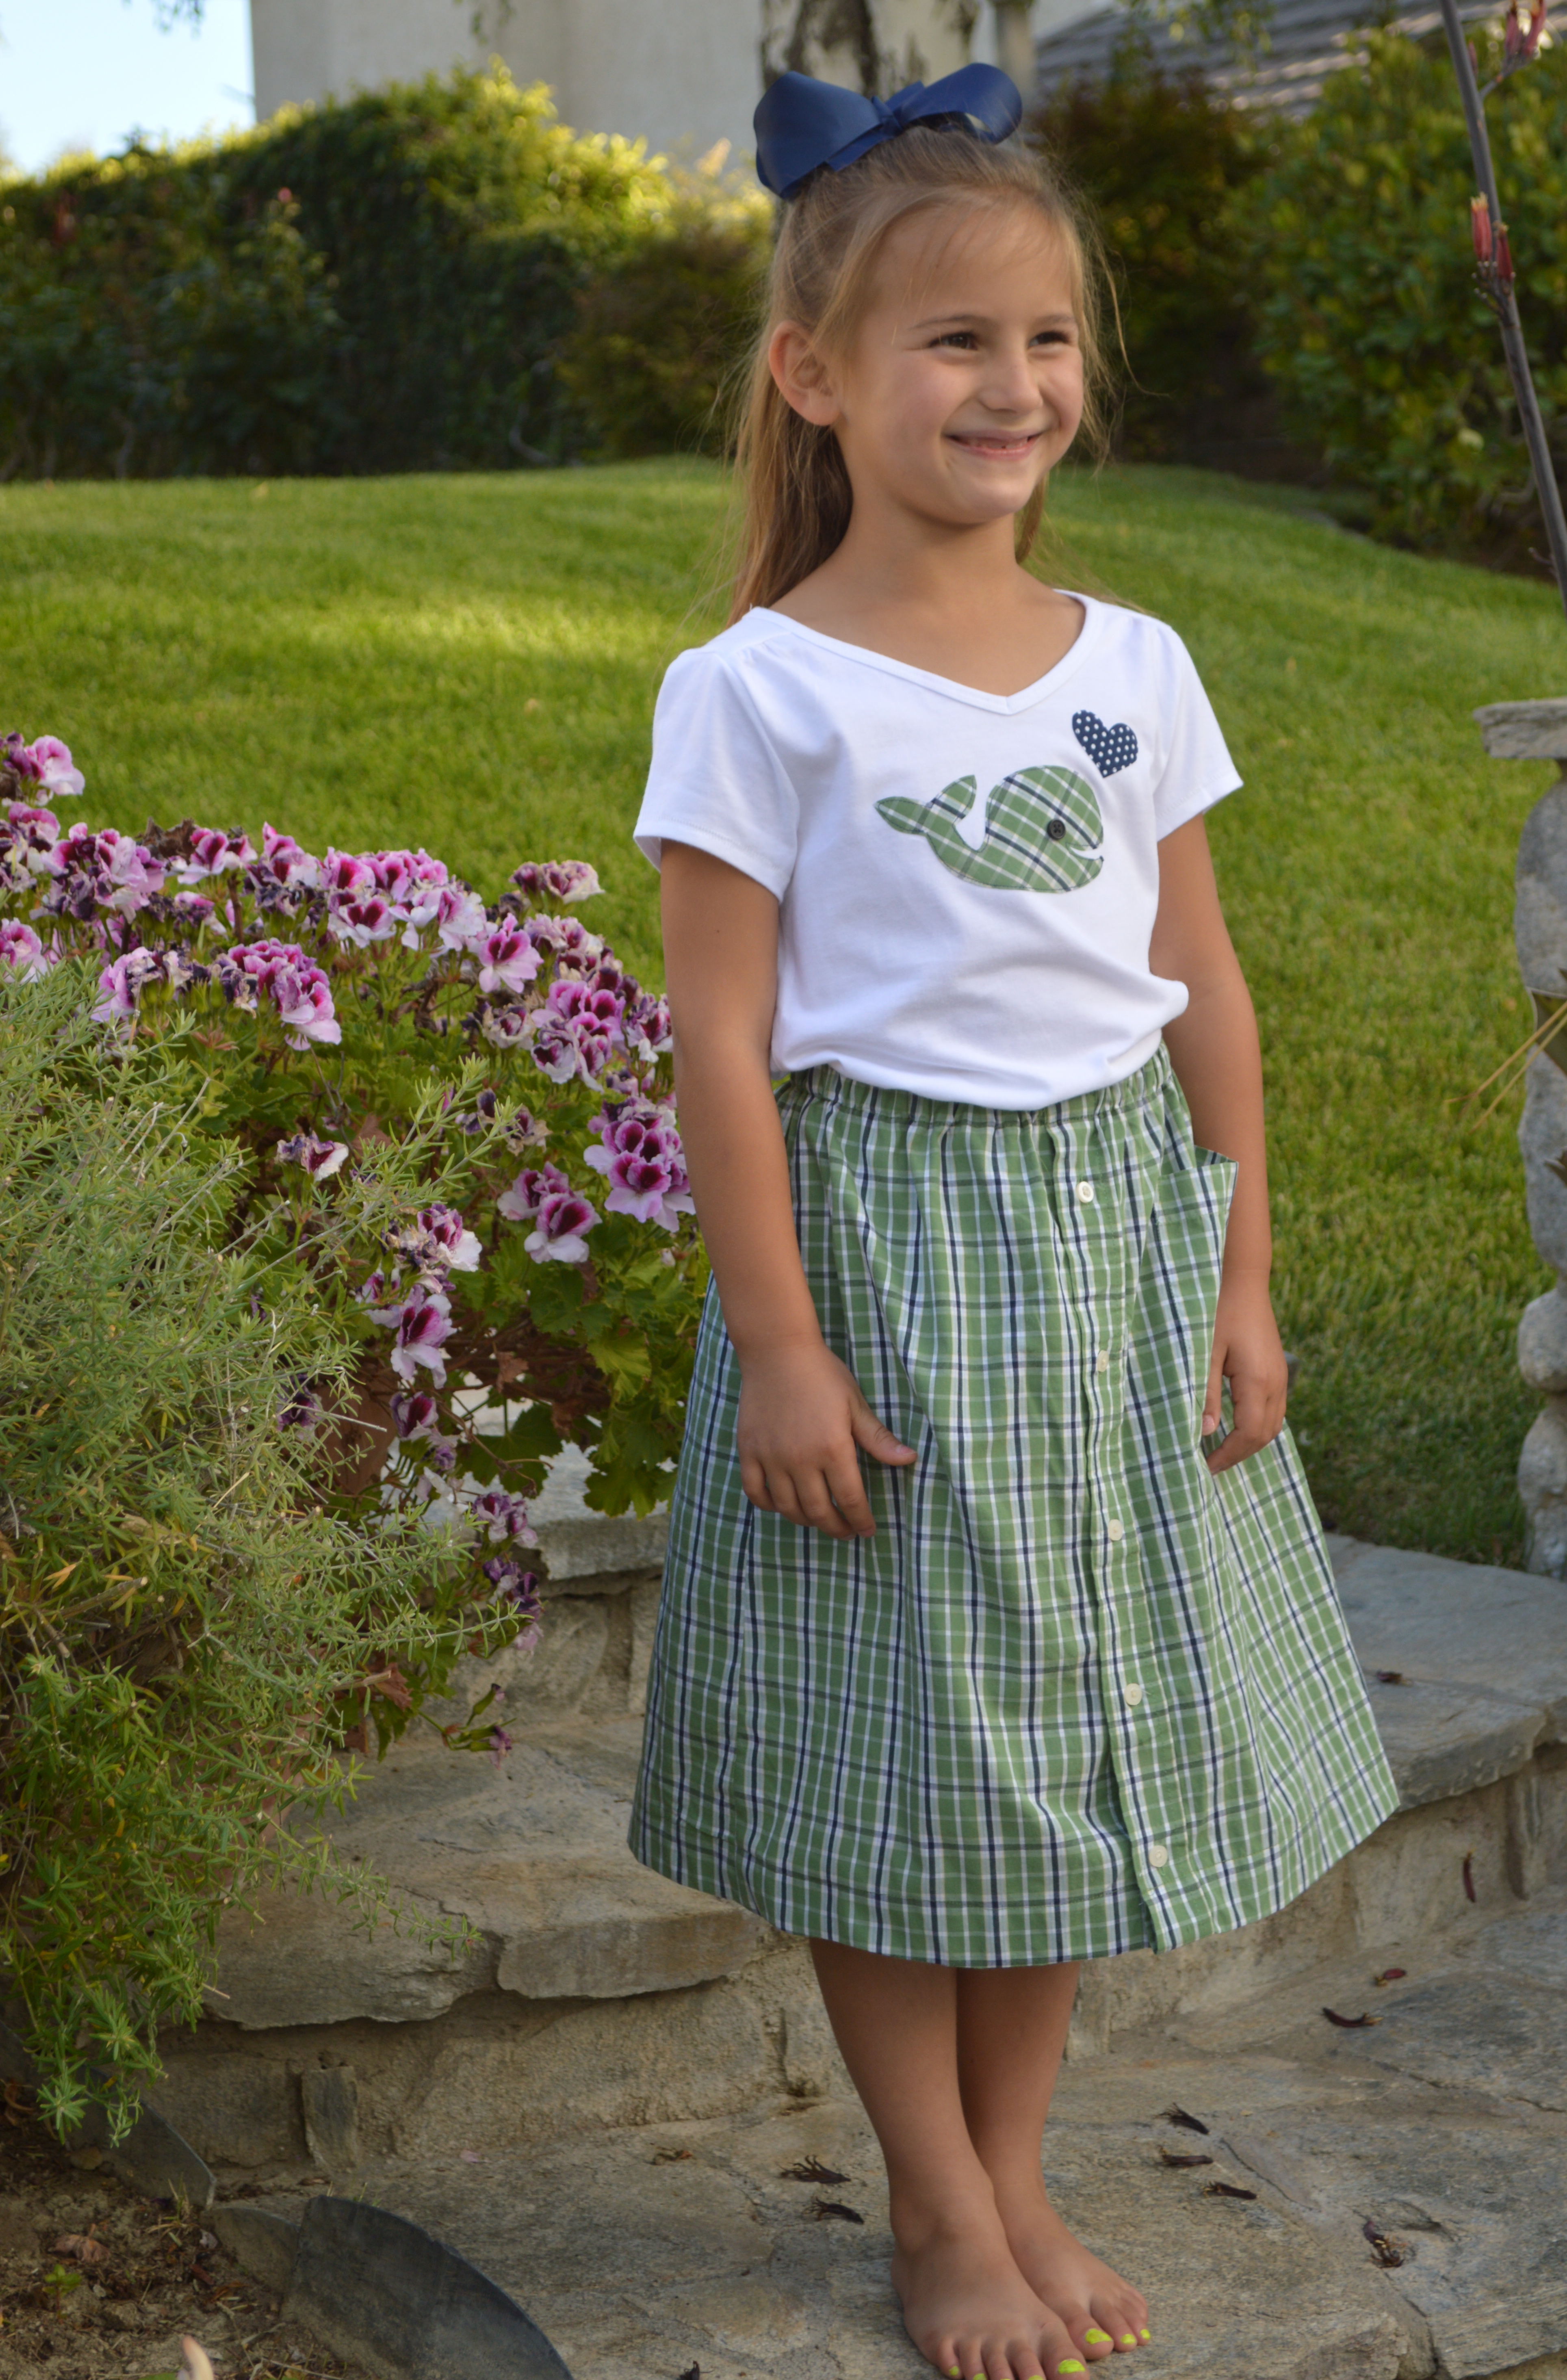
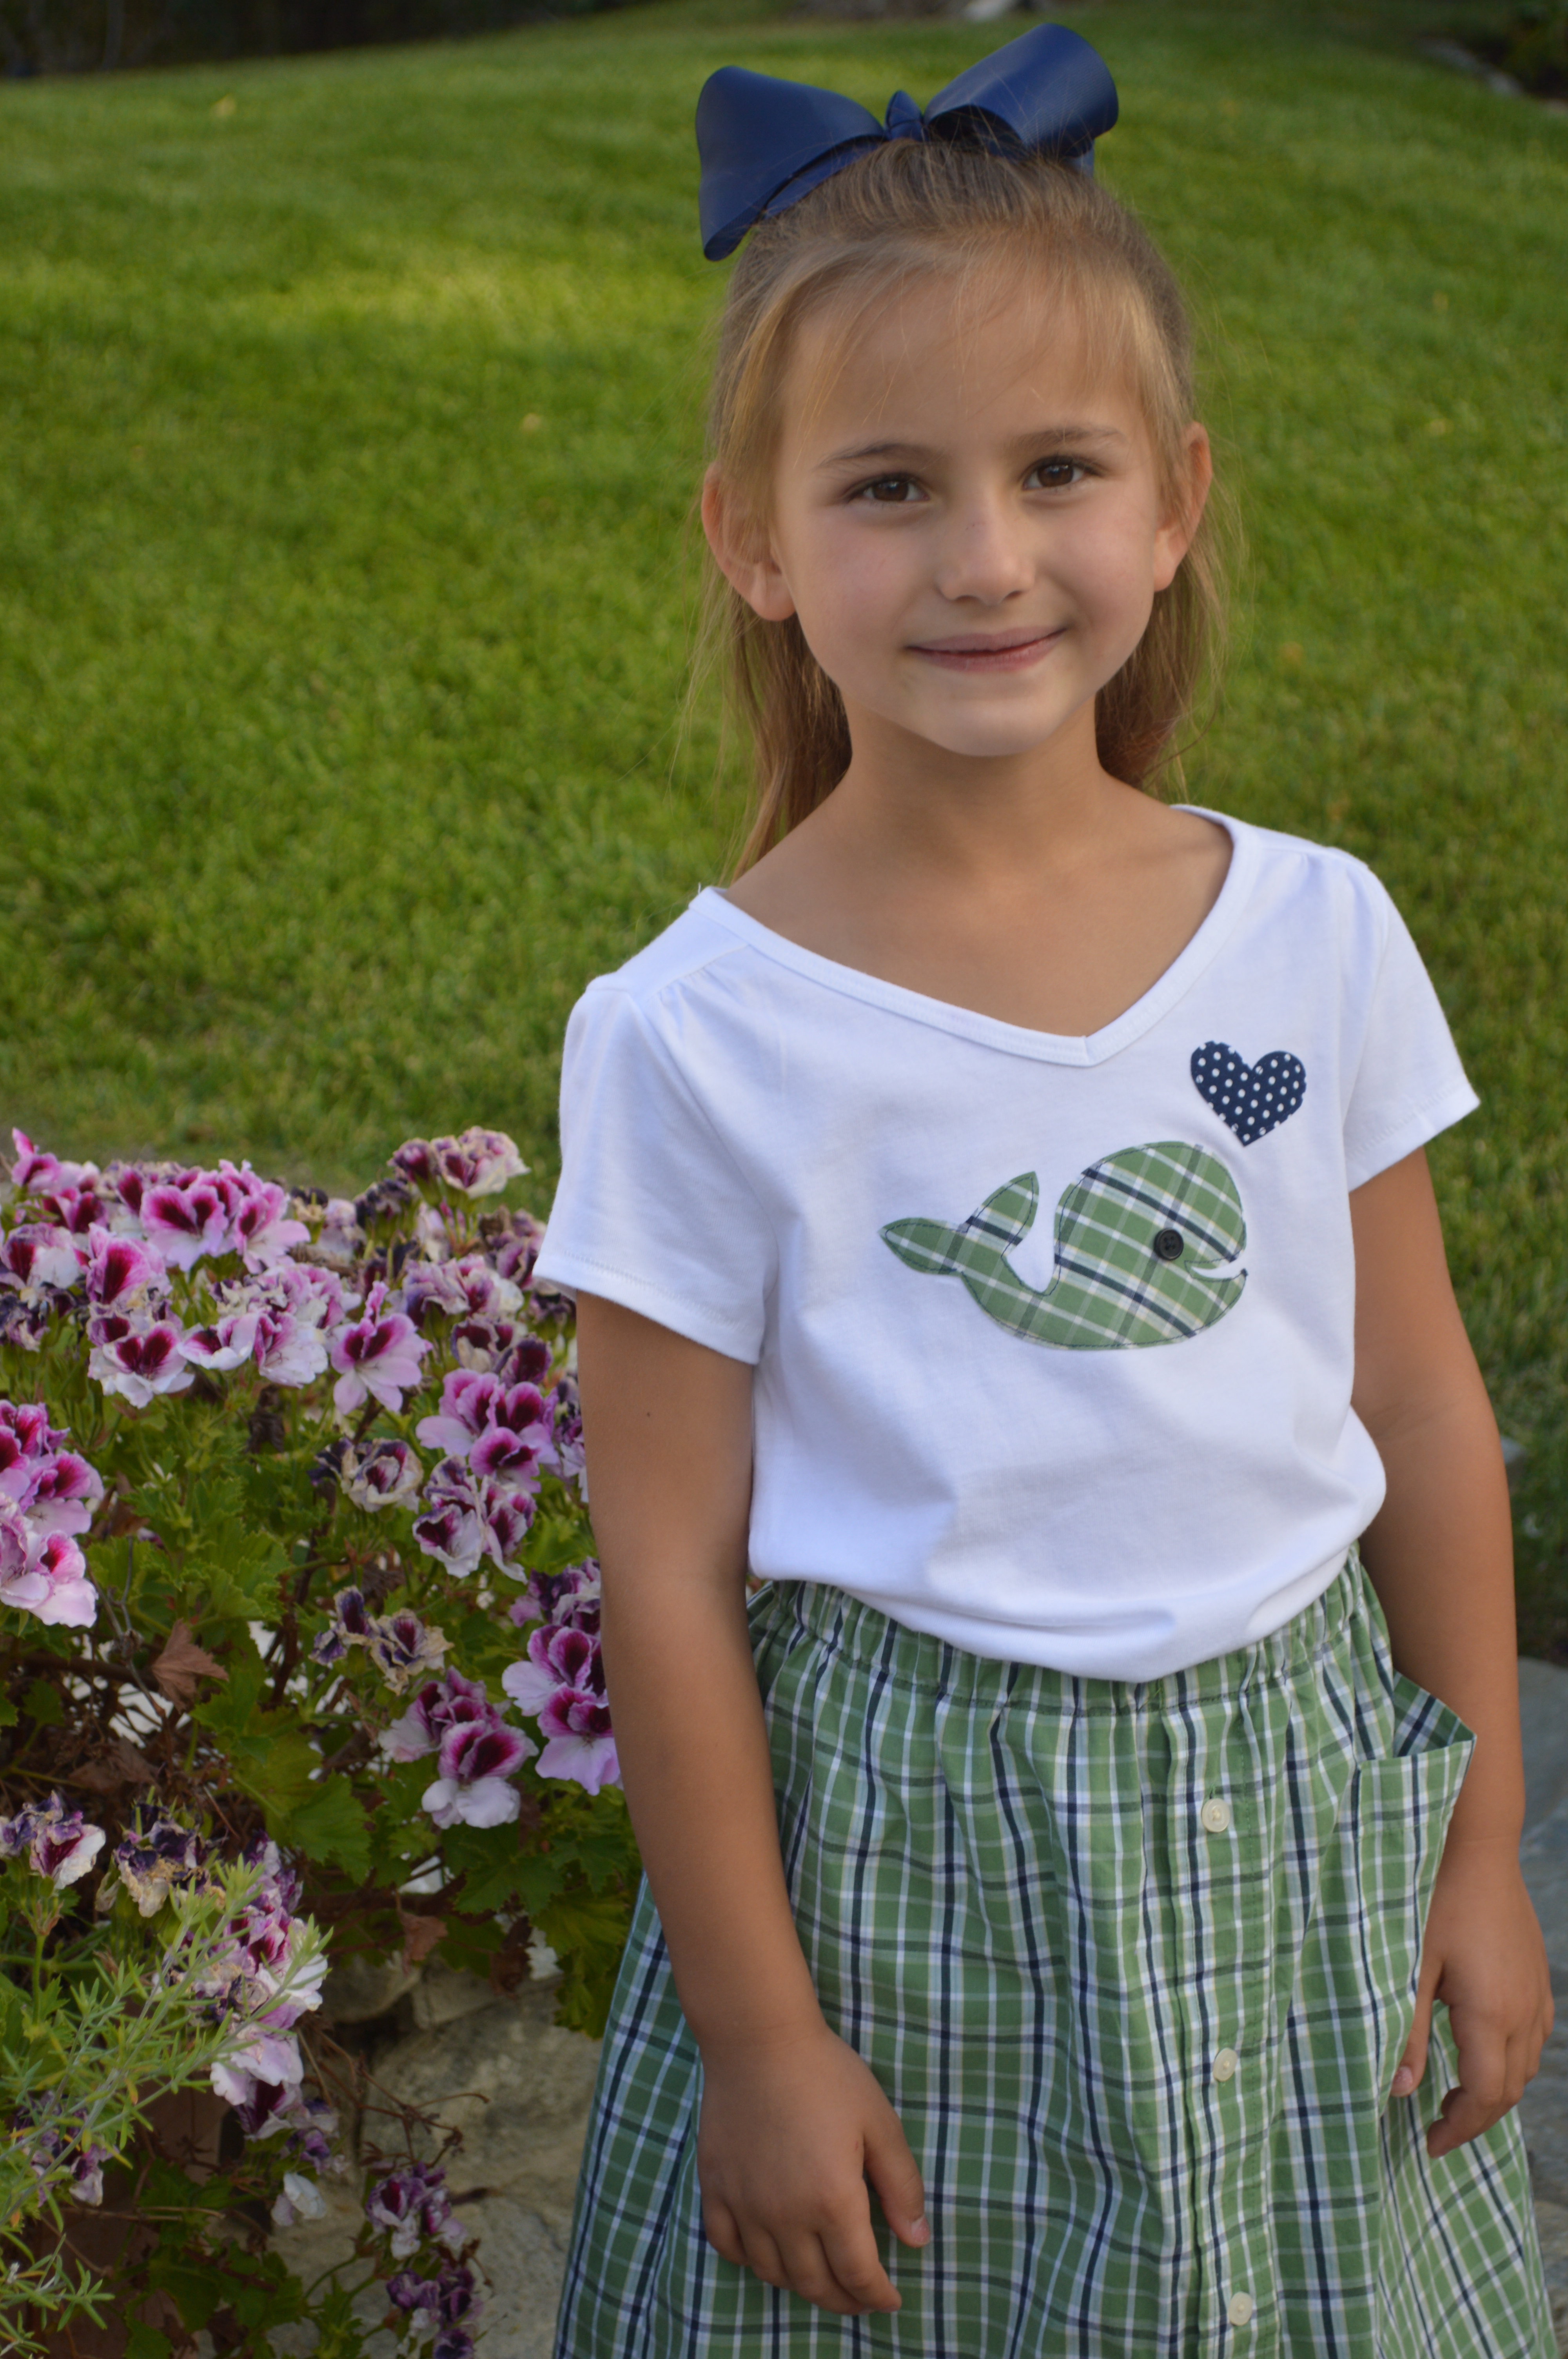
I found this pattern for making a girls skirt out of a men’s button front shirt in this book, Never Been Stitched.  The book is full of fun new sew or low sew projects.  Great for involving kids!

neverbeenstitched


Essentially you get a men’s shirt and cut it up, creating a skirt.  I bought a size XL shirt and it made a size 8 girls skirt.IMG_8390

Sally wasn’t too thrilled about the idea until I made this cute whale shirt to go along with it.  I used some of the left over fabric and used Heat n Bond EZ sheets that you run through the printer.  Click HERE for the whale pattern.
DSC_0455
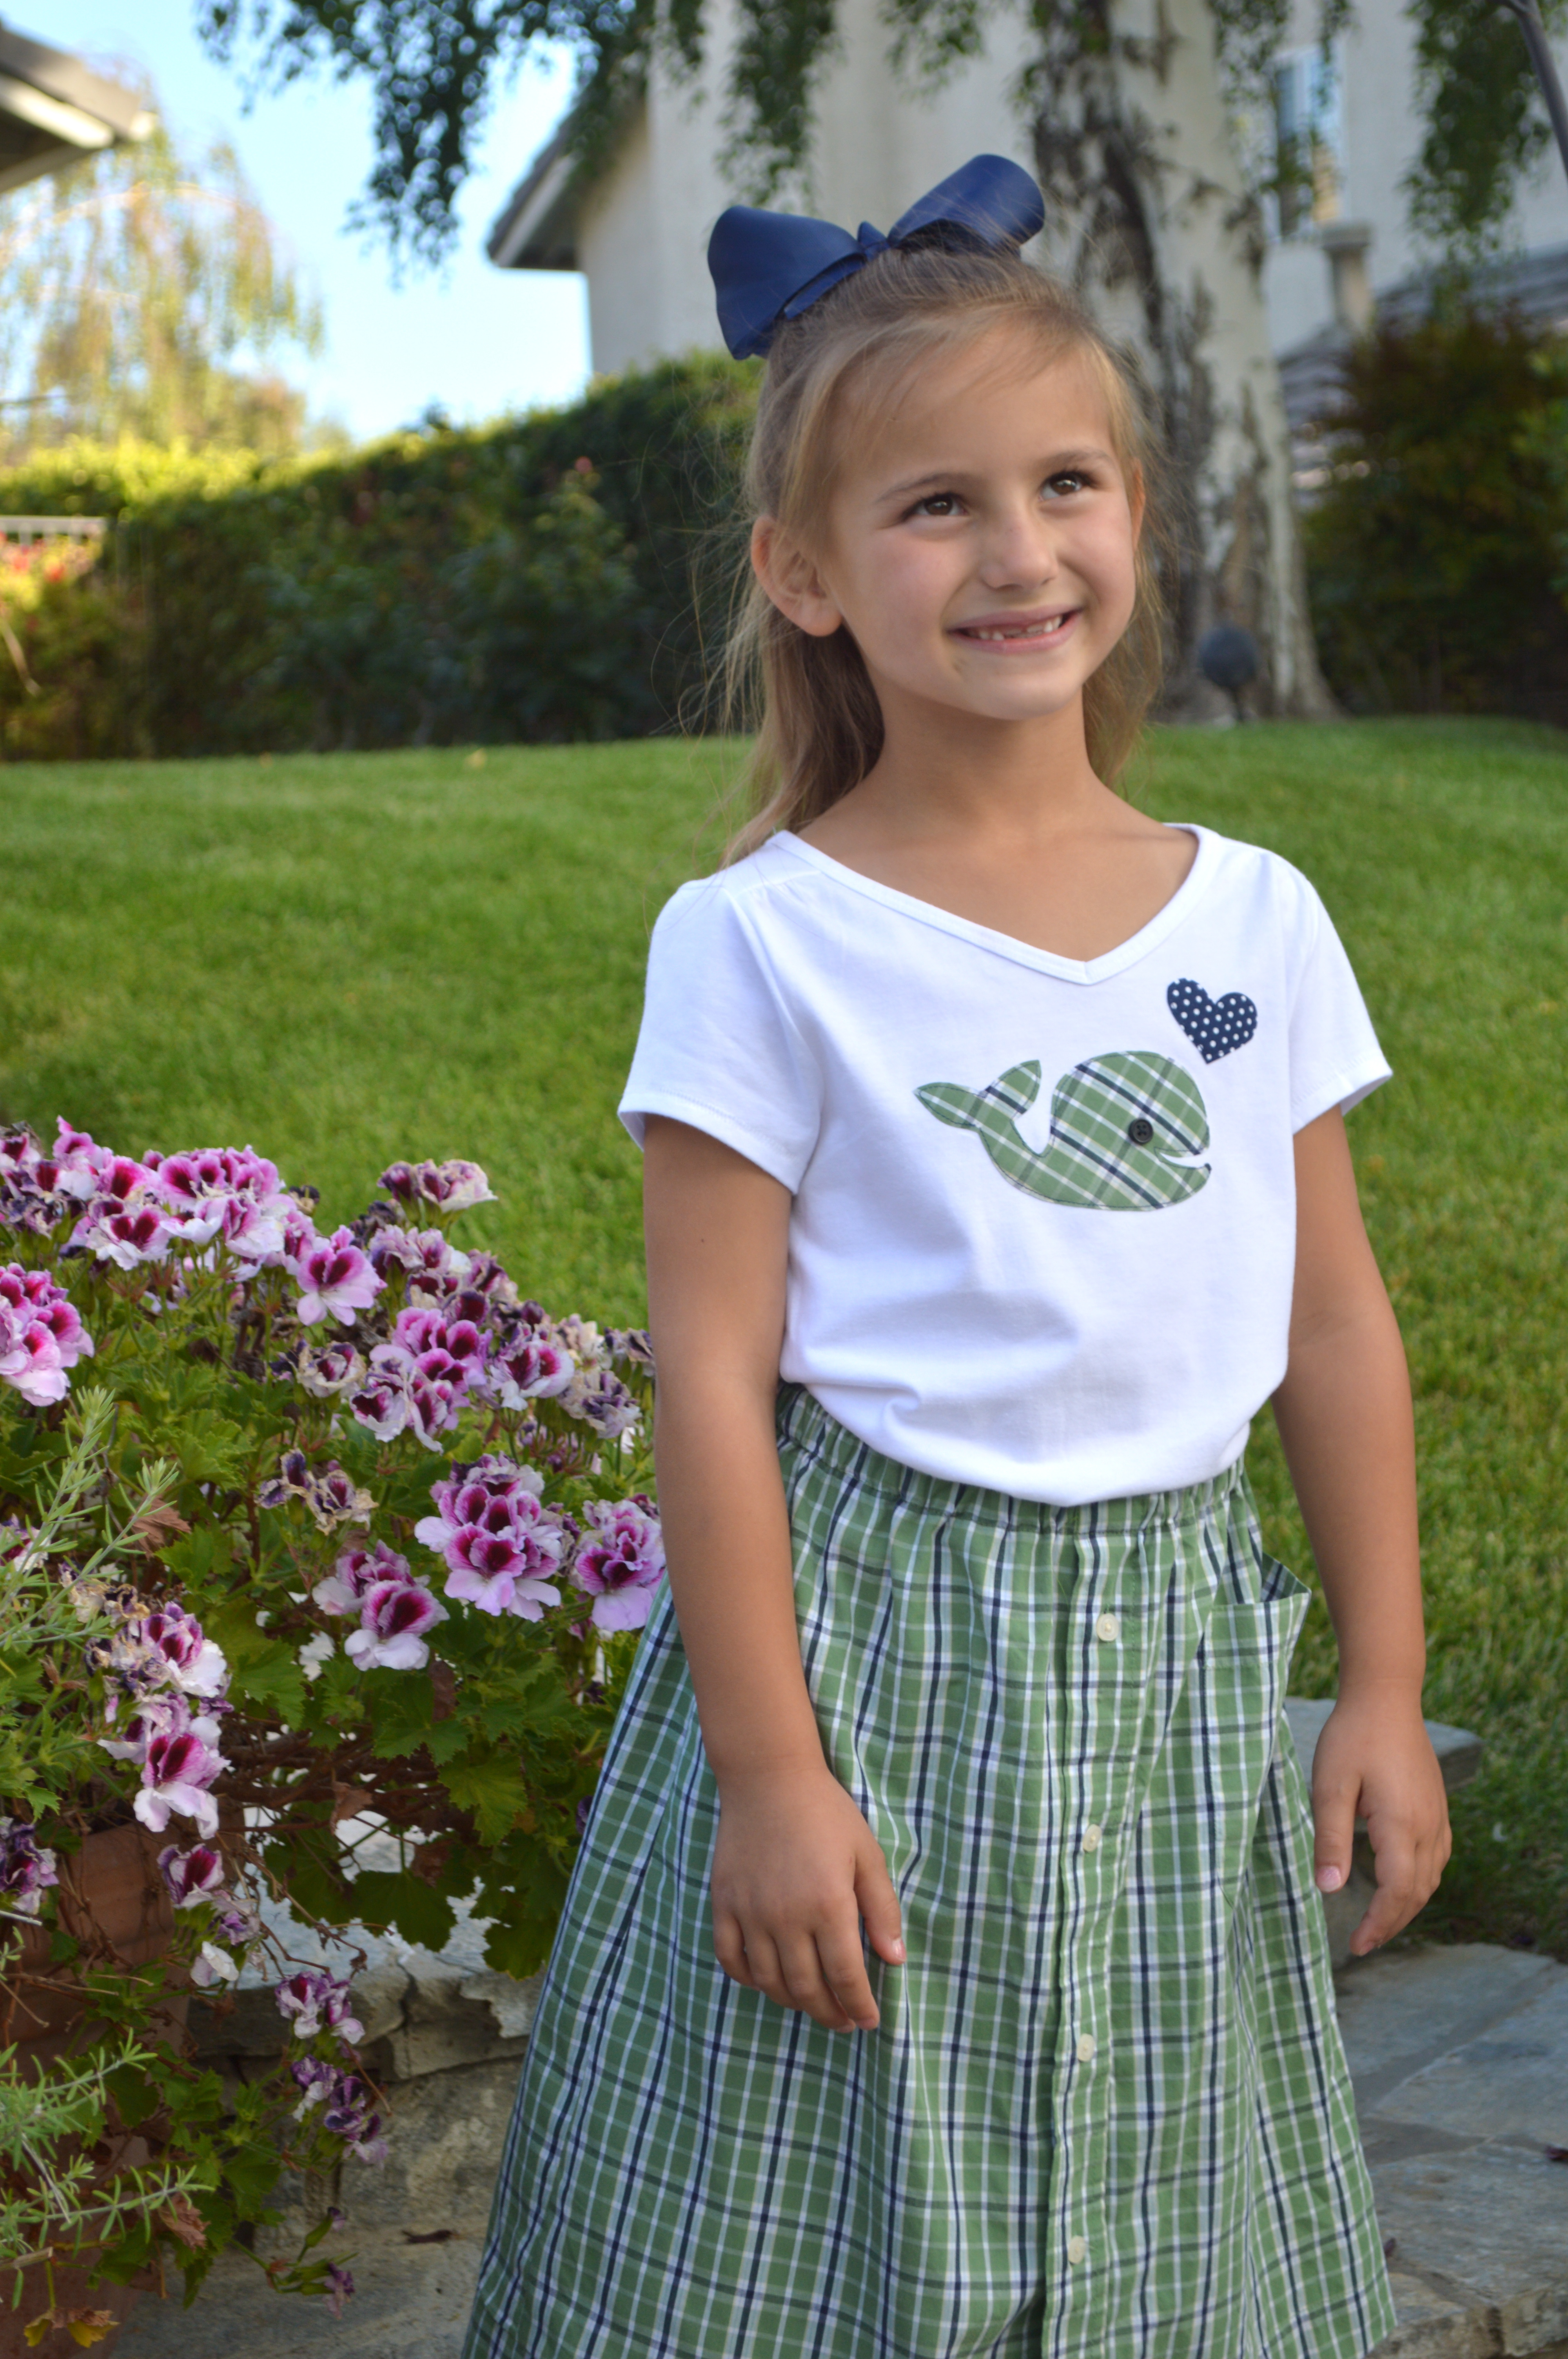
I even used the existing front pocket from the shirt to be a high side pocket on the skirt.
DSC_0363

Outdoor Table Re-Do

My friend gave me her mother’s kitchen table.  It’s not your average kitchen table…..It’s HUGE and ROUND!!!  I think the table originally cost $$$$.  It was in bad shape when I got it.  The mom had caught a floral arrangement on fire and burned part of the table.  Then she cleaned it with some harsh cleaner and it reacted with the finish, turning it into a sticky mess!  Of course we’ll take the table!!!
I didn’t get a good before picture – but this is it after hubby took it apart.  I just love power tools!!!  We plained it down pretty good – it took the burn mark right.  Then finished with light sanding to get it really smooth.  I didn’t bother sanding the base – it is getting paint!
Meet my new favorite stain – Rust-Oleum’s “Driftwood”.  That’s exactly what it looks like!  It’s perfect for this project because it will be living outside!
That’s me!!  Of course I do all my DIY projects in tie-dye!!
We took out the rotten fake wood inlays and prepared the surface for tile!!
And here it is with super cute 1″ tiles.  It makes me think of the ocean!!  Don’t you love the Lazy Suzan on top!  My kids LOVE this – we’ve never had one before!
I sealed it with Rust-Oleum’s Ultimate Spar Varnish.  It has maximum weather protection!!
I love that it can seat 10 people comfortably!

I couldn’t resist painting the base a bright turquoise color!  Spray paint, of course!!

It’s pretty bright, but the outdoors can handle it!!


I love how it turned out – it’s totally me!!

Amanda

Repurposed Window

 I love old windows!  I am always trying to find something new to do with them.  At the top of my stairs, I have 3 frames with pictures of my 3 children on their blessing day.  This window I found has 3 openings….hmmmm!

This is how you make a fabric mat background for your window:

Measure the opening

 Cut cardboard the size of your measurements

 I have 3 pieces the exact same size.  I used my rotary mat and guide, but I used a utility knife so I didn’t ruin my rotary cutter.

 Next, cut your fabric 1″ larger on all sides.  Love this Riley Blake print!

 Get out the hot glue gun – yea!  Glue all sides and pull the fabric so it is tight.

 It should look like this on the back:

 Front:

 You can put these on top of the glass, behind the glass, or instead of the glass.  I put mine behind the glass.

 I took each of the photos and attached them by putting push pins in each corner.  I didn’t actually put a hole in the picture, just next to it and the tack holds the picture in place.

 To secure the cardboard mat to the frame, use small nails and hammer them in each of the sides.

 Because this is pretty heavy, I wanted to hang it safely.  I used “D” rings and attached them with screws to the back of the window.  To hang it, I drilled holes where the “D” rings hit and used anchors and screws.  The “D” rings hook over the anchored screws.

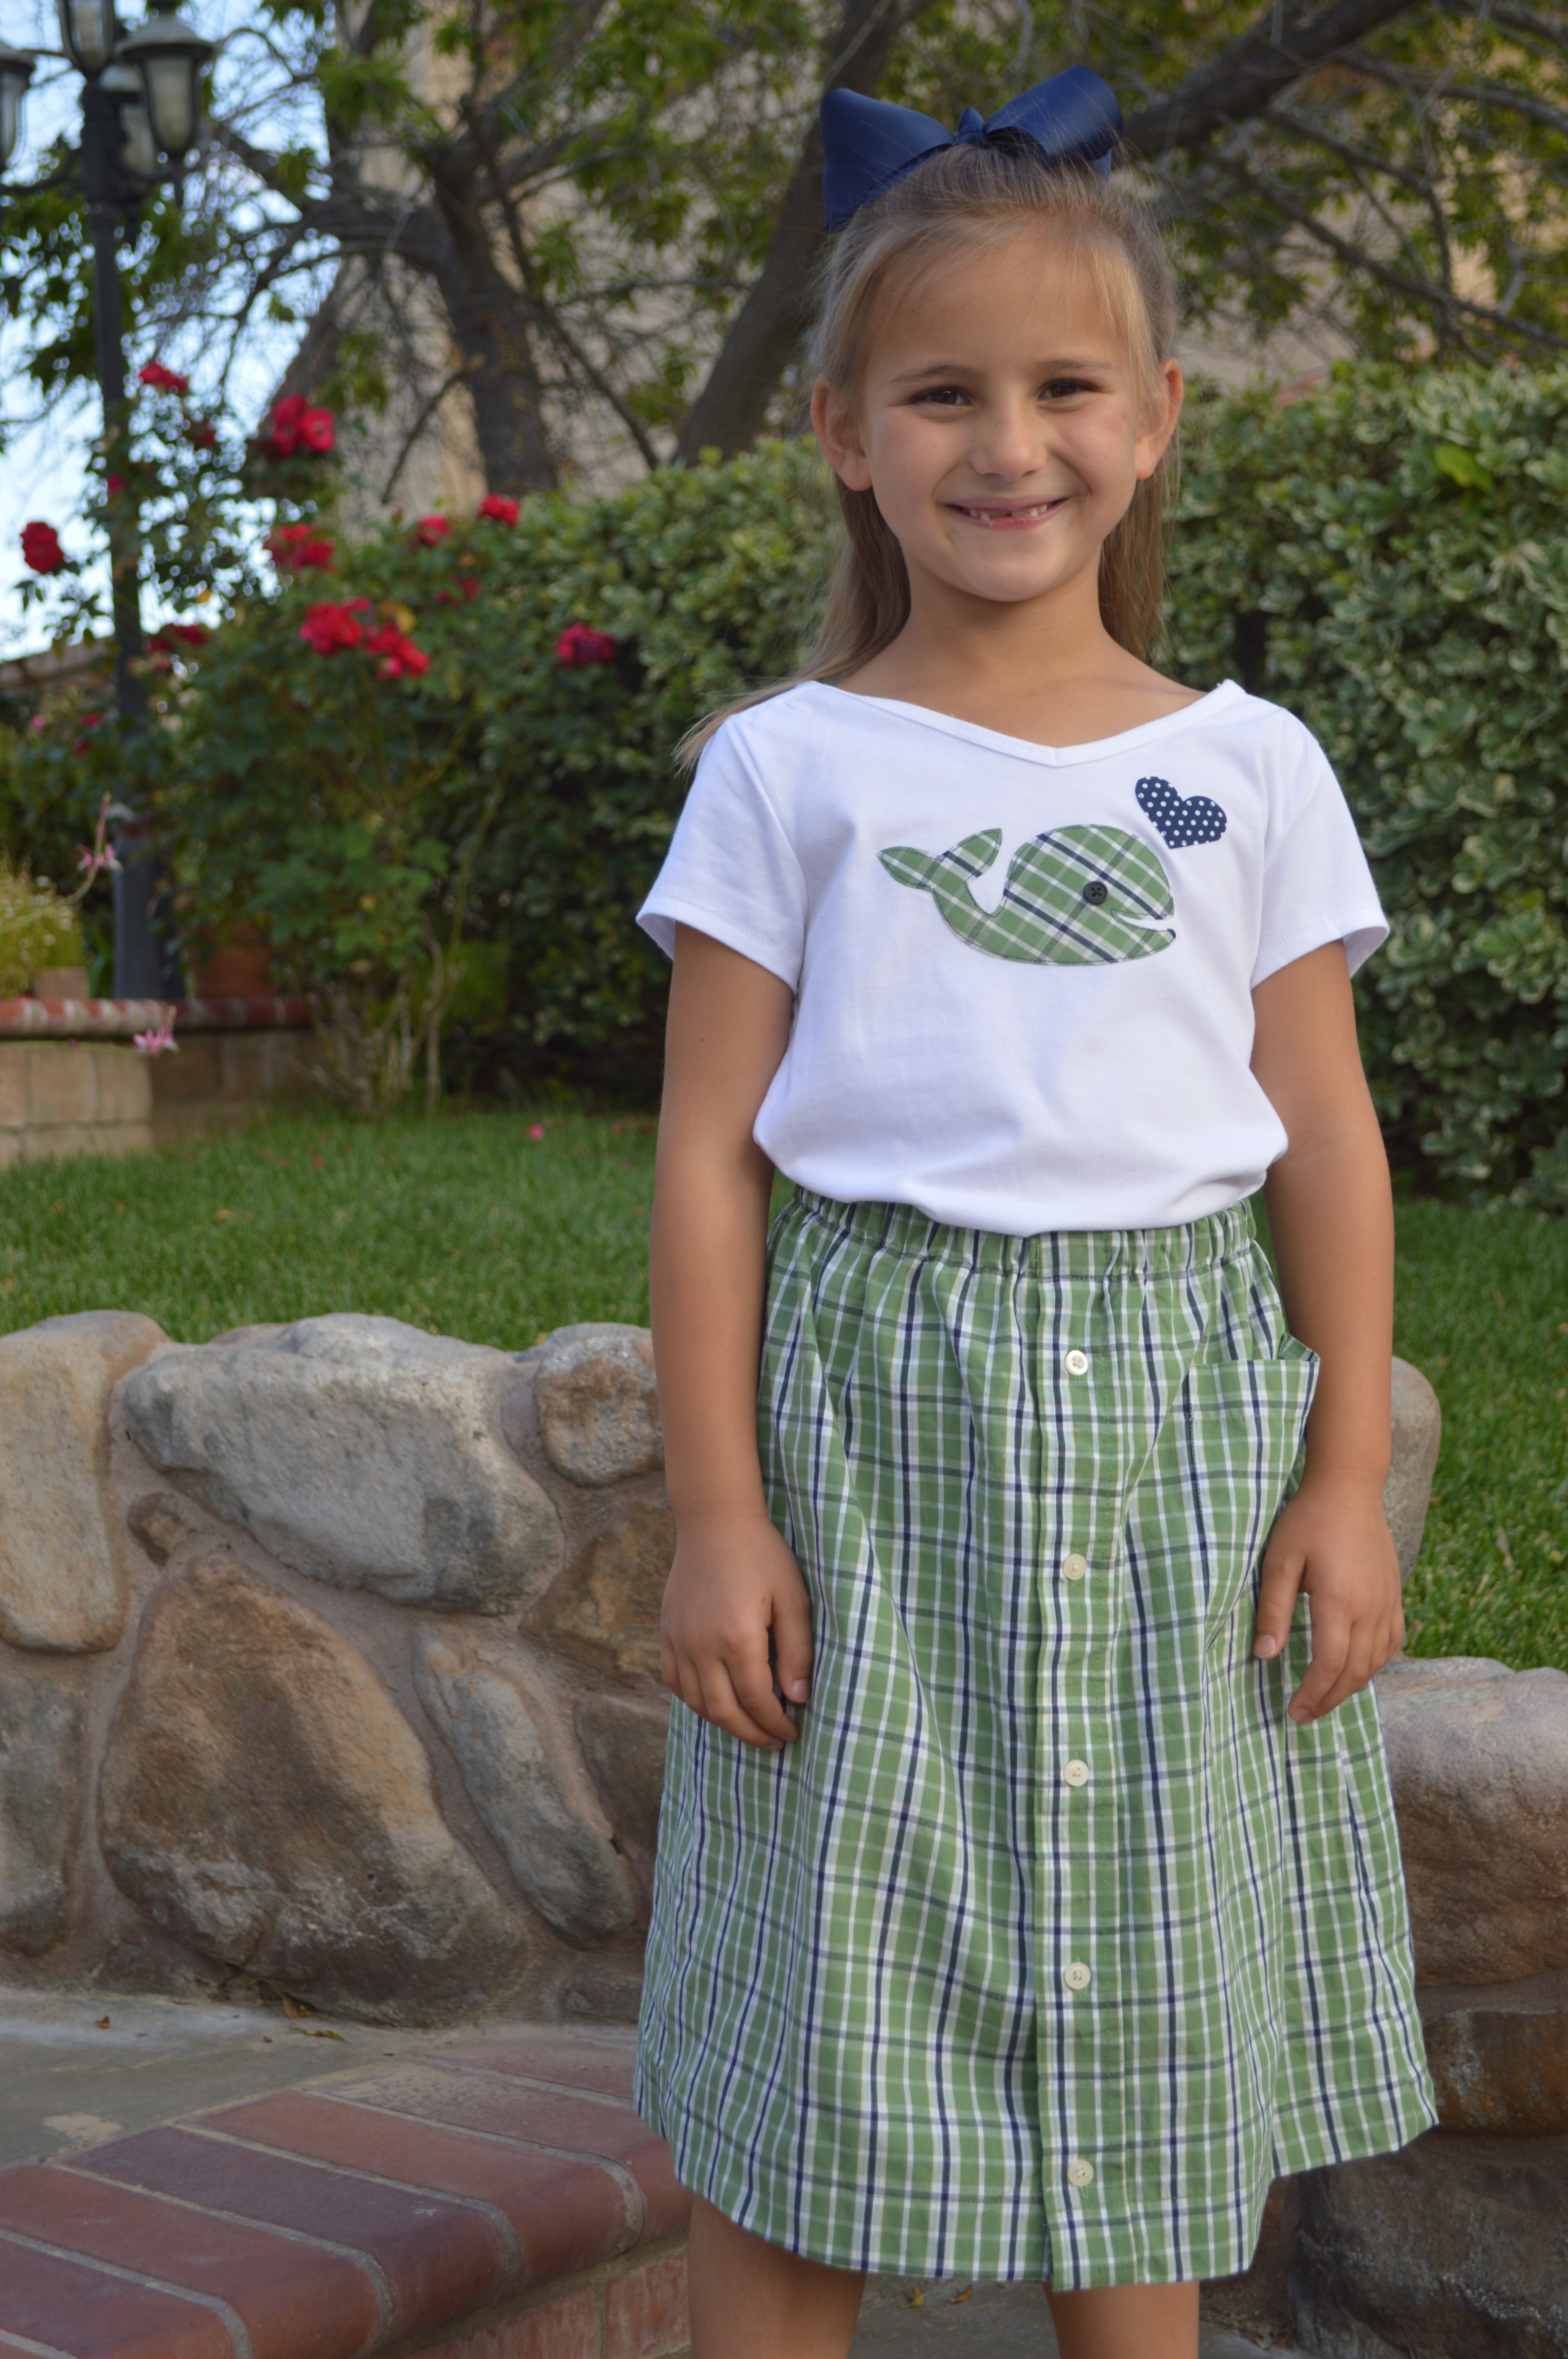
I really like how it turned out!  Looking at my daughter’s photo on the left  (13 years ago) all I have is this snapshot I took of her in the basement (it was on film of course).  The date is even stamped on the side of the photo.  We’ve come a long way in photography!

Amanda

Painted Armoire


 I bought this armoire on Craig’s List on Saturday.  I needed something for my 5 year old’s room – the mess is out of control in there!  I paid $125 for it – she originally wanted $200 so I felt like it was a pretty good deal.  (I am used to garage sale prices!!)  The armoire was from an antique store in Beverly Hills – sold!! 

I got it home and immediately sanded it and painted it…in the dark!  I might be the world’s most impatient person!
 
By Monday morning 3 coats of paint had been applied.

I decided to distress it a touch.  I like the “shabby” feel of it.  I love the detail of the flowers – perfect for the princess Rapunzel room!!

 When I was done with the distressing, I rubbed Minwax Finishing Paste on it – it’s my FAVORITE way to finish furniture.  I love the feel it gives it!


 It is hard to photograph in my daughter’s room – but we got it all moved in last night – yea!!!


Amanda

Painted Tea Cabinet

 I have been wanting to paint this cabinet for quite some time.  I can’t believe I finally did it!

 This is how it looked before.  It was stained one color.  Enter in Sherwin-Williams “Splashy”.  Only my new favorite color!

I decided to tackle this project at 10pm Saturday night.  That’s just how I work.  I took the doors off the hinges and lightly sanded – I mean LIGHTLY sanded.  This piece does not get a lot of wear.  I didn’t even prime (gasp).  I wanted some wood showing through.
 (Do you like the cereal boxes used to hold the doors off the floor!)
After it was painted I rubbed a walnut stain on the painted parts and then quickly wiped it off.  It took the “Splashy” down a notch and made it look a little more vintage.


 I bought some glass knobs which give it just the right touch.

 I added wallpaper to the back of the cabinet.  I cut the wallpaper to fit the dimensions on my rotary cutter.  I followed the manufacturers instructions on adhering the wallpaper.  It was quick and easy.

 
Whose ready for a tea party?

Amanda

Kitchen Table Re-Do

I bought this kitchen table (and 4 chairs which will be used in a different project) on Craig’s List for $25!  I was so excited for a new project.

 Right away I got to sanding it.

 Then I primed it with a dark primer.

 I painted it black.

 Then I painted over the black with white paint.  I used the same chalk paint method as I used on my coffee table.  The technique comes from I Heart Naptime.  I mixed 5 tablespoons of Plaster of Paris with 2 Tablespoons water.  Then added 2 cups of white paint.

My plan was to have the white paint look aged & like it’s chipping off with the black showing through.  Only I got so excited to paint I forgot to add Vaseline to parts of the table to make the paint scrape off easier.  I would definitely not forget this step!!

 Anyway, I painted 3 coats of white paint to the table.

 Next I sanded the edges so the black paint would show through & the table would look aged.  This is where the Vaseline would have been nice.  I didn’t get the big chunky paint chips that I wanted.  I am sure they will come over time!!

This Minwax Finishing Wax is my favorite stuff!!!  It gives such an amazing feel to your furniture – different then polyurethane.  You rub the wax on and then in 20 minutes you buff it out with a clean cloth.  It makes the paint feel like it’s been there for a long time!!  I even used it on my table top.  It won’t protect it as good as polyurethane, but I want the table to age naturally.

 This is our first meal at the table.  I love how it fits the space in my kitchen better than my rectangular table.

 Yea!  Now what can I paint next??

Boo Photo Art Thingy

I have so many Halloween photos through the years – it’s hard to display them all!  I came up with this idea to use photos to create the mat.  I bought this frame at a garage sale and the decorative mat was already in the frame.  I tossed the glass, painted the frame and then glued my favorite Halloween photos to the mat.  I also love the paper rosette – I can’t get enough of them!!

Coffee Table Re-Do!

 I bought this coffee table at a garage sale over 6 months ago – I paid $2 for it!  I didn’t really know what I wanted to do with it – I figured I would paint it or something.  So, it sat in the backyard for months and months.  After reading I Heart Naptime’s post on DIY Chalk Paint, I was inspired to paint something.  This coffee table was the perfect candidate!

 Step #1
Have your husband kill the black widow spider that is living in the underside of the table.  YIKES!!!

 I loved the tutorial from I Heart Naptime.  She does an amazing job of explaining each step and her piece of furniture came out fabulous.  You should check it out!!  I followed her steps pretty closely.

#2 Sand

This table had spots of glitter glue all over it from it’s previous owner.  I felt that a good sanding would help my table get off to a good start.  I didn’t sand down to the grain – just till it was smooth.

 #3 Base Color
My goal in this piece was to distress it.  I wanted a black color showing through (you can use any color – or even have the wood show through)  I used some black paint and painted the edges and spots on the surface.  Looking back, I would have given the entire table a coat of black because I couldn’t remember where I put my spots on the top!!

#4 Vaseline

This is a technique to help the base color show through the top color.  I have also seen it done with candle wax.  Rub the Vaseline along the edges and parts where you want the black to show through – this will give it a shabby chic or rustic look depending on how much sanding you do. 

#5 the Chalk Paint Mixture

This is where we will get that worn, vintage feel to our paint.  I went to Lowe’s and purchased latex paint in a light aqua color.  I asked for Satin finish and when I got home I noticed it was semi-gloss.  I was a little miffed, but it worked fine anyway. 

Mix 5 Tablespoons of Plaster of Paris with 2 to 3 Tablespoons water in a small container
Then measure 2 cups of paint in a separate container and stir the plaster mixture into the paint until it’s smooth.  This was the right amount for the size of table I was painting.

#6 Paint Paint Paint

I gave my table 3 coats of paint with a paint brush, letting it dry completely between coats.  Some items may only need 2 coats of paint.

#7 Inspection
Make sure your cat inspects your work, getting his paws, tail and back in the paint!!

#8 Sanding
Take a light weight sand paper and sand where ever you want the black to show through.  I sanded all the edges, curves, and random areas on the top.  This is where the Vaseline helps so you don’t have to sand like crazy – especially with 3 coats of paint!  It worked great!!

 #9 Finishing Wax
This is my favorite part of the project!  Use Minwax Paste Finishing Wax.  Get a rag and rub it all over your piece of furniture.  Then let it sit for 20-30 minutes.  Take another cloth and buff or polish the wax.  The wax gives it a vintage look as it is not glossy or too shiny, yet not flat.  It’s the perfect finish for this project.  If you are finishing a piece that needs to be durable, such as a kitchen table, I suggest polyurethane or polycrylic – it will be more durable.  You can get those in satin finish so they aren’t too glossy.

 Ta Da!!!!
It’s done & I LOVE it so much!!!

 I would totally paint furniture using this technique again.  When I bought the $2 table I was thinking $4 of spray paint and it’s done.  This process was lots more $$ but still cheaper than buying real chalk paint.  Plus I have plenty of Plaster of Paris and finishing wax to do several more projects – YEA!!!

Bunny Jars

Instead of packing for our camping trip, I have been obsessing about these:
Yesterday I saw this tutorial for Bunny Jars from Torie Jayne. For the past 24 hours all I could think about was making the jars. I went through all the children’s toy animals only to find not one bunny. (If I want to make dinosaur jars sometime, I am set!) I went to a few stores keeping my eyes open. Finally at Pier One I found these porcelain bunny ornaments – they were the closest thing so I bought them.

Last night I cut off the hangers (which I wish they didn’t have) and epoxied them to my jars. (I save every jar I come across. I even emptied out a bottle or pickle relish because I liked the jar!)


This morning I got out the spray paint. I first primed them then painted them what ever colors I had on hand. I filled them with paper grass (which was also hard to find this late in the season) and then put the malted milk eggs in. I think they are cute.
Now I can start packing for our camping trip!!!