Alice’s Crossroads Quilt Pattern

WonderlandBlogHop

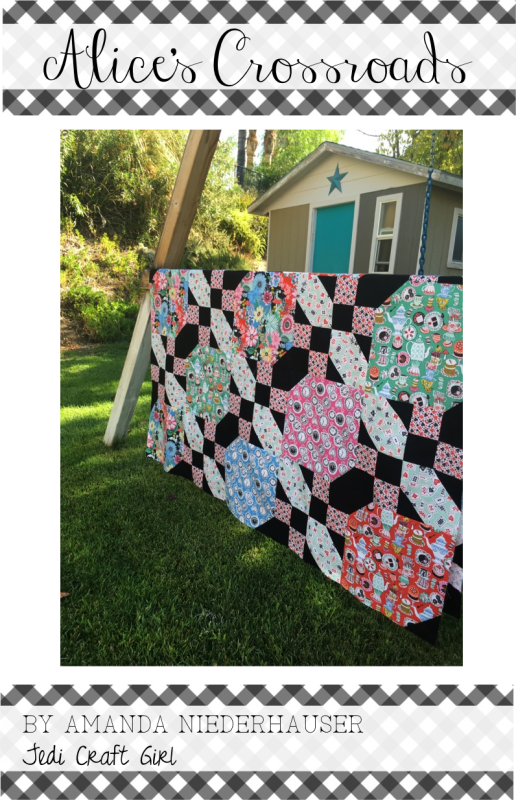
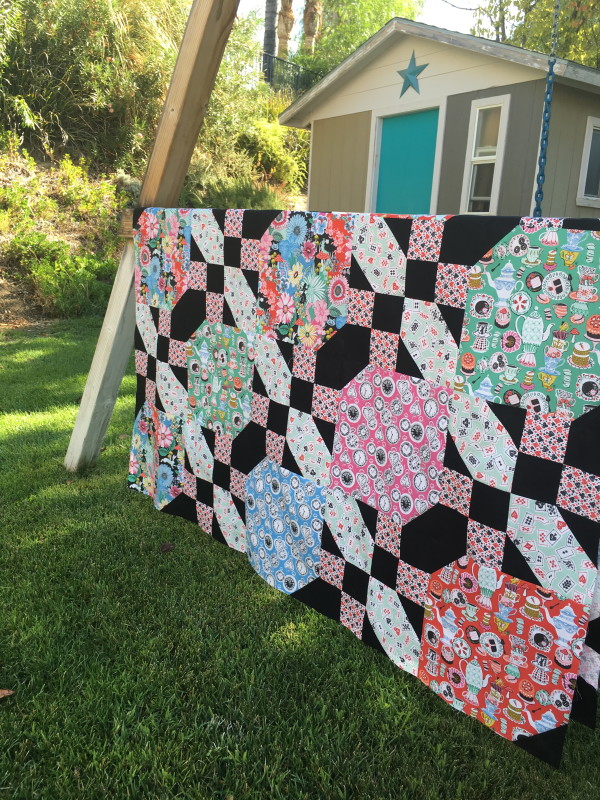
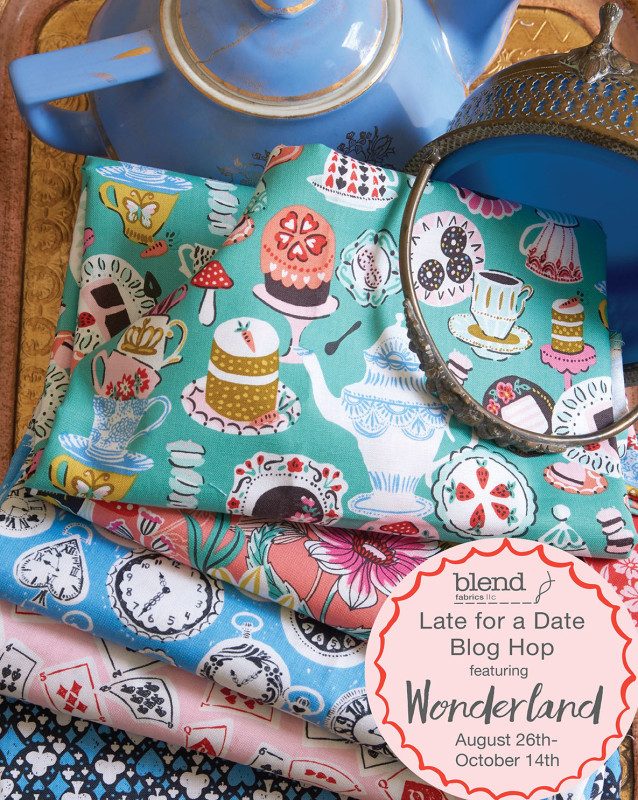
I’m super excited to announce my latest quilt pattern called Alice’s Crossroads which is inspired by Blend Fabrics’ Wonderland fabric line.

alice crossroads cover

One day Alice came to a fork in the road and saw a Cheshire cat in a tree. “Which road do I take?” she asked. “Where do you want to go?” was his response. “I don’t know,” Alice answered. “Then,” said the cat, “it doesn’t matter.”

I love this scene because we learn a lot about life from the Cheshire Cat’s answer and this totally inspired the quilt!  The quilt actually has several different paths and so it’s up to you to choose which way to go!  You can purchase the pattern in my Etsy shop for instant PDF download 🙂

IMG_3407

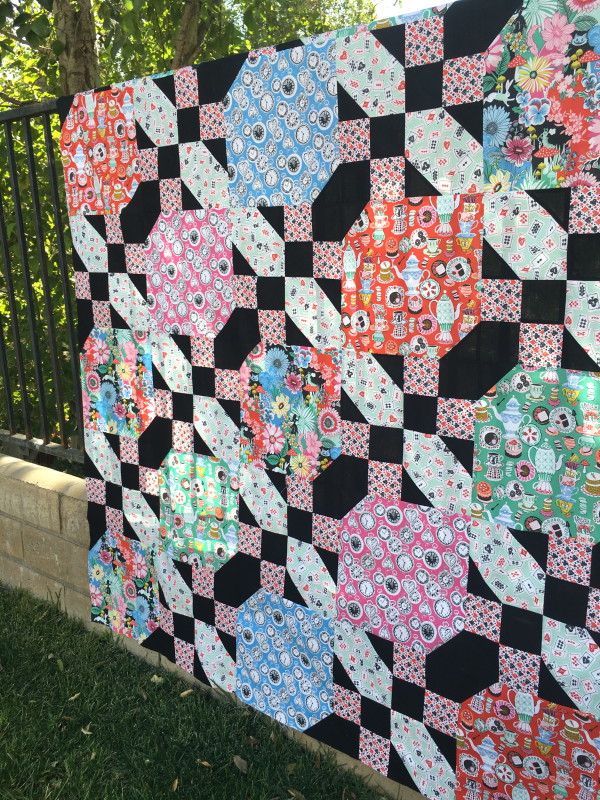
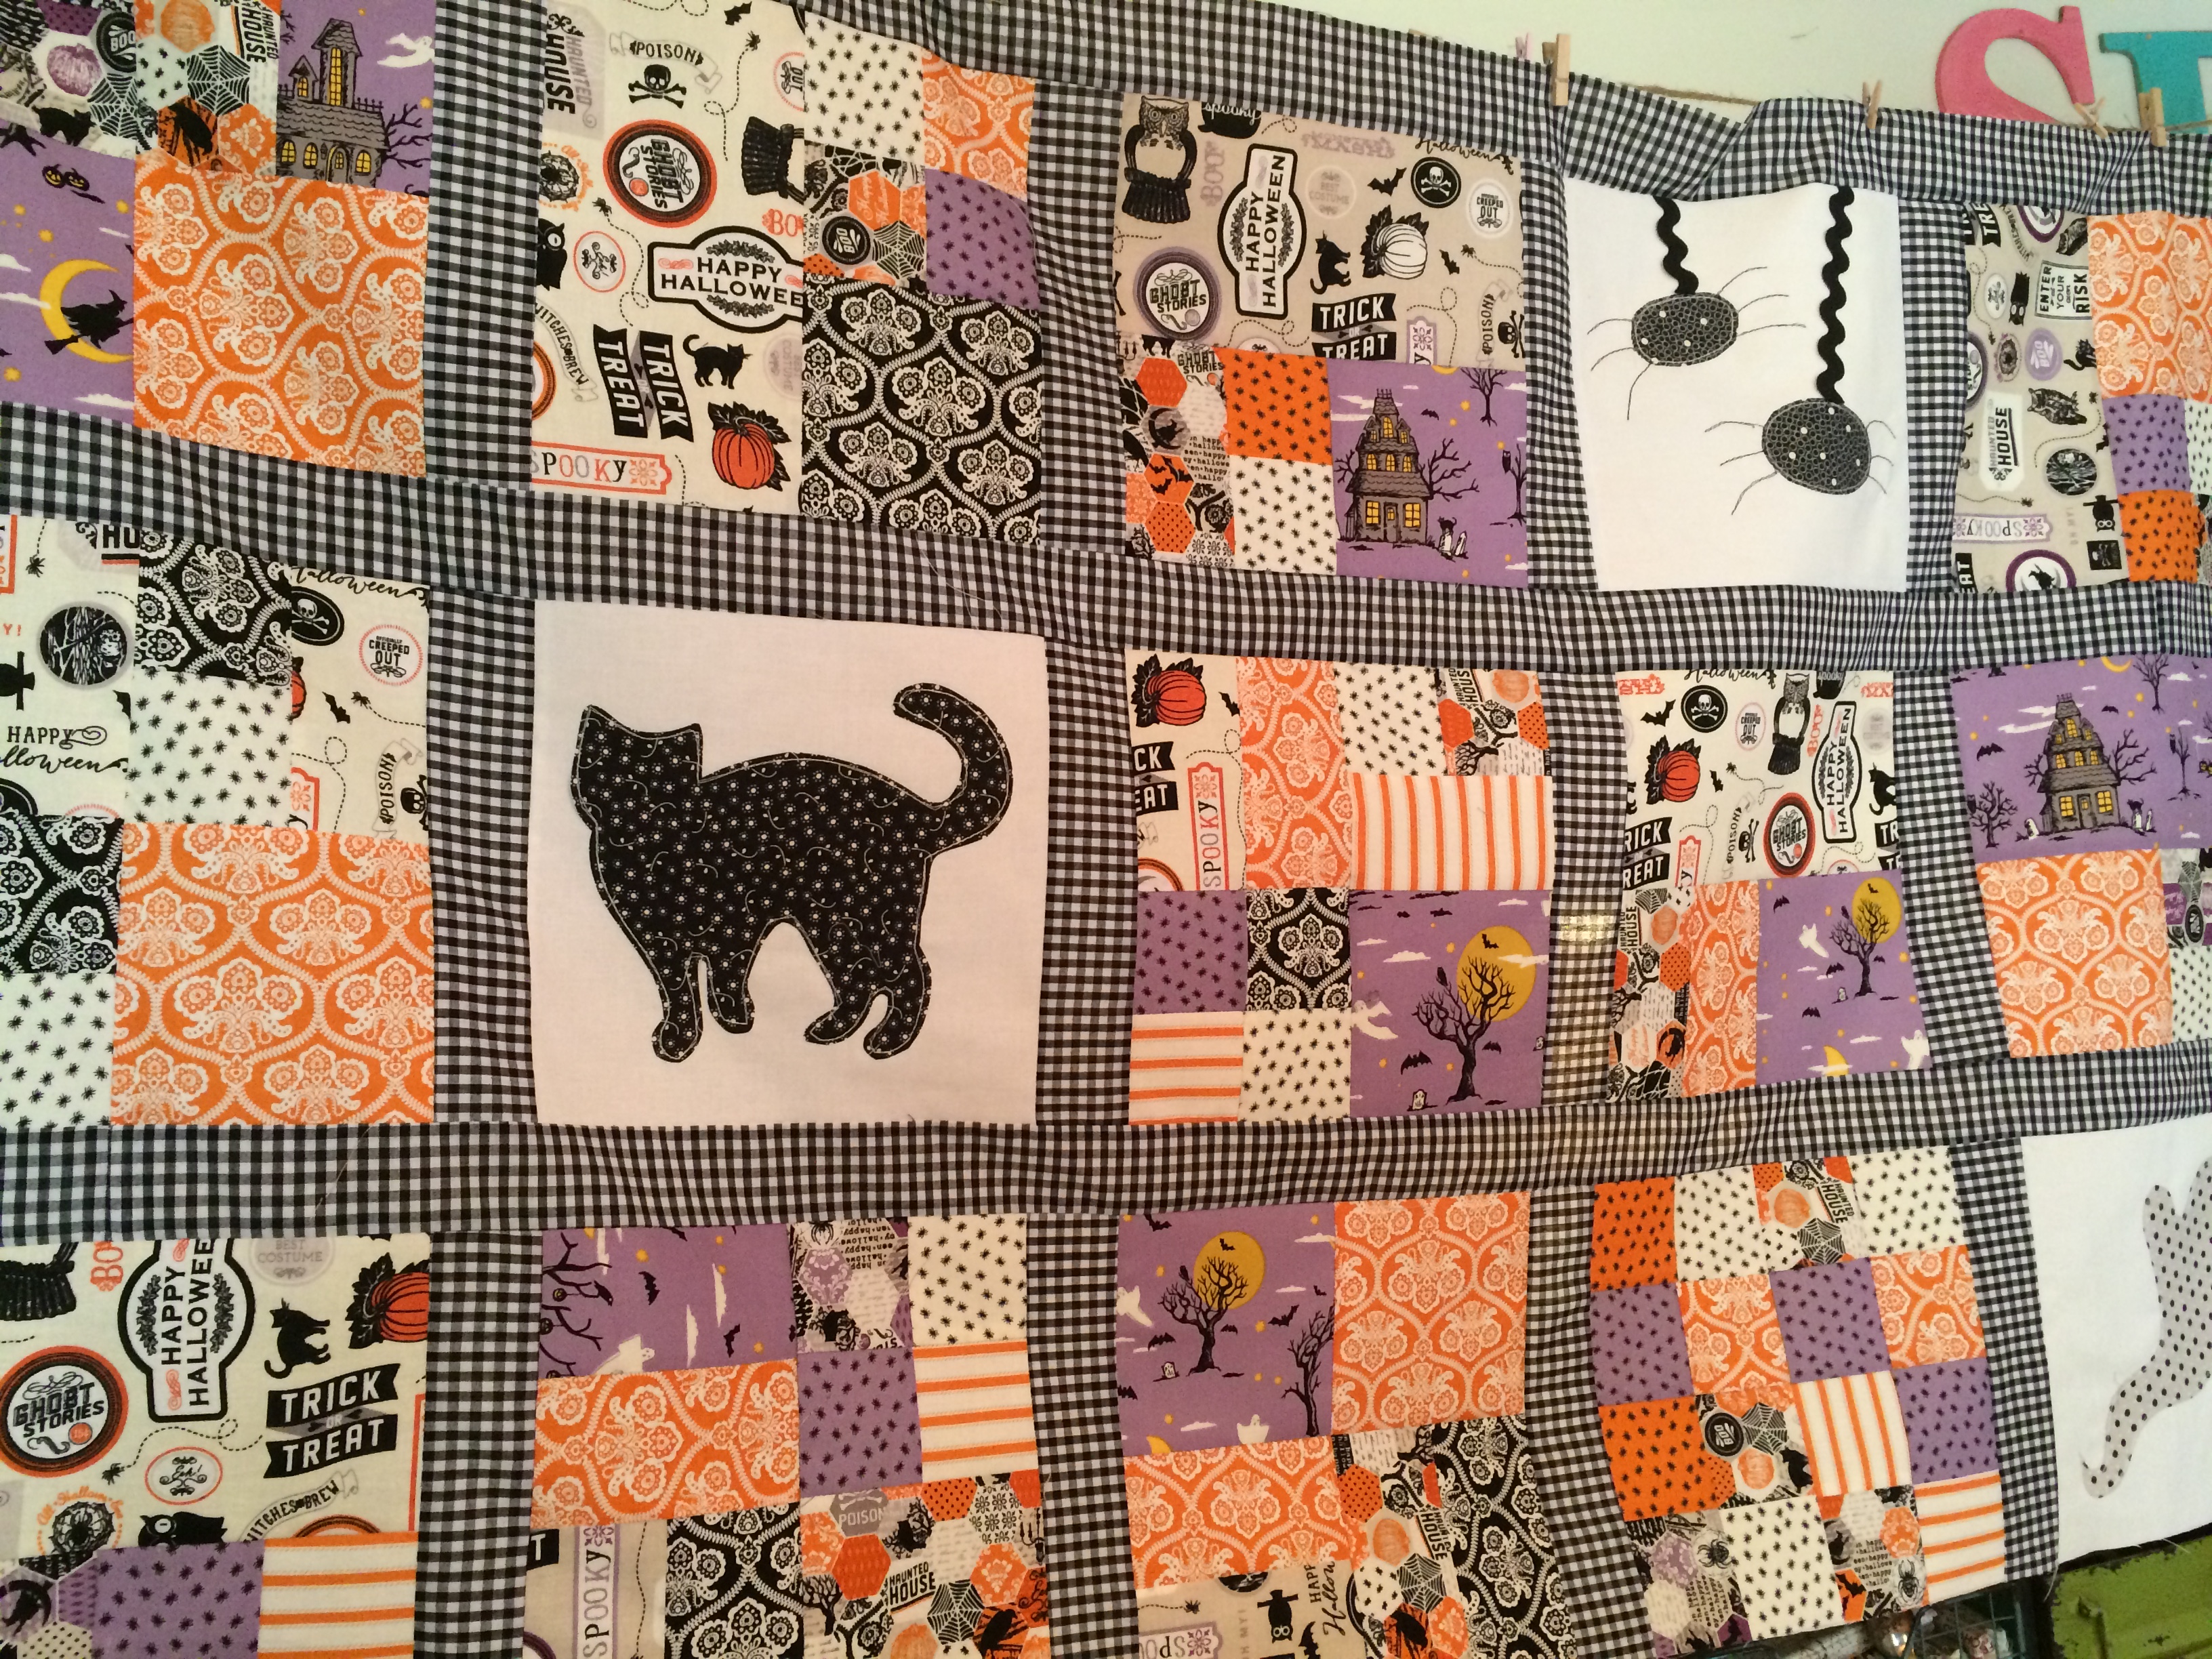
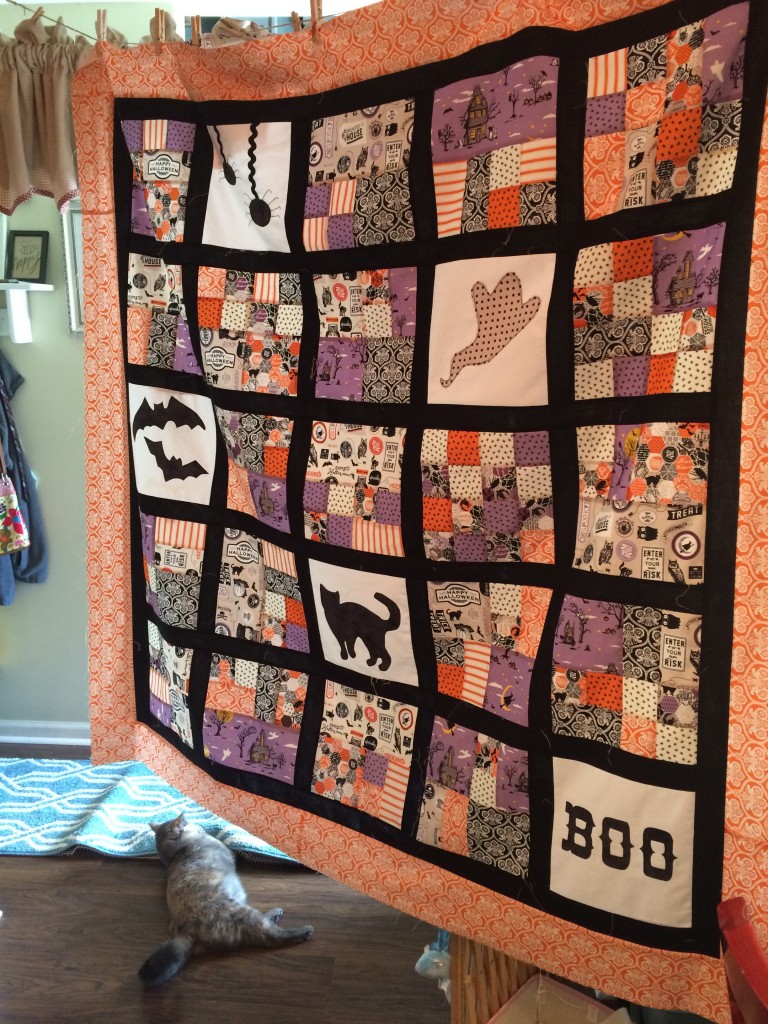
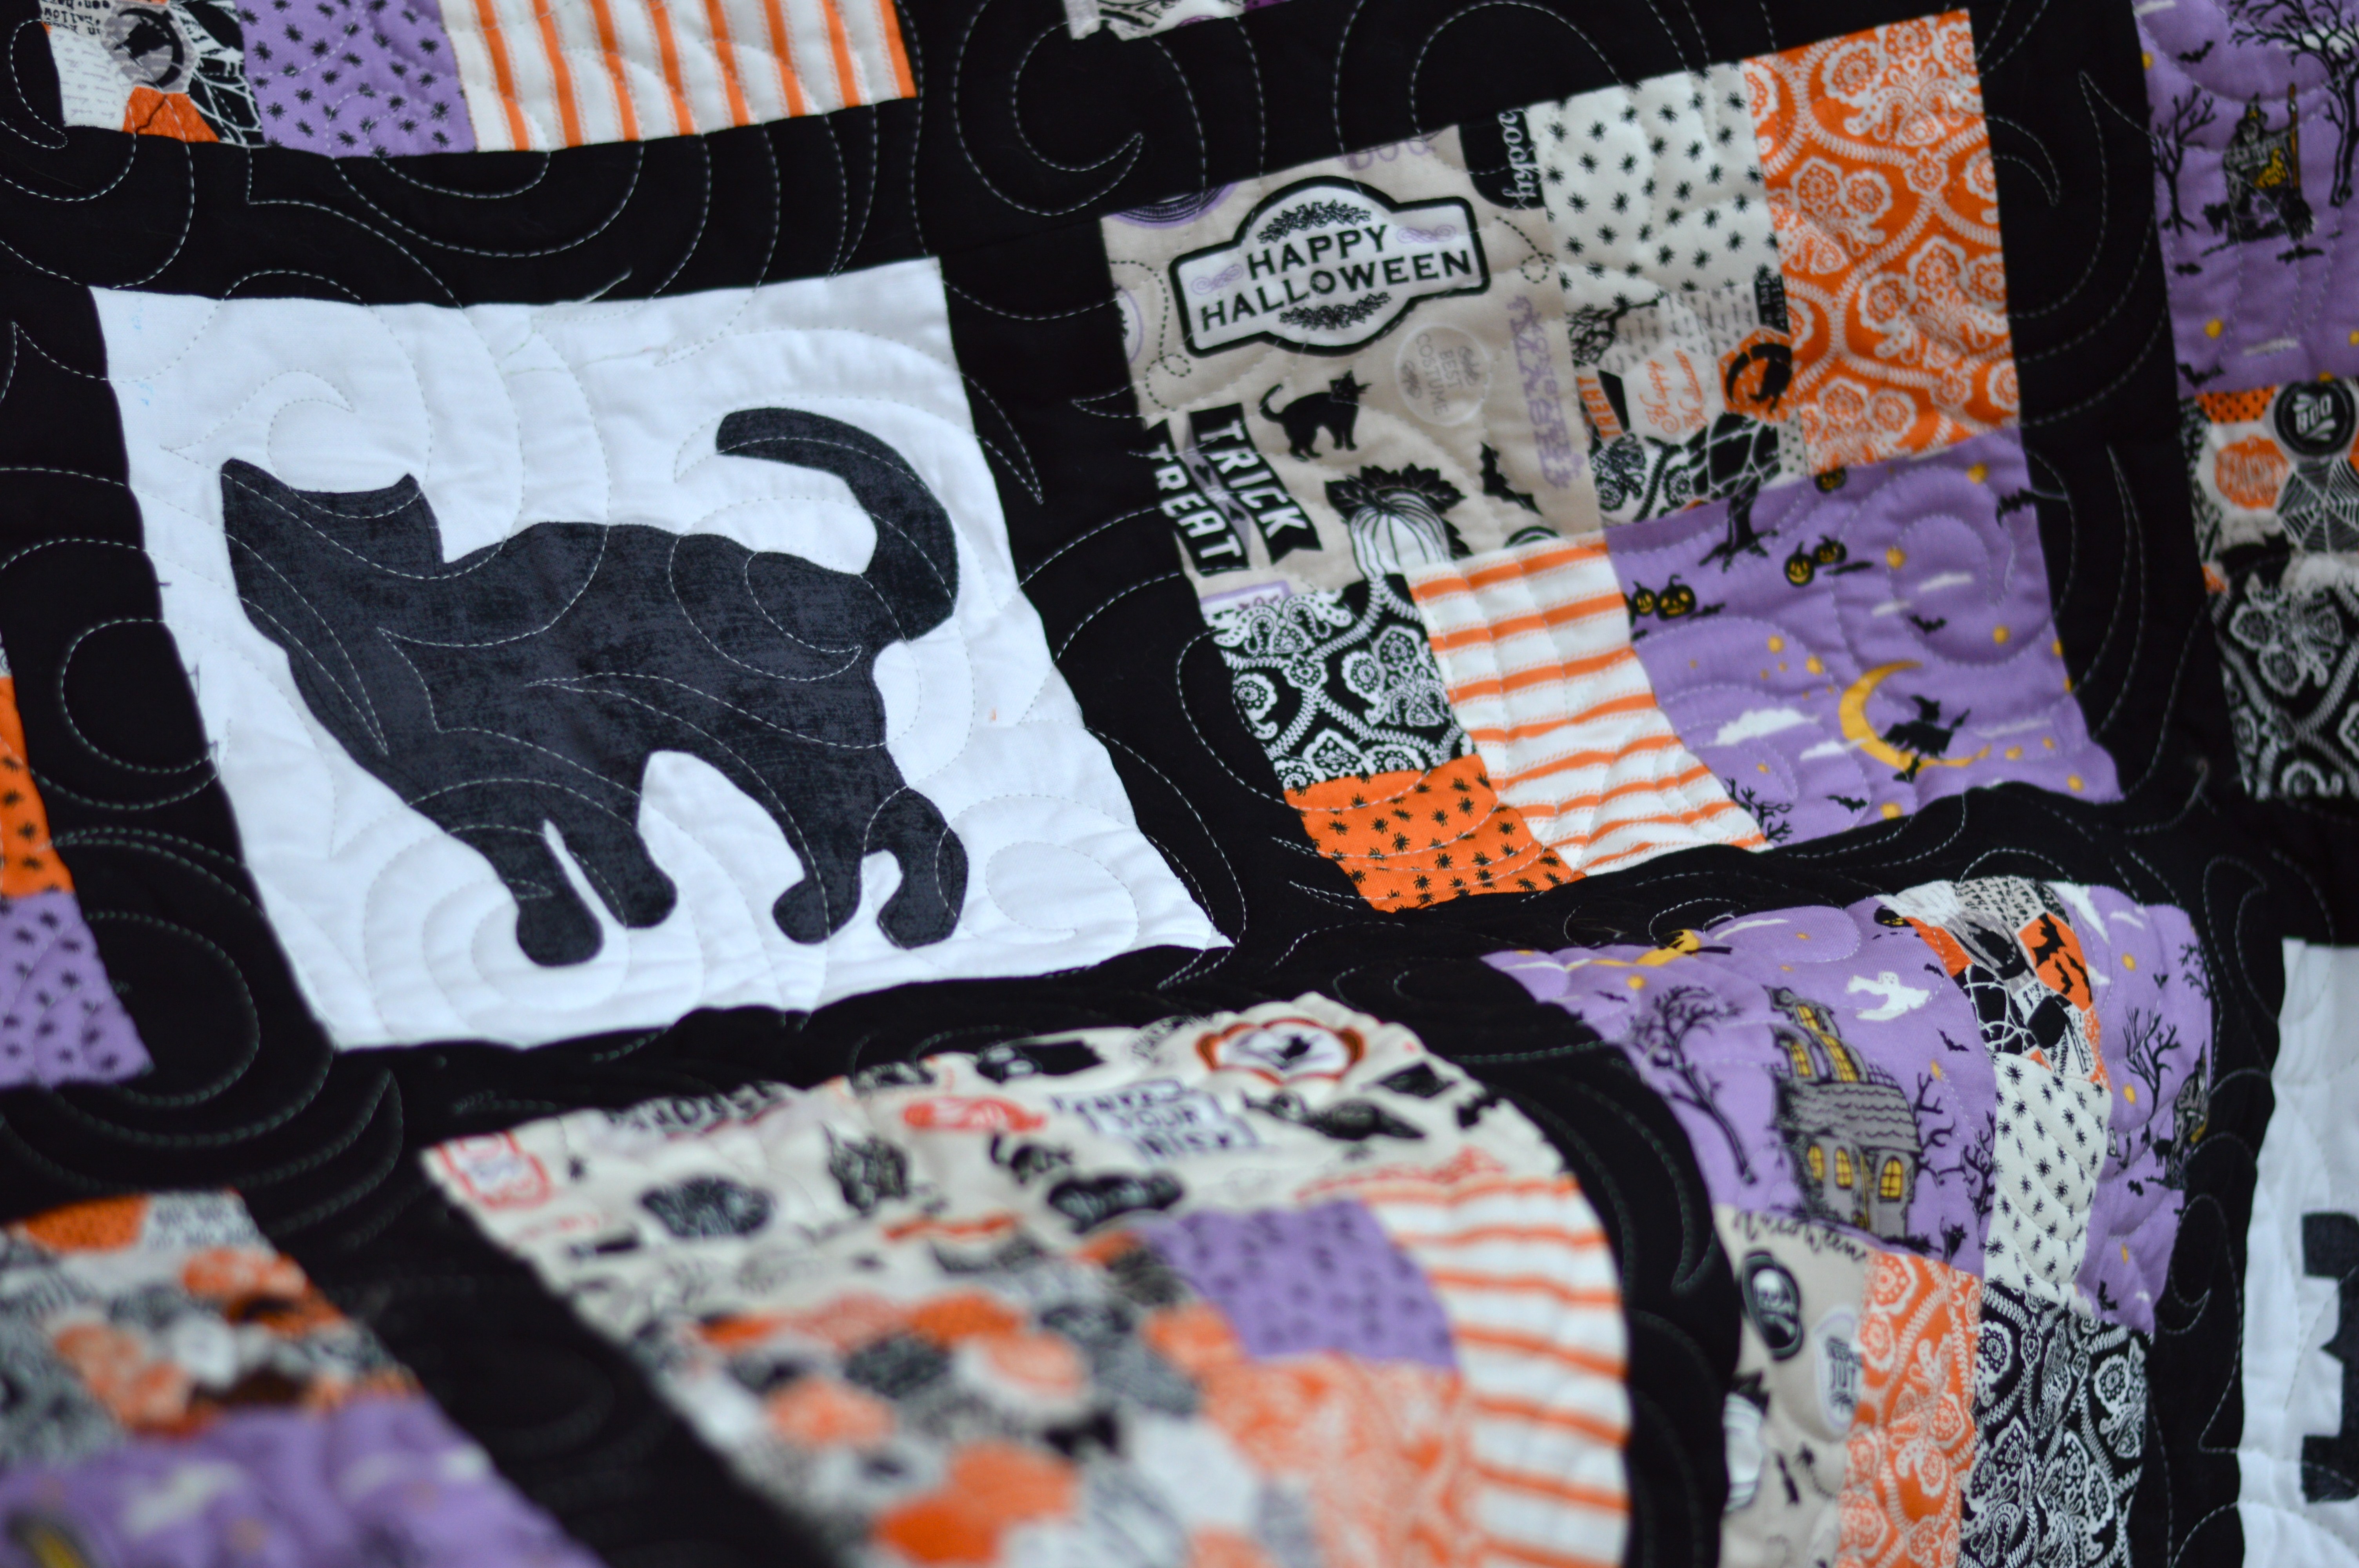
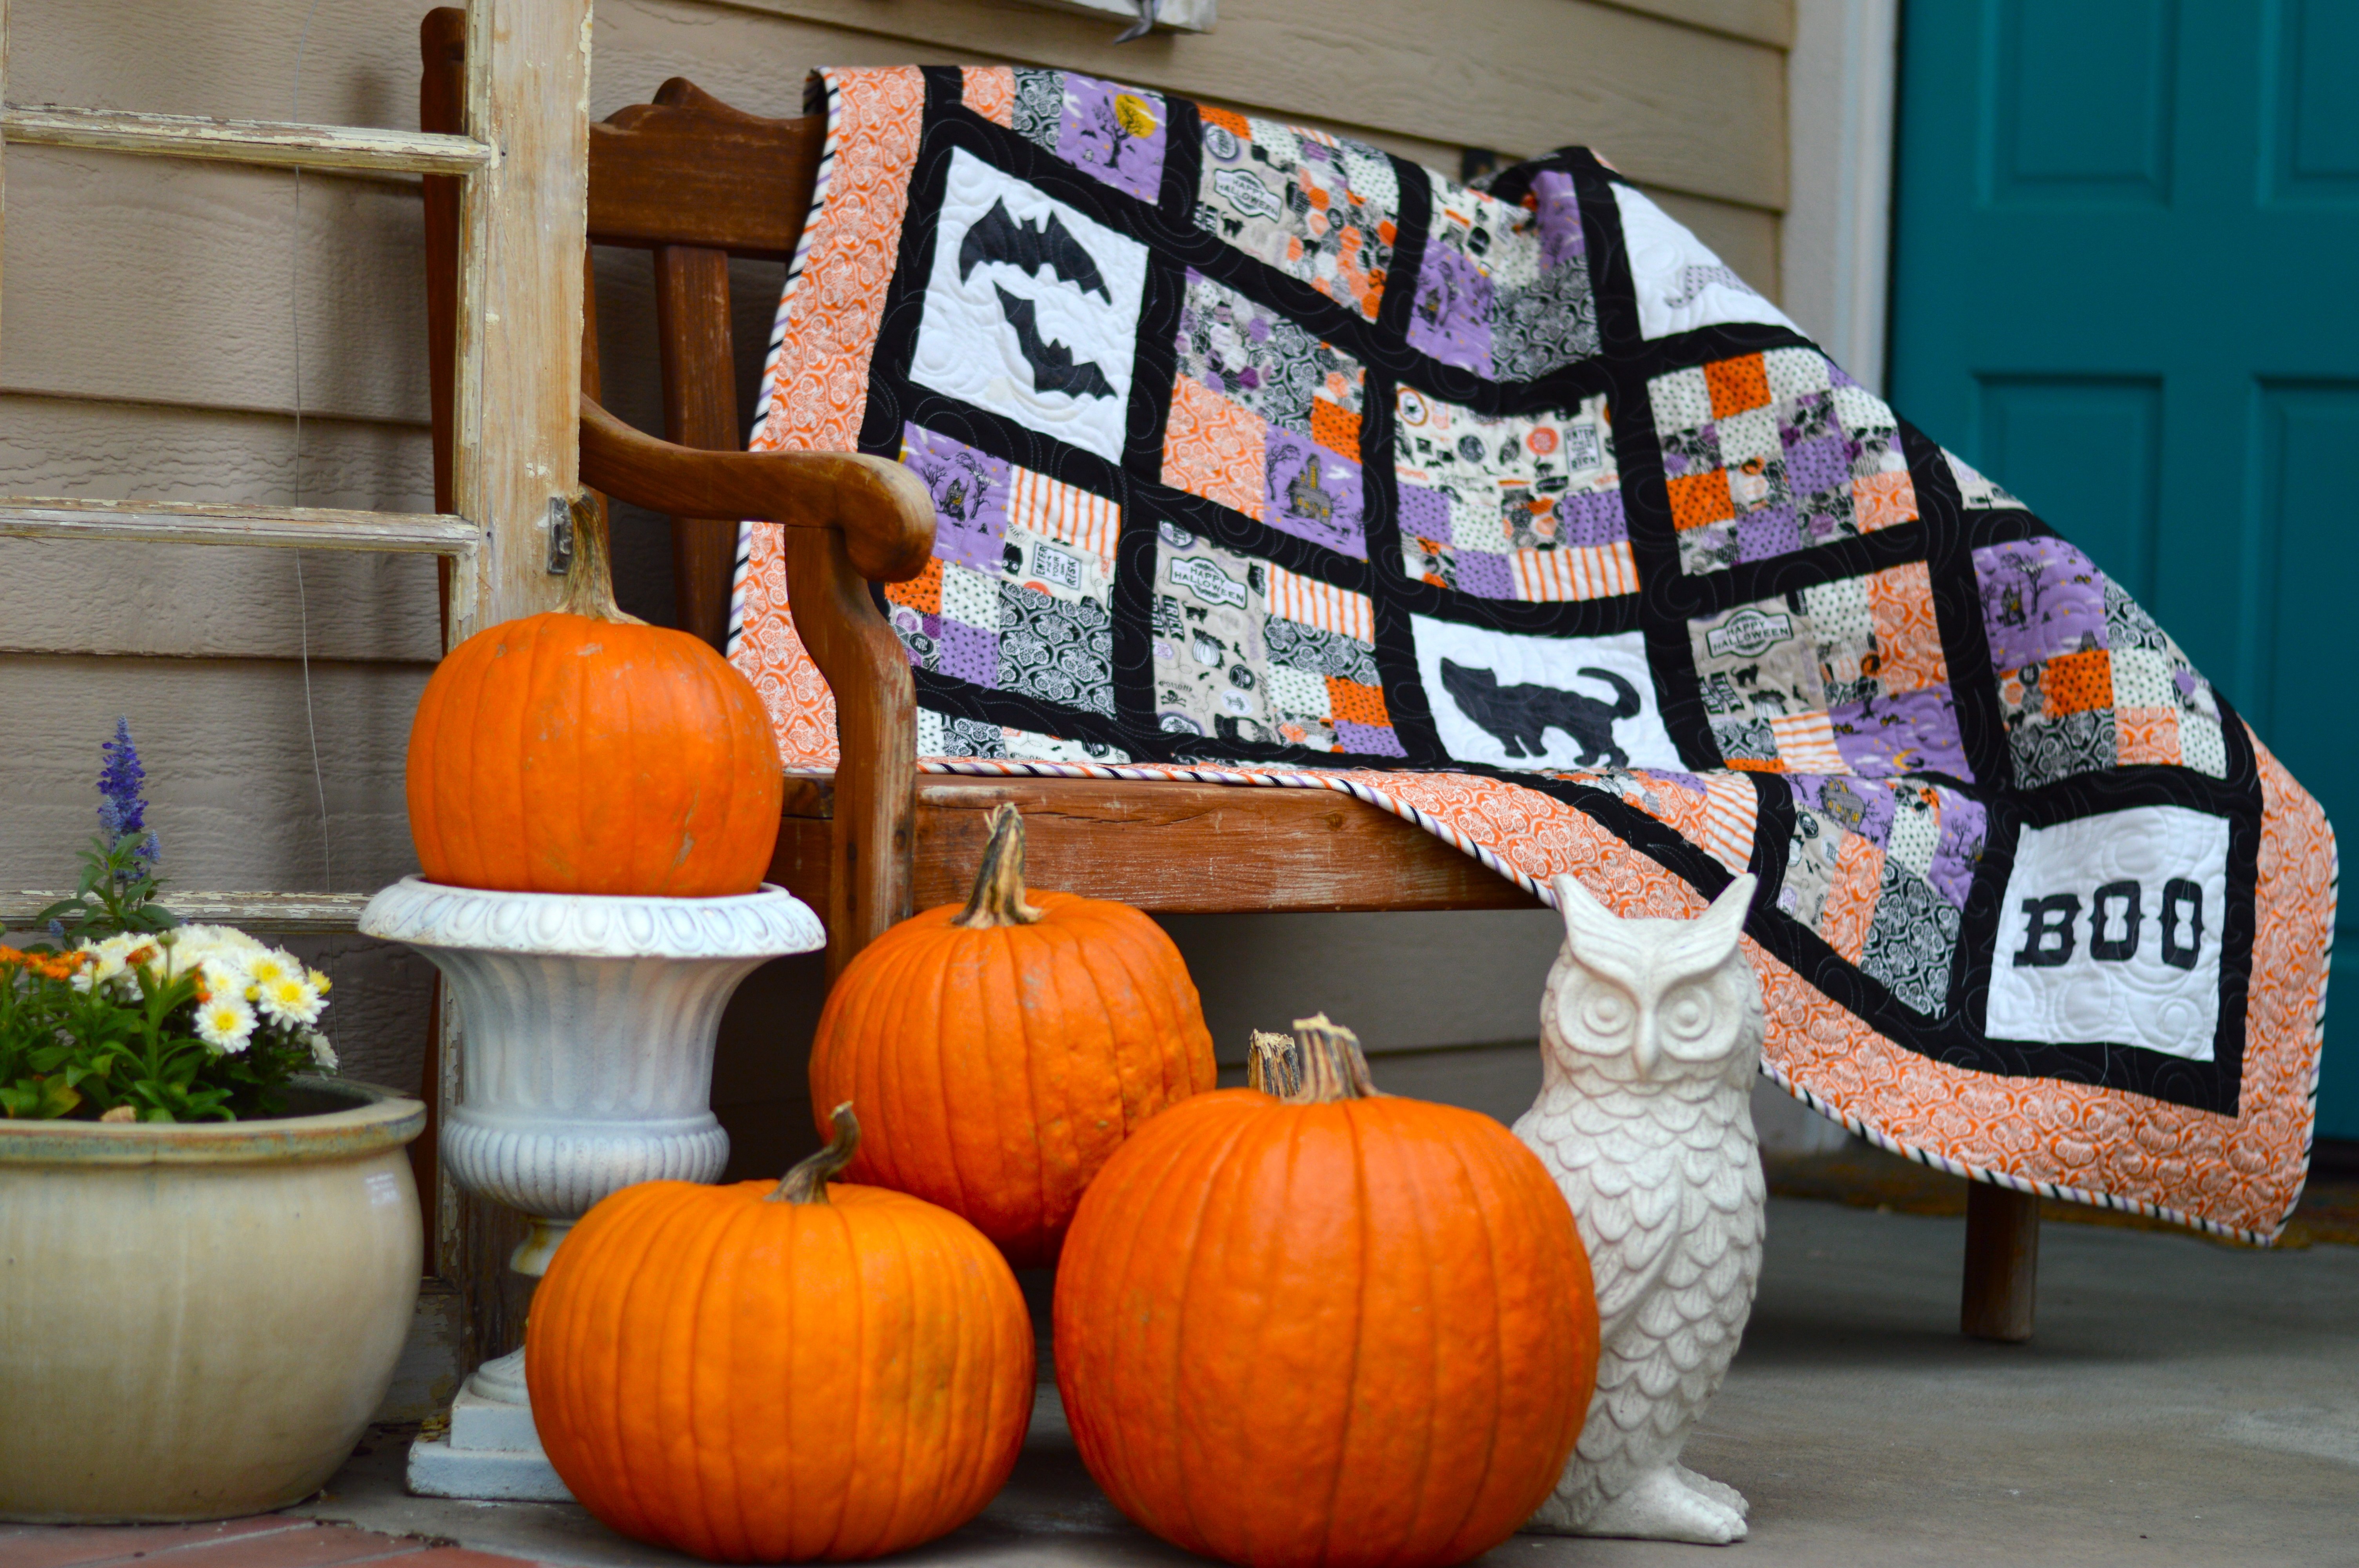
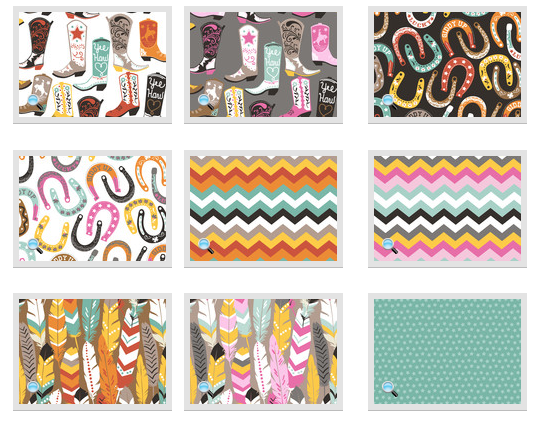
I am always drawn to large theme prints. It’s hard finding patterns that let you use large cuts of fabric to showcase these prints. I love designing quilt patterns that let you do just that. This quilt would be fun to use with all different theme fabrics: character, sports, animal, etc. Get creative!!!

IMG_3410(1)
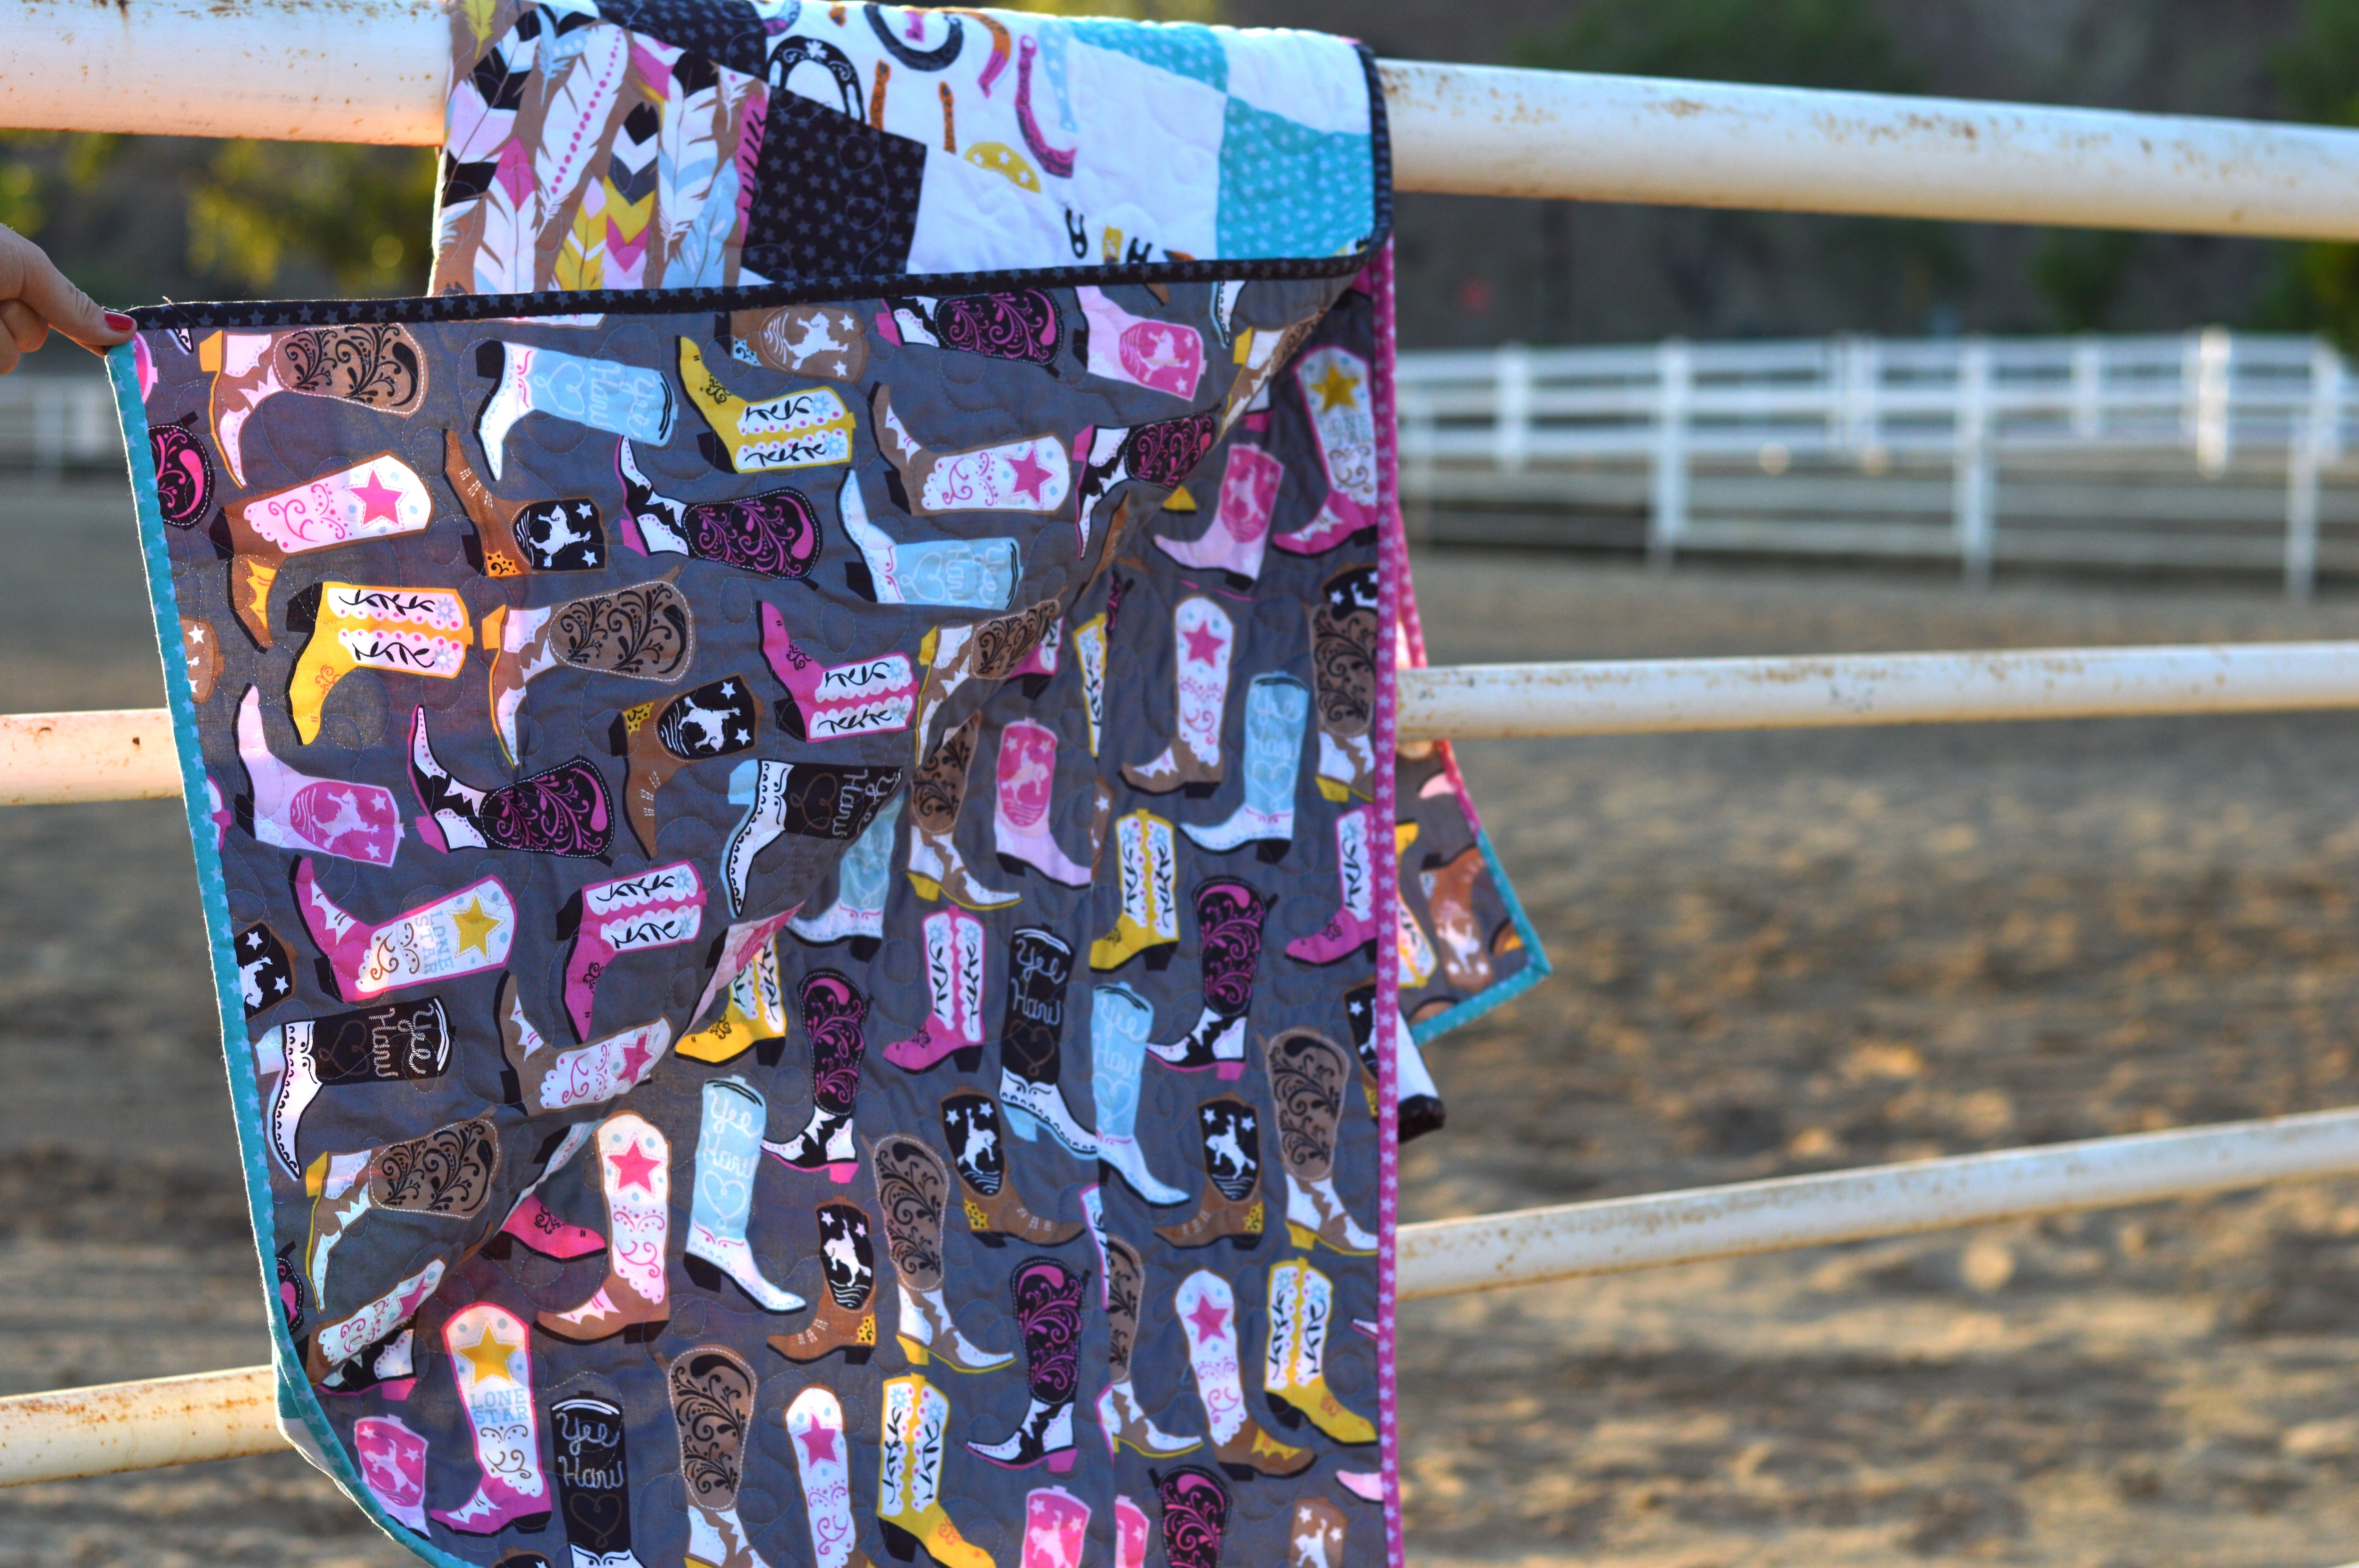
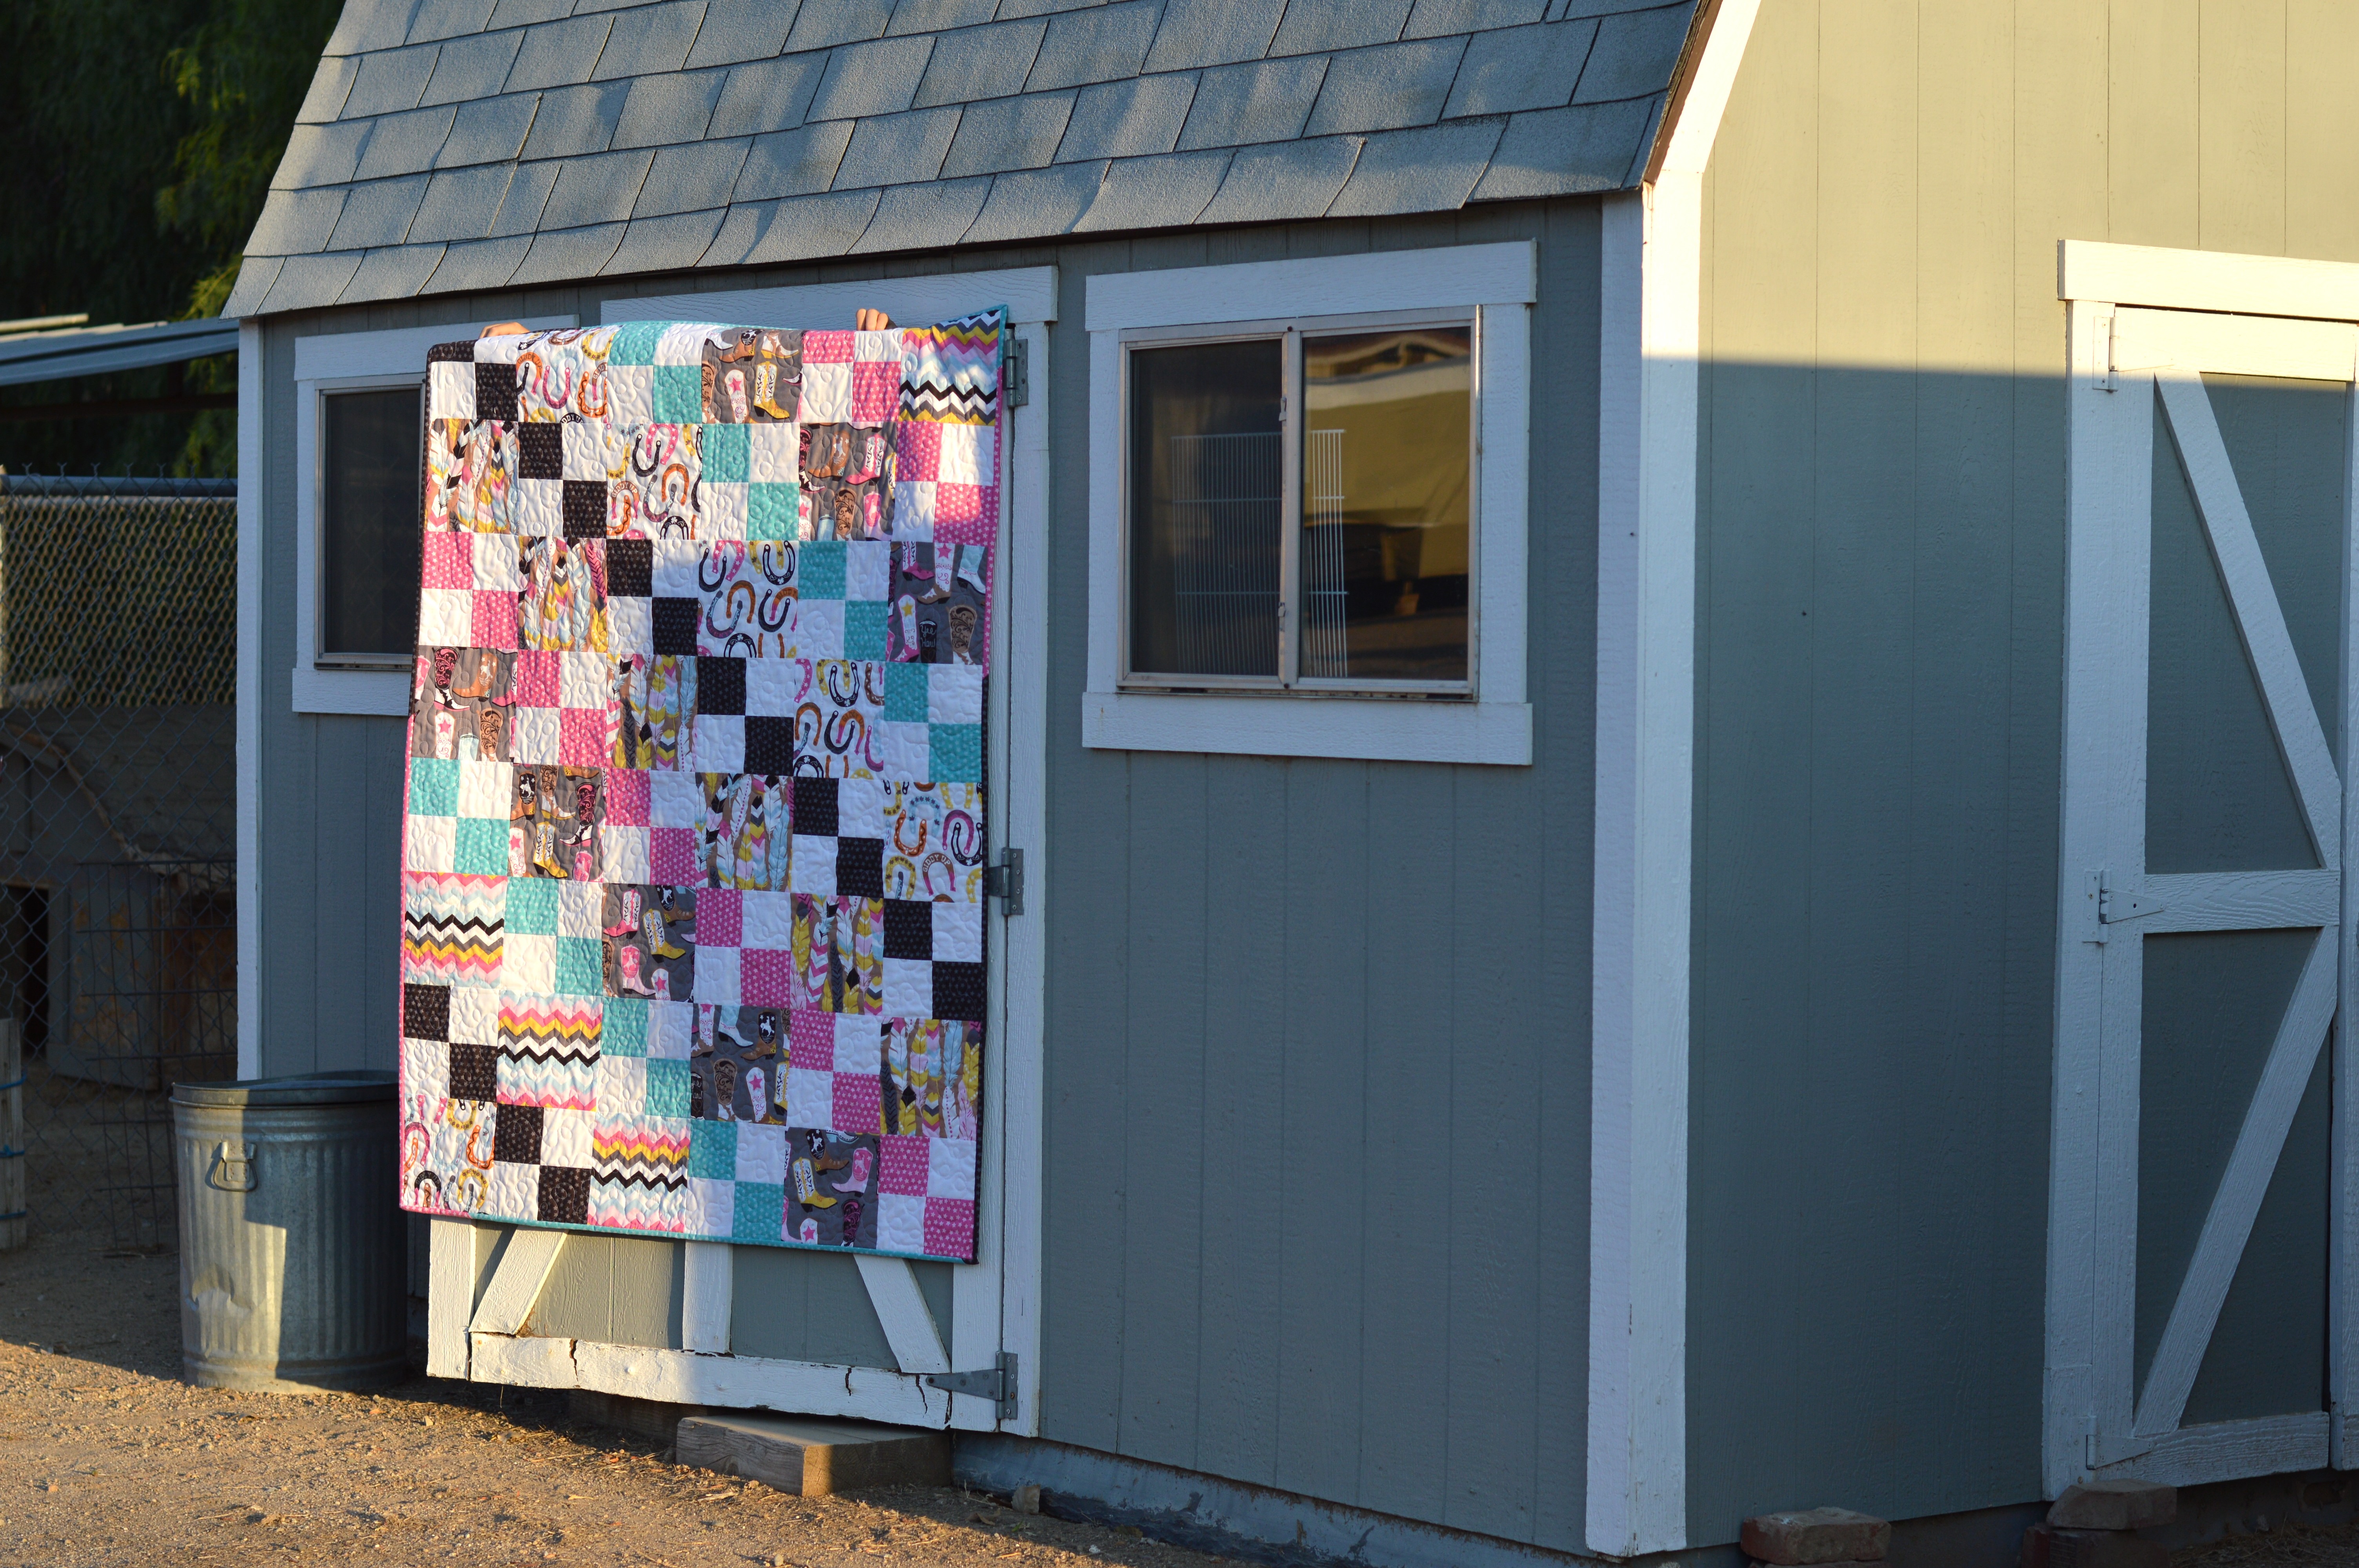
The finished quilt measures 60″ x 72″ and each block is 12″.

IMG_3399

It’s really fun to sew together and I love getting to show off the amazing fabrics in this collection!
FullSizeRender

I hope you like it and give it a try!!!
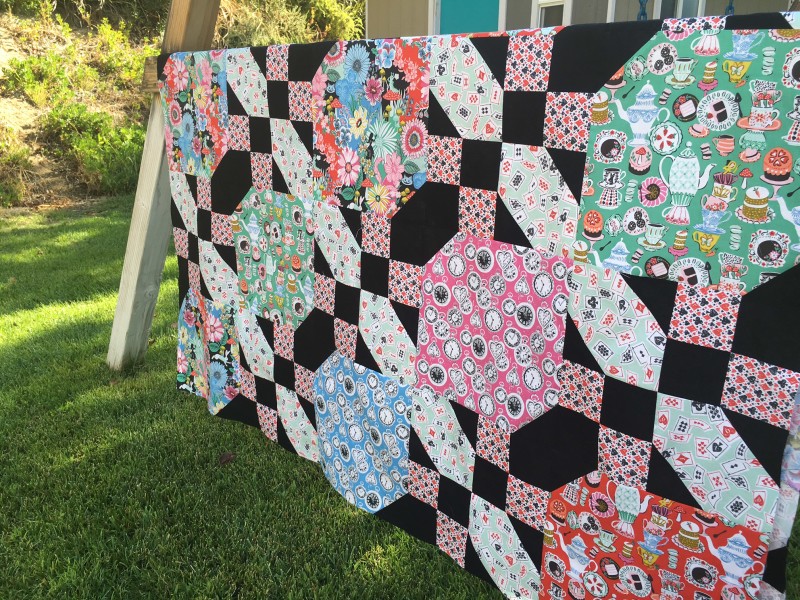
IMG_3400
WonderlandBeauty

Market Tote Pattern

market bag pattern cover

I created this fun and versitile tote bag for Blend Fabrics.  It’s such a great tote because it folds up super flat but then you can fill it with tons of stuff!  It’s perfect for beach towels and swimming stuff, goodies from the farmers market, or a fun day in the fabric district in LA!  You can download the pattern by clicking HERE.

doughnut bag 2

No really, it’s huge!  Sally was thrilled to finally have a photo shoot that involved food!!!  This fabric is called Lolly by Blend Fabrics.

doughnut bag 4

dougnhut bag 3

You can make this optional Doughnut Money Pouch.  Download the instructions HEREdoughnut moneydoughnut bag3

I also made a True Blue version of this bag.  doughnut bag

Noel Mini Quilt

quilt cover

I am so in love with Tasha Noel’s newest fabric, Pixie Noel!

Screen Shot 2016-05-23 at 9.51.51 PM 
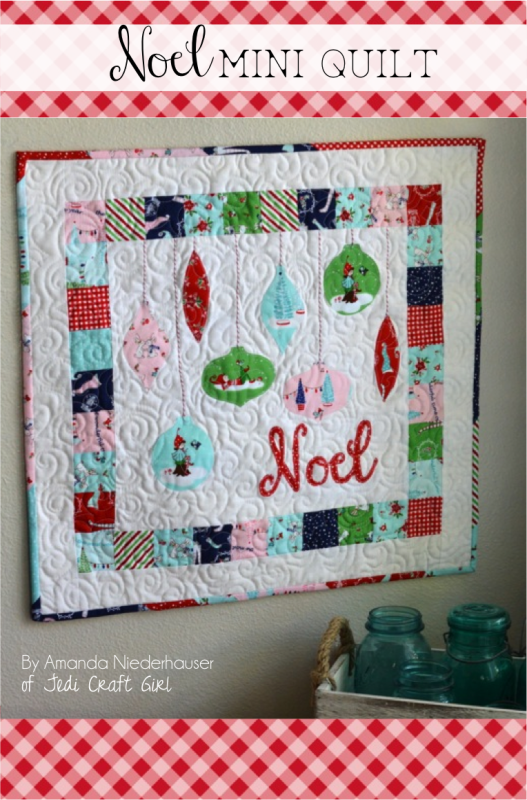
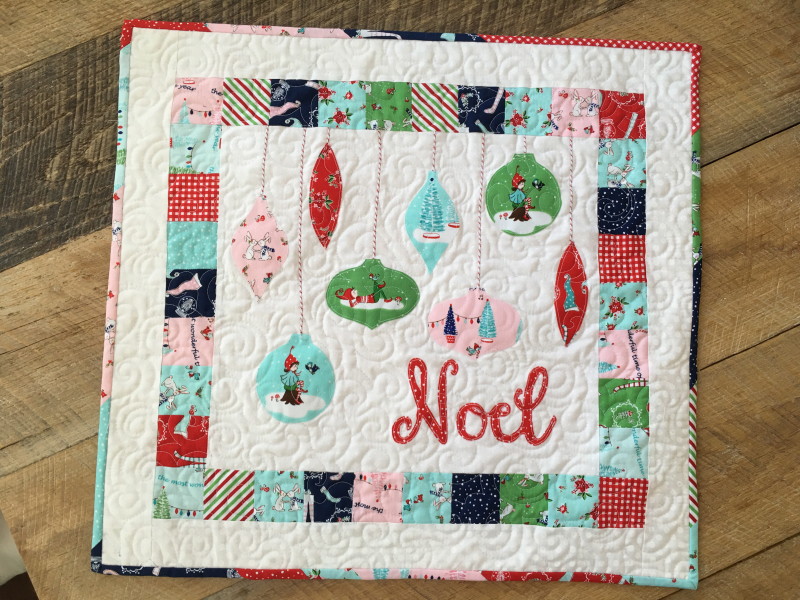
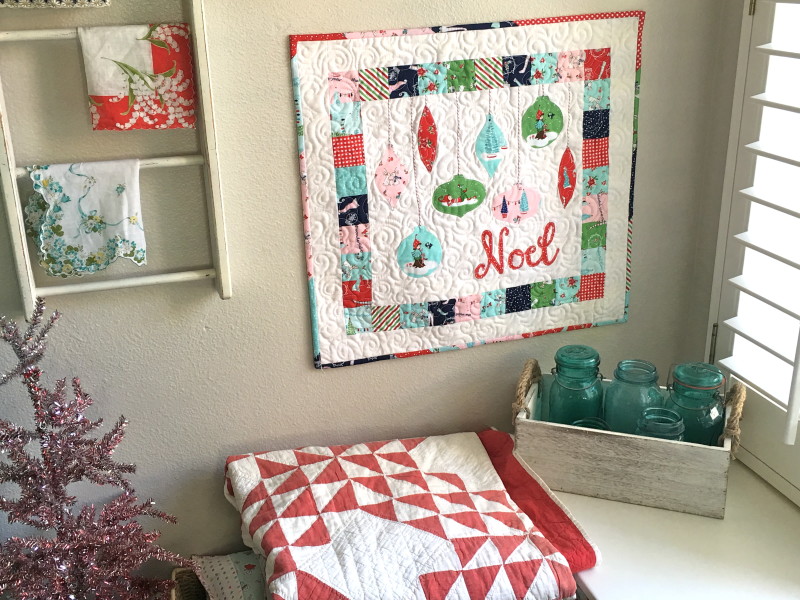
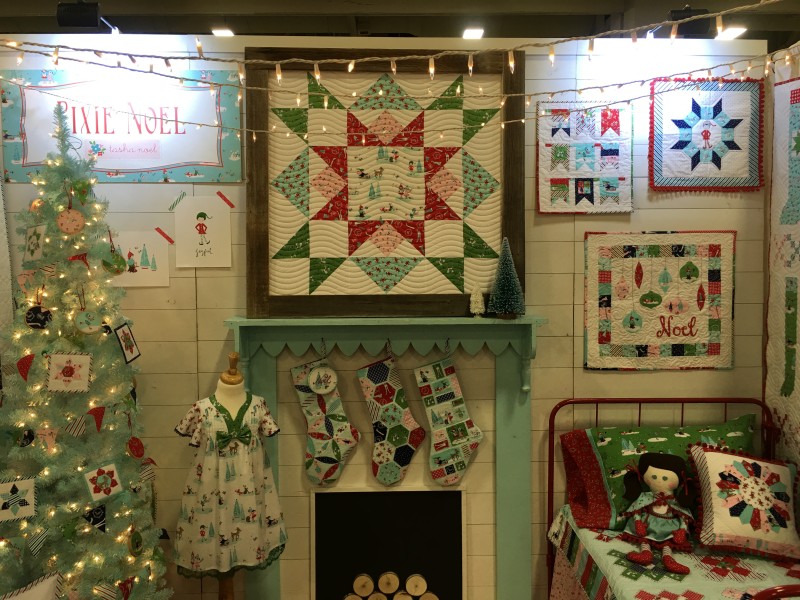
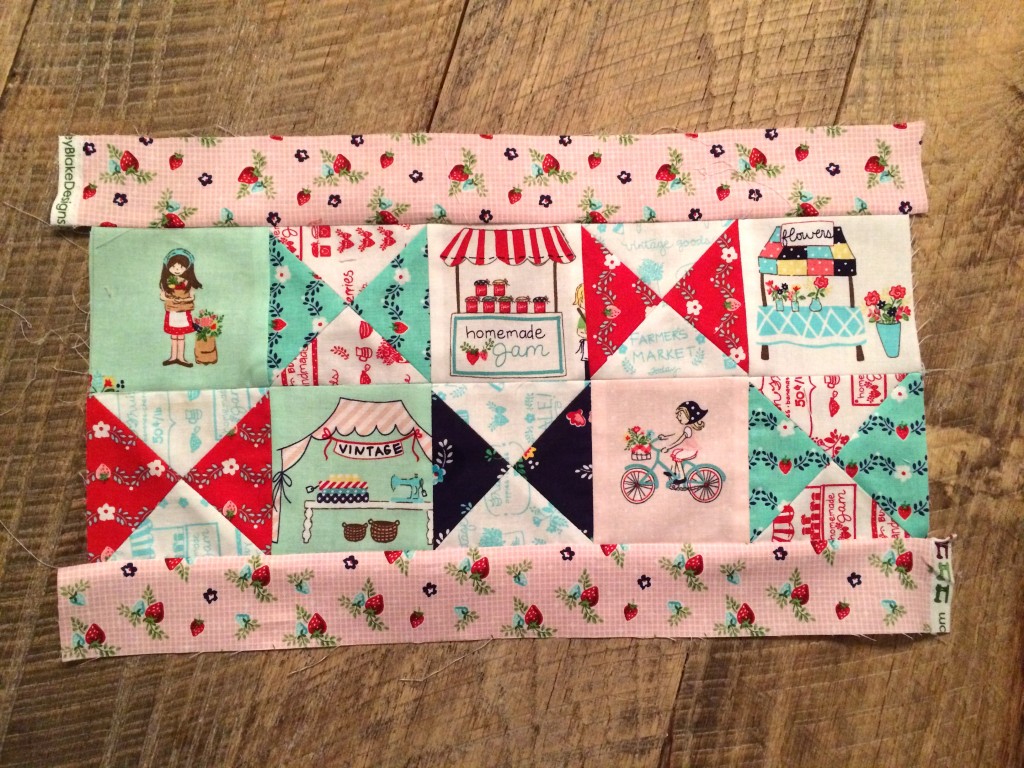
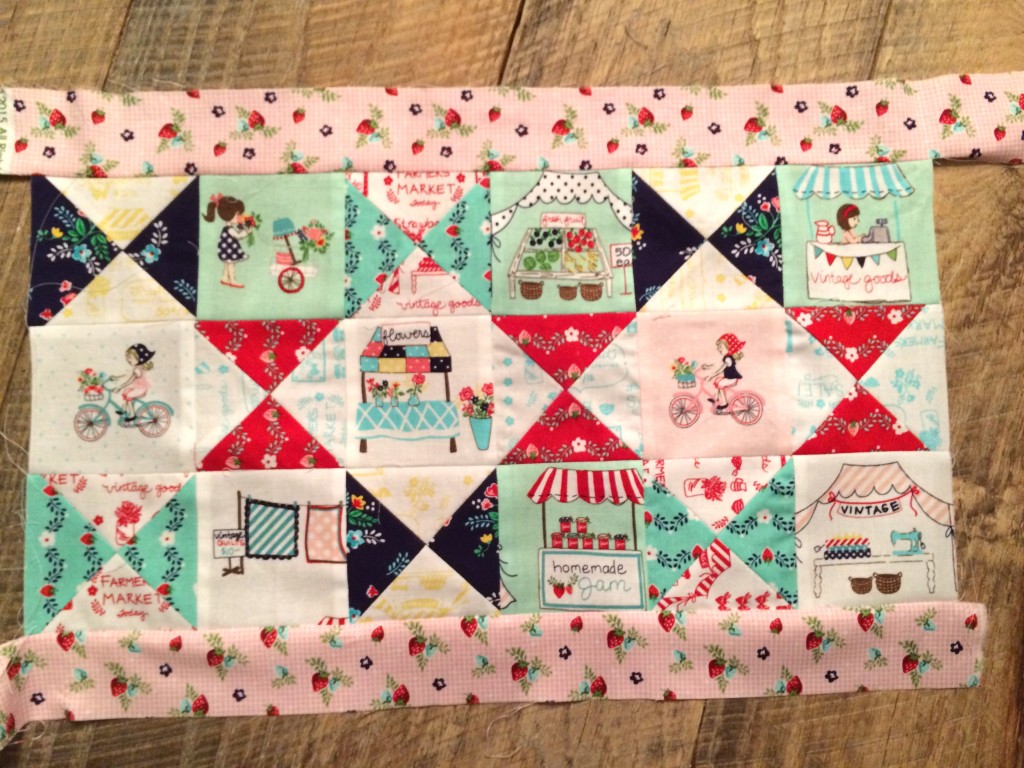
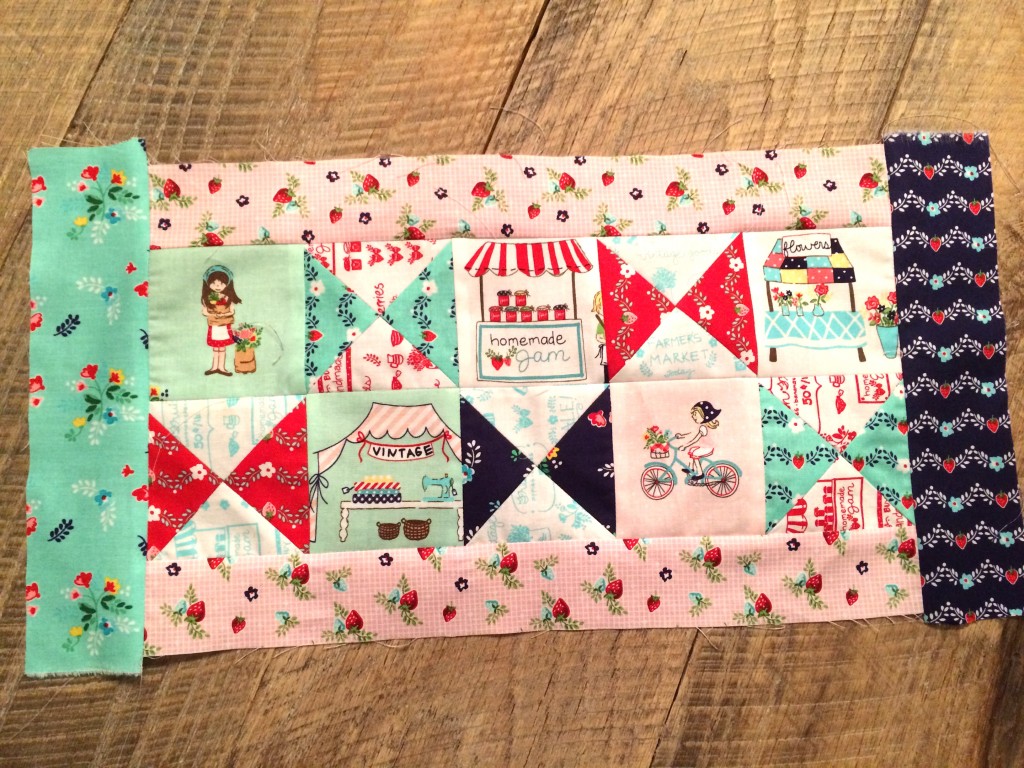
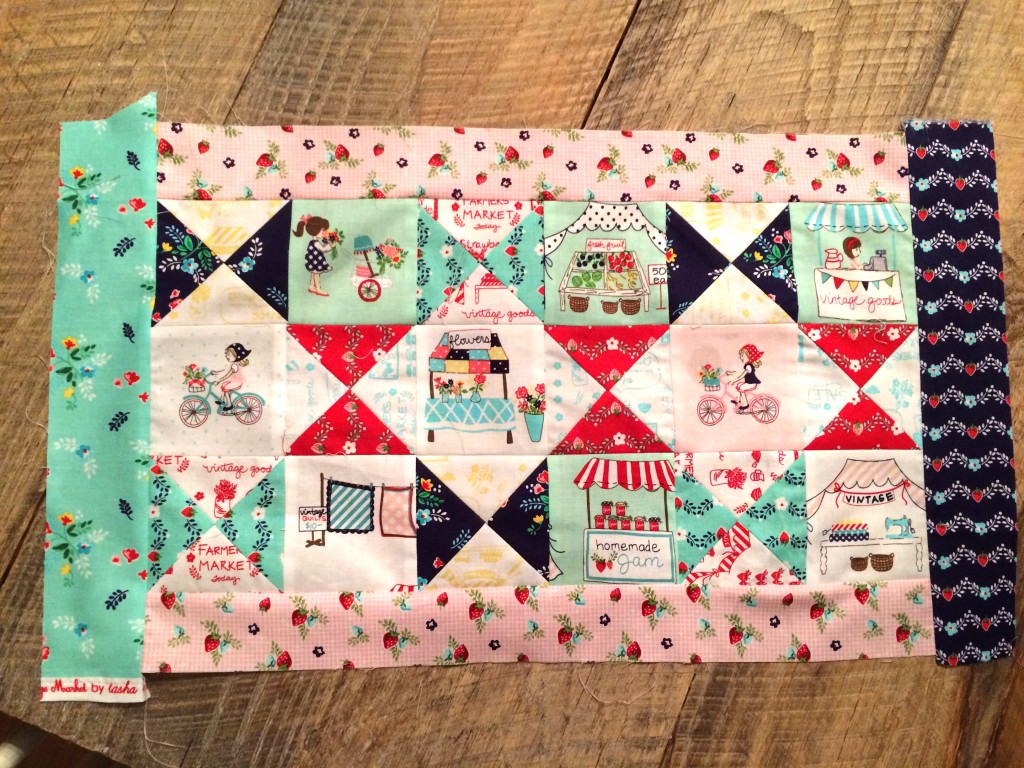
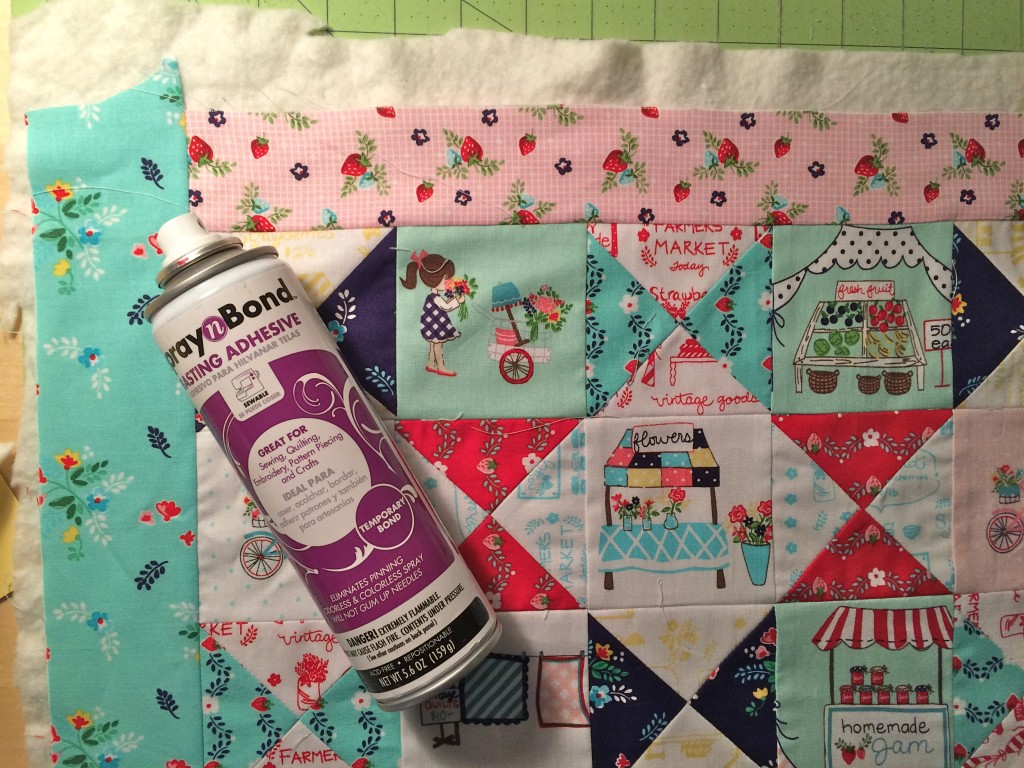
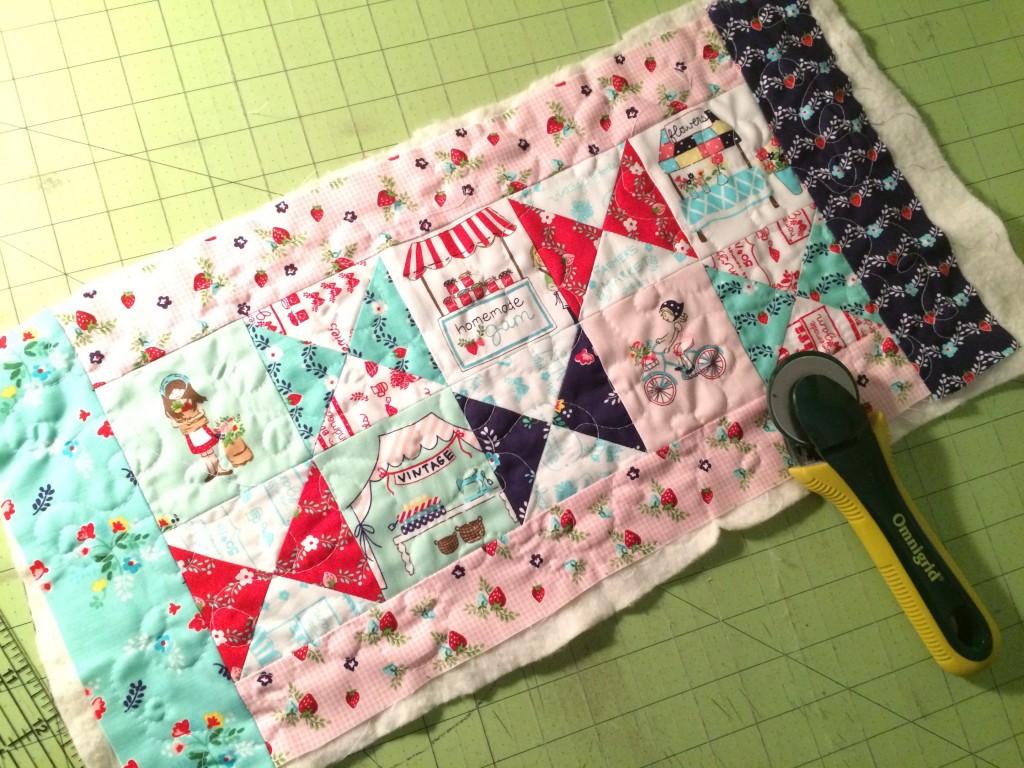
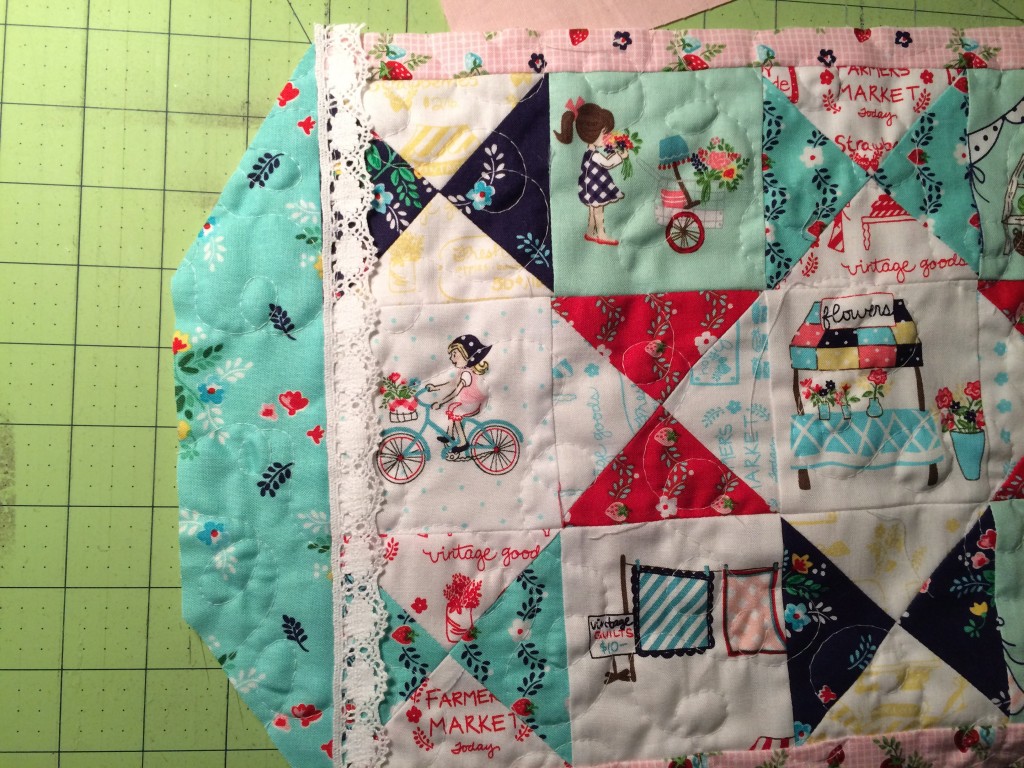
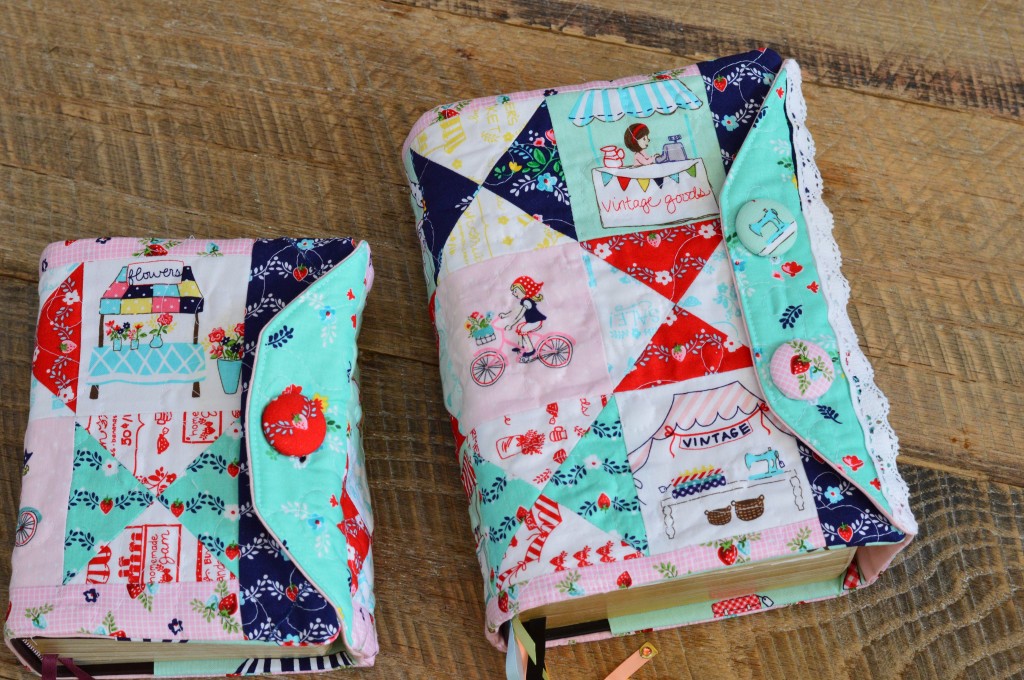
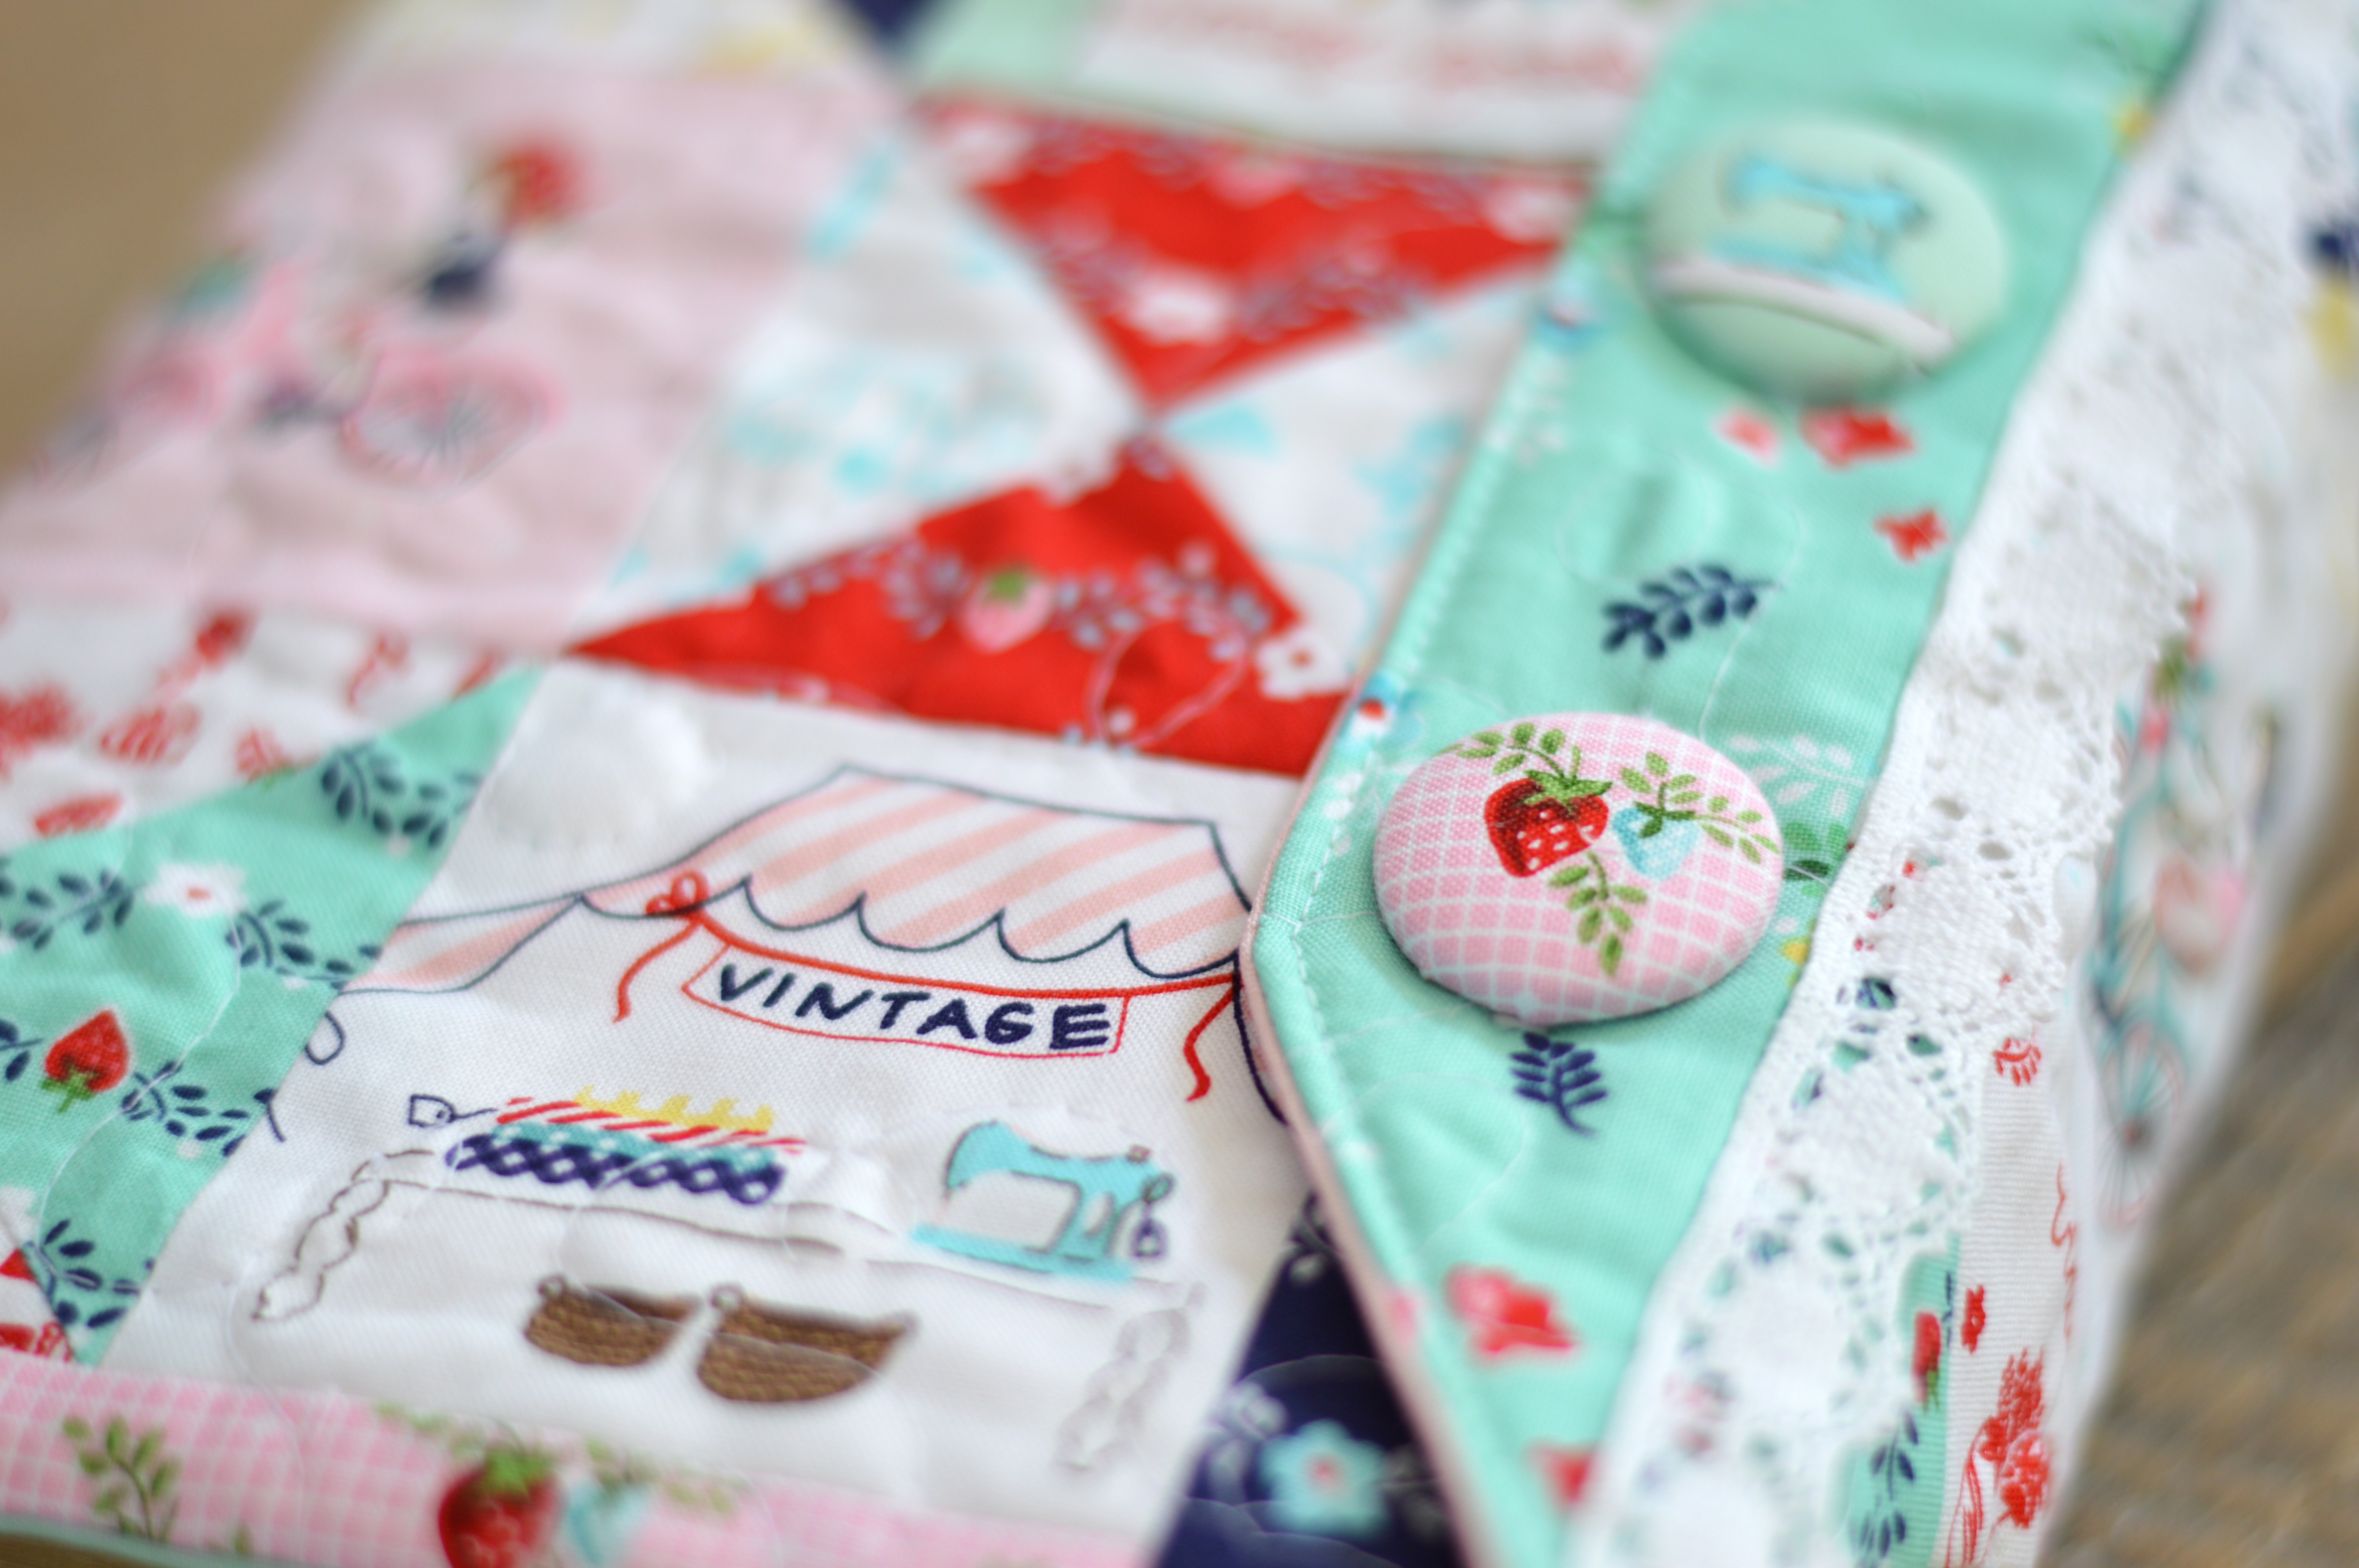
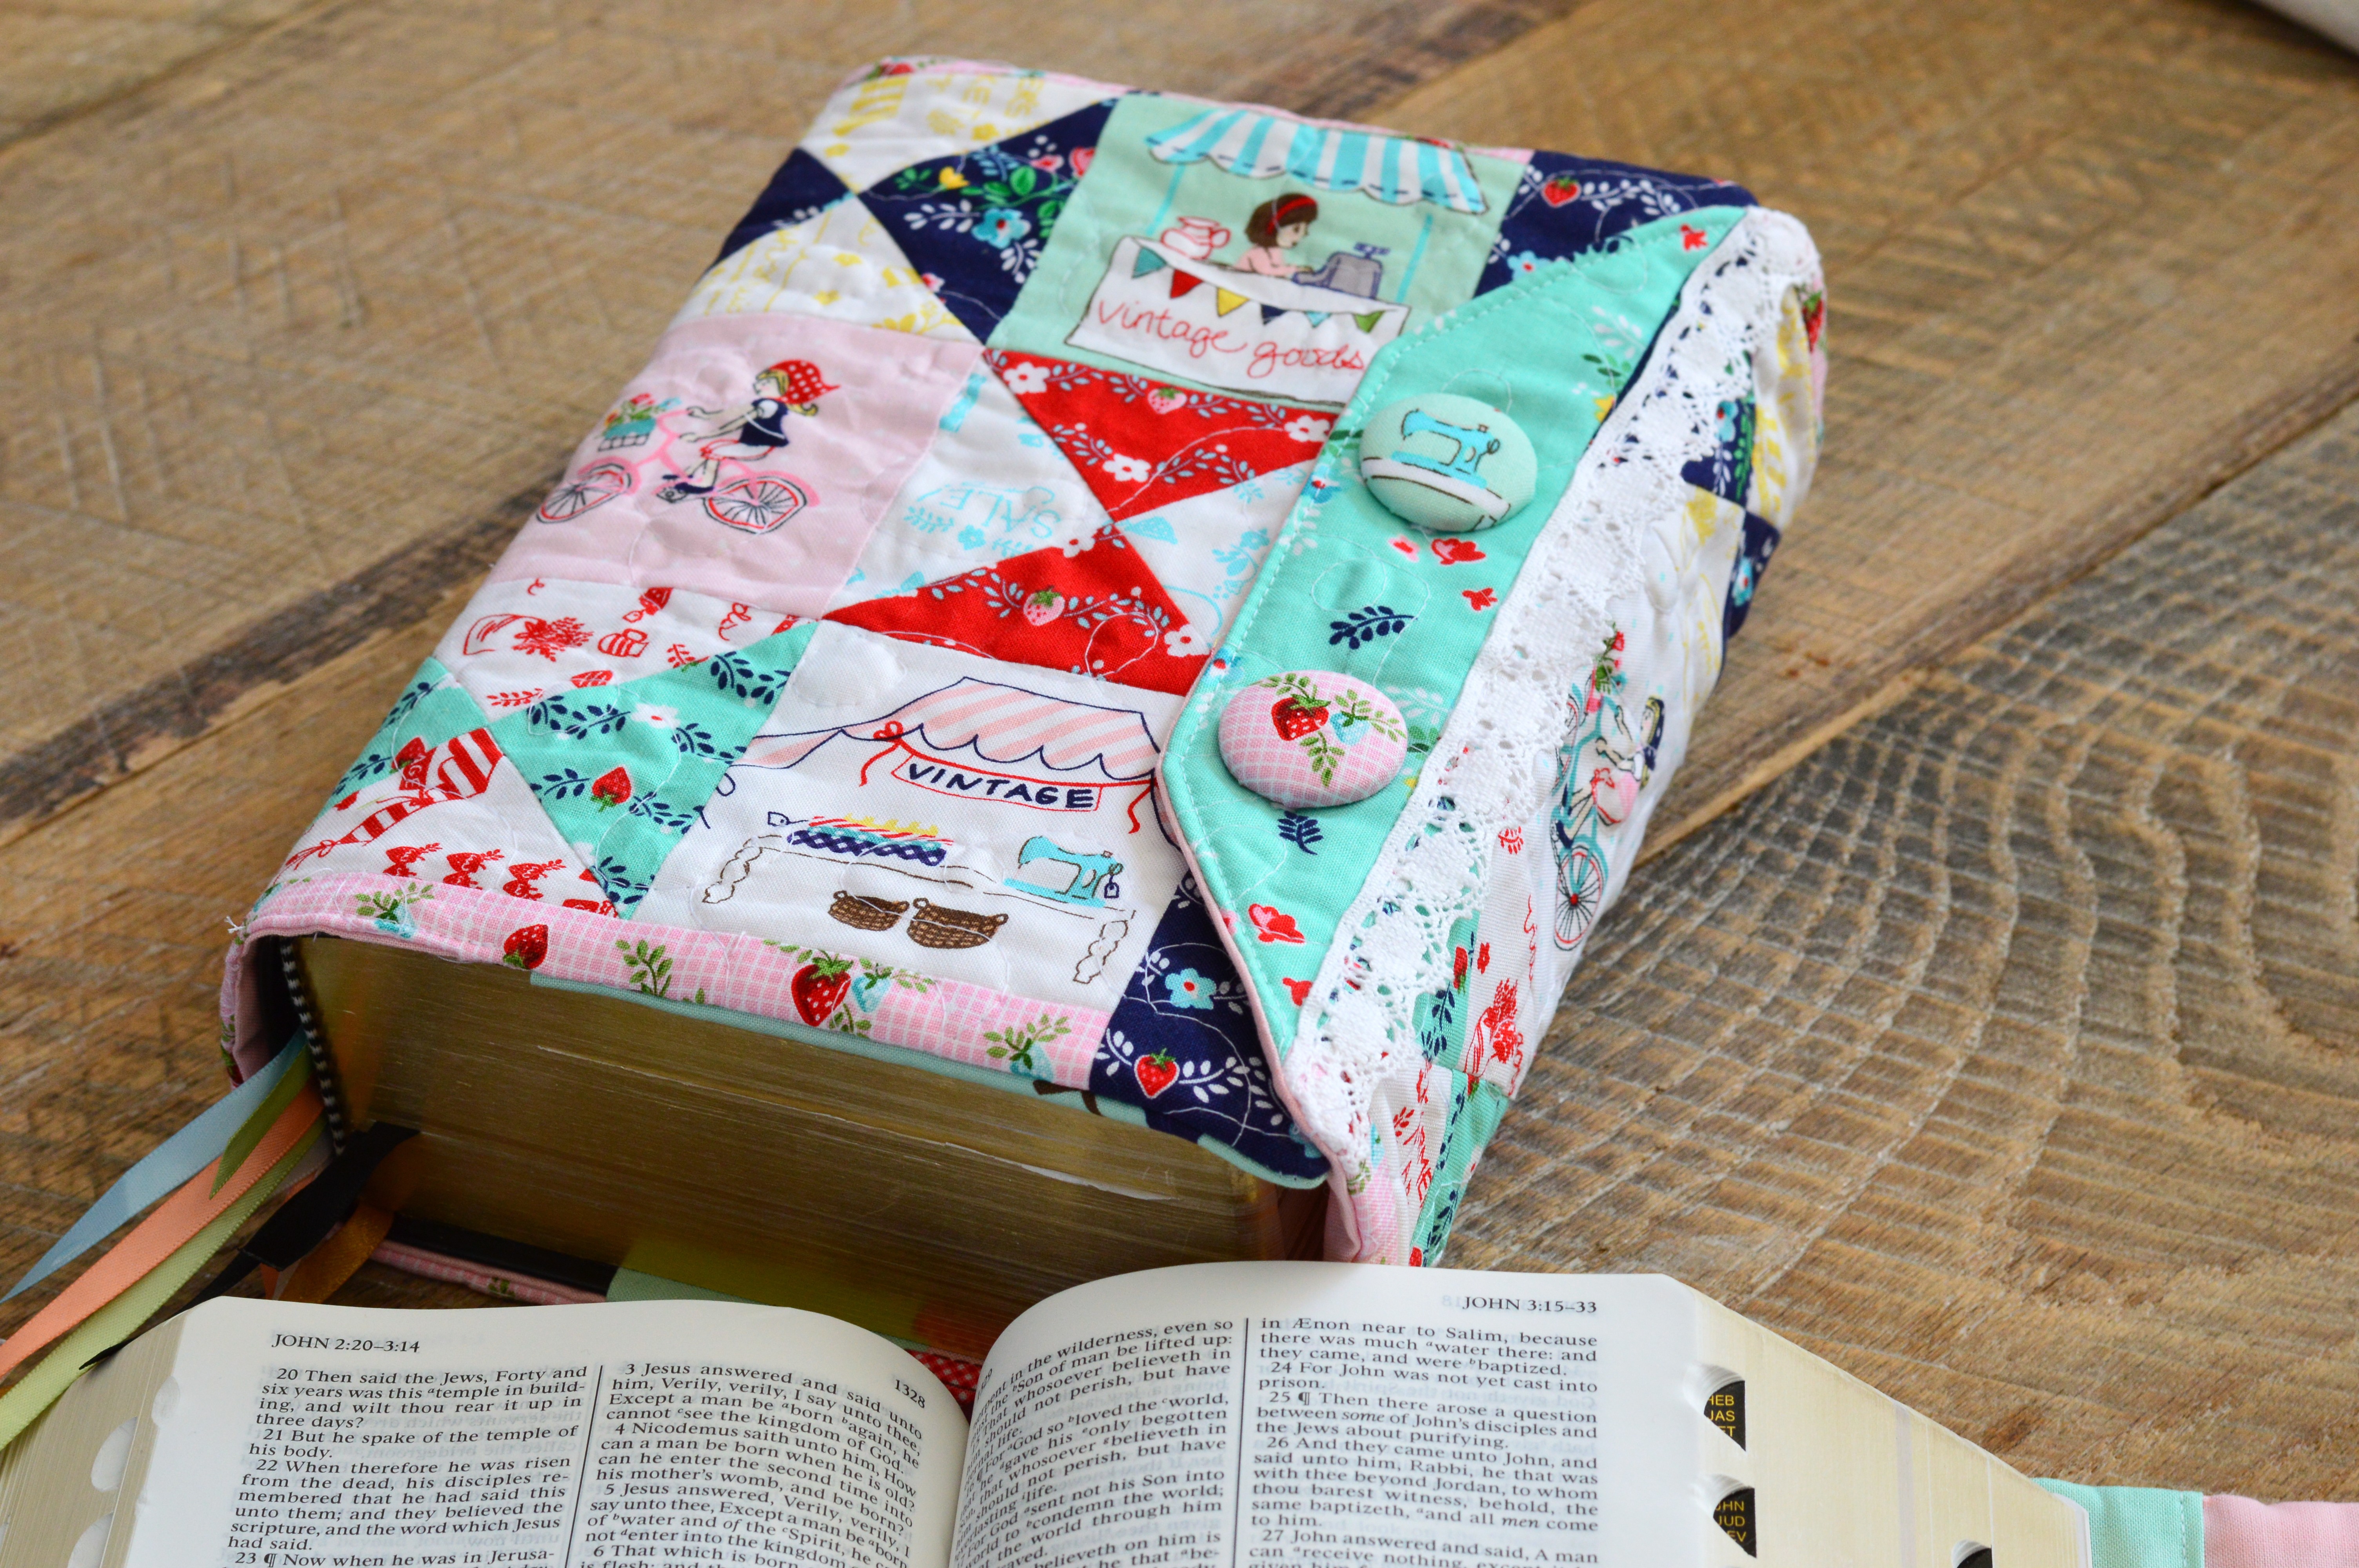
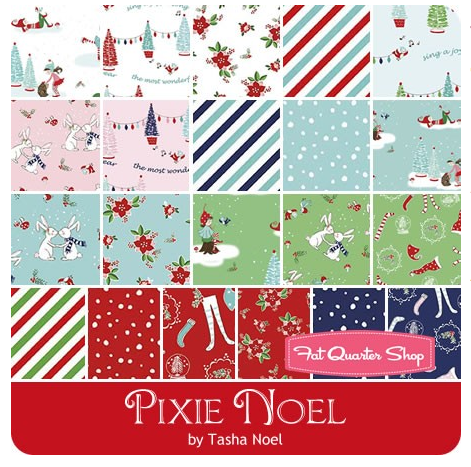
I created this little mini quilt for her to hang in her Quilt Market booth.  You can purchase this quilt pattern as a PDF download in my Etsy shop.IMG_8371 
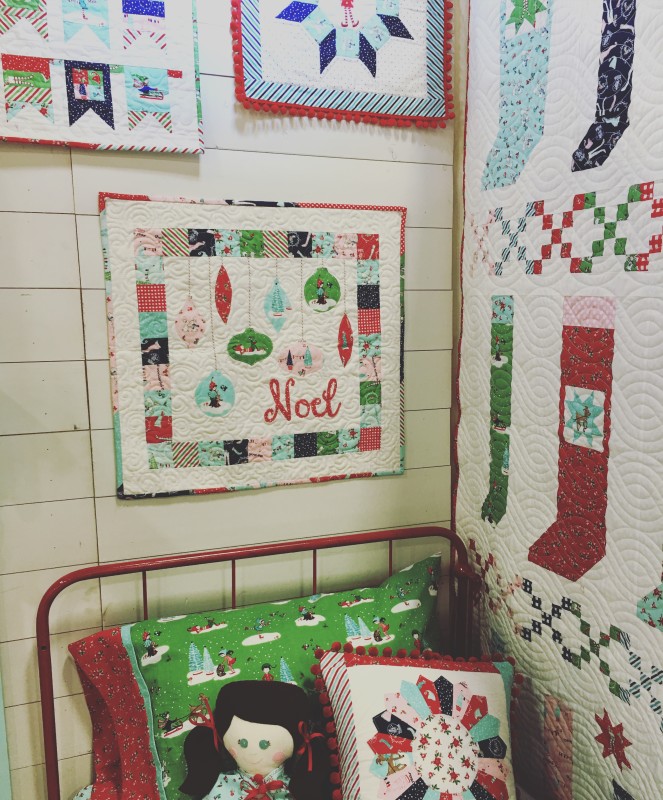
Her booth was the cutest!

IMG_7481

The mini quilt features iron-on applique ornaments and letters and a scrappy pieced border.IMG_7484

I quilted it in swirls to look like swirling snow.  This is the perfect size to sew up for yourself or for gifts!  You can get a jump on your Christmas list!!IMG_7501

IMG_8092

Vintage Kitchen Blog Hop and Quilt Tutorial

catinthekitchen

I am so thrilled to be part of the Vintage Kitchen Blog Tour!  Andrea from Jolijou has designed this amazing vintage inspired kitchen theme fabric!!  You can see all the wonderful prints here on the Riley Blake Designs Website.vintage kitchen quilt 5

It is the perfect colors of vintage Pyrex dishes.

vintage kitchen quilt 2 
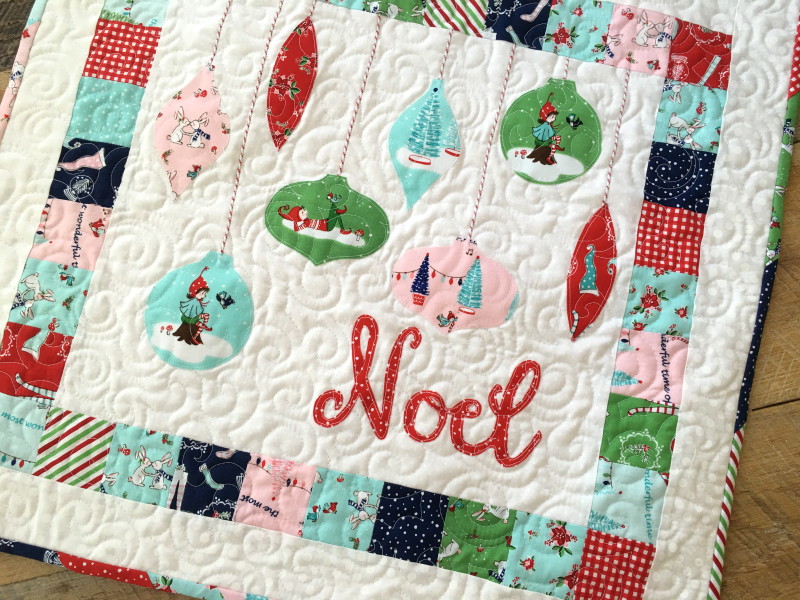
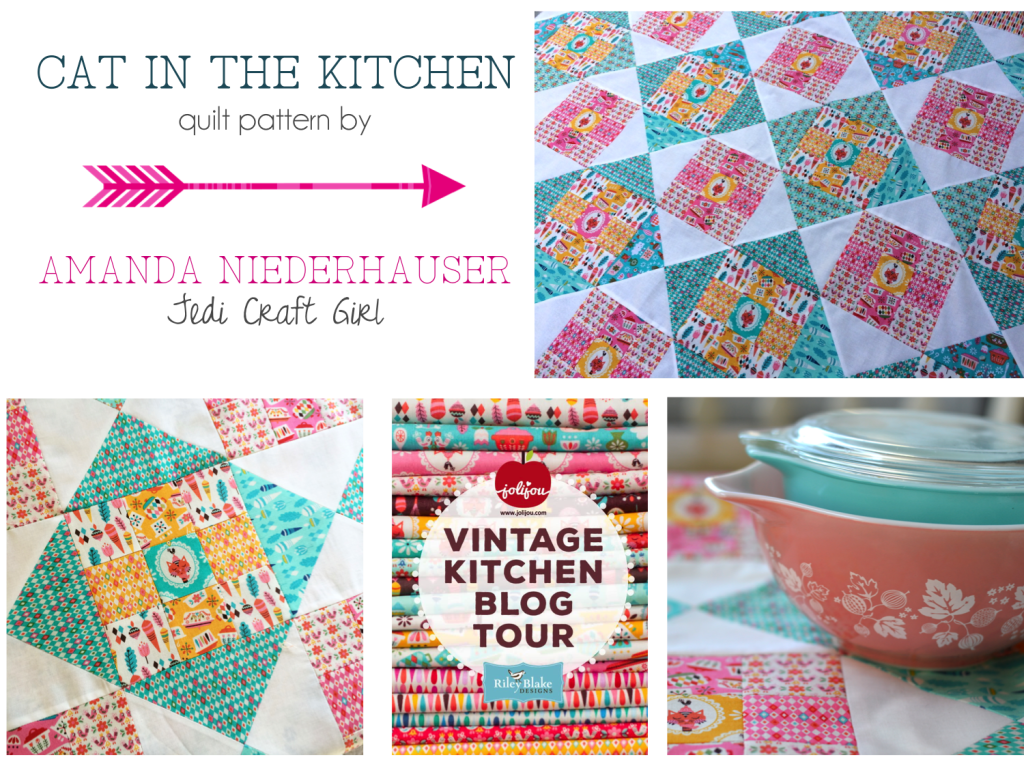
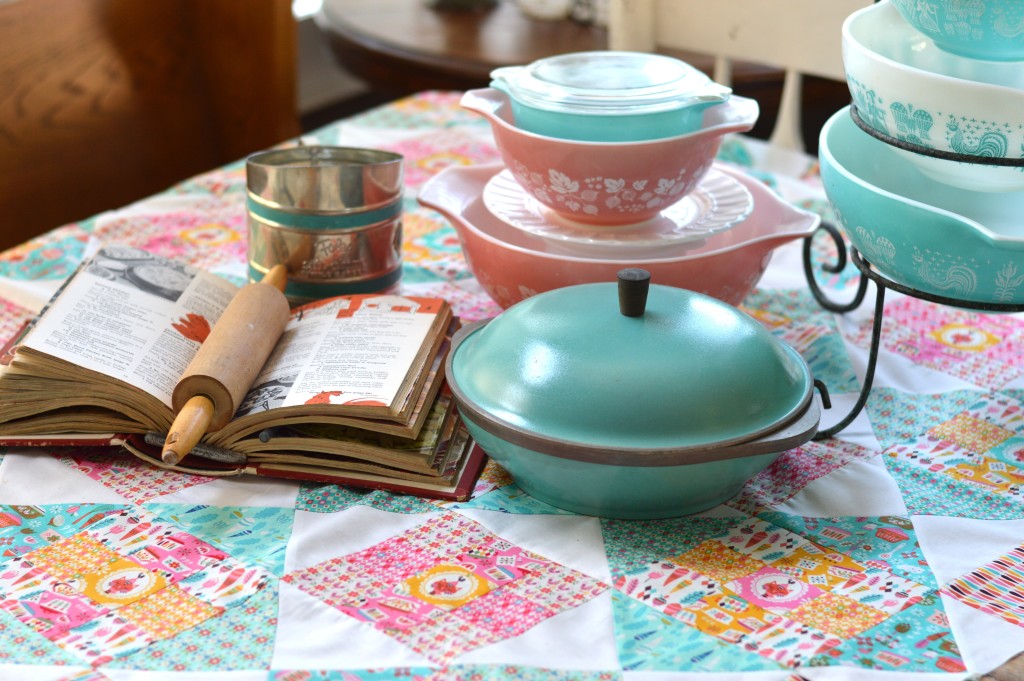
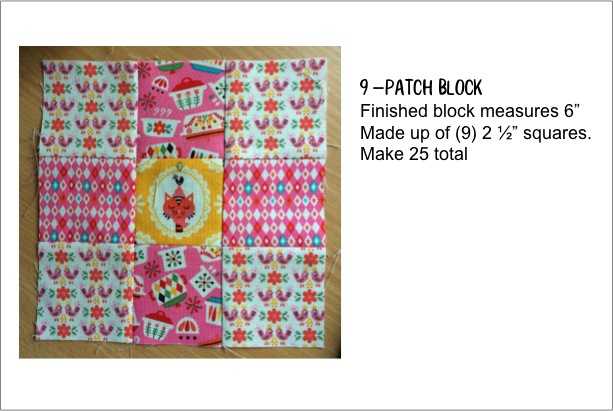
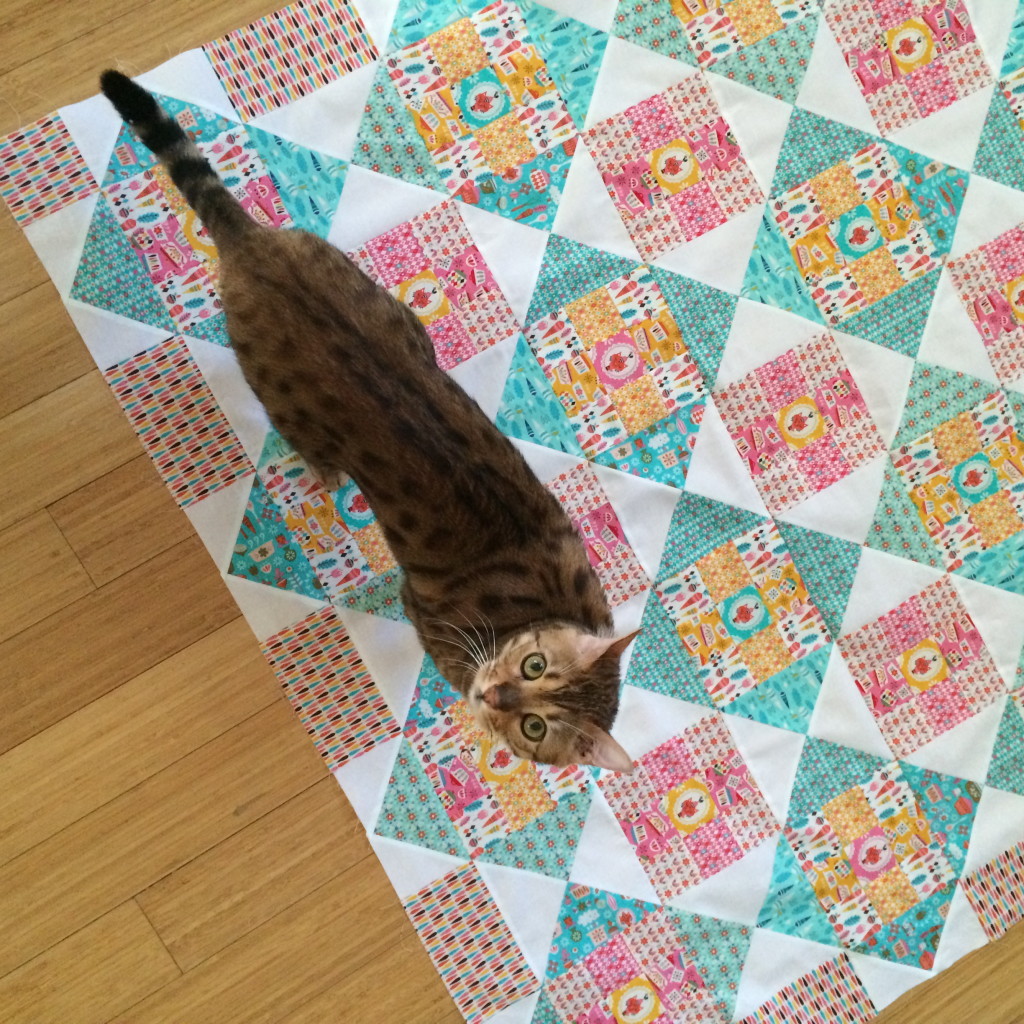
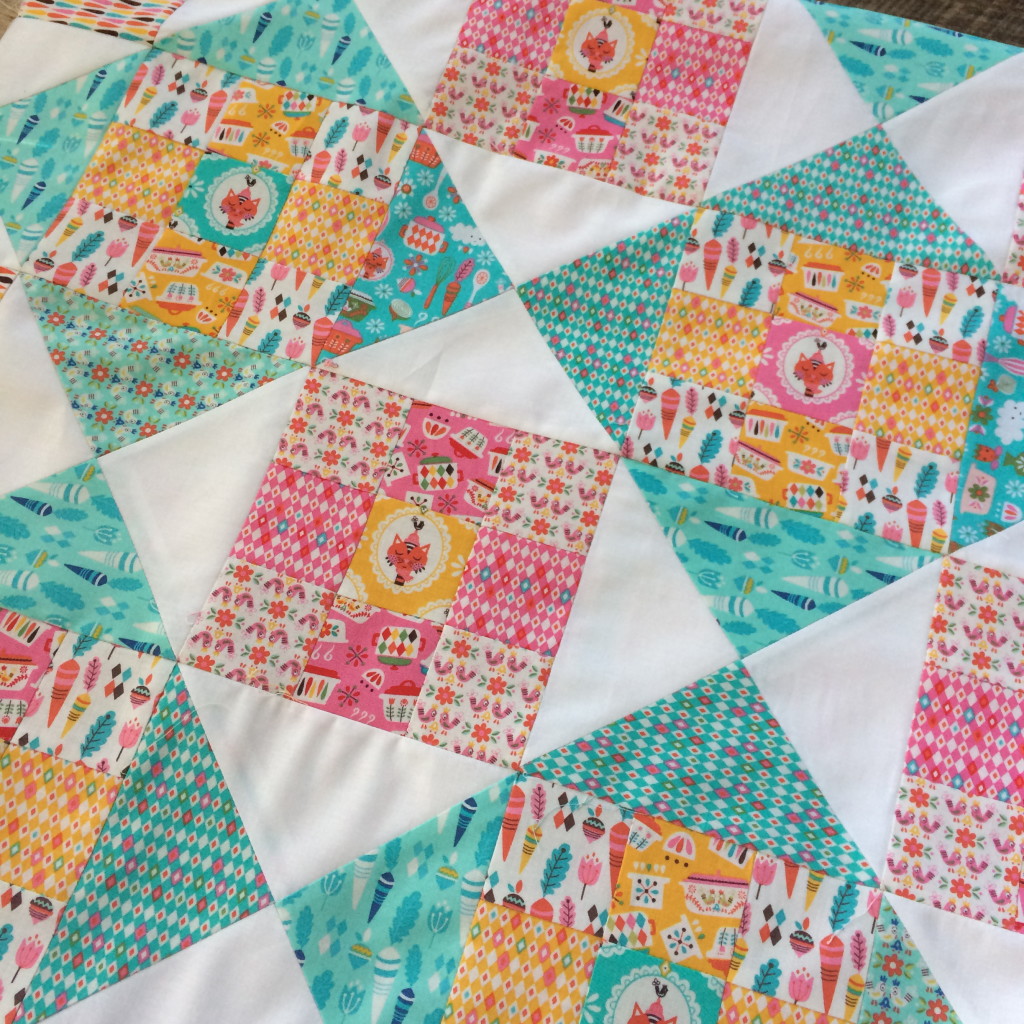
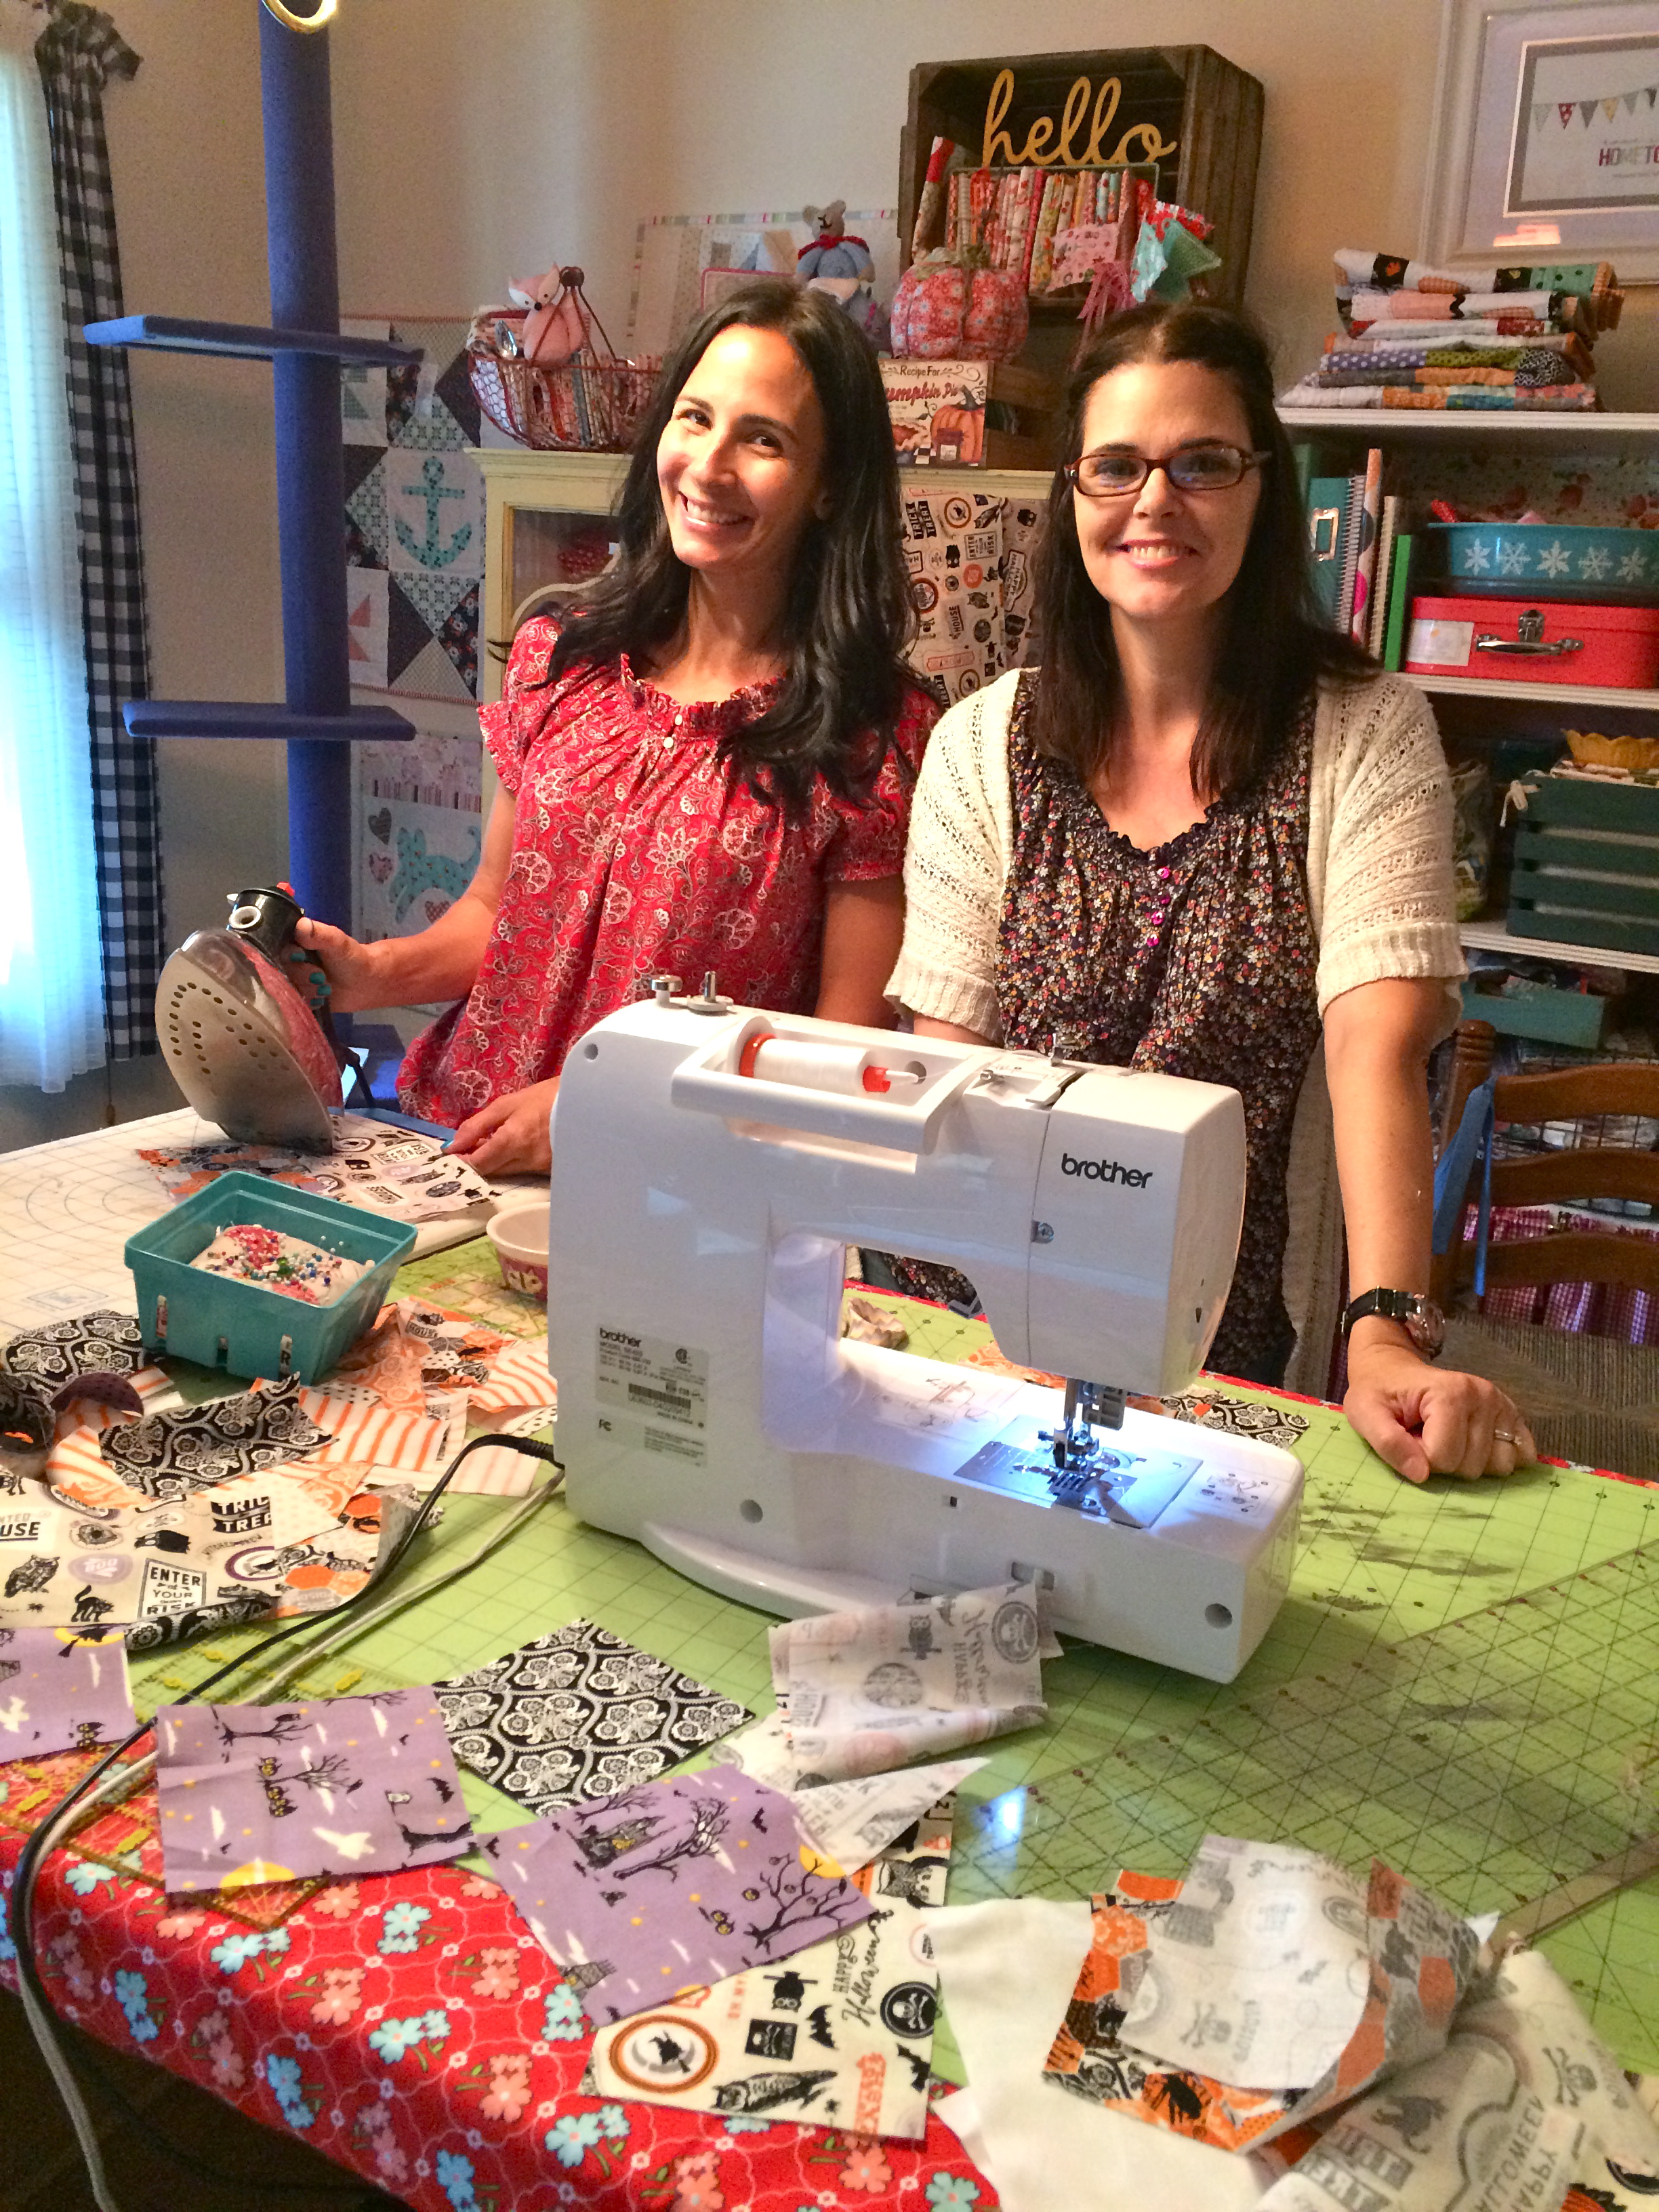
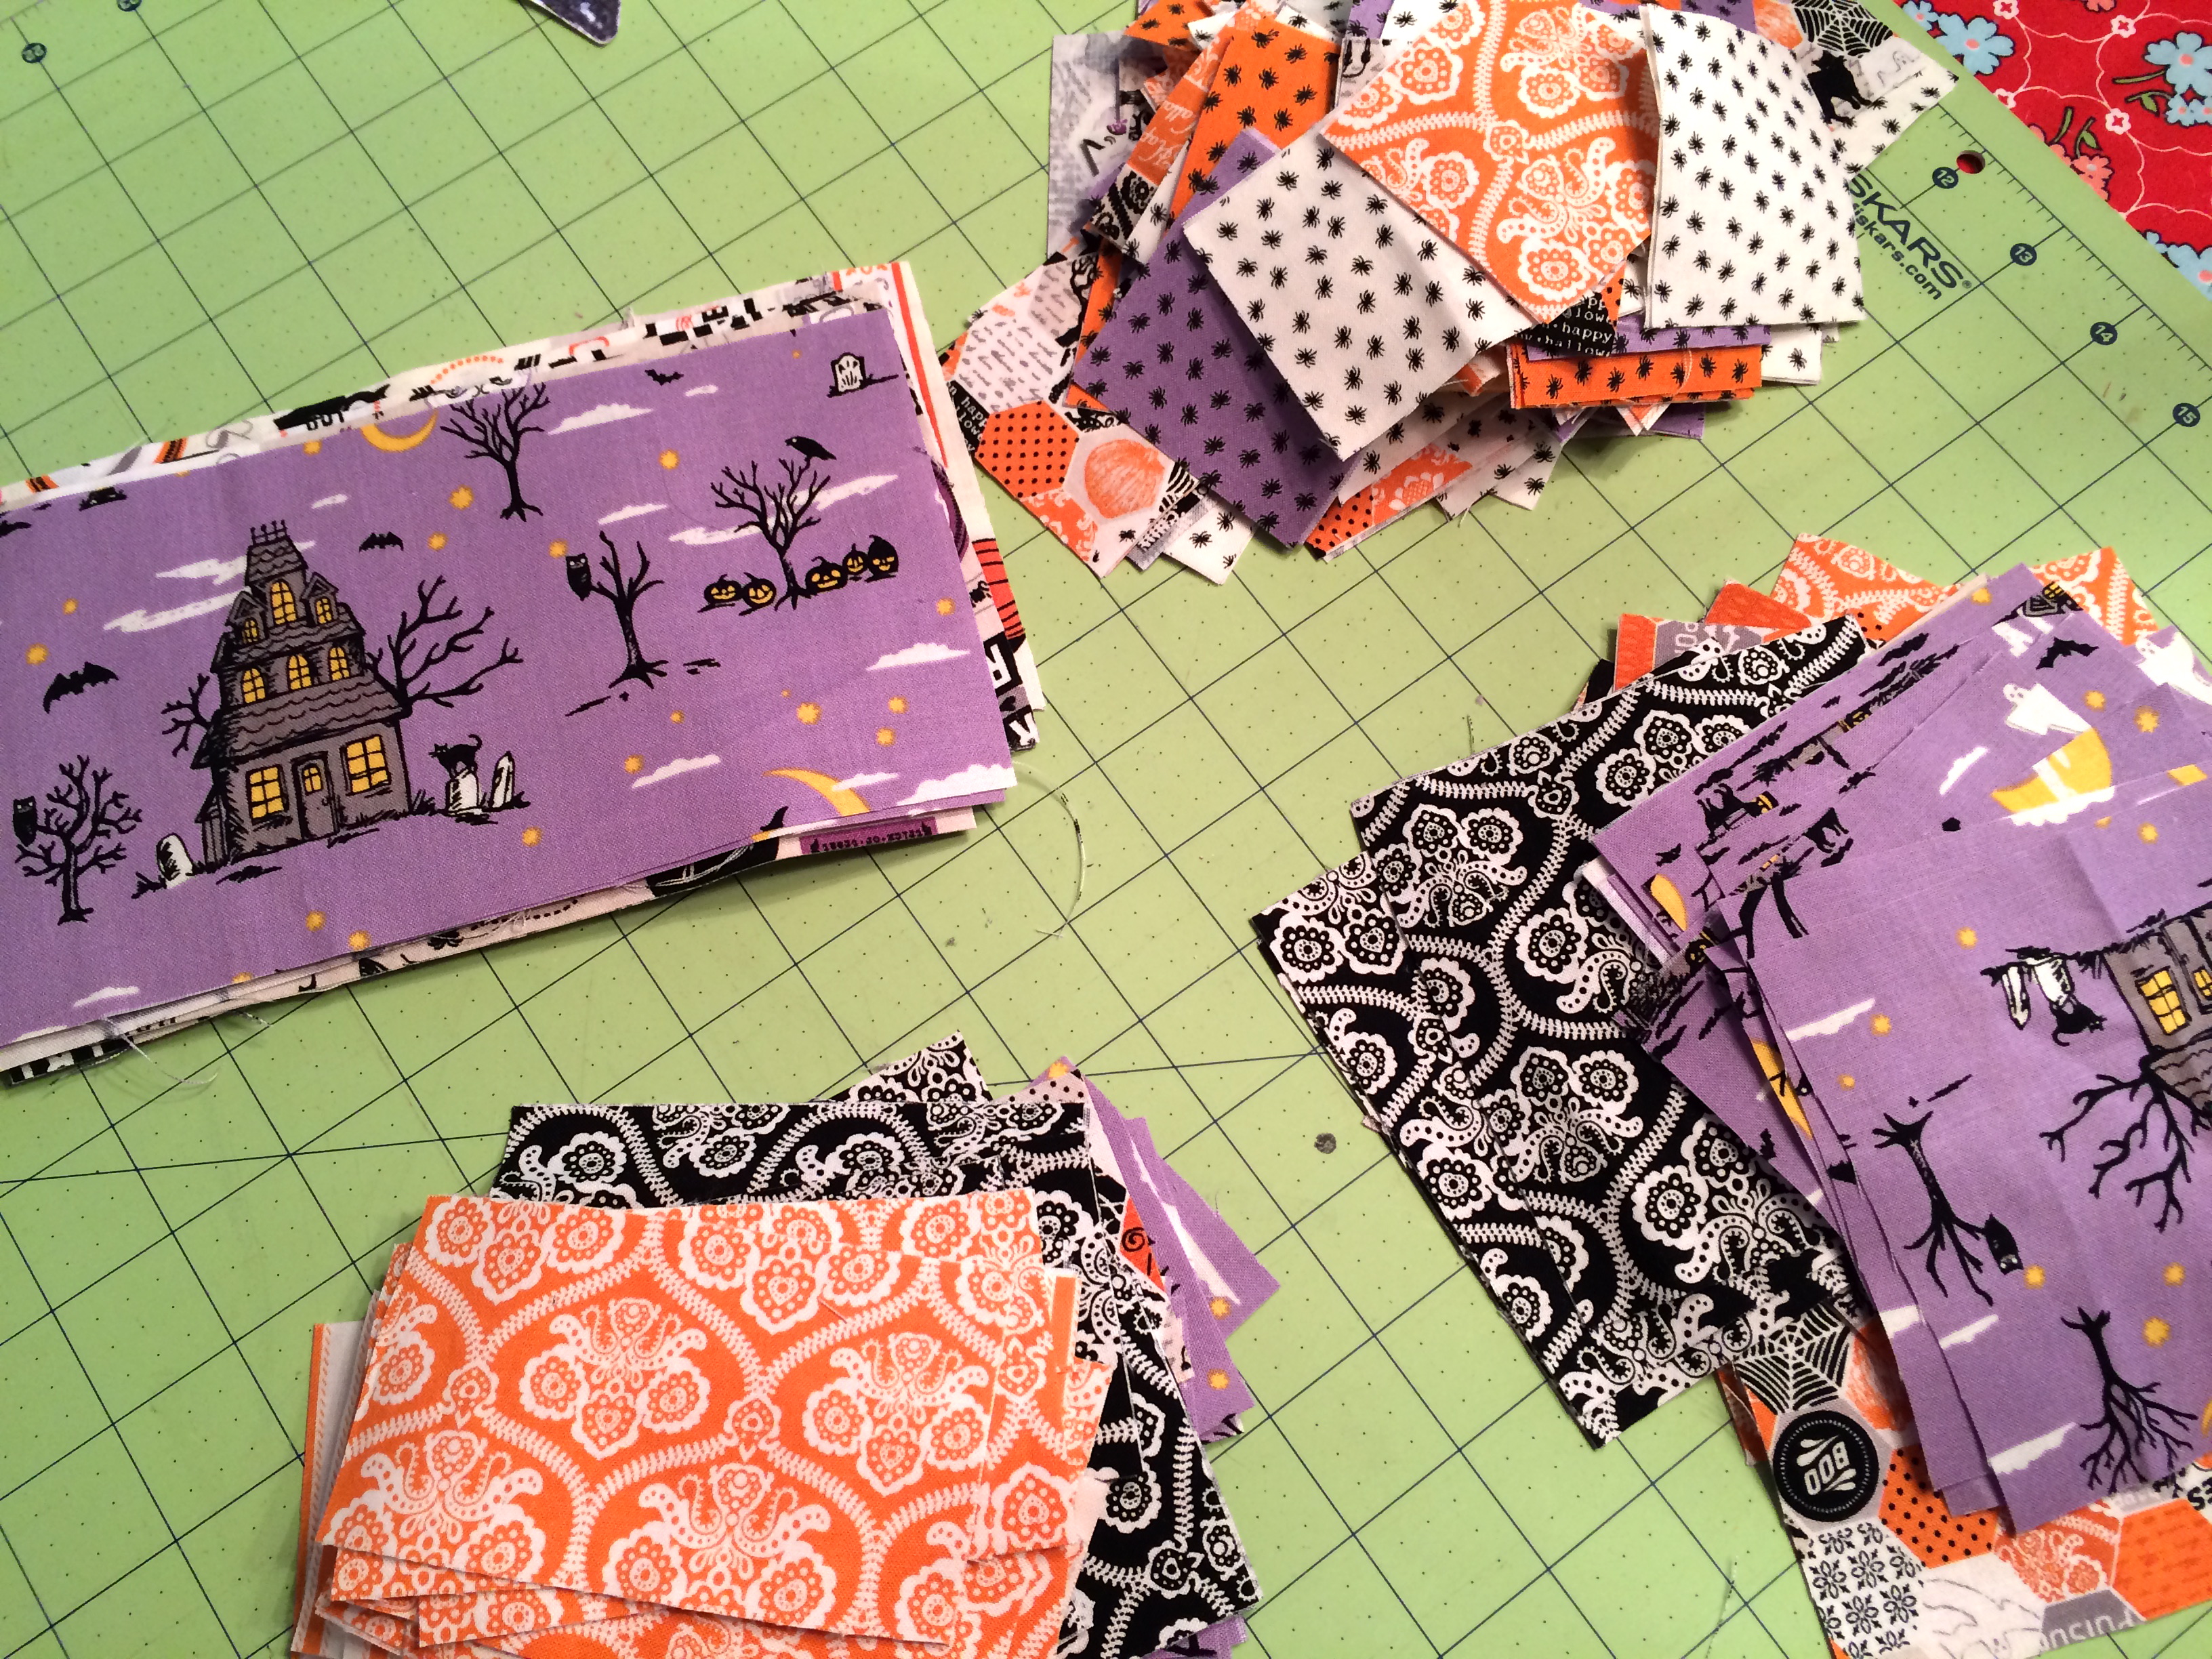
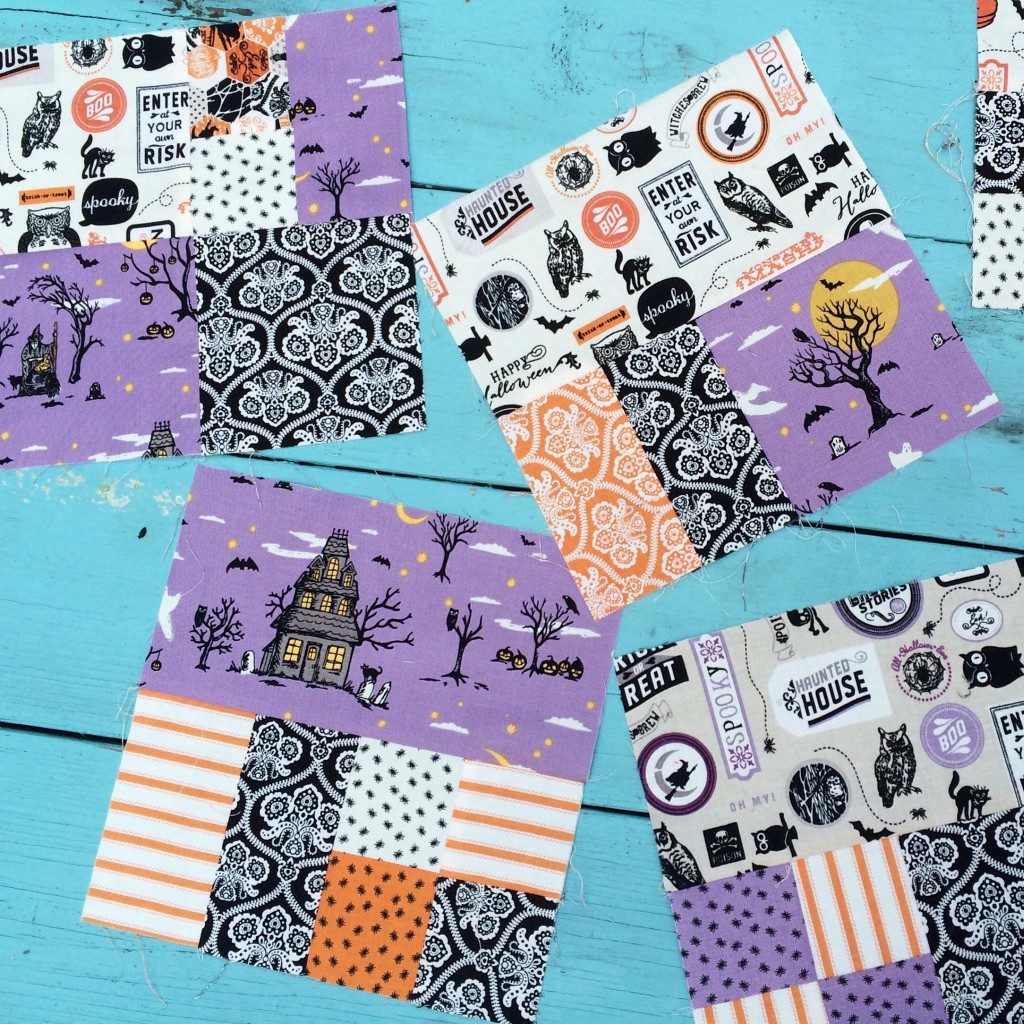
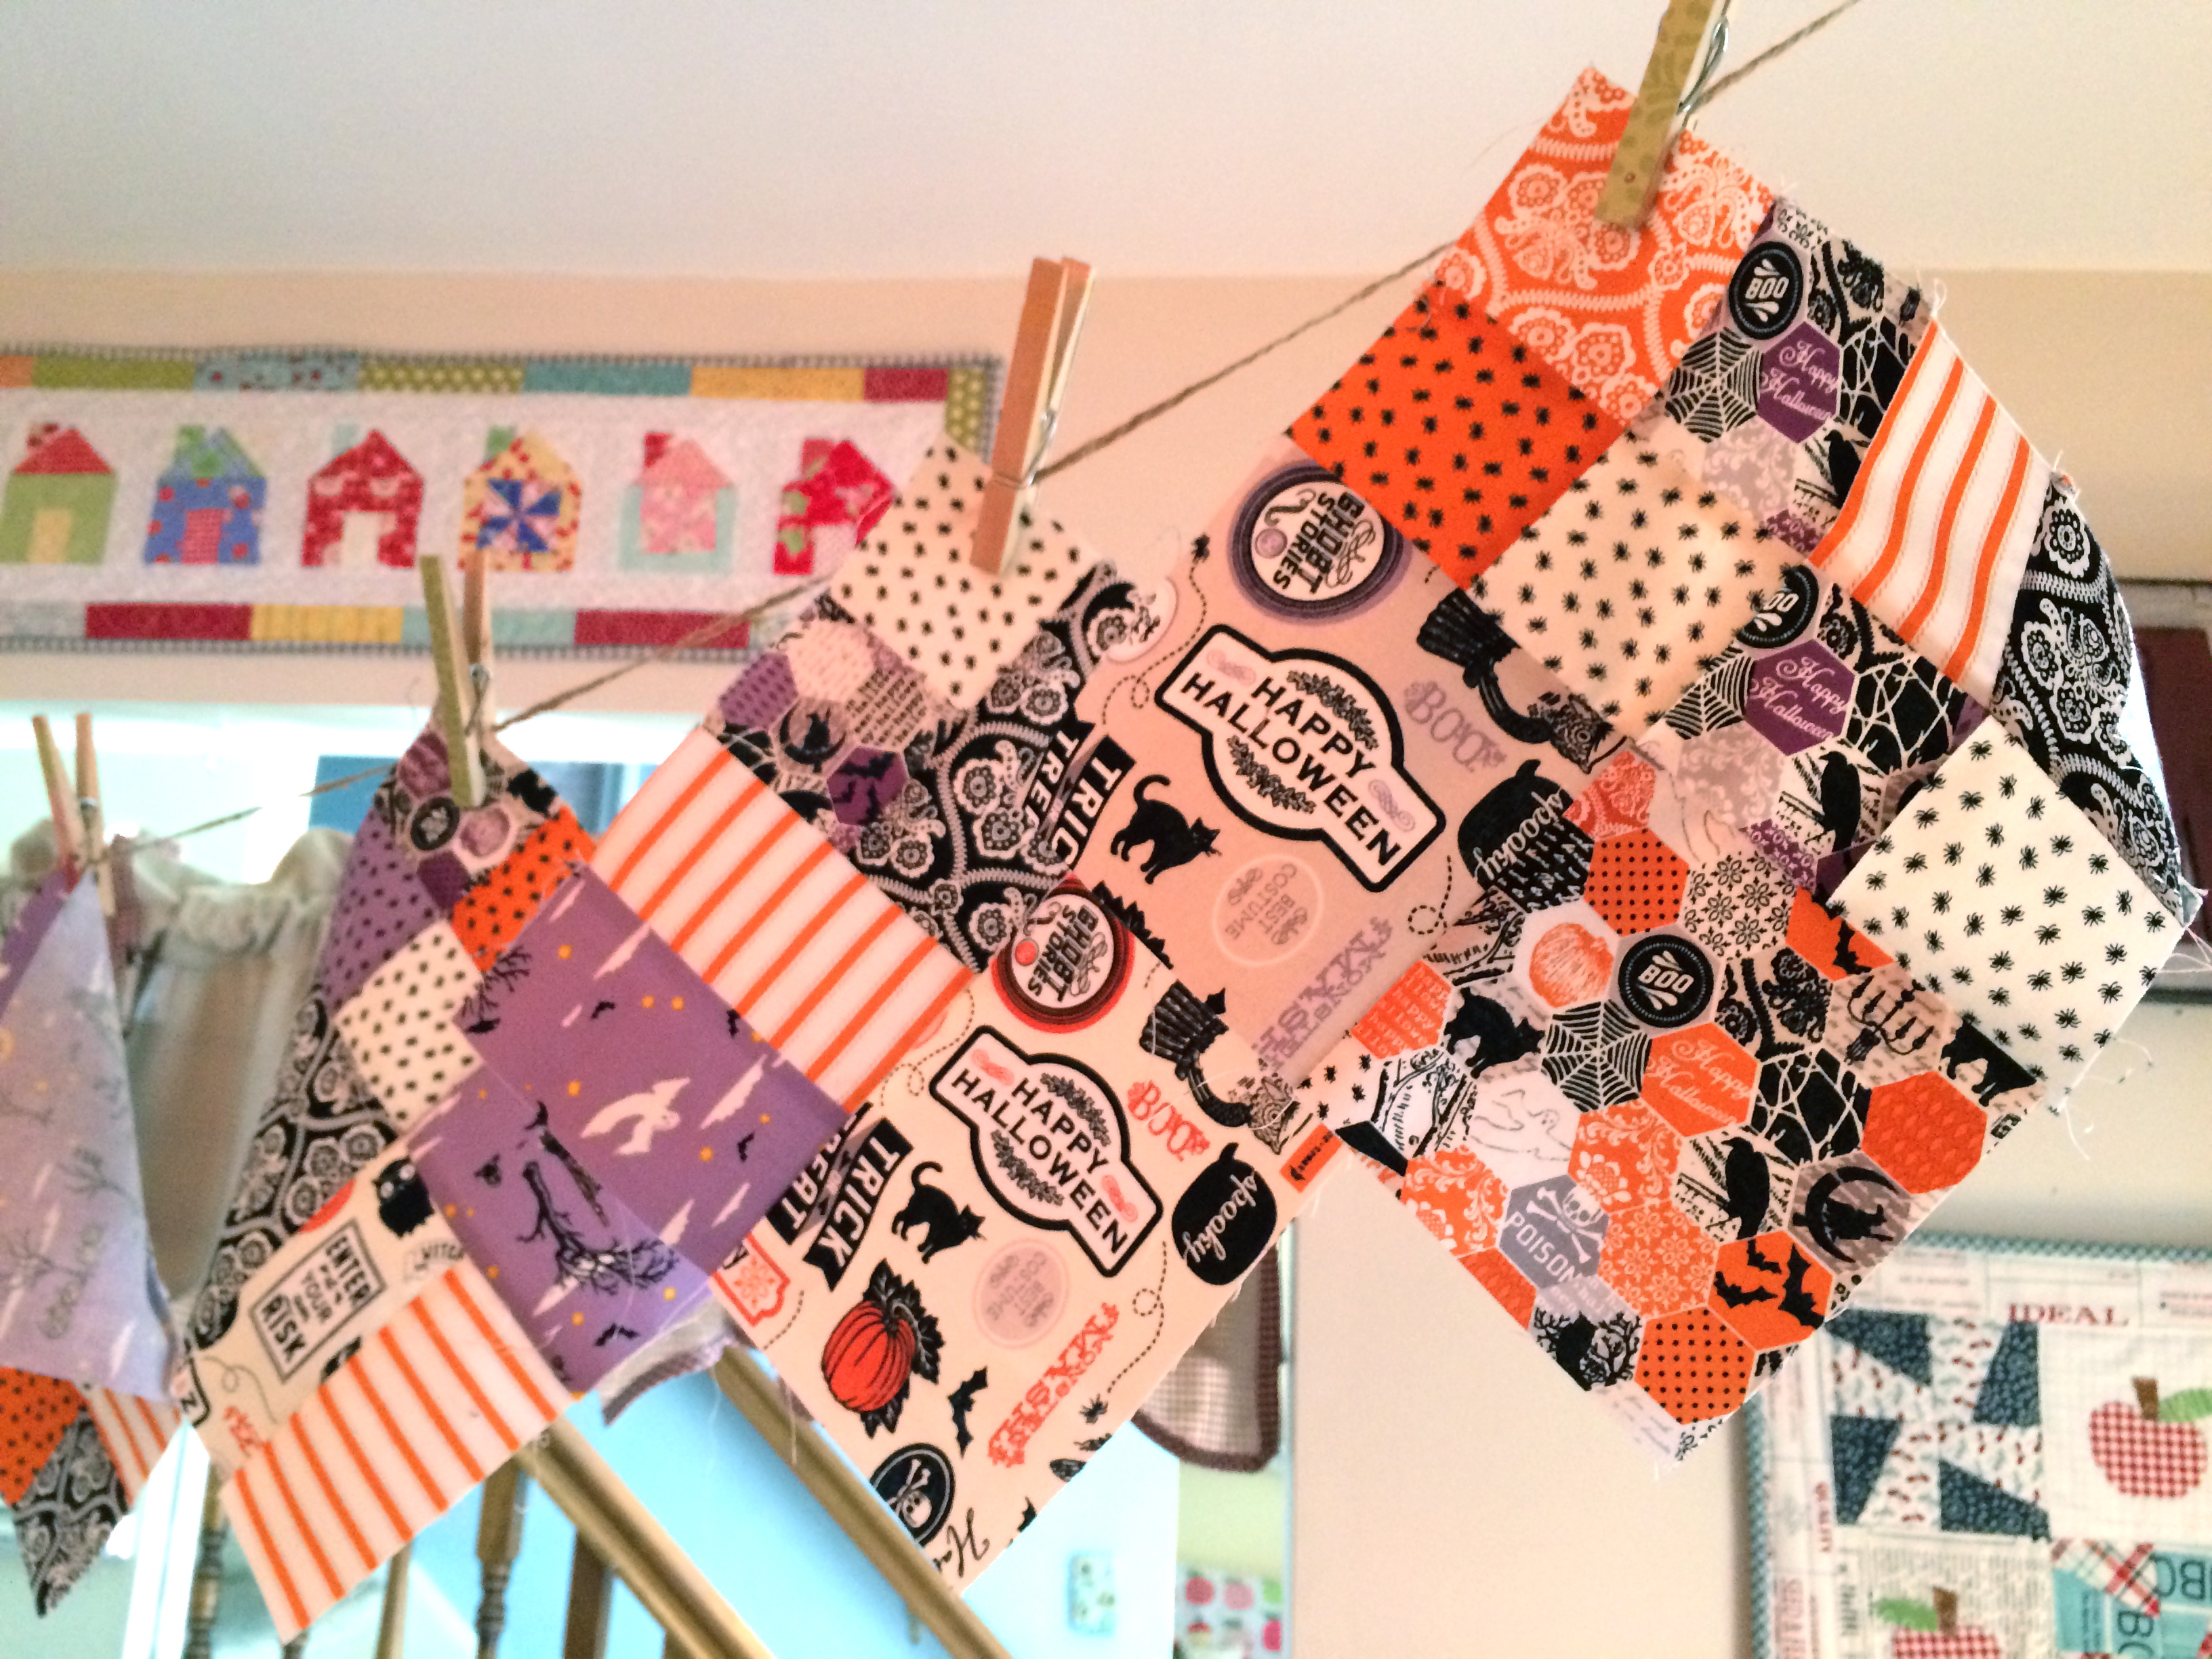
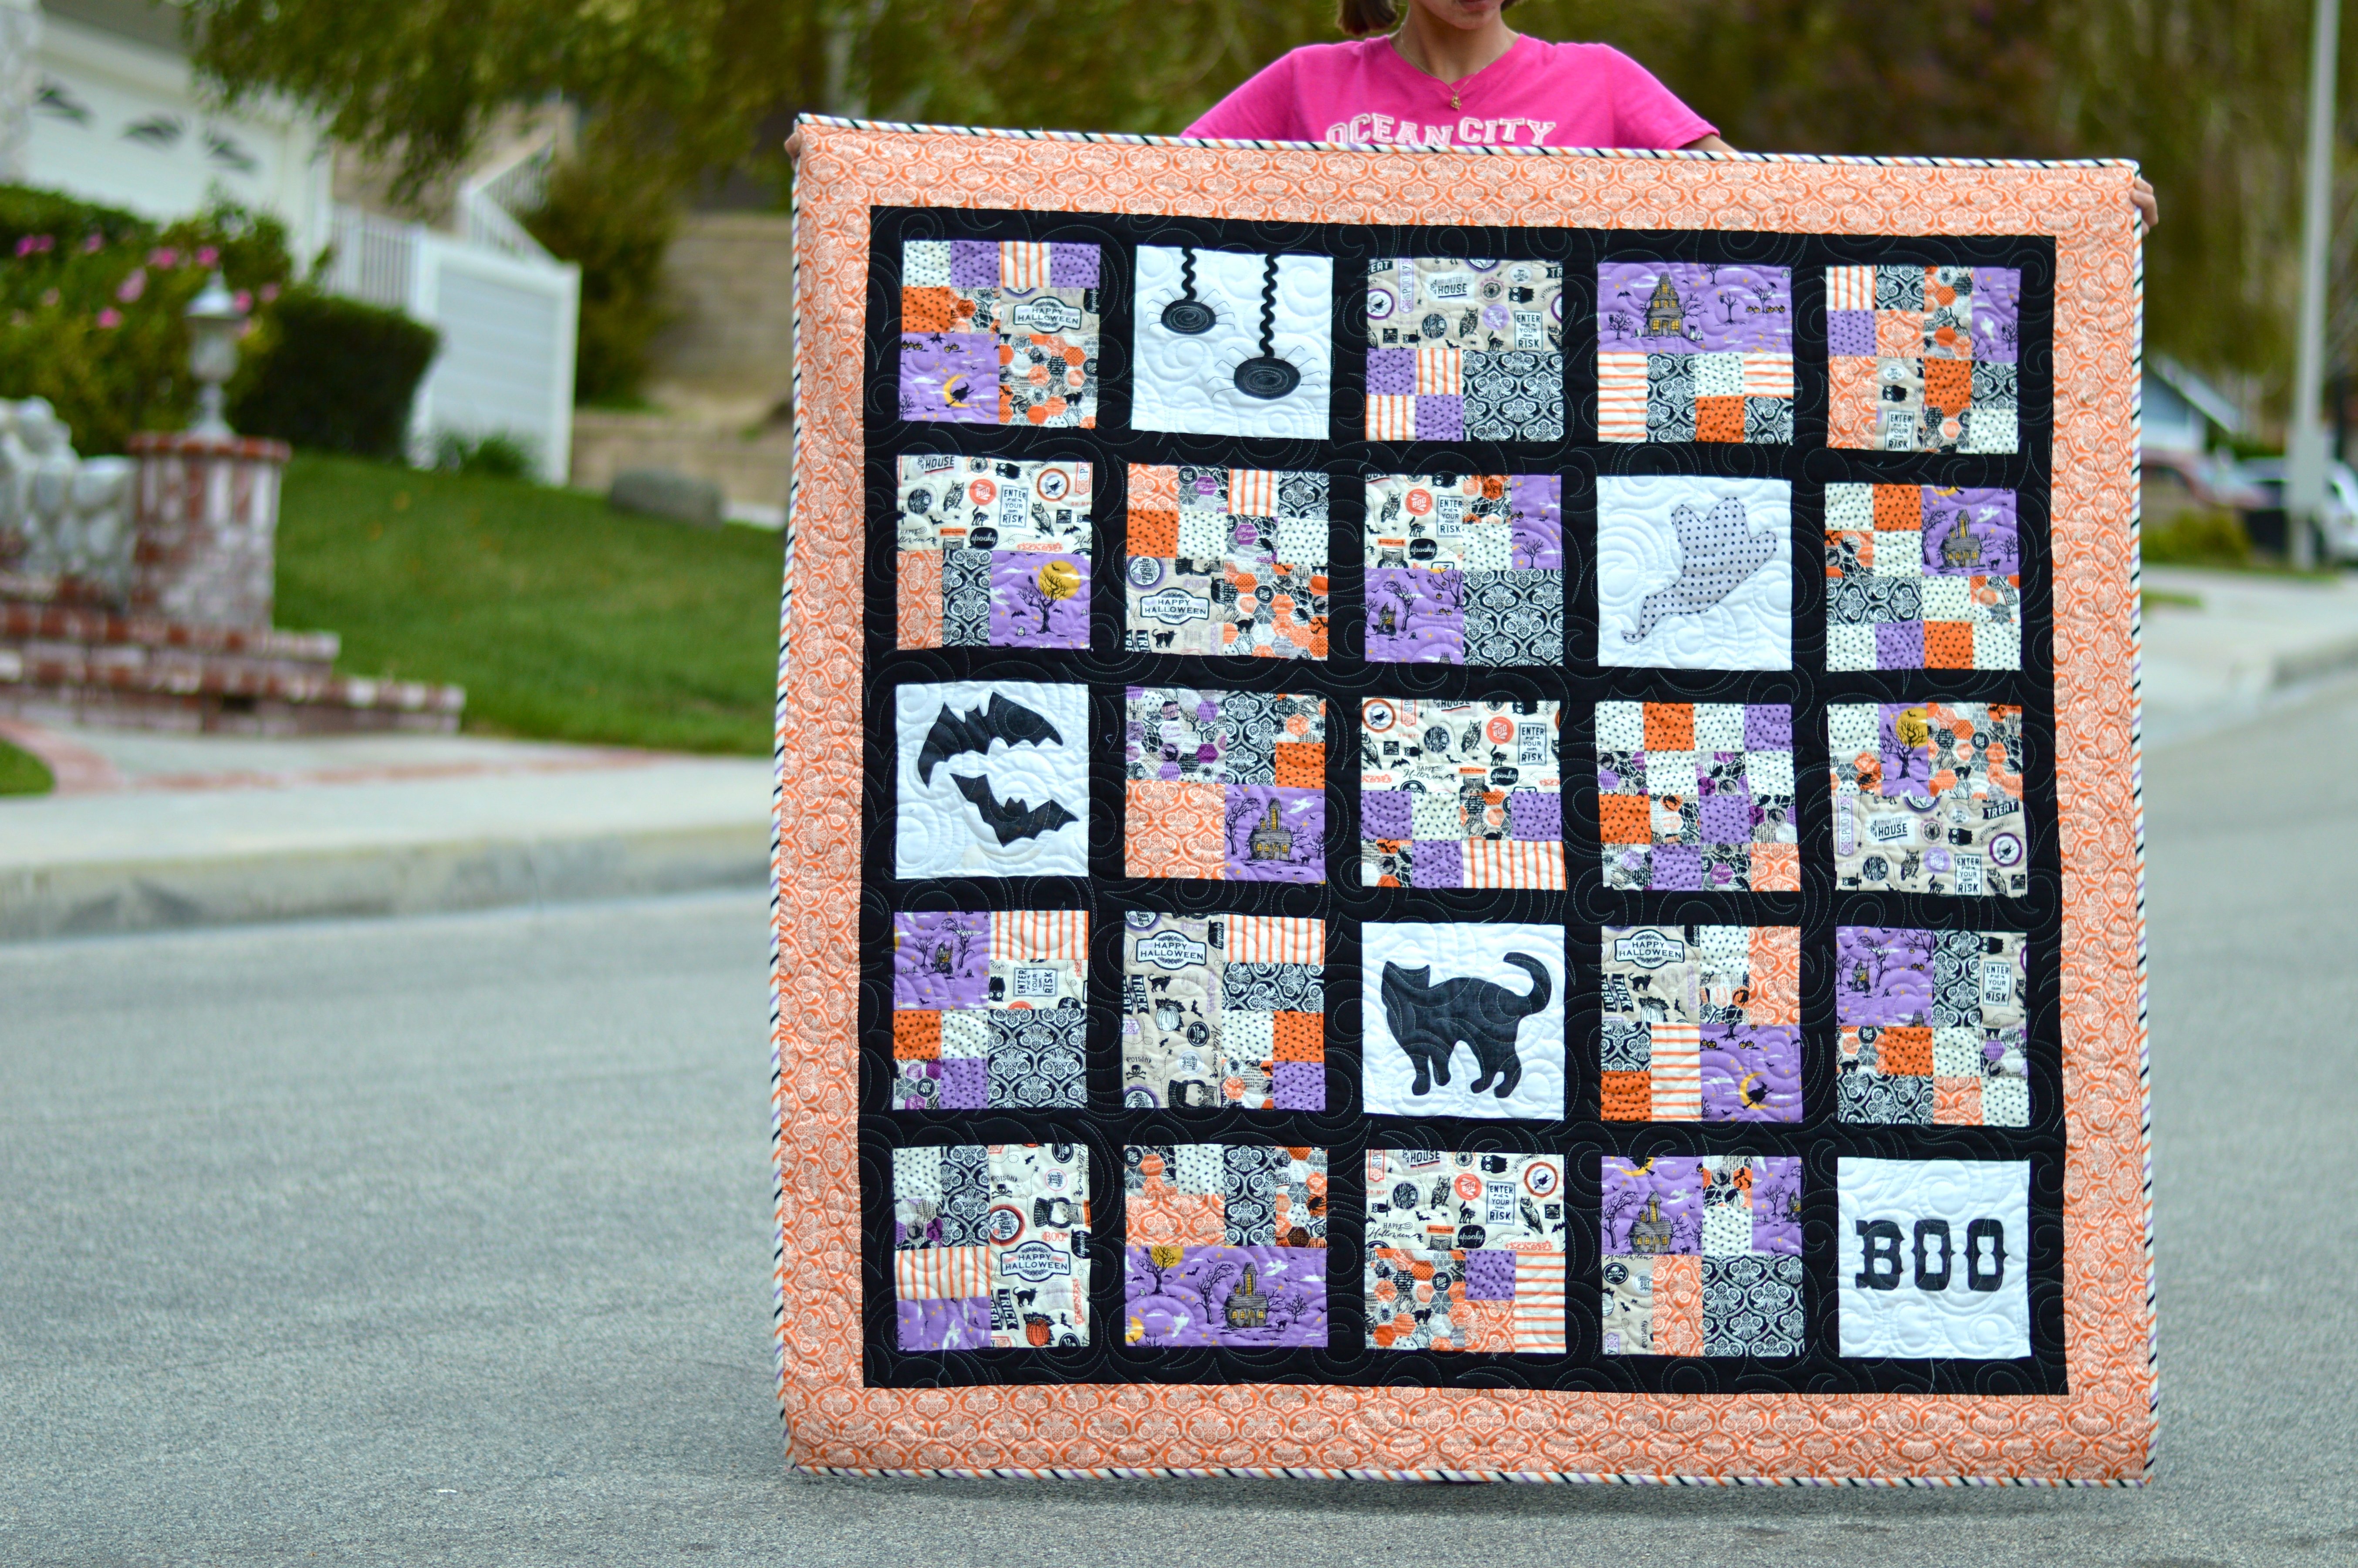
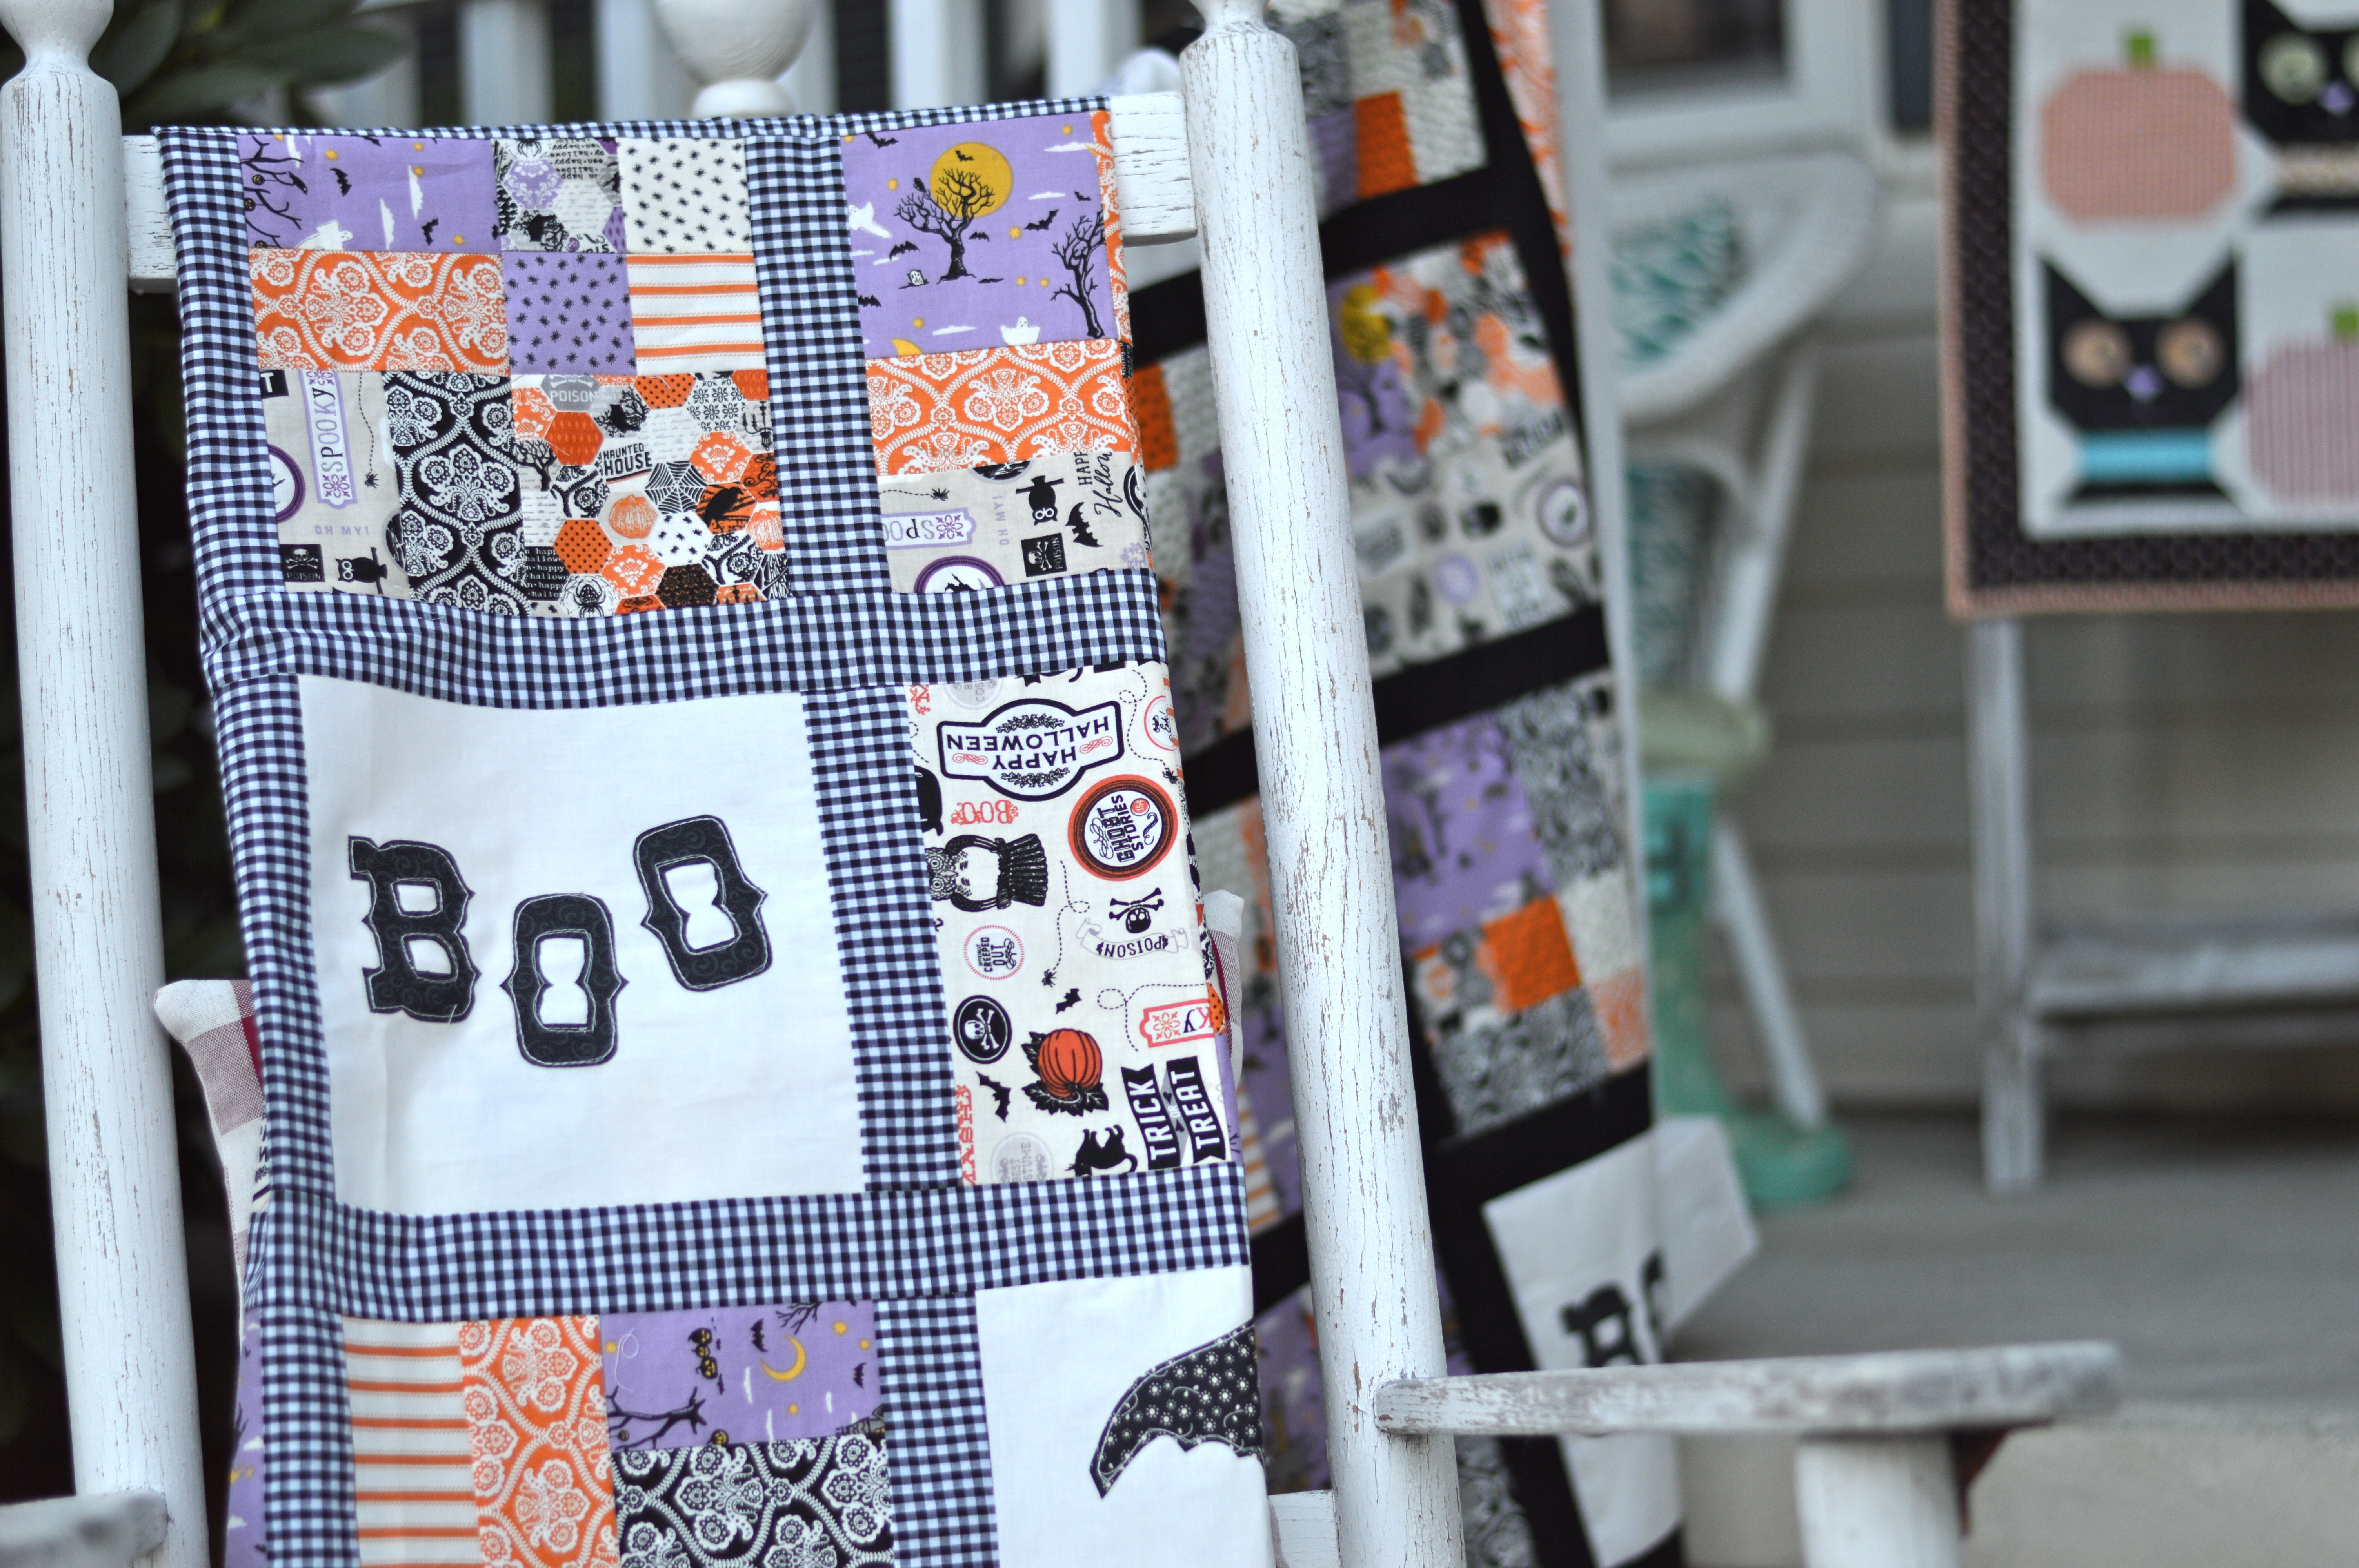
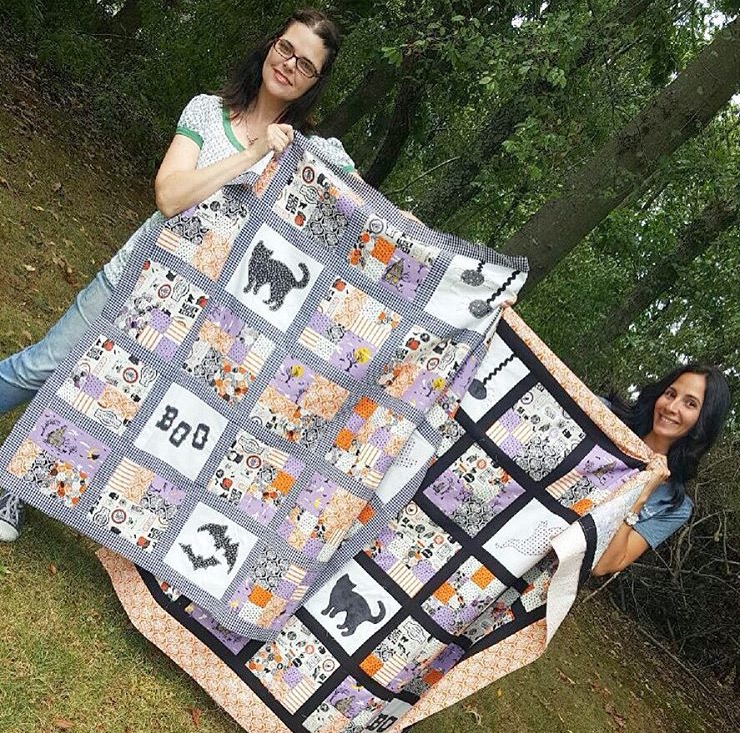
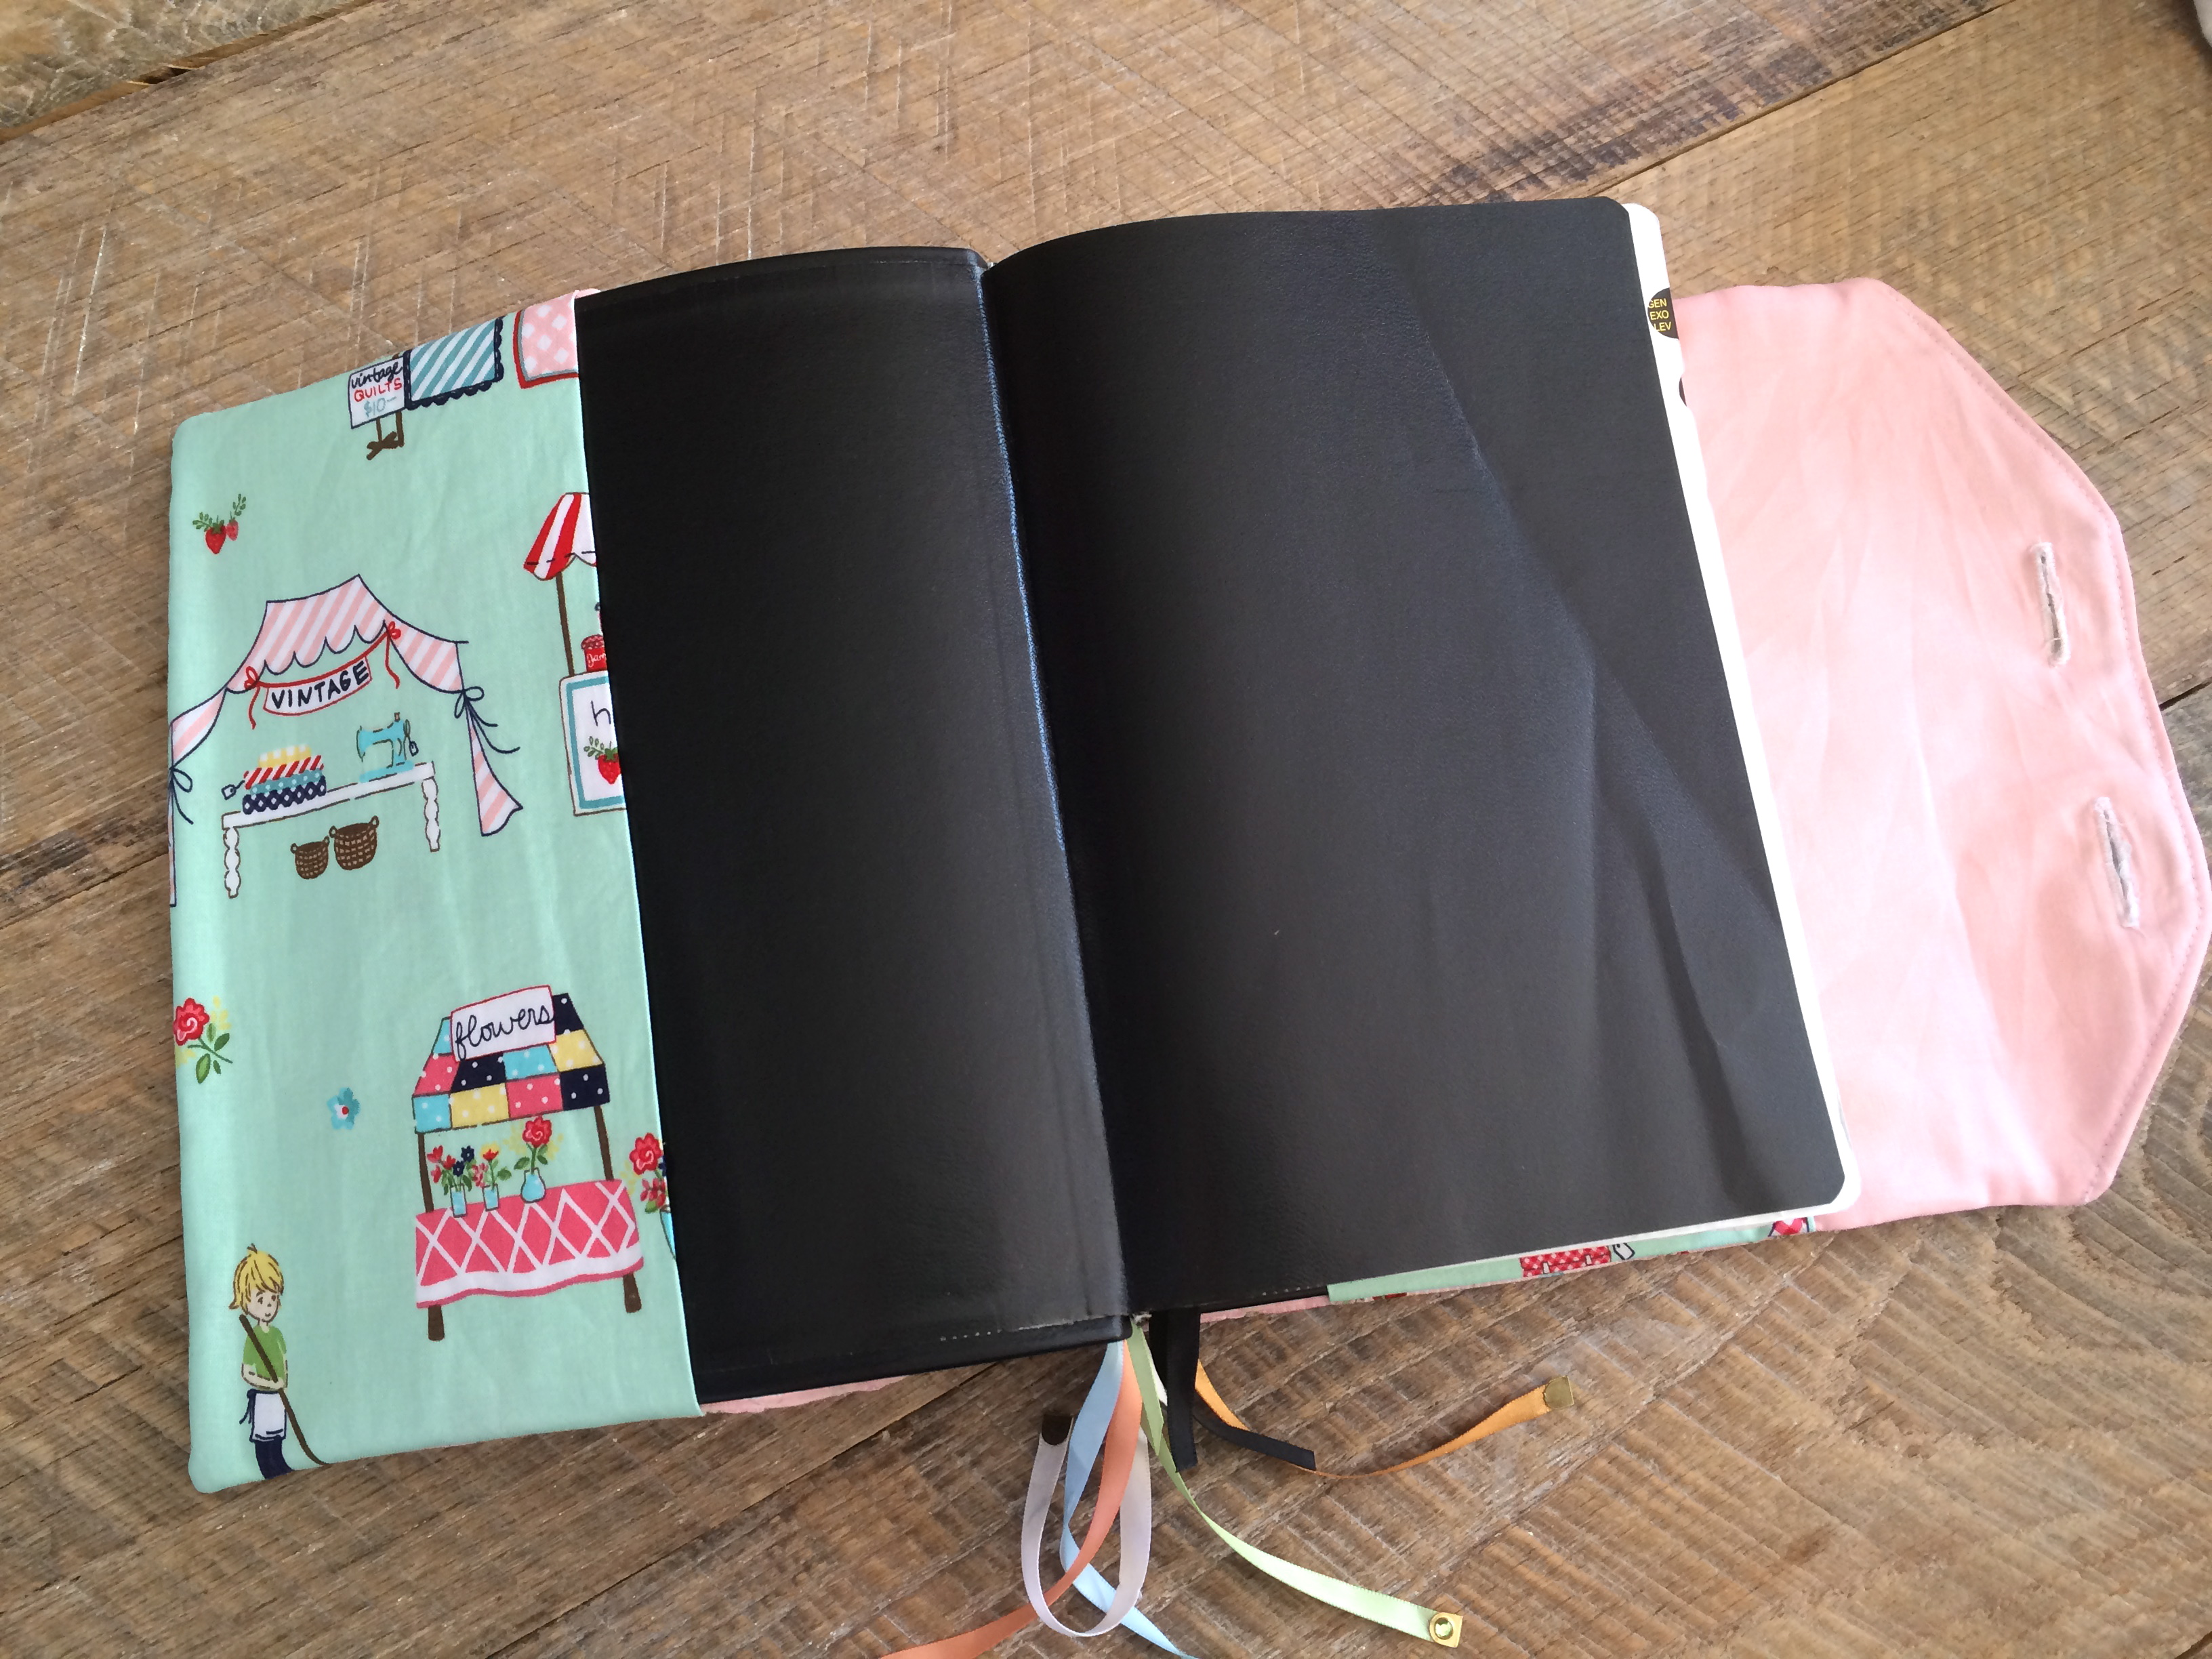
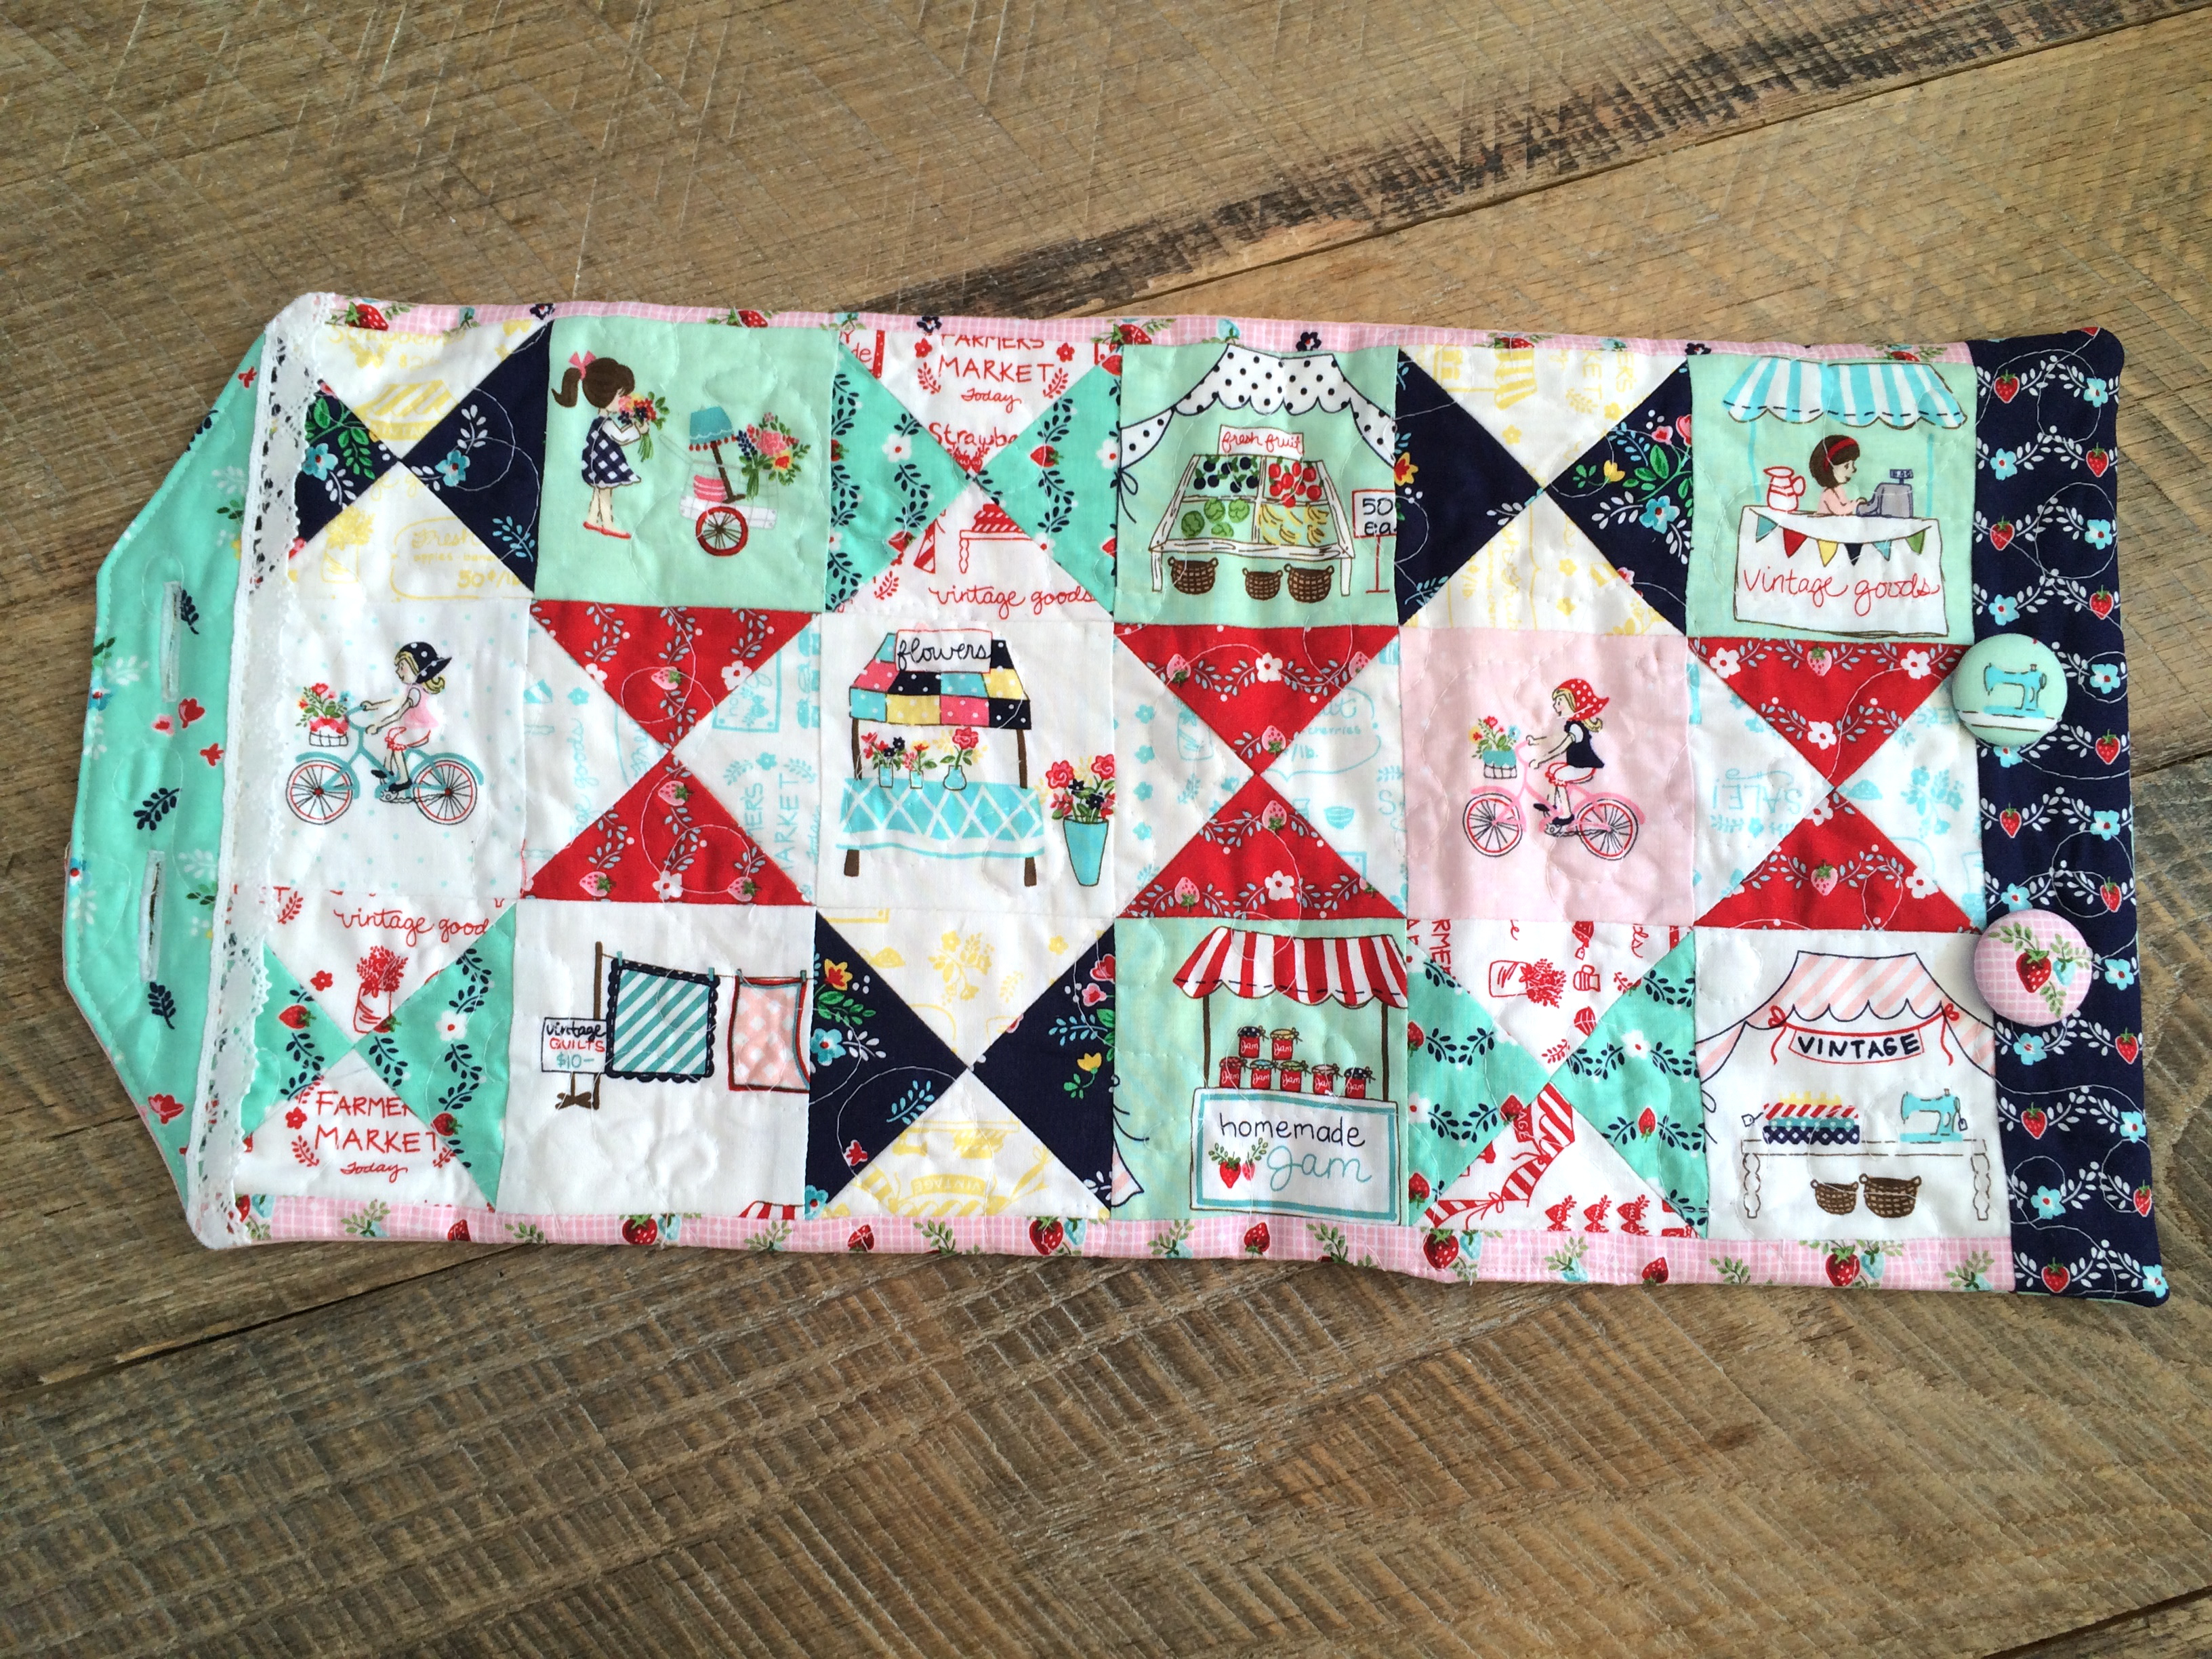
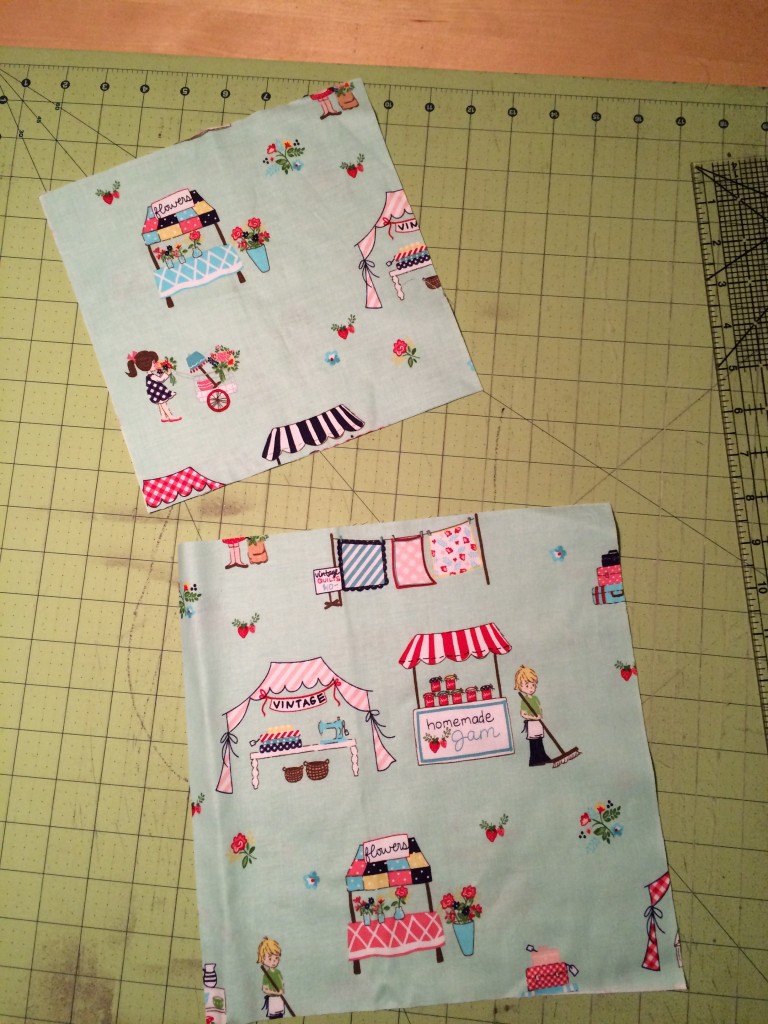
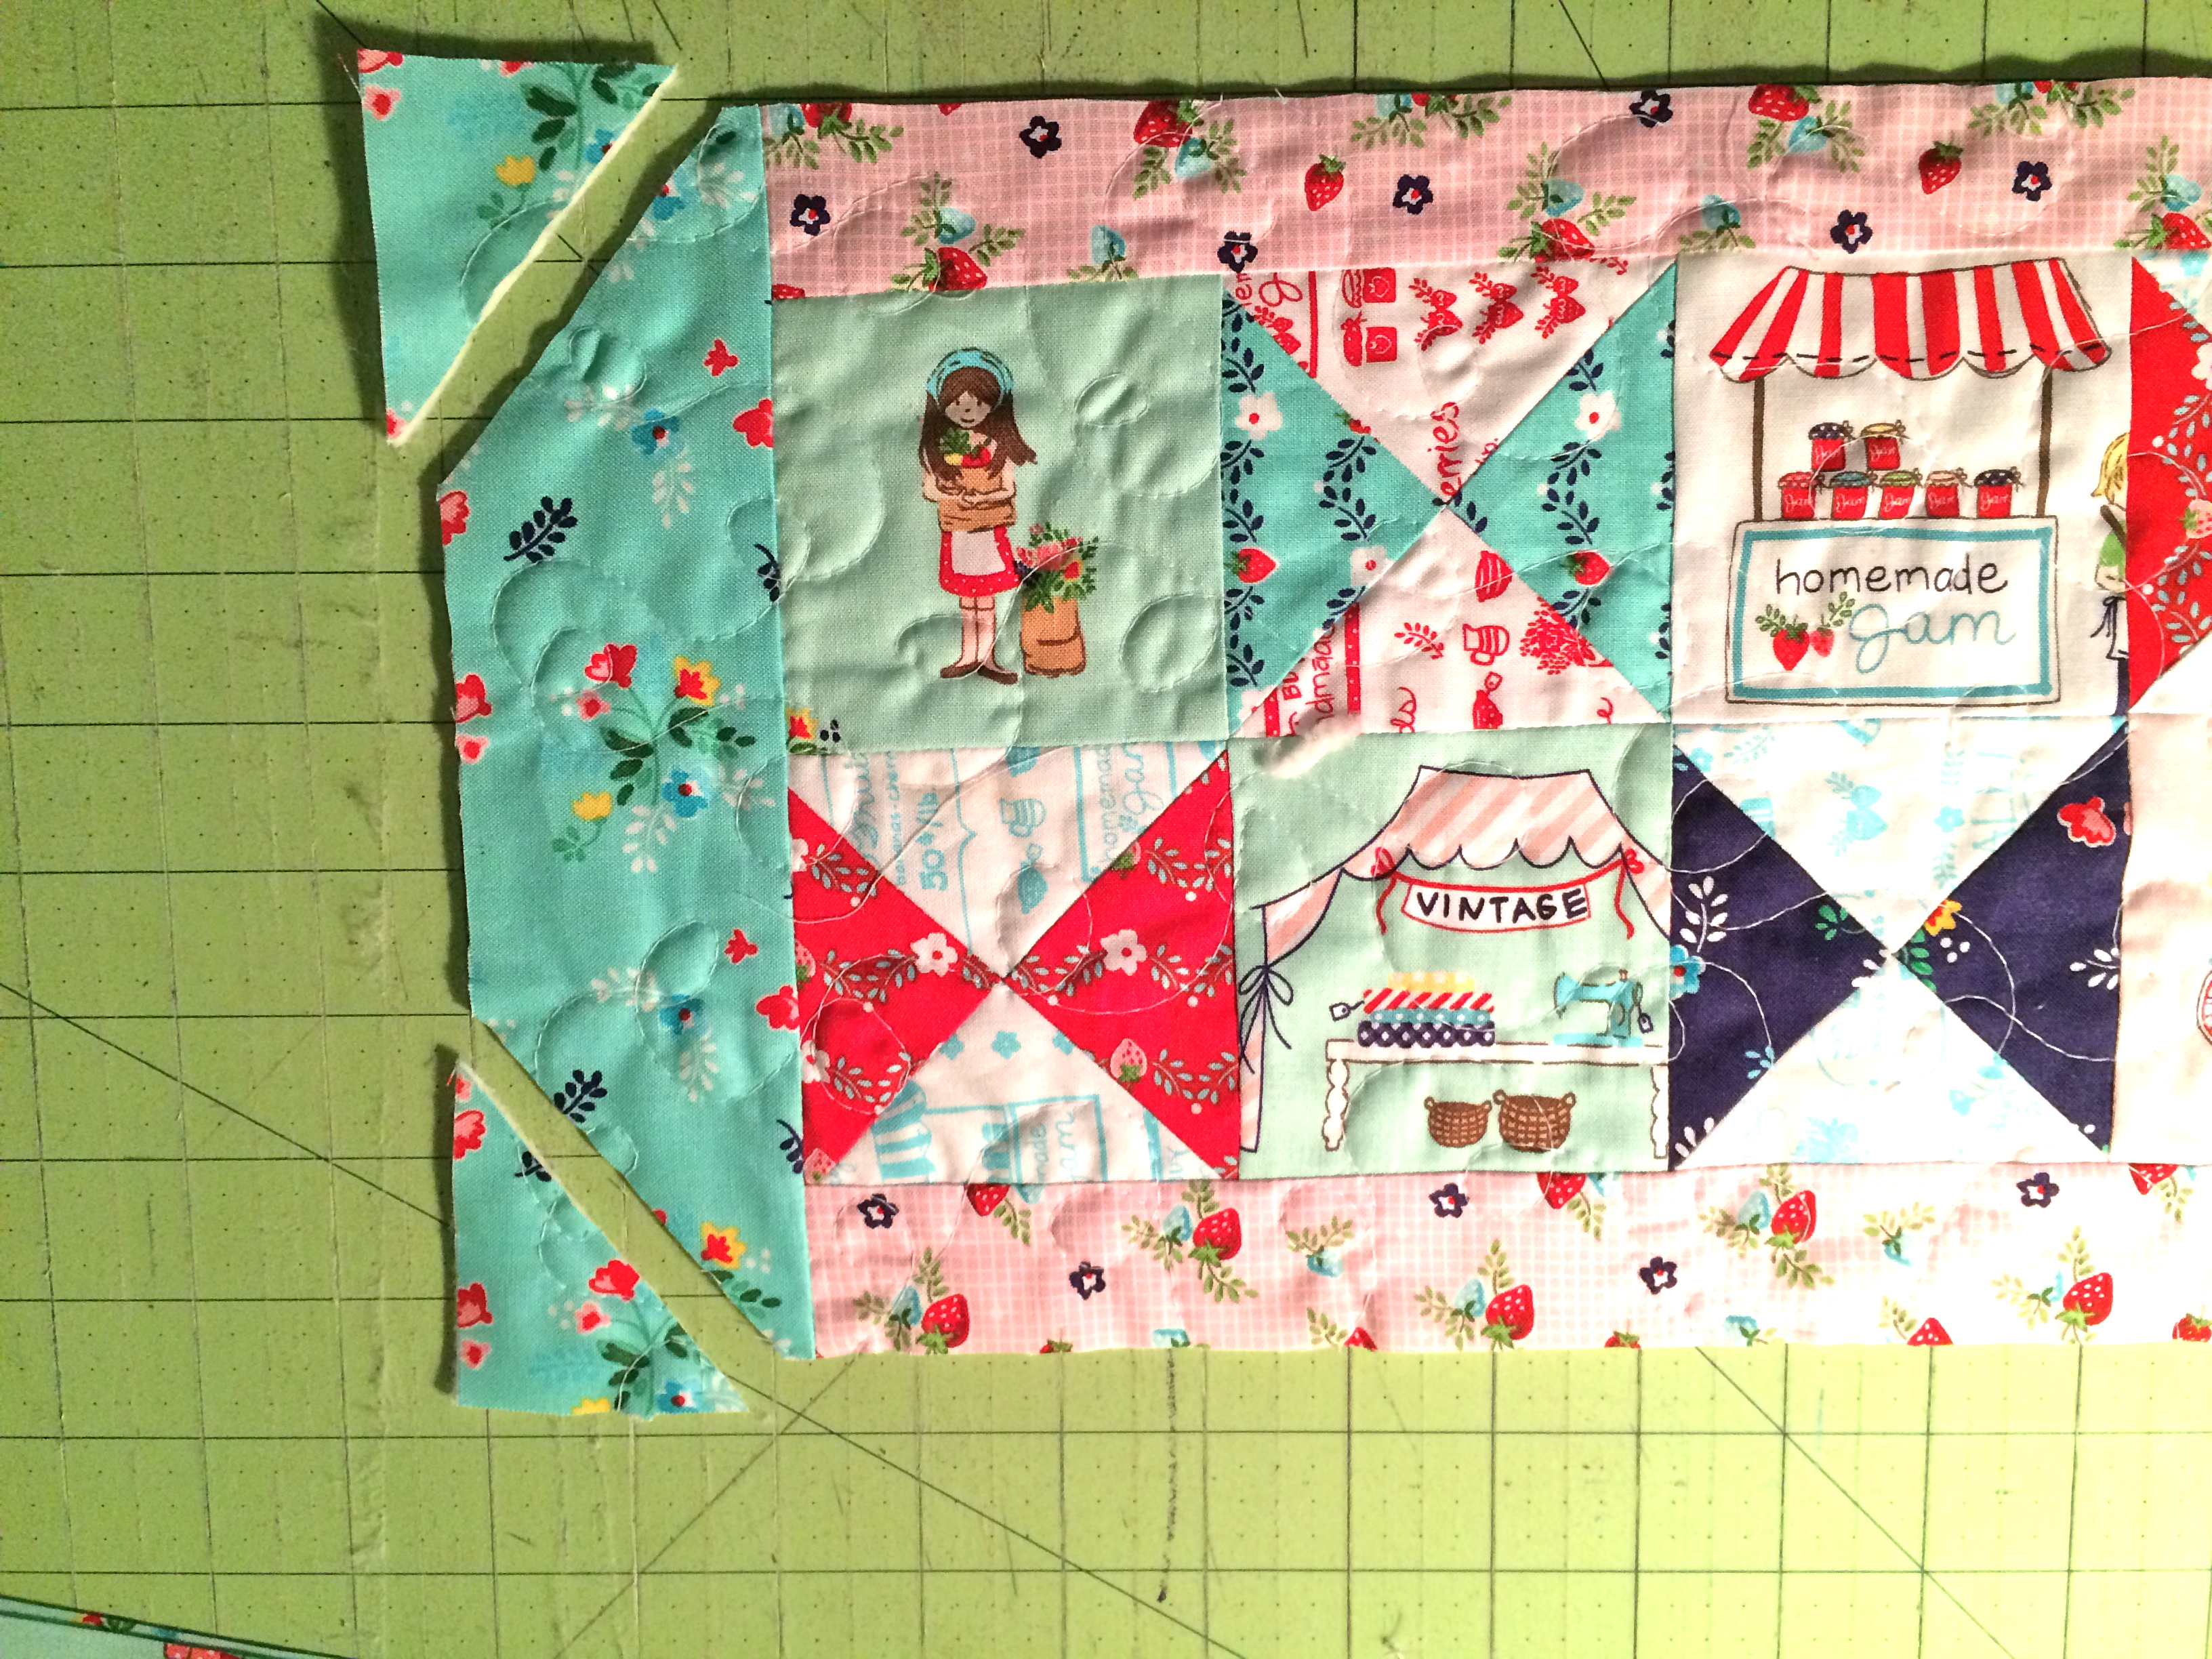
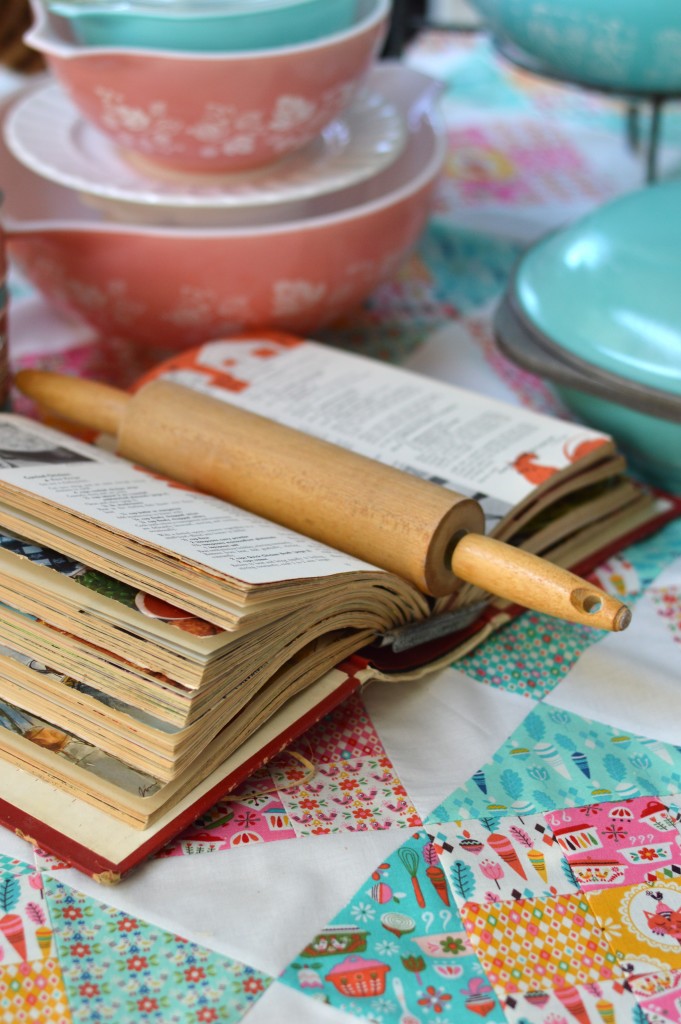
I created this quilt called “Cat in the Kitchen”.  It is made up of hourglass blocks and 9-patch blocks.  What could be more fun!! IMG_5395
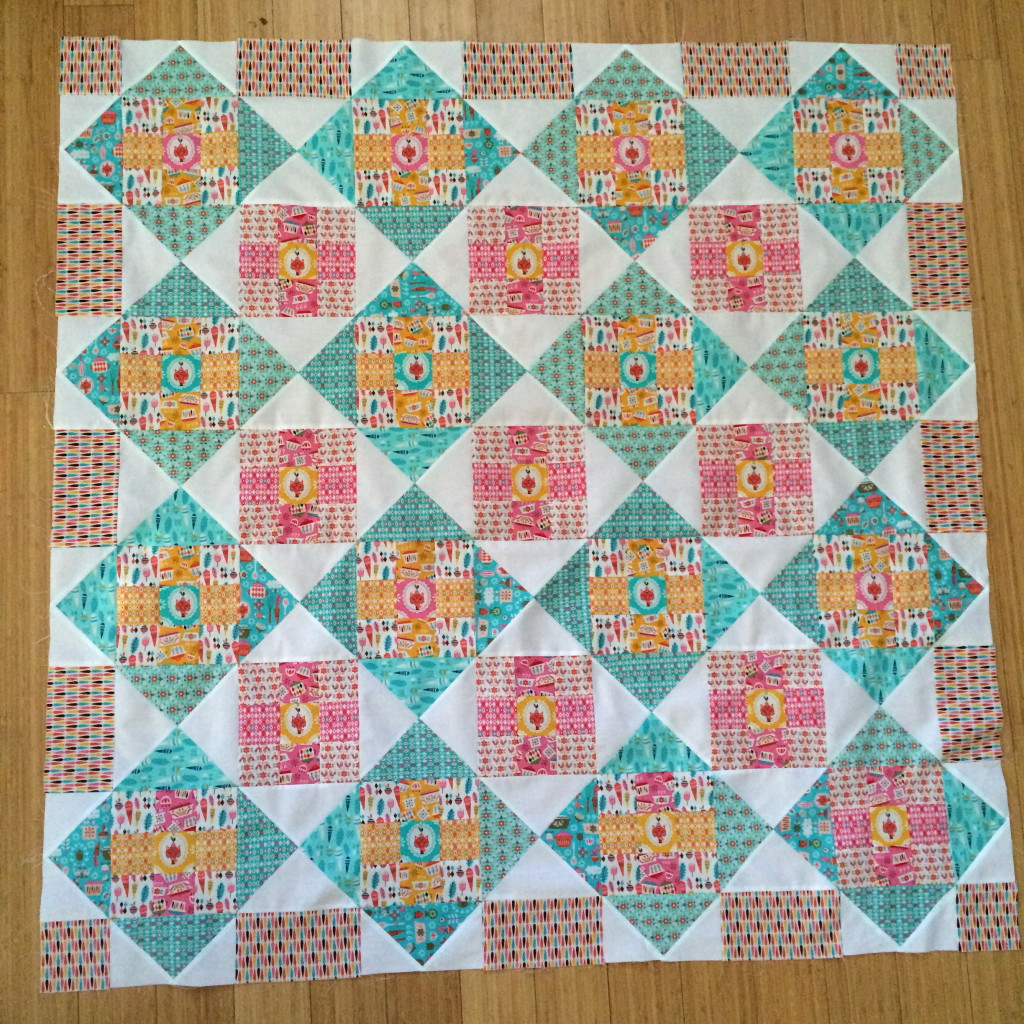
Each of the 9-patch blocks has a kitty in the center – just like in my kitchen….with Mufasa constantly in the center of it all.

vintage kitchen quilt 
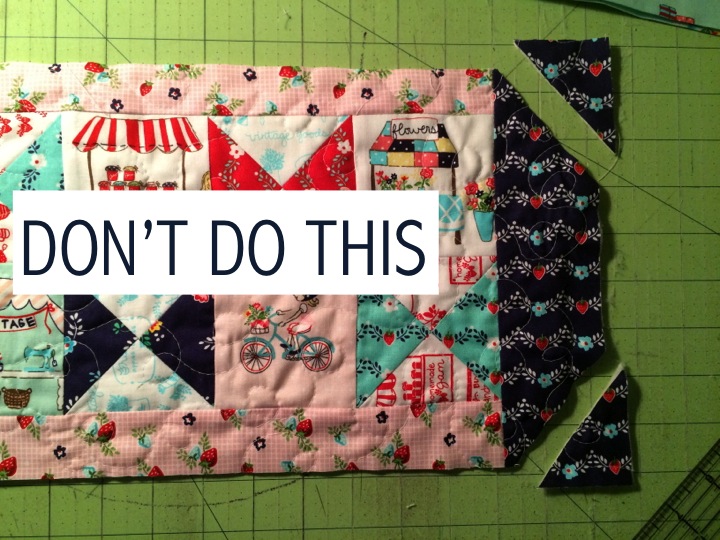
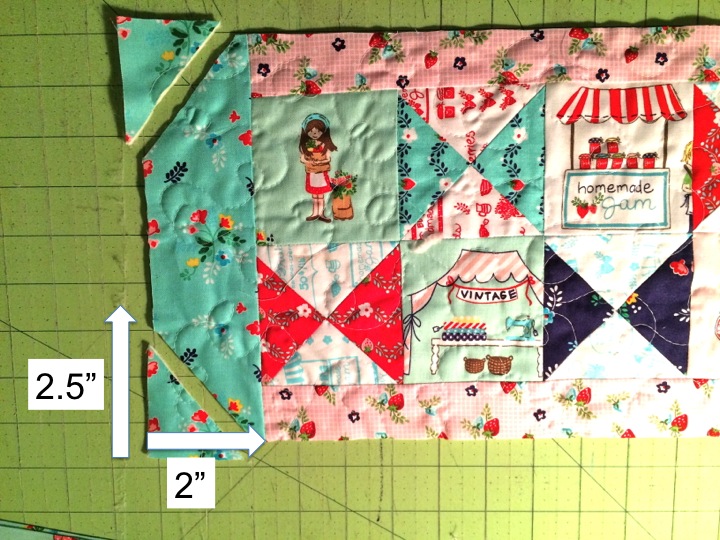
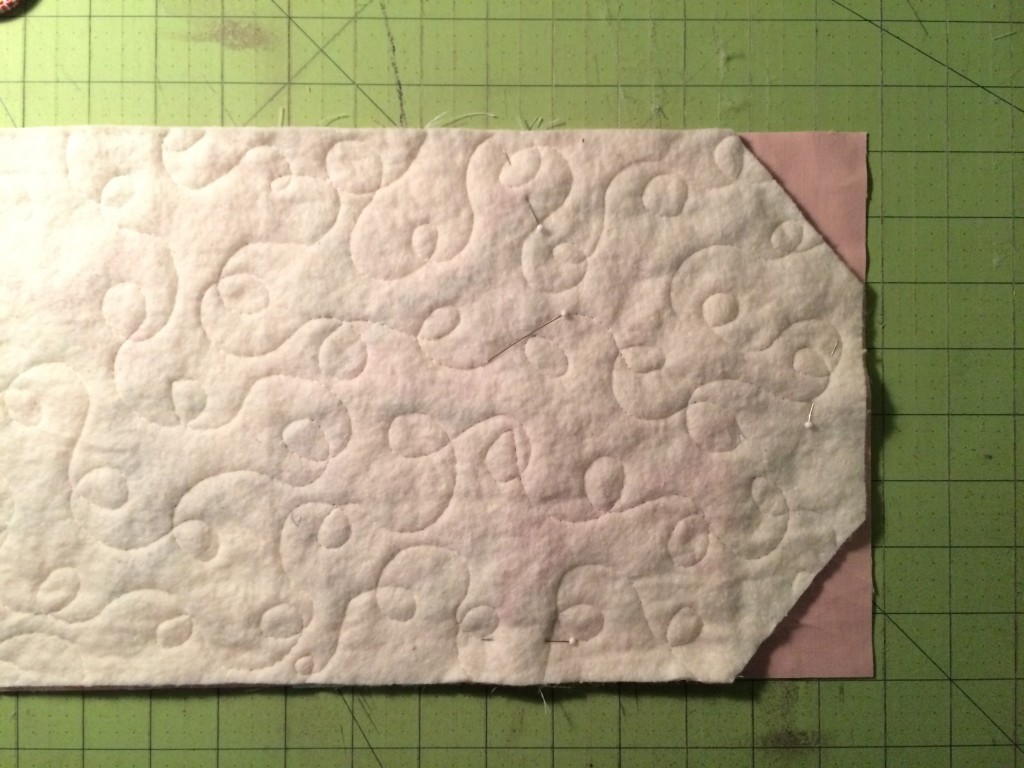
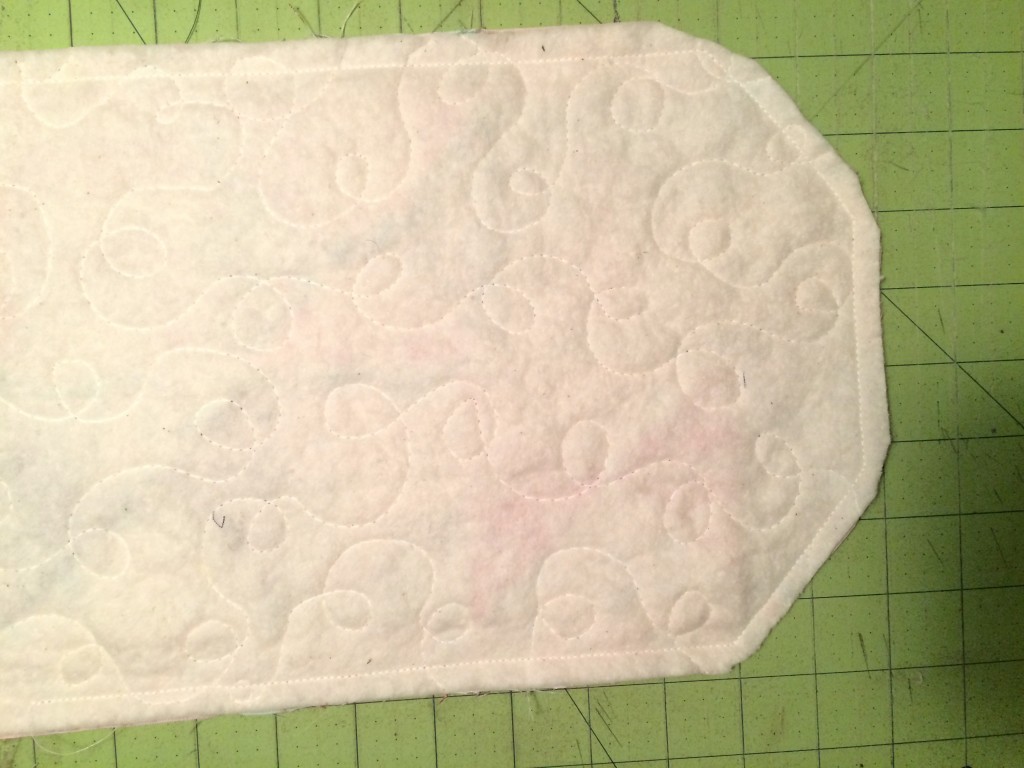
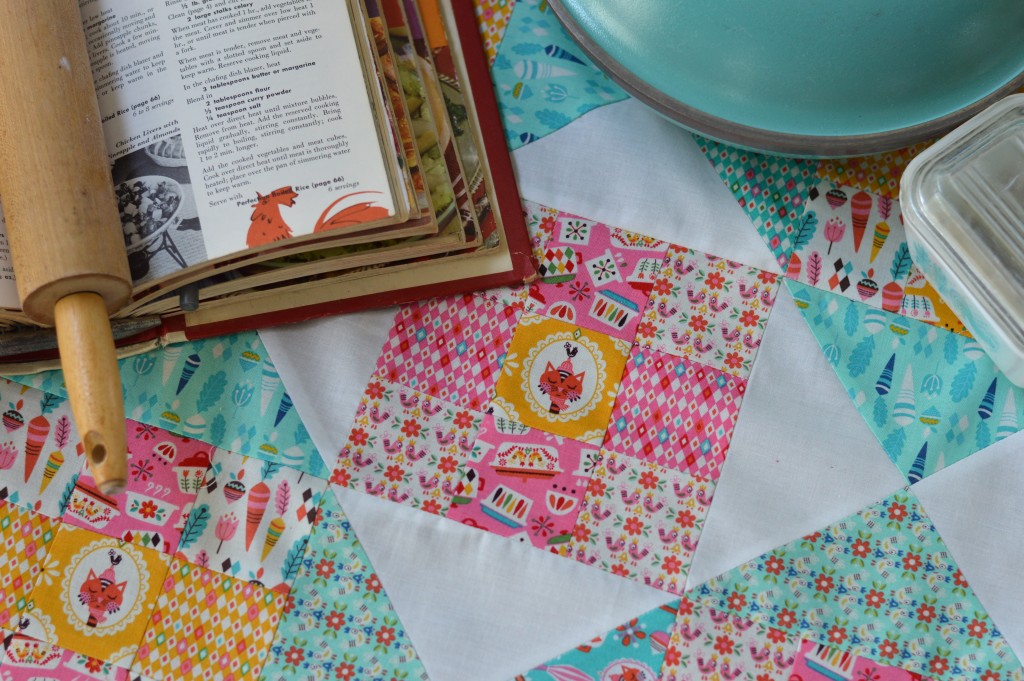
I have created a few little instruction guides to help you put this quilt together.

 Supplies:
Assortment of Vintage Kitchen fabrics 1/3 yard each (4 blues, 2 pinks, 3 low volume, 2 yellow, cats, and others to mix in)
Solid White 1 1/3 yard
3 yards backing
1/2 yard binding
Begin by creating the hourglass blocks and 9-patch blocks.  All seams are 1/4″.

hourglass instructions

9 Patch Block – pinks & yellows with cats in the center.

9patch

The edges of the quilt are finished with flying geese blocks and rectangles.  flying geese
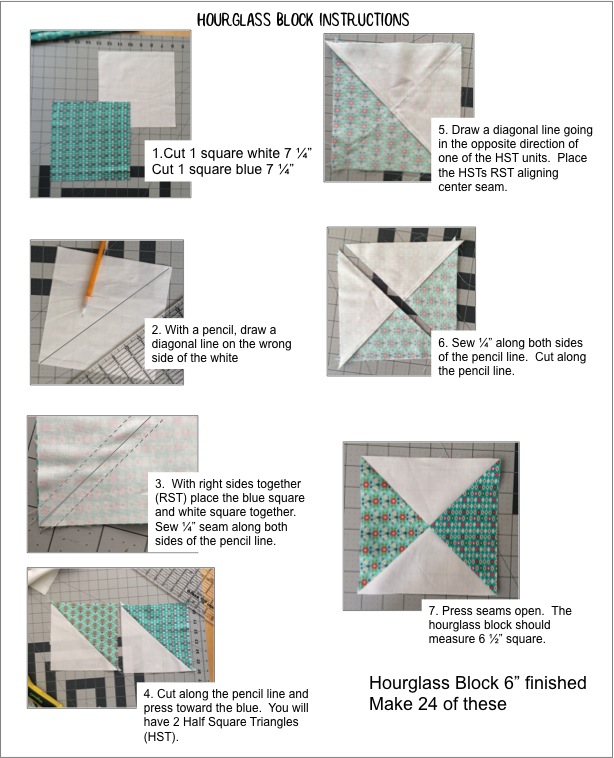
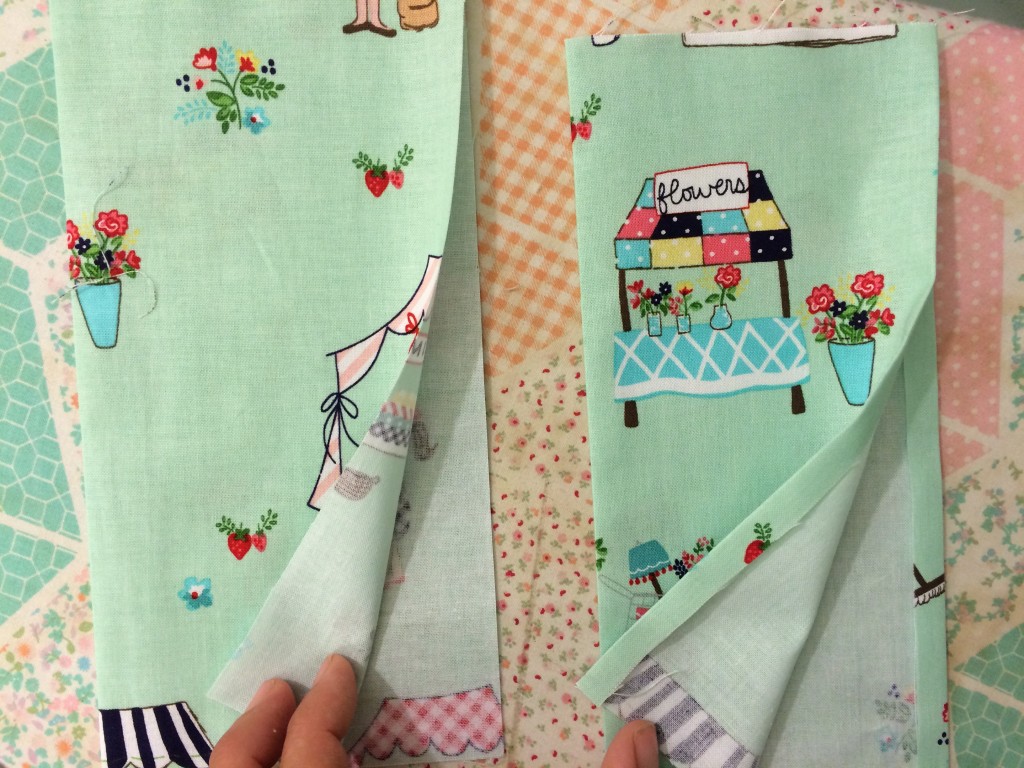
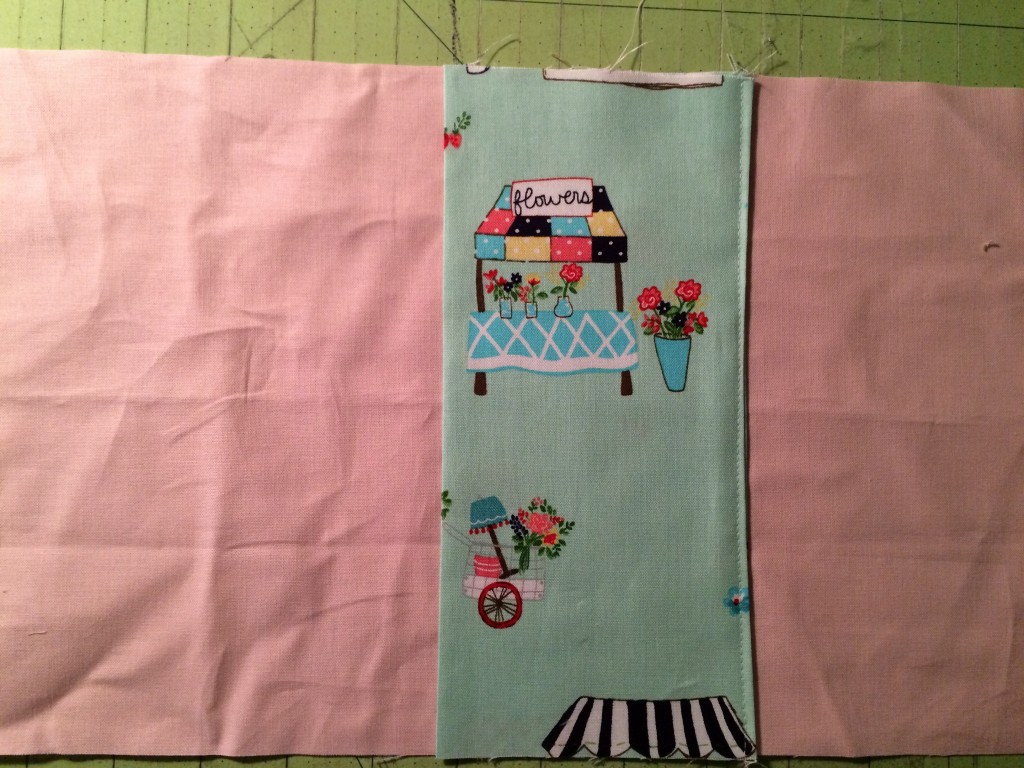
Lay out the quilt as suggested below:

quilt layout

Assemble the quilt together in rows, pinning at each intersection and pressing.  Make sure your cat walks all over it for inspection before you quilt it!!!

IMG_5398

I am so happy with how this quilt came together!  The fabrics were so much fun to sew with!  My mind is just racing with more ideas of fun things to sew with this fabric!!!

IMG_5412

Check out all the other amazing projects that my friends are making as part of this blog hop!!vintage kitchen quilt 6

blog tour

3/7/2016

Julia – Riley Blake Designs

www.rileyblakedesigns.com/blog

3/7/2016

Andrea – Jolijou

www.jolijou.com

3/8/2016

Nina – Hedi

www.hedinaeht.blogspot.de

3/8/2016

Anja – Nähkitz

www.naehkitz.de

3/9/2016

Swafing Fabrics

www.blog.swafing.de

3/9/2016

Carrie Beri Bee Designs

www.beribeedesigns.com

3/10/2016

Herzenssachen

www.linababedierste.blogspot.de

3/10/2016

Andrea – anlukaa

www.anlukaa.blogspot.com

3/11/2016

Emma – Frühstück bei Emma

www.fruehstueckbeiemma.blogspot.com

3/11/2016

einchen – doppelnaht

doppelnaht.blogspot.com

3/14/2016

Anorina – Samelias Mum

www.sameliasmum.com

3/14/2016

Bev – Flamingo Toes

www.flamingotoes.com

3/15/2016

Amy – Diary of a Quilter

www.diaryofaquilter.com

3/15/2016

Julia – lillesol & pelle

www.lillesolundpelle.com

3/16/2016

Andy – A Bright Corner

www.abrightcorner.com

3/16/2016

Sabine – farbenmix

www.farbenmix.de/inspiration

3/17/2016

Simone – KaeptnStupsnase

www.kaeptnstupsnase.com

3/17/2016

Sarah – Mädchenkram

www.mein-maedchenkram.de

3/18/2016

Melissa Corry

www.happyquiltingmelissa.com

3/21/2016

Jessica Stewart

www.snickerdoodlestew.com

3/21/2016

Bine Guellich

www.waseigenes.com

3/22/2016

Lindsay Wilkes

www.thecottagemama.com

3/22/2016

Sandra – Flaupa

www.flaupa.blogspot.com

3/23/2016

Amanda Niederhauser

www.jedicraftgirl.com

3/23/2016

Ina – pattydoo

www.pattydoo.de

3/24/2016

Ruth Sodl-Warter

www.rogeruethsgarden.com

3/24/2016

Marissa – Rae Gun Ramblings

www.raegunramblings.com

Happy Haunting Halloween Quilt

happy haunting halloween quilt coverIsn’t Halloween the best time of year for quilting?  I get so excited over orange and black and cats and bats!  I can’t have enough quilts!  I am so in love with this line from Deena Rutter called Happy Haunting by Riley Blake Designs.  It is everything Halloween should be!

happy haunting halloween quilt 2This quilt sews together fast and YOU get to pick the layout of each block.

happy haunting halloween quilt 21This quilt is also best put together with a friend.  Tina from @emilyannskloset and I got together this summer for a Coast to Coast Kitty Quilter Retreat where we sewed about 15 hours each day for 4 days!

happy haunting halloween quilt 26  Let’s get started!

Finished Quilt 55″ x 55″

Supplies:

fat quarters or quarter yard cuts of Halloween prints

1 yard sashing

3/4 yard outer boarder

fat quarters for applique

1/3 yard for background blocks for applique

Heat n Bond Lite or Heat n Bond Lite EZ Print Sheets

Applique pattern, click HERE

1/2 yard binding

3 yards backing

FOR THE BLOCKS

Begin by cutting the fabric into the following categories:

2.5″ squares

2.5″ x 4.5″ rectangles

4.5″ squares

4.5″ x 8.5″ rectangles

just keep cutting from a variety of fabrics until you have a sizable amount.

happy haunting halloween quilt 24Now the fun begins – don’t lay it out!  Just be totally random!  The goal here is to create 8.5″ blocks by using a combination of 4 patches, strip sets, and larger rectangles.  Below are a few examples, the combinations are endless!  Just be creative!

happy haunting halloween quilt 30

Each time we finished a block we hung it up on a clothes line and said “No, THIS is the cutest block!”

happy haunting halloween quilt 25For the finished quilt you will need 20 total pieced blocks and 5 applique blocks.  We even made a block that was all 2.5″ squares!

happy haunting halloween quilt 3 APPLIQUE

For the applique background squares, cut (5) 8.5″ white squares.  Trace the applique onto heat n bond lite or use the Heat n Bond EZ print sheets.  Iron the heat n bond to the wrong side of the fabrics and cut out the shapes.  Peel off the backing paper then press in place on the white squares.  The spiders have ric rac stitched onto the block and the legs are stitched with black thread. Top stitch around each image.happy haunting halloween quilt 29

Once all the blocks are finished it’s time to sash.  I love that Tina choose black and white gingham to sash her quilt – it gives it a cozy country look!

FOR THE SASHING

Cut (20) 2″ x 8.5″ strips

you will need to piece the next sashing strips to give you the following measurements

(6) 2″ x 46.5″ strips for the horizontal rows

(2) 2″x 49.5 strips for the sides

Sew the 8.5″ sashing strips in between the blocks forming horizontal rows.  Then add the horizontal strips along the top, middle rows, and bottom.  Press.  Finish by adding the 2 side strips.

happy haunting halloween quilt 28

OUTER BOARDER
After sashing add the outer boarder.  I don’t measure at this point – do you?  Cut (6) 3.5″ x WOF strips for the outer boarder.  You will need to sew them together end to end to have enough length.  Sew the side strips on, square up, press and then sew the top and bottom strips on.

happy haunting halloween quilt 10I had my friend use her long arm quilter to sew swirls all over the quilt, even through the applique.  I LOVE it!happy haunting halloween quilt 8   I am totally in love with this quilt.  I cut the striped fabric on the bias for the binding.  Striped binding is my absolute FAVORITE!!!!happy haunting halloween quilt 4   happy haunting halloween quiltI had such a wonderful time putting this quilt together with my friend Tina.  Isn’t it fun to sew with friends and family!!!

IMG_1088

Blend Fabrics Luckie Girl Quilt Pattern {free}

luckie girl quilt patternI am so excited to share this pattern with you!  I love theme prints and I am always trying to find ways to make quilts with these wonderful theme prints I collect.  This pattern is super fun, it’s a perfect beginning quilters, and it looks a little more complicated than just sewing squares together.  The fabrics are from Blend Fabrics Luckie Girl Collection.   I am head over heals for these pink, turquoise and gray boots and horse shoes!!  I am sharing this PDF pattern with you for FREE!  Just click HERE!!!

Screen Shot 2015-09-08 at 7.36.11 PMThe boots are the cutest!!  blend luckie girl quilt pattern 7

blend luckie girl quilt pattern 6I made this quilt as a graduation gift for a sweet gal who grew up riding horses and competing in Rodeo.  She’s off to college in Idaho.

blend luckie girl quilt pattern 5

blend luckie girl quilt pattern 9

I hope you have as much fun making this quilt as I did!  blend luckie girl quilt pattern 4

Scripture Cover Tutorial Featuring Vintage Market from Riley Blake Designs

scripture cover tutorial

My daughter and I recently received new scriptures and with new scriptures comes a need for new covers!  I love these little quilted covers, I think of them as blankets for your bibles….heehee 🙂  The Riley Blake Designs fabric I am using is called Vintage Market Fabric by Tasha Noel.  Absolutly everything Tasha designs is too cute for words.  I can’t decide which little scene is my favorite!  I love jam, bicycles, quilts, sewing machines, and all vintage goods.  I guess I love it all!!!

This pattern will walk you through the steps of determining the measurements for your bible or book and how to create a quilted cover.  The two examples shown are a set of regular “quad” scriptures and then the larger “quad” scriptures.  scripture cover  vintage market 5

The first step is to take the measurements of the book.  Hold the tape measure from cover to cover with the book closed as pictured below.  Write down that length measurement.  Then do the same thing width wise and record that number.

scripture cover tutorial riley blake designs vintage market

MEASUREMENTS

To determine the measurements for the width (top to bottom), add 1″ to the width measurement and then subtract 1/8″.

To determine the measurements for the length (side to side), measure the length and add 6″.

For the regular quad, the book measures:  7 3/8″ x 13″ so the number we are after is 8 1/4″ x 19″

For the large quad, the book measures: 9 3/8″ x 15″ so the number we are after is 10 1/4″ x 21″

Overview

IMG_8804

Here is a photo of what the finished cover looks like.  The inside consists of 2 flaps to insert the book cover.  The cover also extends beyond the book so it wraps around and buttons to close.IMG_8802

Construct the Quilted Cover

Following the instructions for the “quilt” will give you a quilt that is slightly larger than the measurements required.  Not to worry, I have put a little “extra” in as the quilt tends to shrink after being quilted.  Once it is pieced and quilted you will square it up to the measurements you determined at the beginning.

The quilt consists of 3.5″ cut blocks that finish 3″ square.  The Vintage Market motifs are fussy cut.  They are alternated with hourglass blocks.

How to Fussy Cut

There are many ways to fussy cut an image, this is my method.  Cut a 3.5″ square out of a piece of card stock.  Use this as a little window to center the motif.  Draw a pencil line around the 3.5″ square.  Keep in mind you will have 1/4″ seam allowances.
scripture cover tutorial riley blake designs vintage market 4

Using scissors  do a rough cut around the pencil line.  Then place the image on a cutting mat and use the pencil lines as a guide to line up the ruler.  Make sure to match the ruler to the grid as the pencil marks might be off slightly.  Any pencil marks shown will be caught in the seam allowance.

scripture cover tutorial riley blake designs vintage market 5

Next, wrangle your cat away from the fabric so you can continue with this project 🙂

scripture cover tutorial riley blake designs vintage market 6

Hour Glass Block

To make the hourglass block, cut a light 5″ charm square and a dark 5″ charm square.  Draw a diagonal line on the back of the light square.
scripture cover tutorial riley blake designs vintage market 7

Place the light and dark squares right sides together.  Sew 1/4″ seam along both sides of the pencil line.  Cut apart and press toward the dark.  
scripture cover tutorial riley blake designs vintage market 8

Take the two half square triangle (HST) units and draw a diagonal line on one of the wrong sides.  Place the HST units together so the lights and darks are opposite, match the center seam.  Sew 1/4″ along both sides of the drawn line.  Cut apart along the pencil line and press the seams open.
scripture cover tutorial riley blake designs vintage market 10
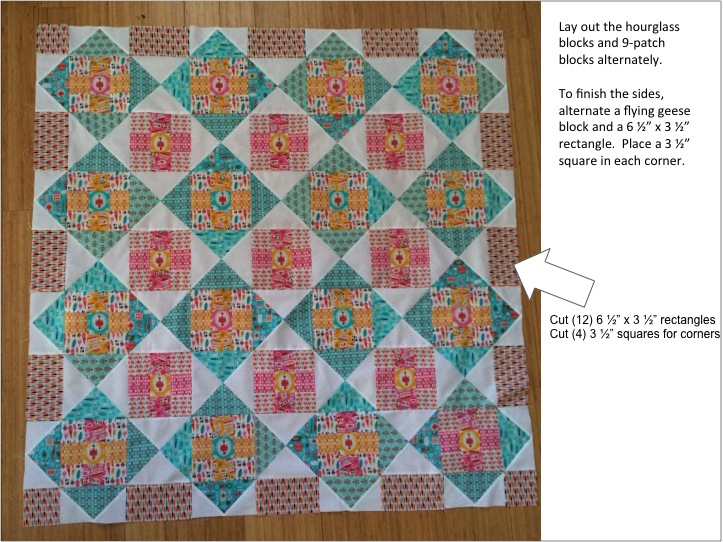
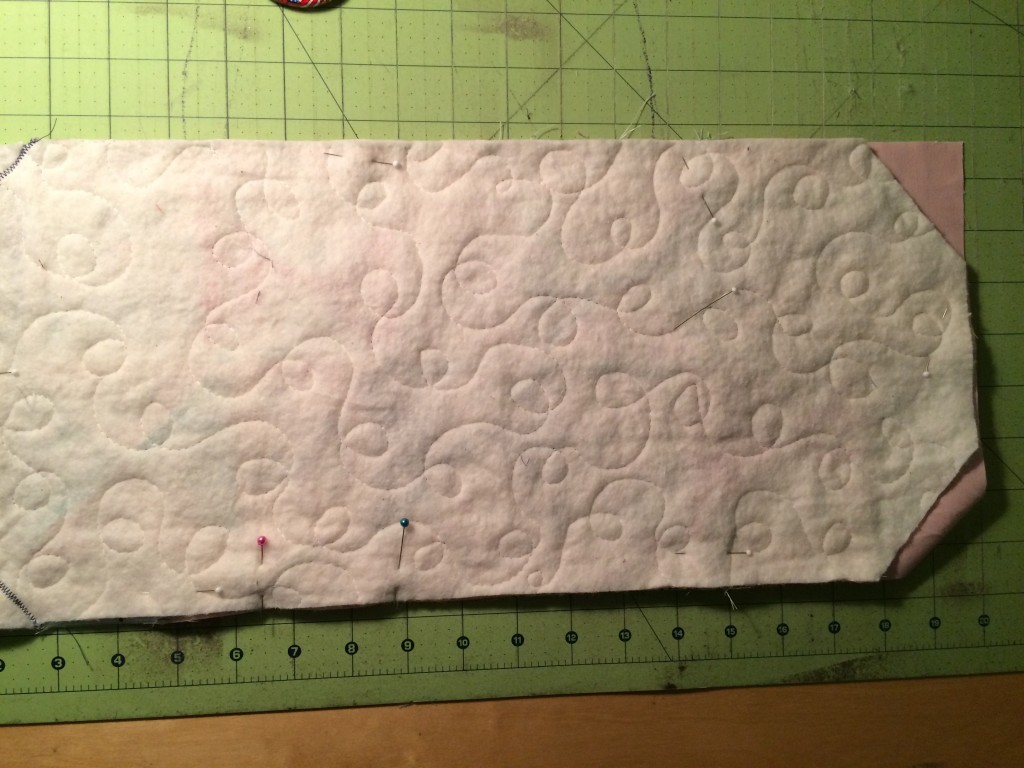
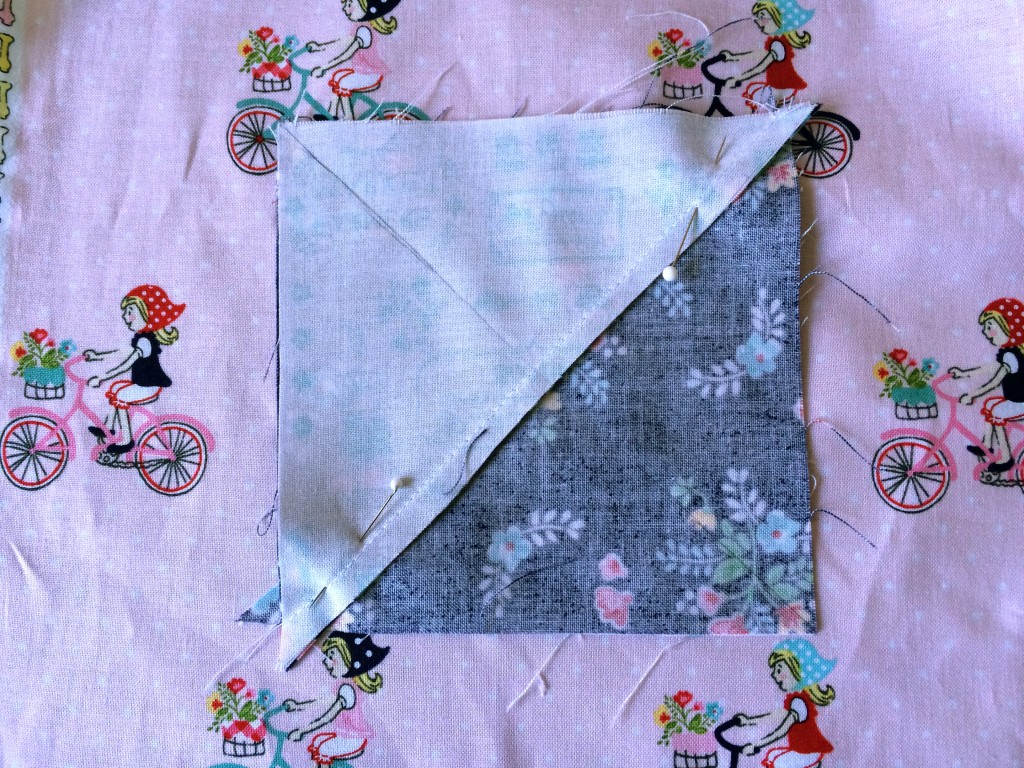
This will give you 2 hour glass blocks.  Next, place the hourglass block on the cutting mat and “square up” to measure 3.5″.  Make sure to align each diagonal seam with the 45 degree lines on the cutting grid.

scripture cover tutorial riley blake designs vintage market 11

It will look nice and perfect when you are done!

scripture cover tutorial riley blake designs vintage market 13

For the regular quad, you need (5) fussy cut squares and (5) hourglass blocks

For the large quad, you need (9) fussy cut squares and (9) hourglass blocks

If you are creating your own book cover with different measurements, you need enough squares to get closest to your measurement, but not to exceed the measurement.  There will be accent strips to make up the difference.

Piece the quilt together using 1/4″ seams, block by block, pressing toward the fussy cut blocks.  Then join the rows together, pressing seams open.  The regular size of scriptures has 2 rows and the large size of scriptures has 3 rows.

For both sizes of scriptures, sew a 2″ strip along the top and bottom of the “quilt”.  No need to measure, it can hang off, it will all get squared up soon.  Press seams toward the strips.

scripture cover tutorial riley blake designs vintage market 14

scripture cover tutorial riley blake designs vintage market 15

Square up the sides and sew a 2.5″ strip to the right side and a 2.5″ strip to the left side.  Press seams toward the strips.  It is best if these are different colors as they will be overlapping once the cover is finished.

scripture cover tutorial riley blake designs vintage market 16

Again, do this no matter what size scriptures you are using.

scripture cover tutorial riley blake designs vintage market 18

Baste the quilt to the batting.  I love to use Spray n Bond because I can baste this little quilt in about 30 seconds!!!  Quilt as desired.

scripture cover tutorial riley blake designs vintage market 19

Once it is quilted it is time to square up the finished quilt cover.  Here are the measurements again:

For the regular quad: 8 1/4″ x 19″

For the large quad: 10 1/4″ x 21″

It is best to determine the center and than count each side out so the top and bottom strips look even.scripture cover tutorial riley blake designs vintage market 20

Next cut an angle off the LEFT side of the quilt.  NOT THE RIGHT SIDE LIKE I DID.
DON'T

Cut the angle on the LEFT side.  For the 2-row quilt, measure in 2″ and angle down 2.5″.  Do this on both corners.  For the 3-row quilt, change the measurements to 2″ in and 3″ down.

cutting

You can add lace or other decorative trim at this point.

scripture cover tutorial riley blake designs vintage market 30

Our quilt is finished!  WhoooHoooo!!!

Flaps

Prepare the flaps by cutting (2) squares the size of the width measurement.  For the regular quad it is 8 1/4″ square and for the large quad it is 10 1/4″ square.scripture cover tutorial riley blake designs vintage market 22

Press both flaps in half.  Set aside one flap.  On the second flap, press the edges opposite the half crease under 1/4″ inches like this:

scripture cover tutorial riley blake designs vintage market 23

Cut the lining piece (pink) the measurements of the quilt:

For the regular quad: 8 1/4″ x 19″

For the large quad: 10 1/4″ x 21″

Position the flap without the pressed seams on the left, aligning the raw edges and the folded part toward the center. flap placement

Place the flap with the pressed under edges at the 14″ mark for the regular quad scriptures  and the 16″ mark for the large quad scriptures.  If you are determining your own measurements you would subtract the length of the quilt by 5″.  Pin the right flap in place and top stitch along the folded edges.  The left flap will be caught in the final seam.

scripture cover tutorial riley blake designs vintage market 26

Place the quilted cover on the lining/flap piece, right sides together.  Match all edges and pin in place.  Don’t worry about the angles, we will cut them later.

scripture cover tutorial riley blake designs vintage market 27

Leave an opening for turning where the colored pins are:

scripture cover tutorial riley blake designs vintage market 28

Sew all the way around the cover using 1/4″ seams.  If your seams are larger the cover won’t fit.  Trim off the excess lining where the angles are.  Clip the corner and turn right side out.  Press all edges and press opening edges under.  Top stitch the opening closed.

scripture cover tutorial riley blake designs vintage market 29

The inside should look like this (below).  You can add a little top stitching around the angle flap.  Don’t top stitch around the entire cover or the book won’t fit inside.

IMG_8803

Insert the scriptures and mark where you want the button holes.  If your measurements only call for 2 rows of quilt blocks, you only need 1 button.  For the larger version with 3 rows of quilt blocks, it is helpful to have 2 buttons.  Sew the button holes and then hand sew the buttons, making sure not to catch the thread in the flap.

You’re done!!!!

You can use regular buttons or make covered buttons like these ones:

IMG_8815

True fact:  If you have cute scriptures you are more likely to read them 🙂

scripture cover vintage market

scripture cover vintage market 4

scripture cover vintage market 2

I hope you enjoy this tutorial!  Let me know how yours comes out 🙂scripture cover vintage market 3

Strawberry Patch Quilt Pattern – Available Now!

strawberry-patch-cover
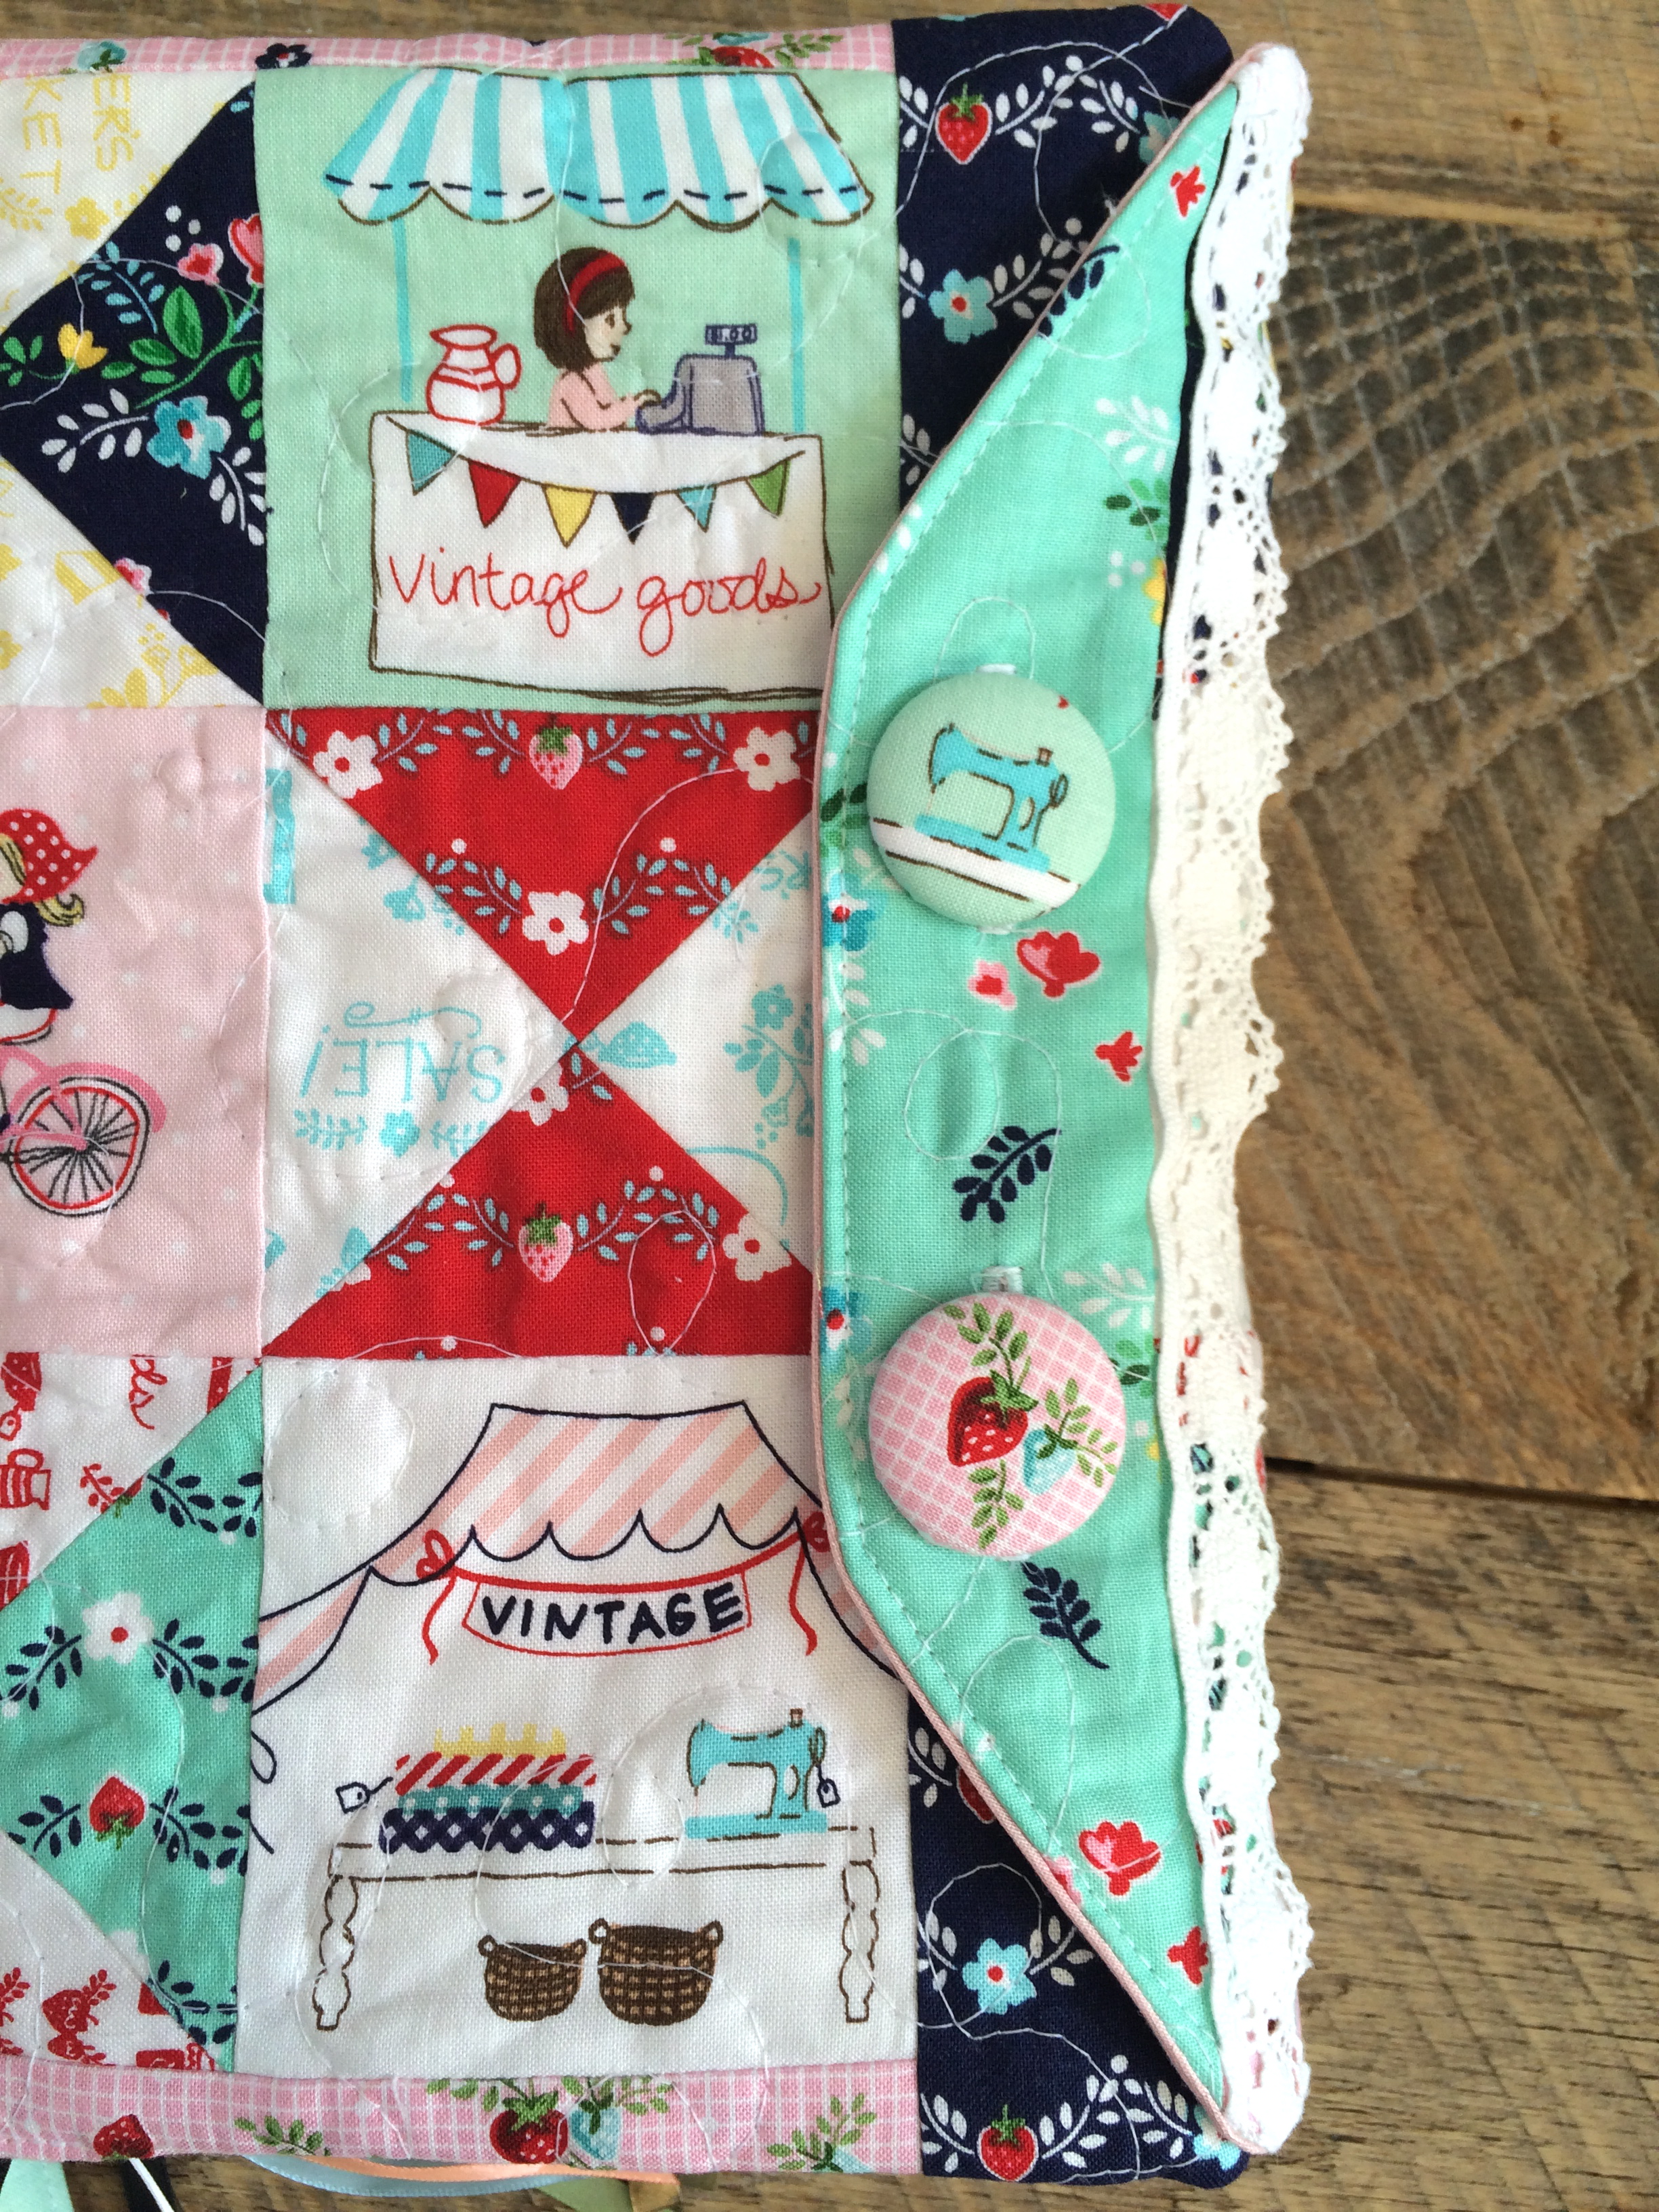
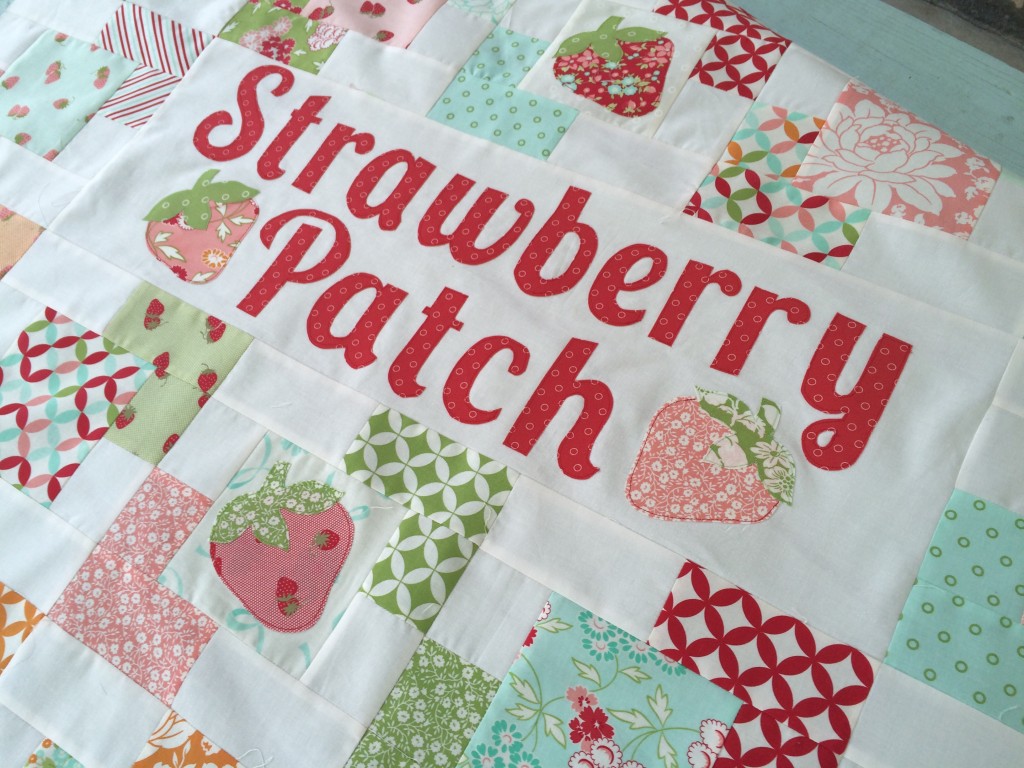
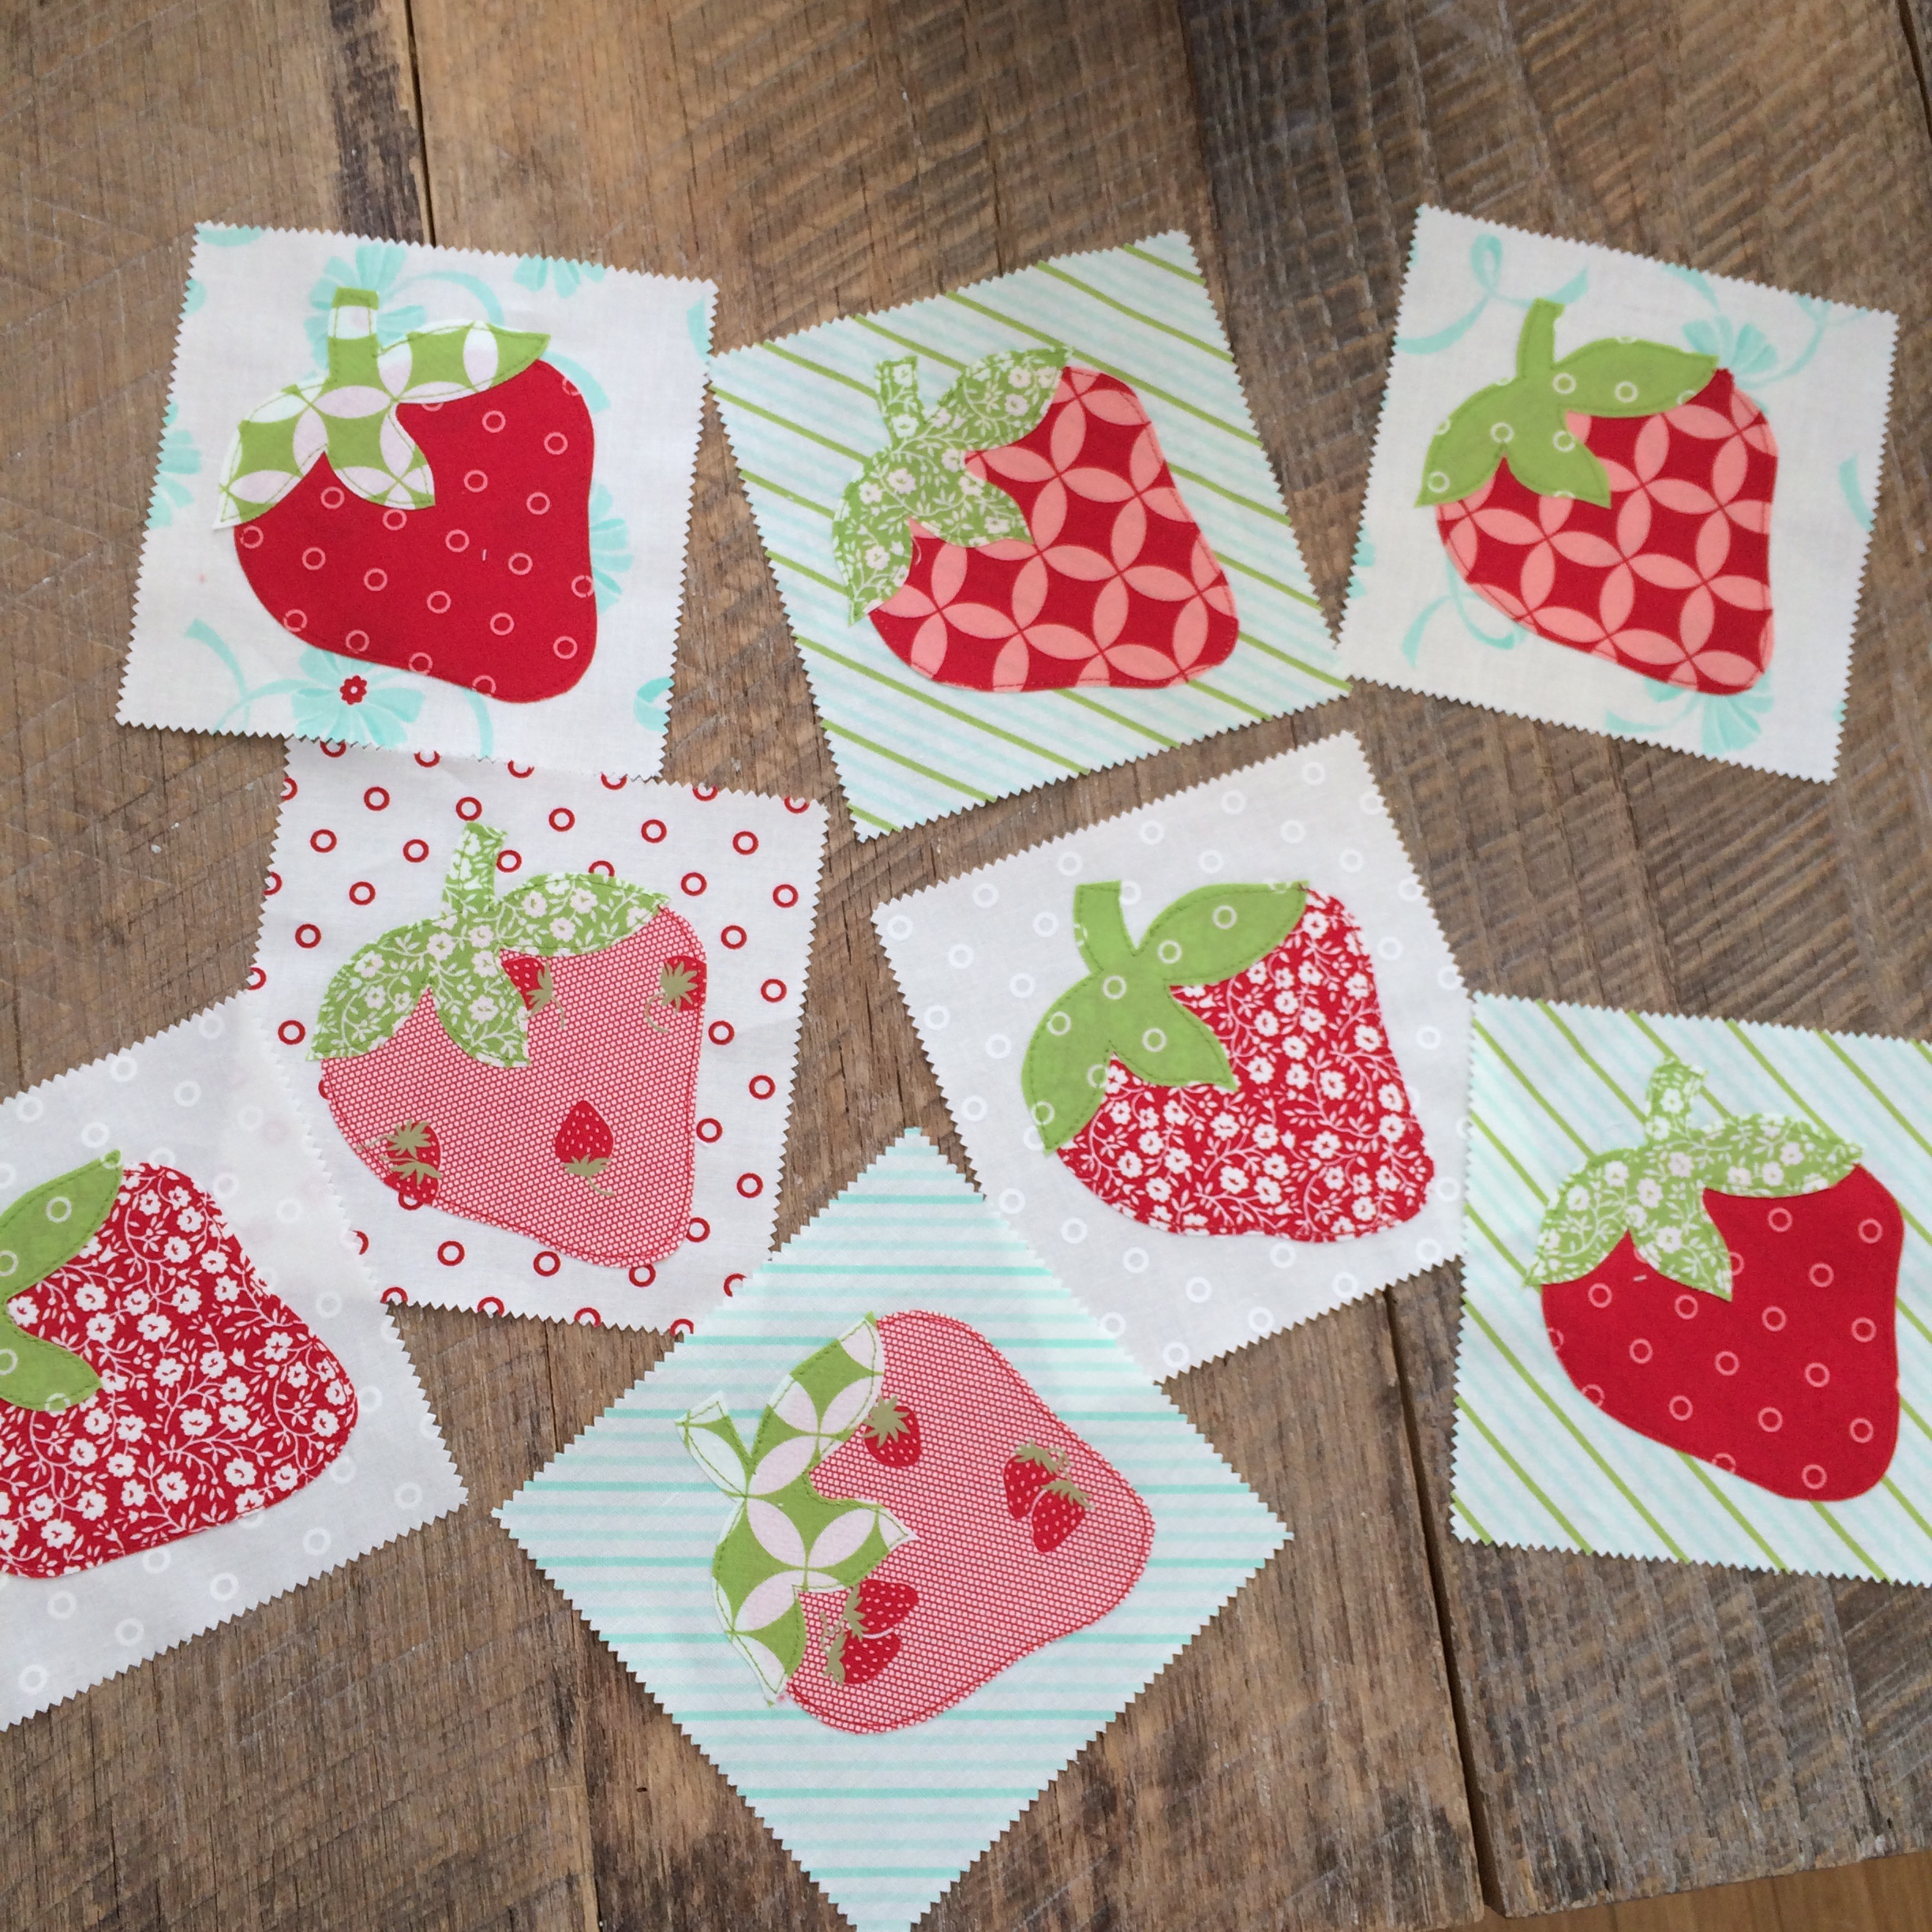
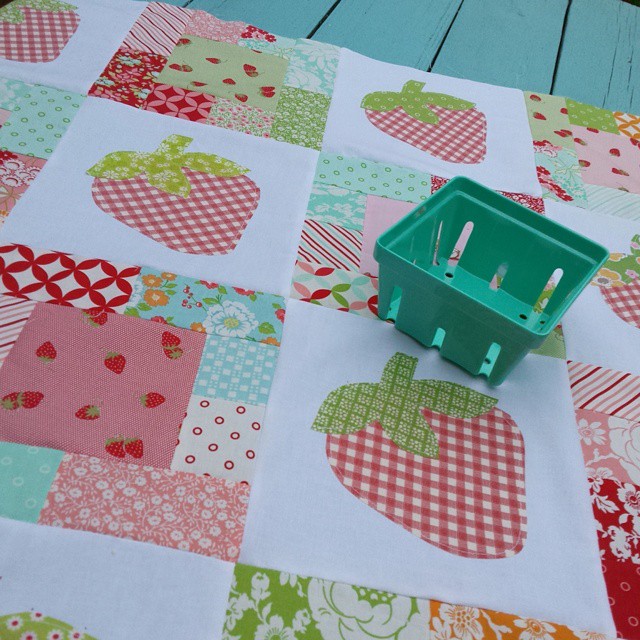
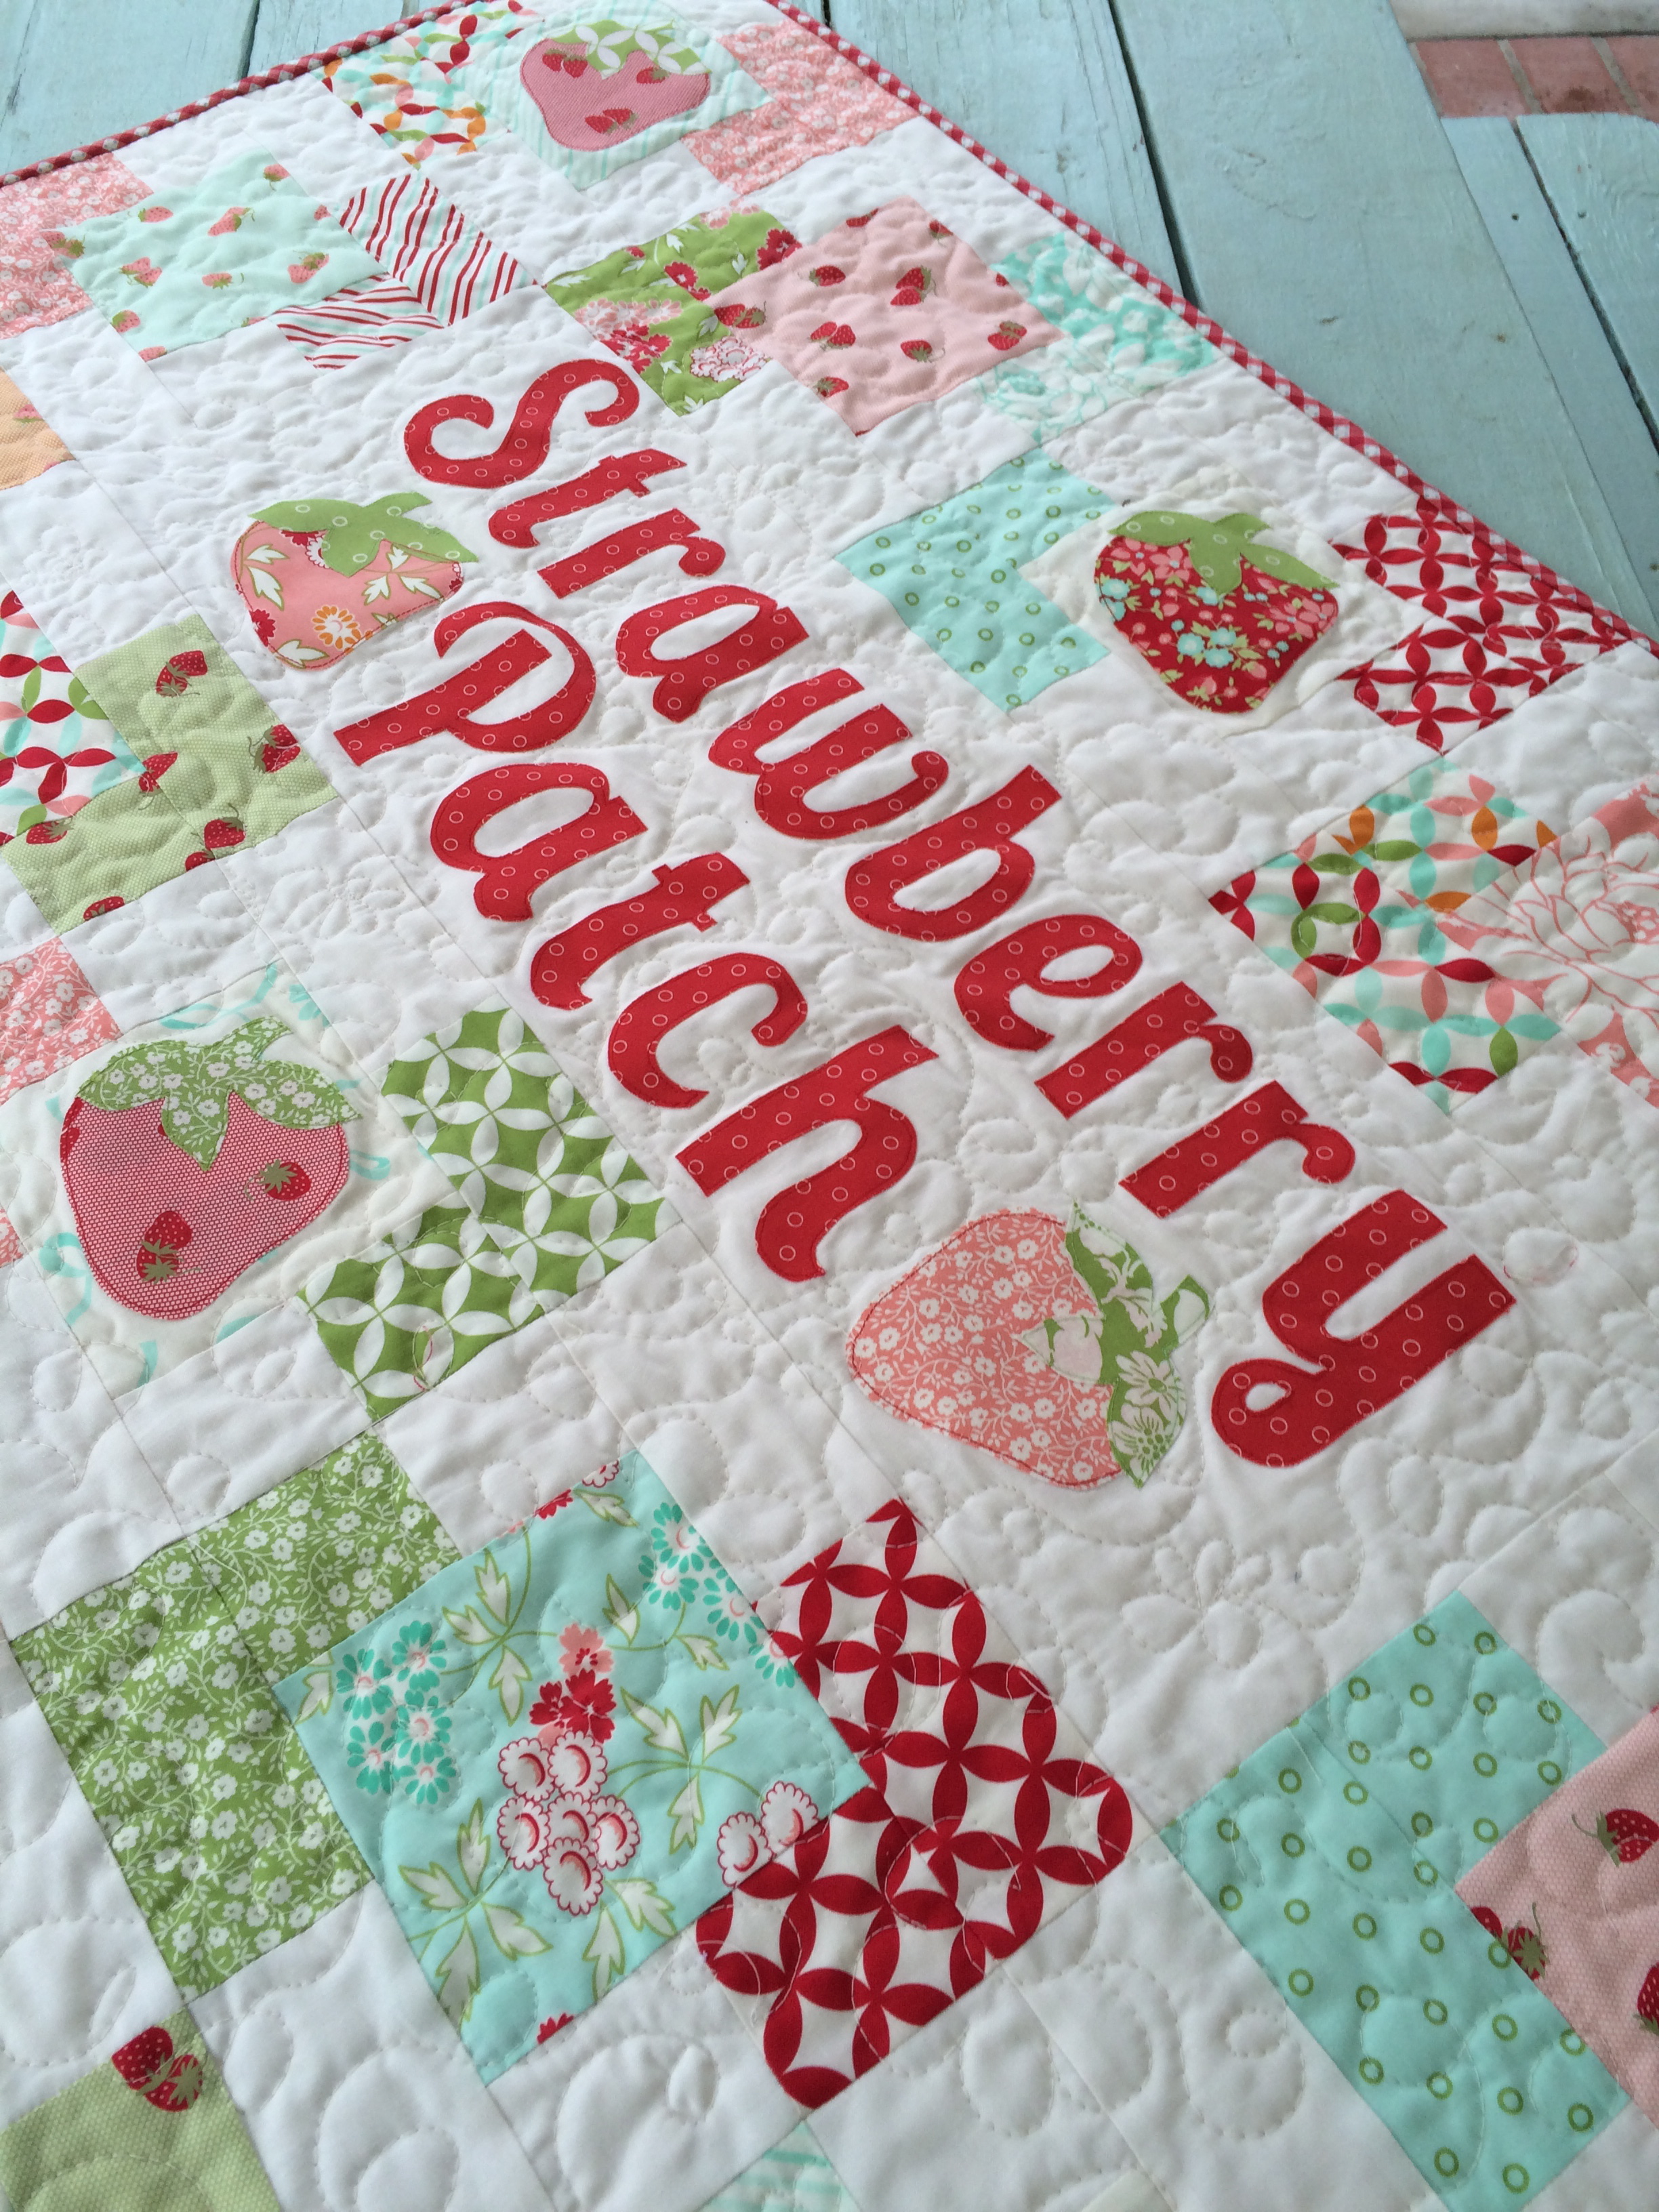
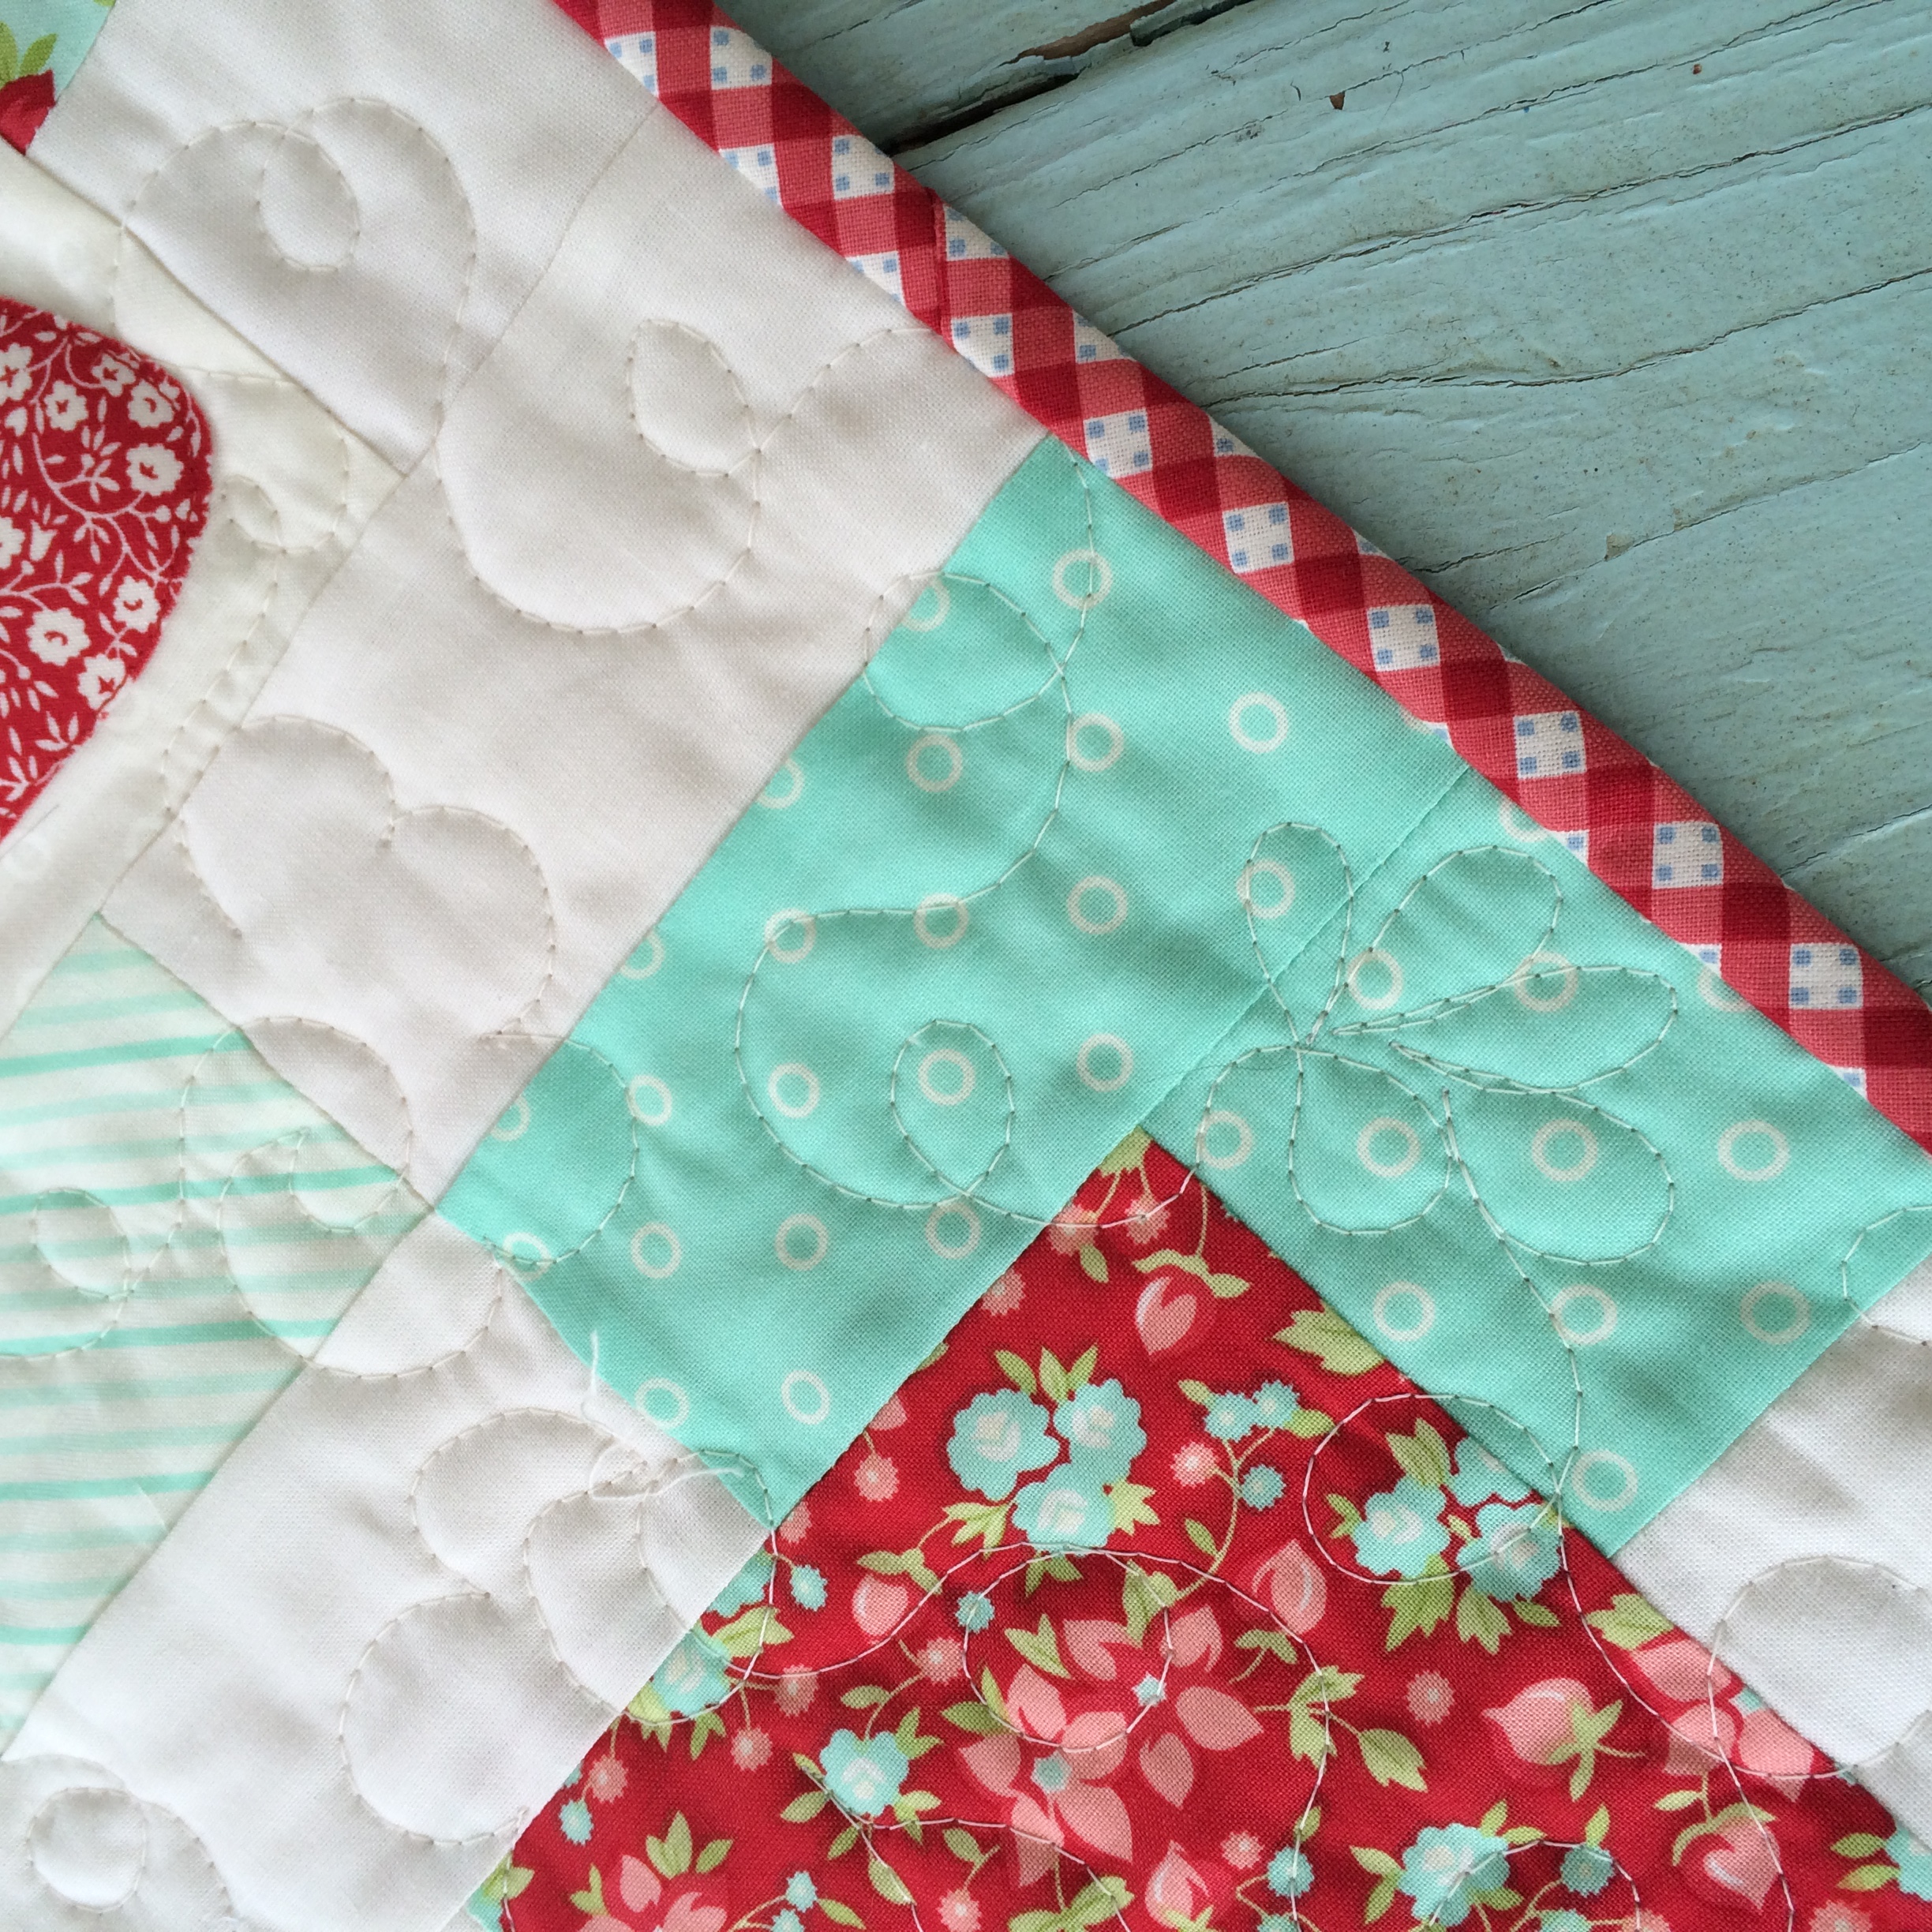
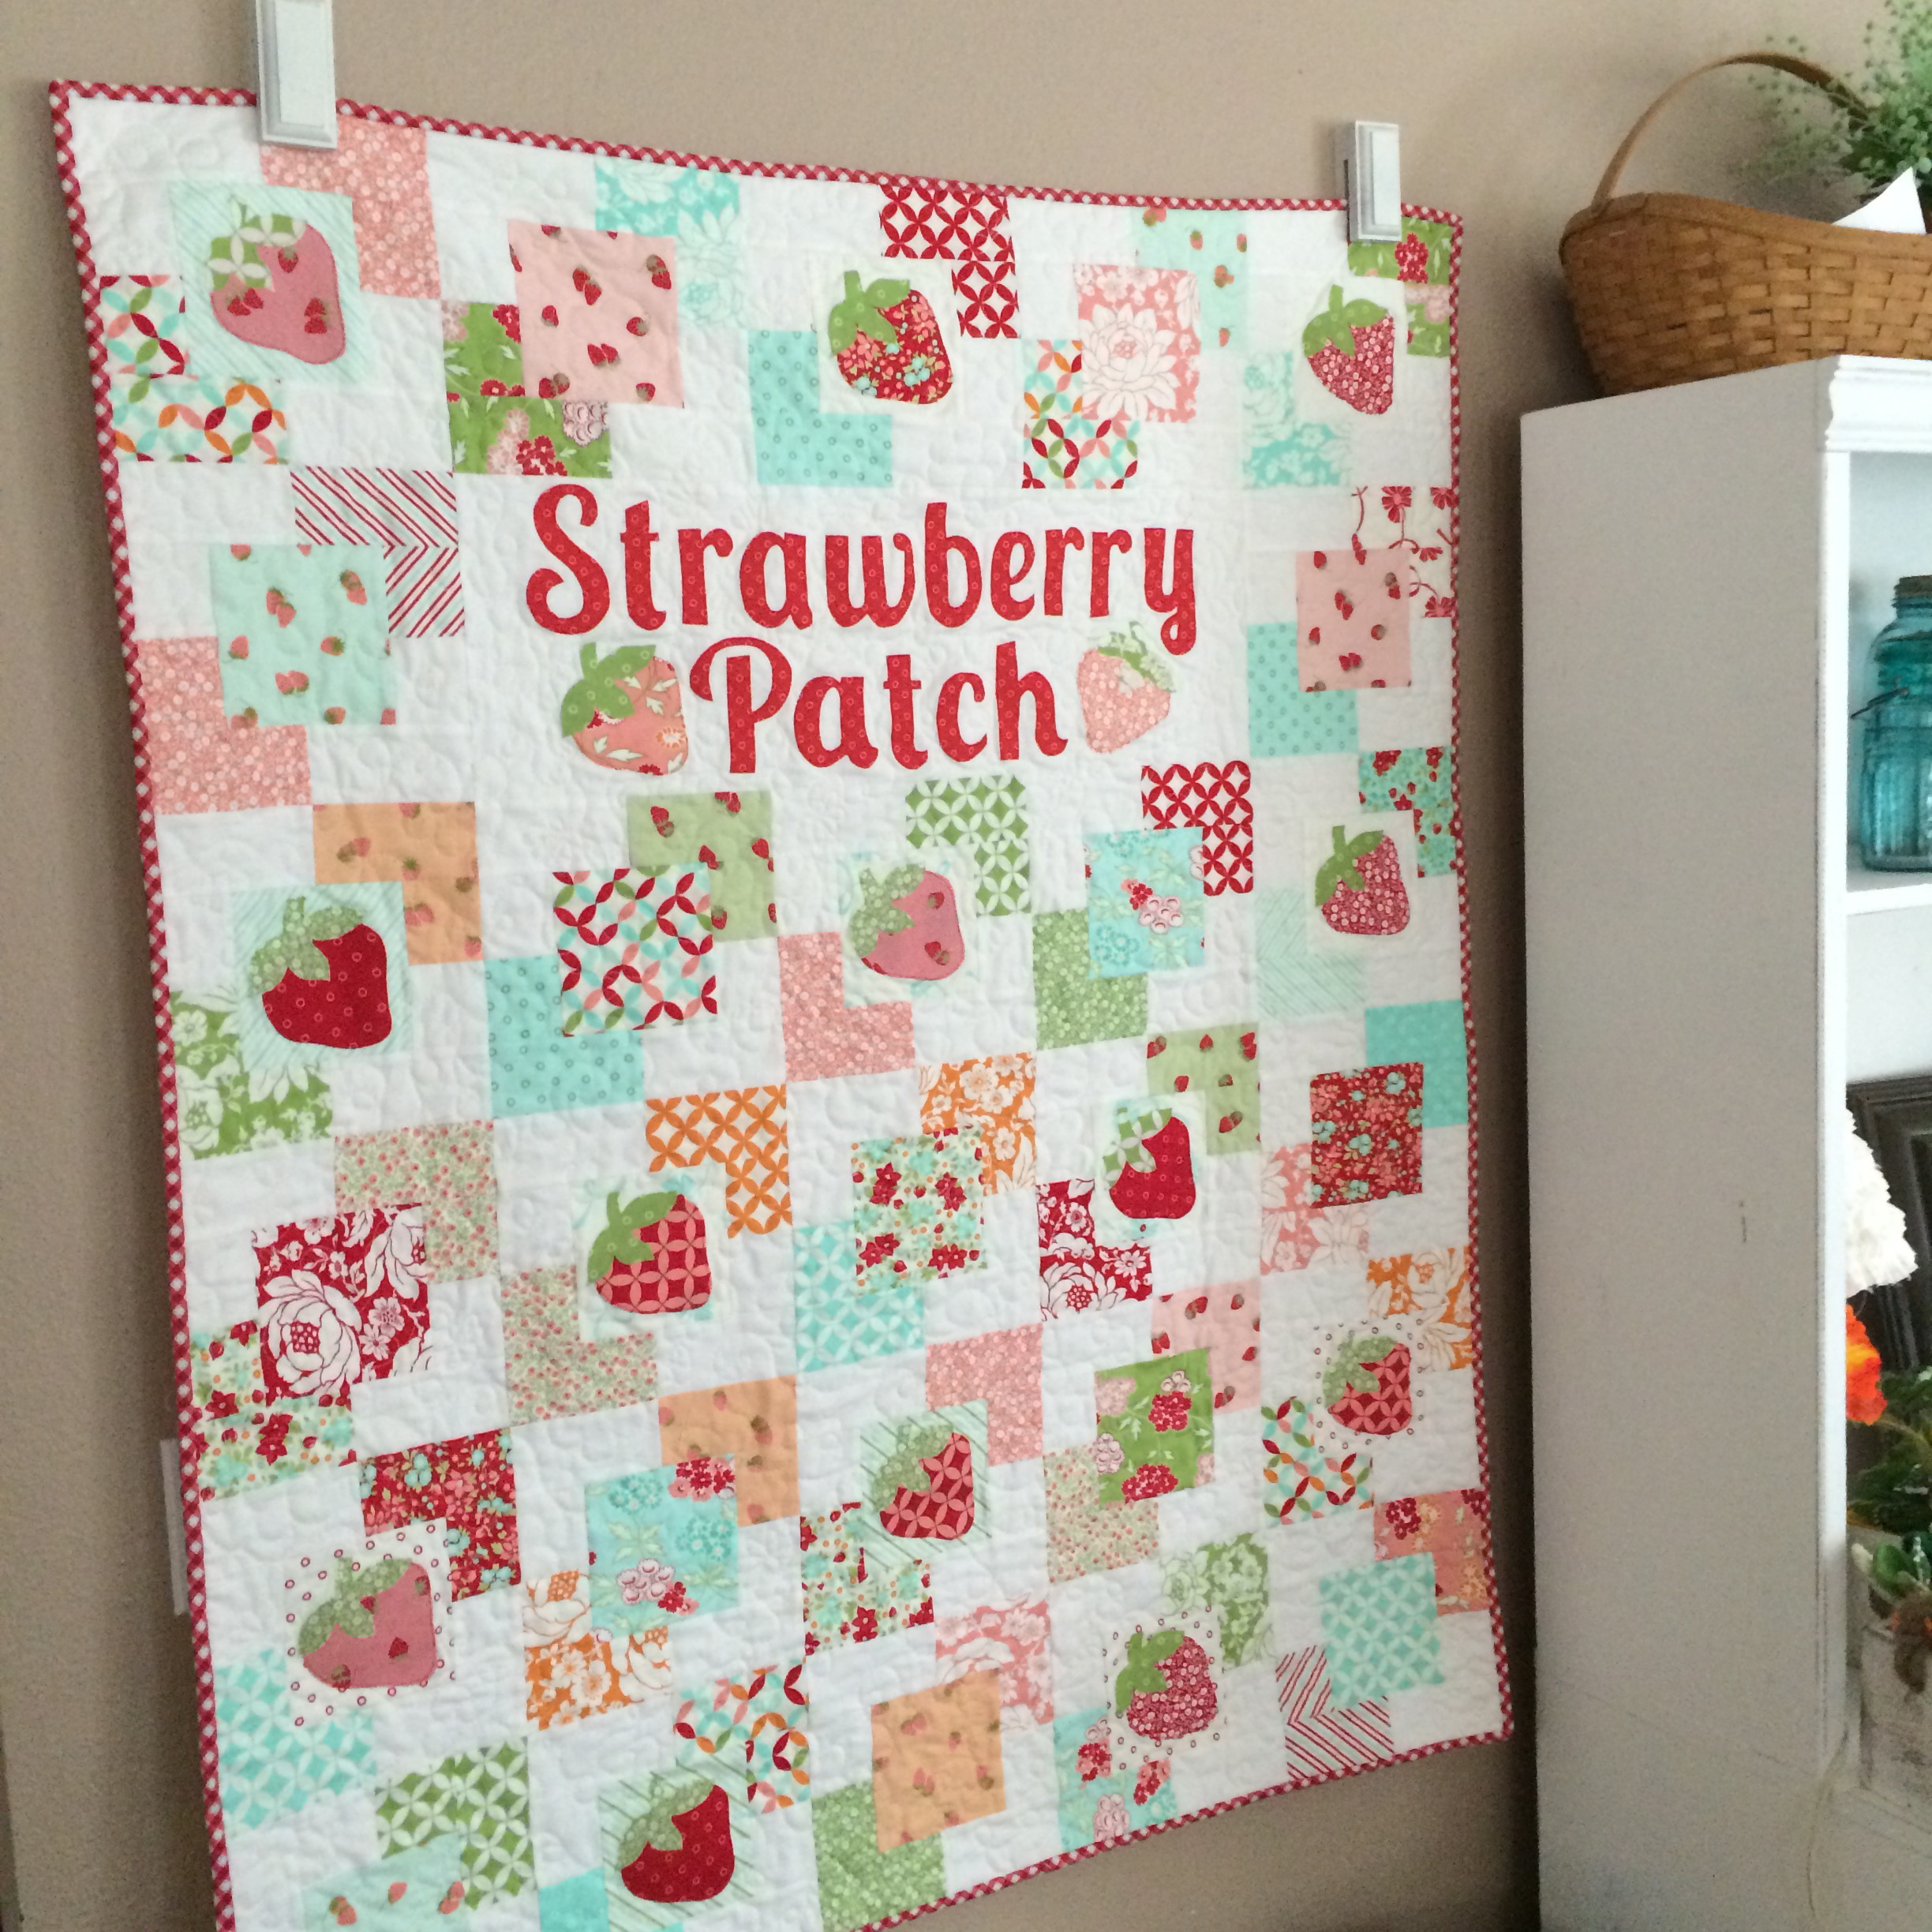
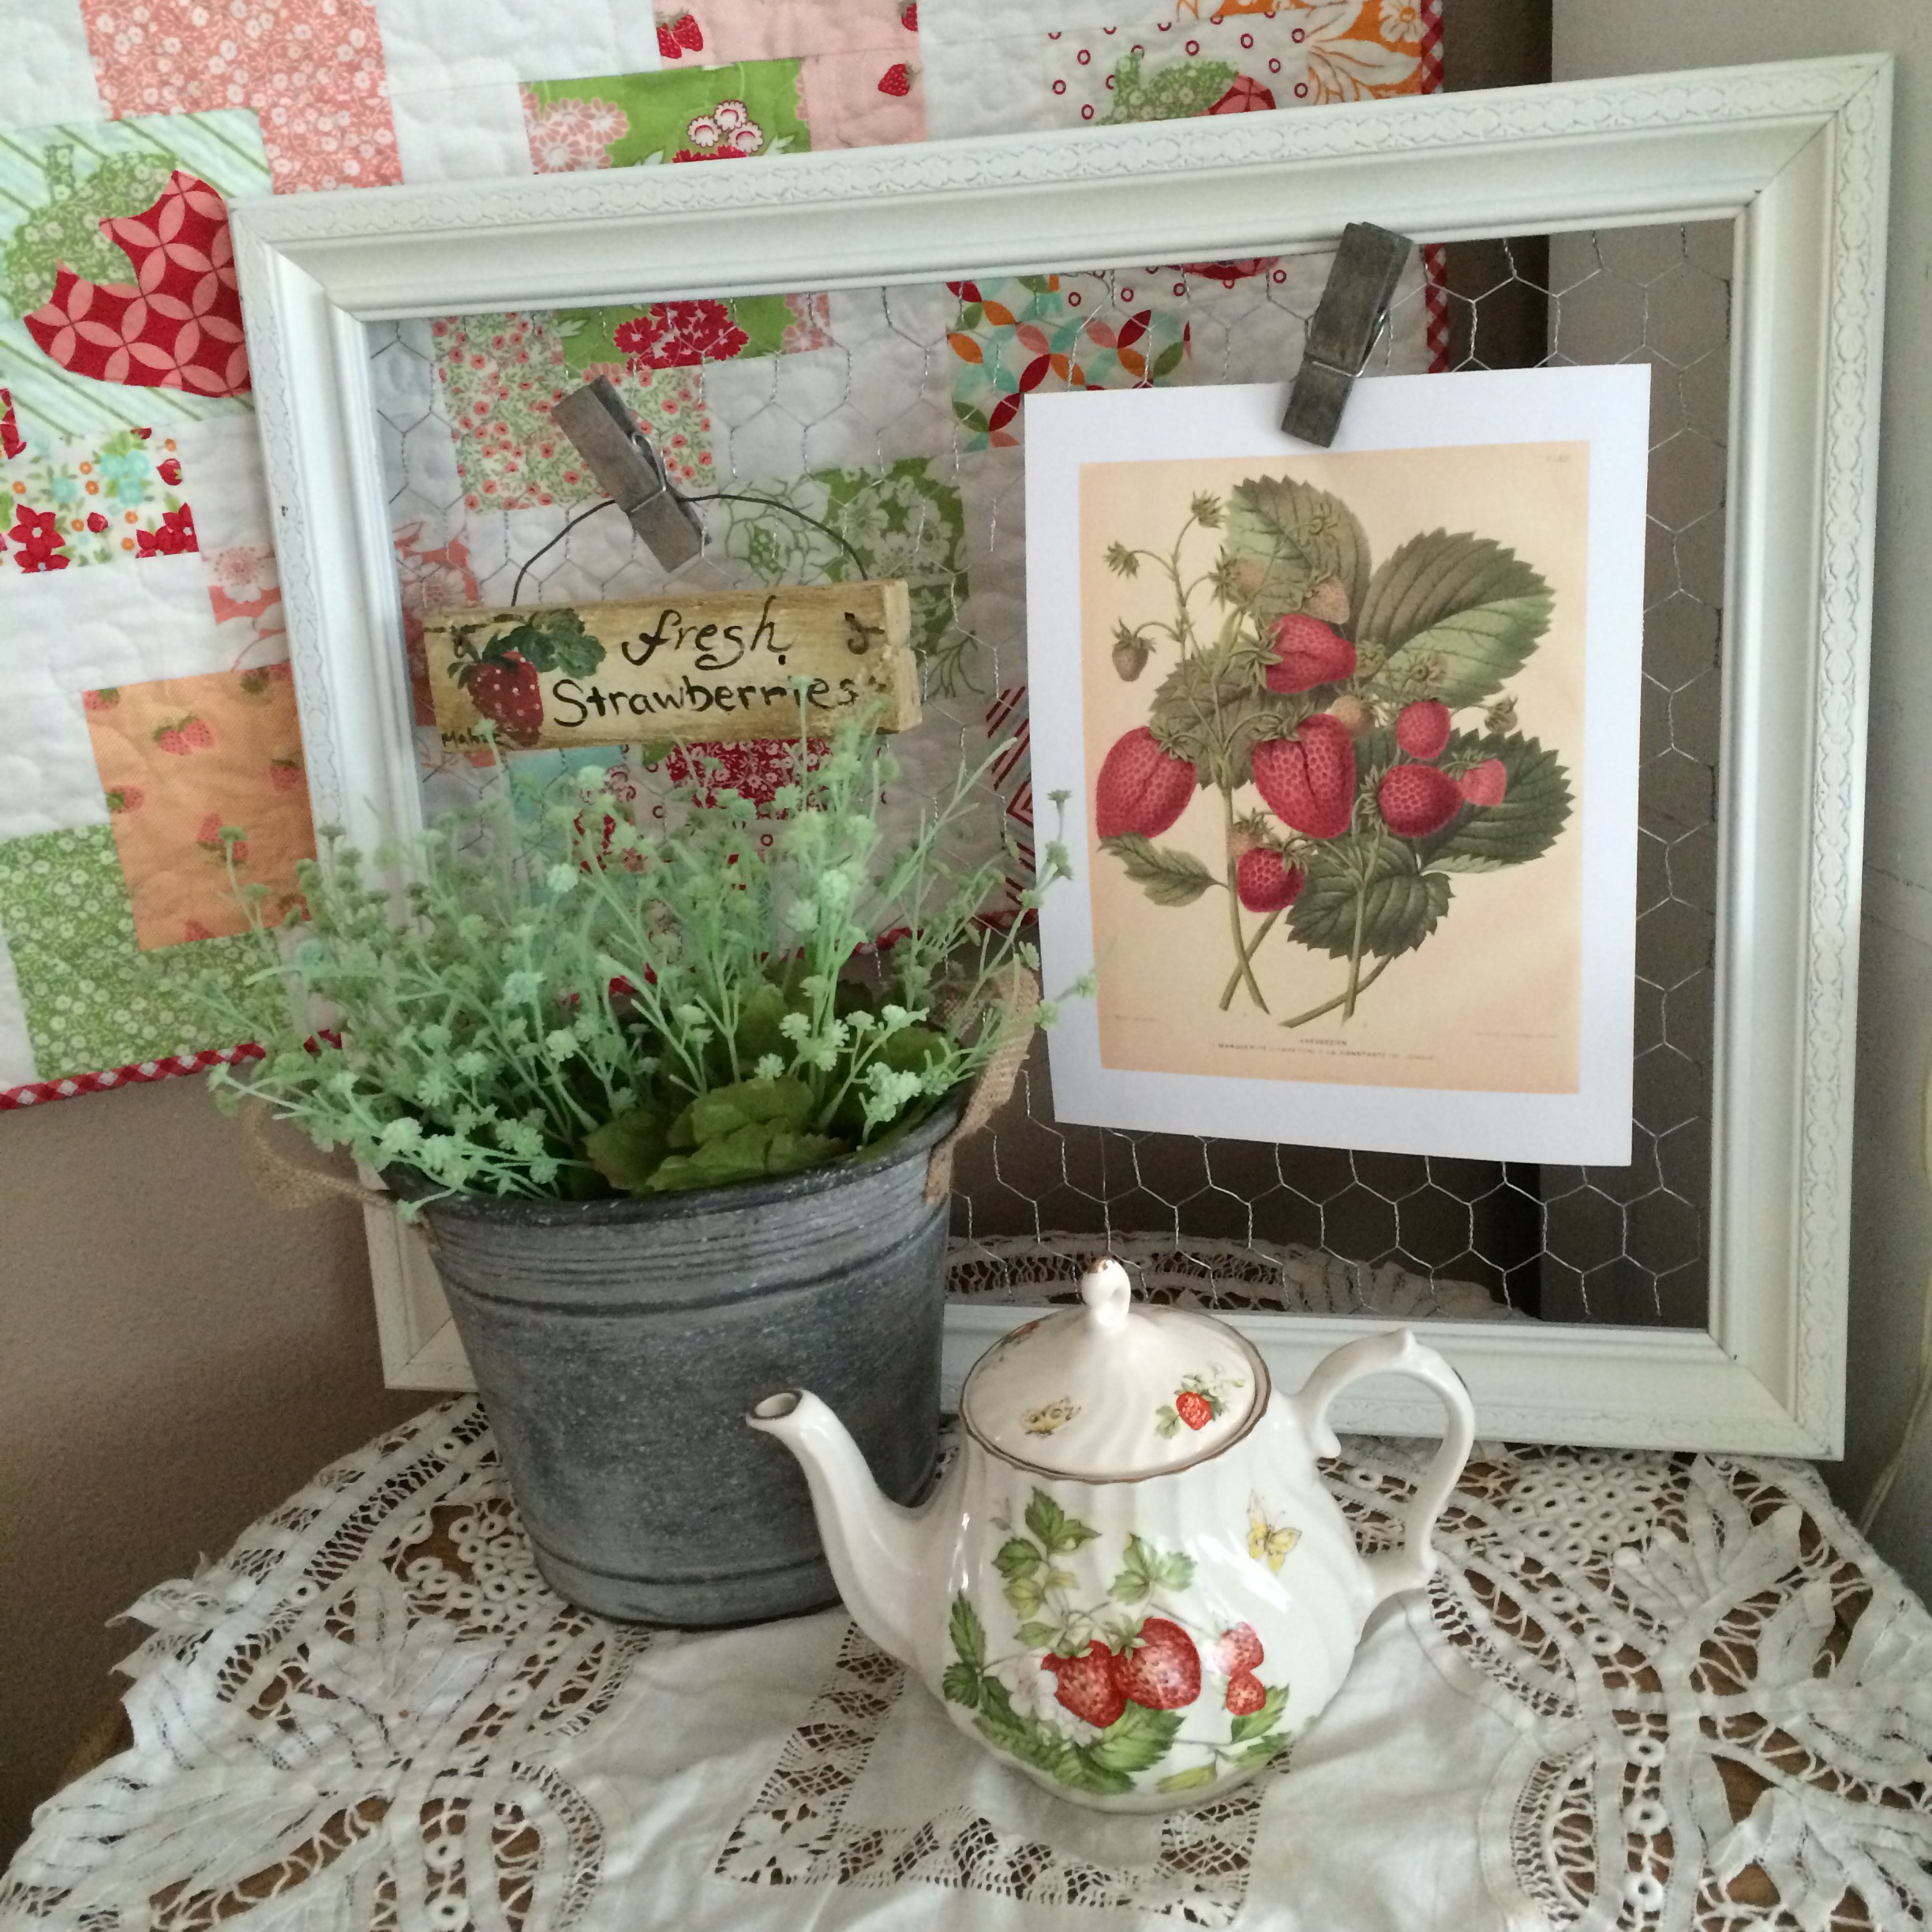
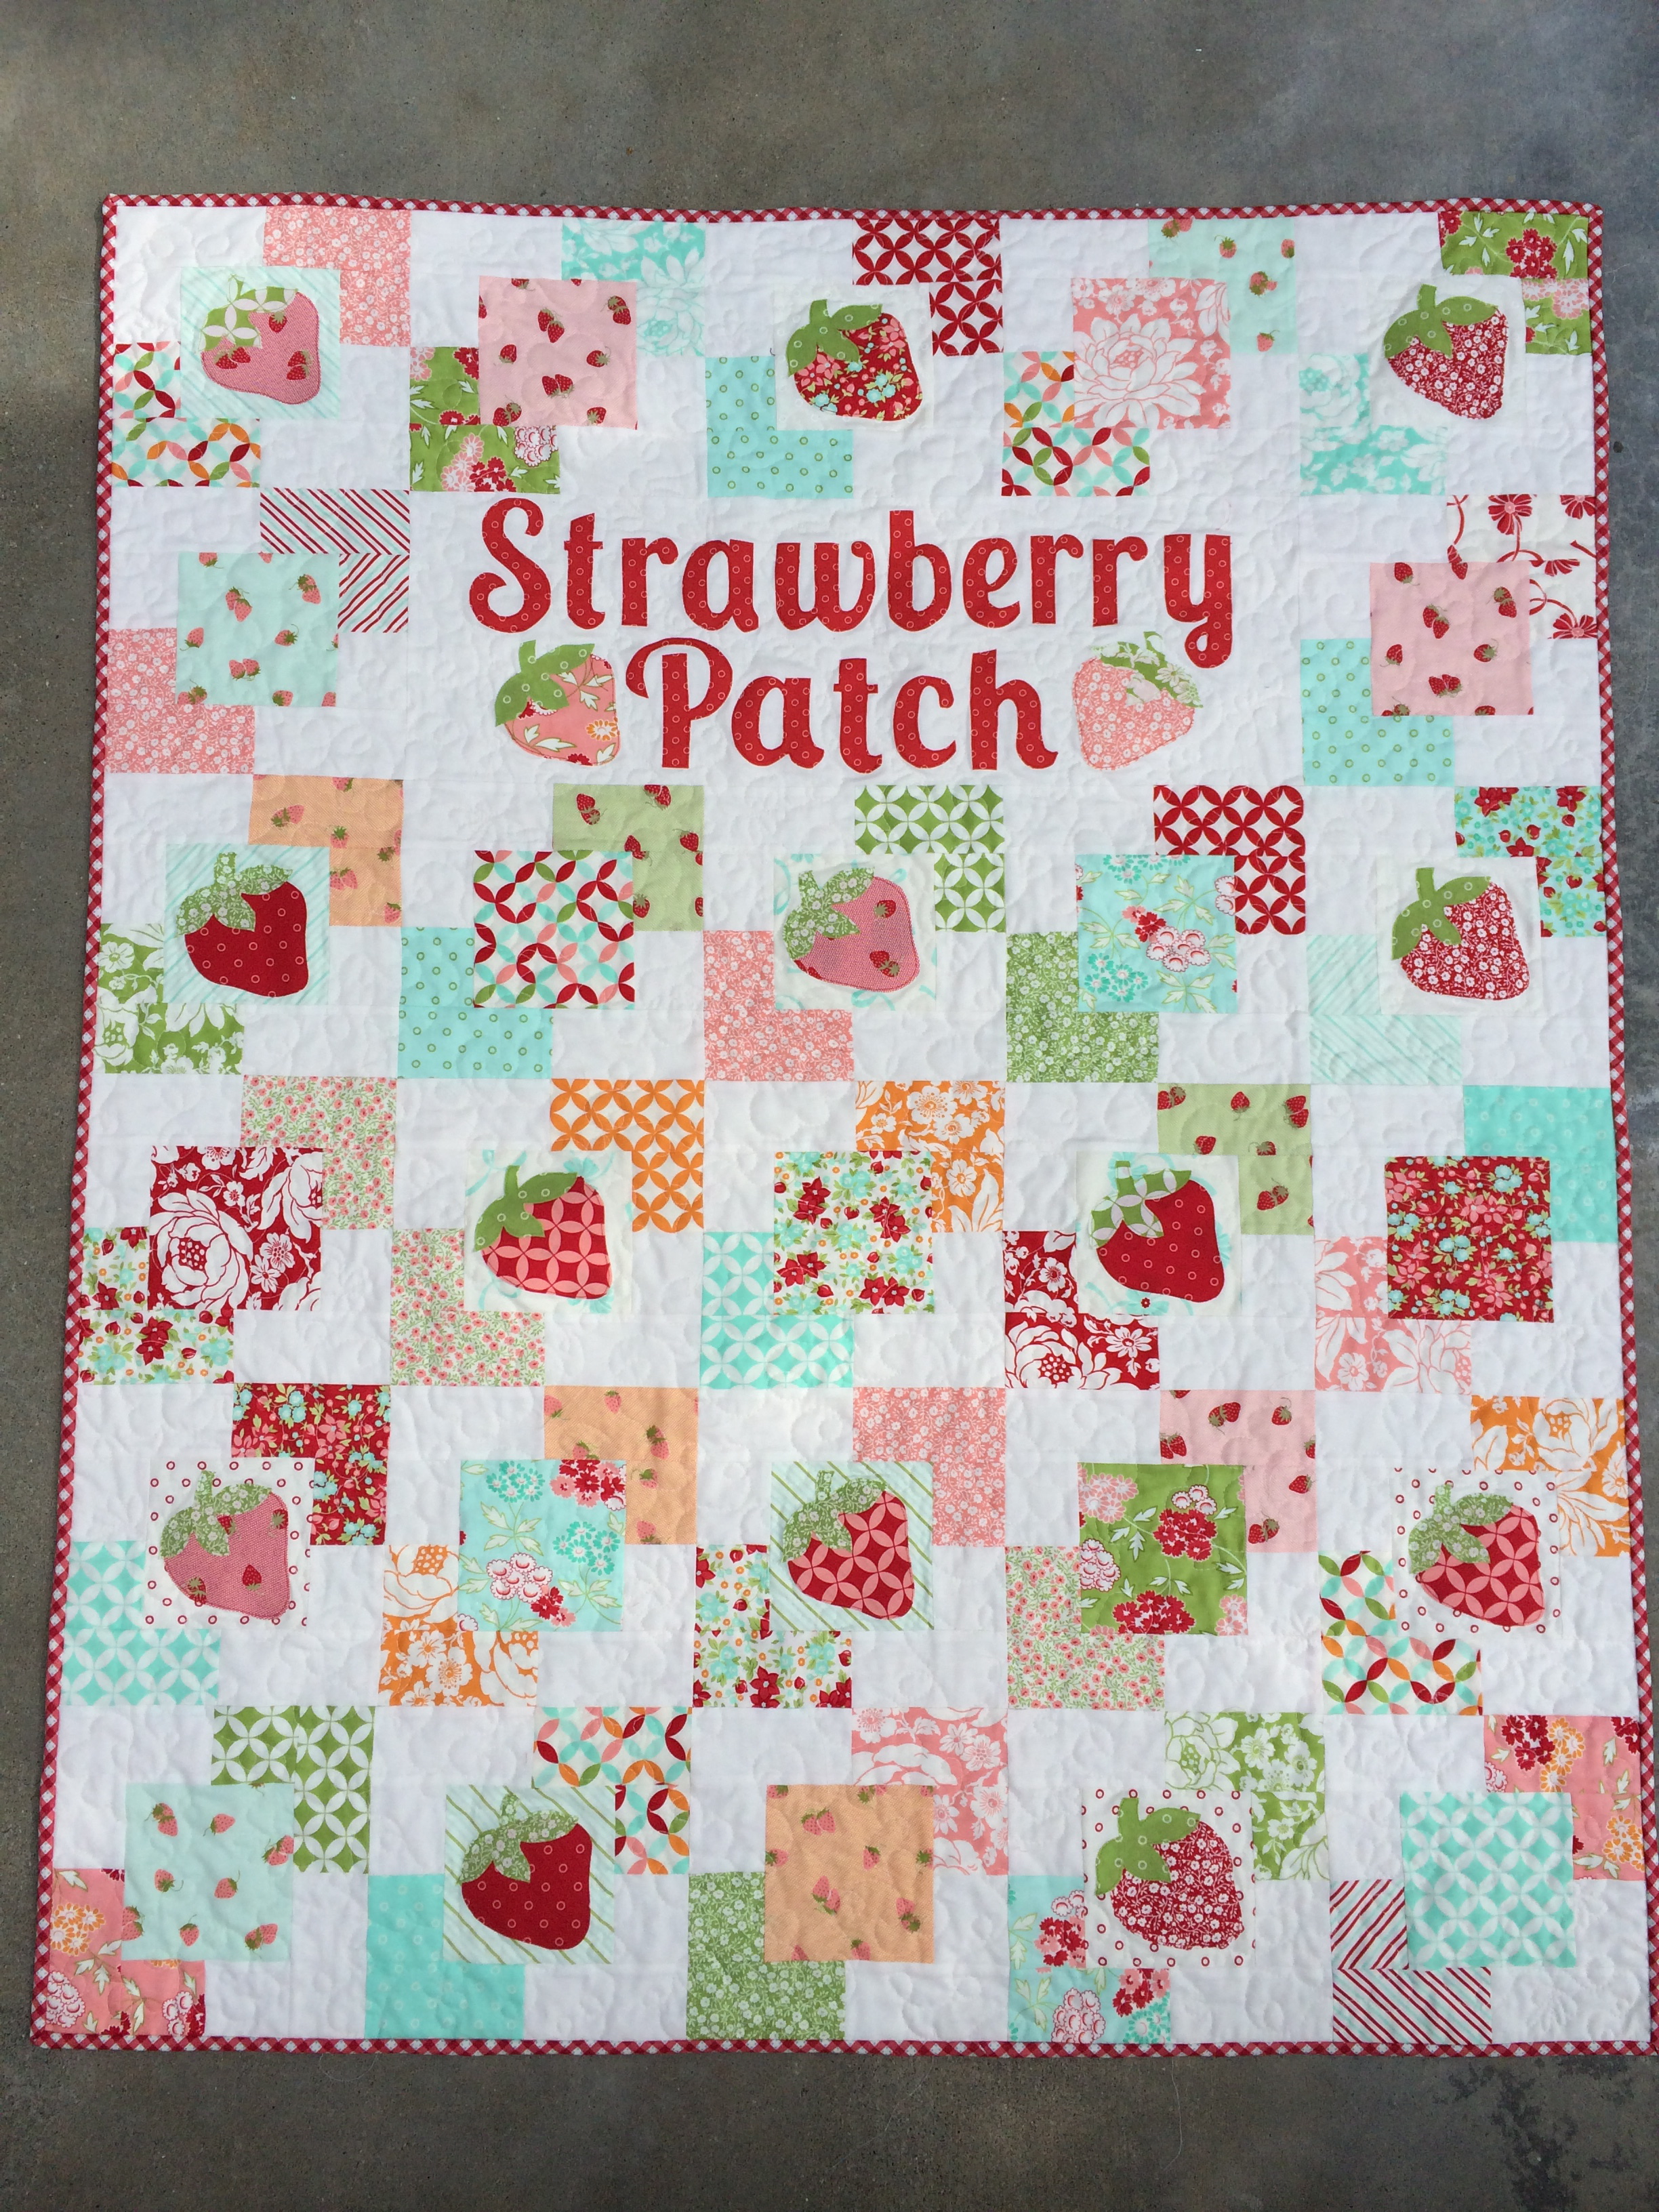
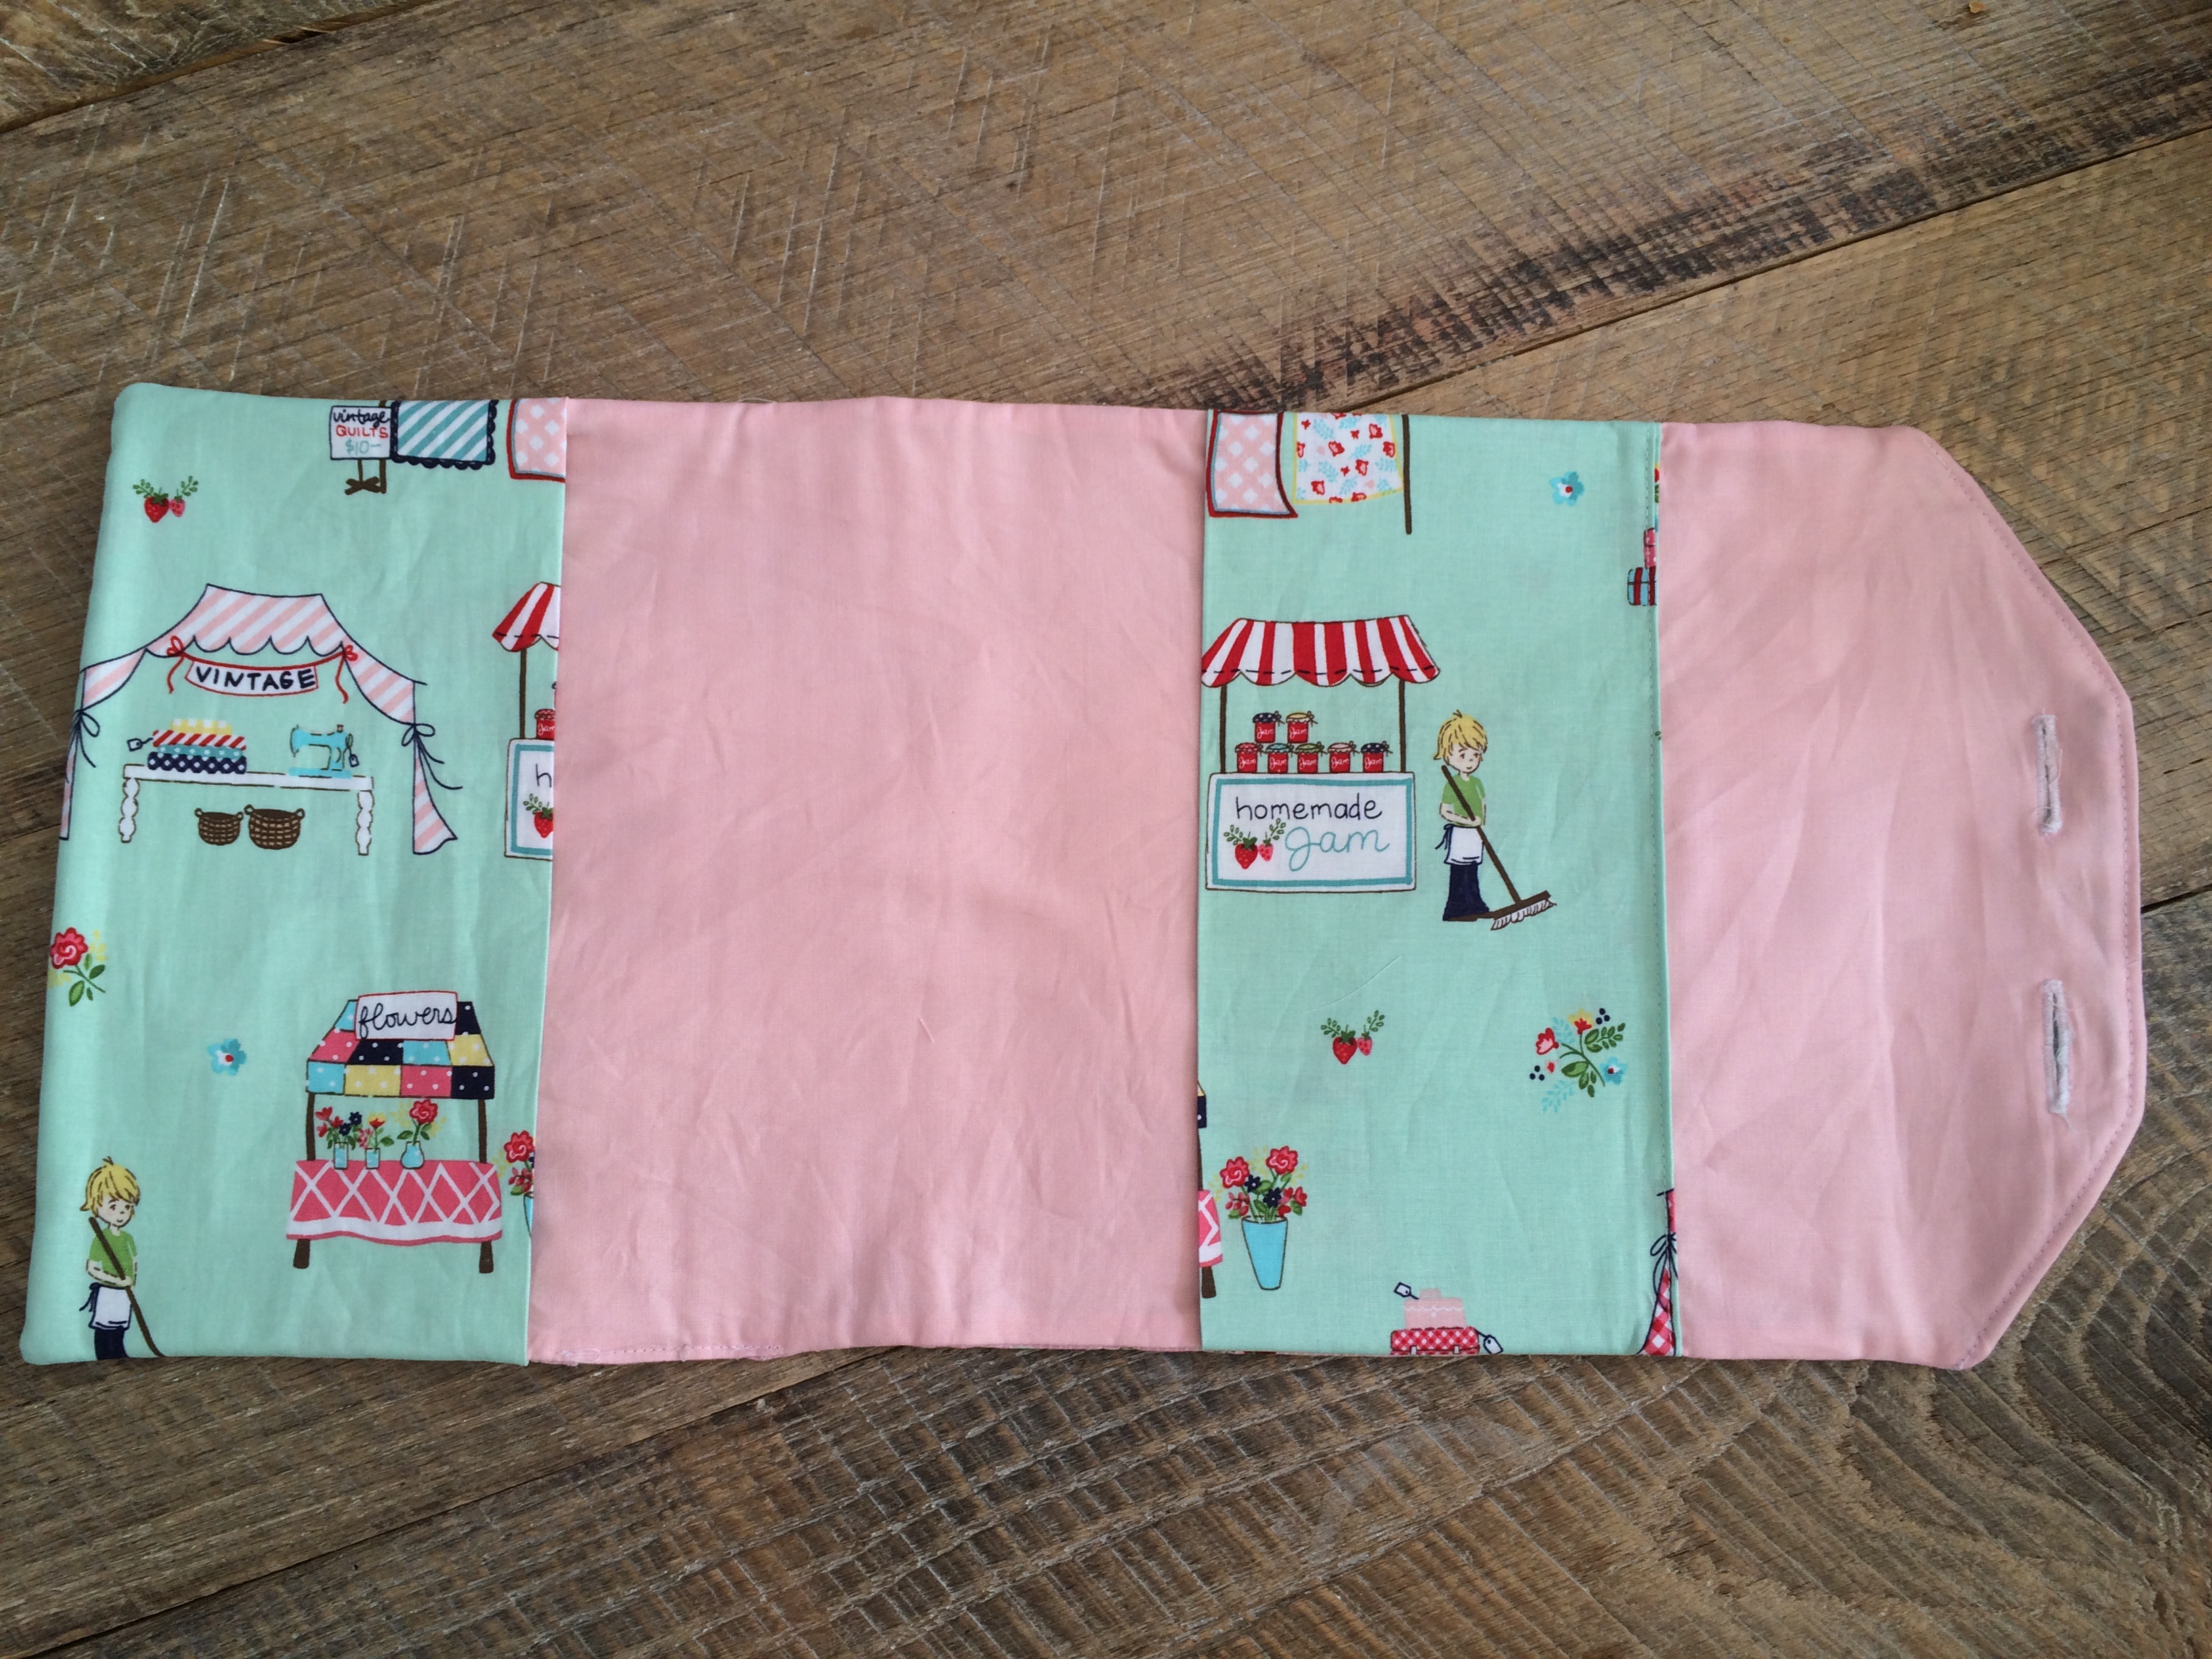
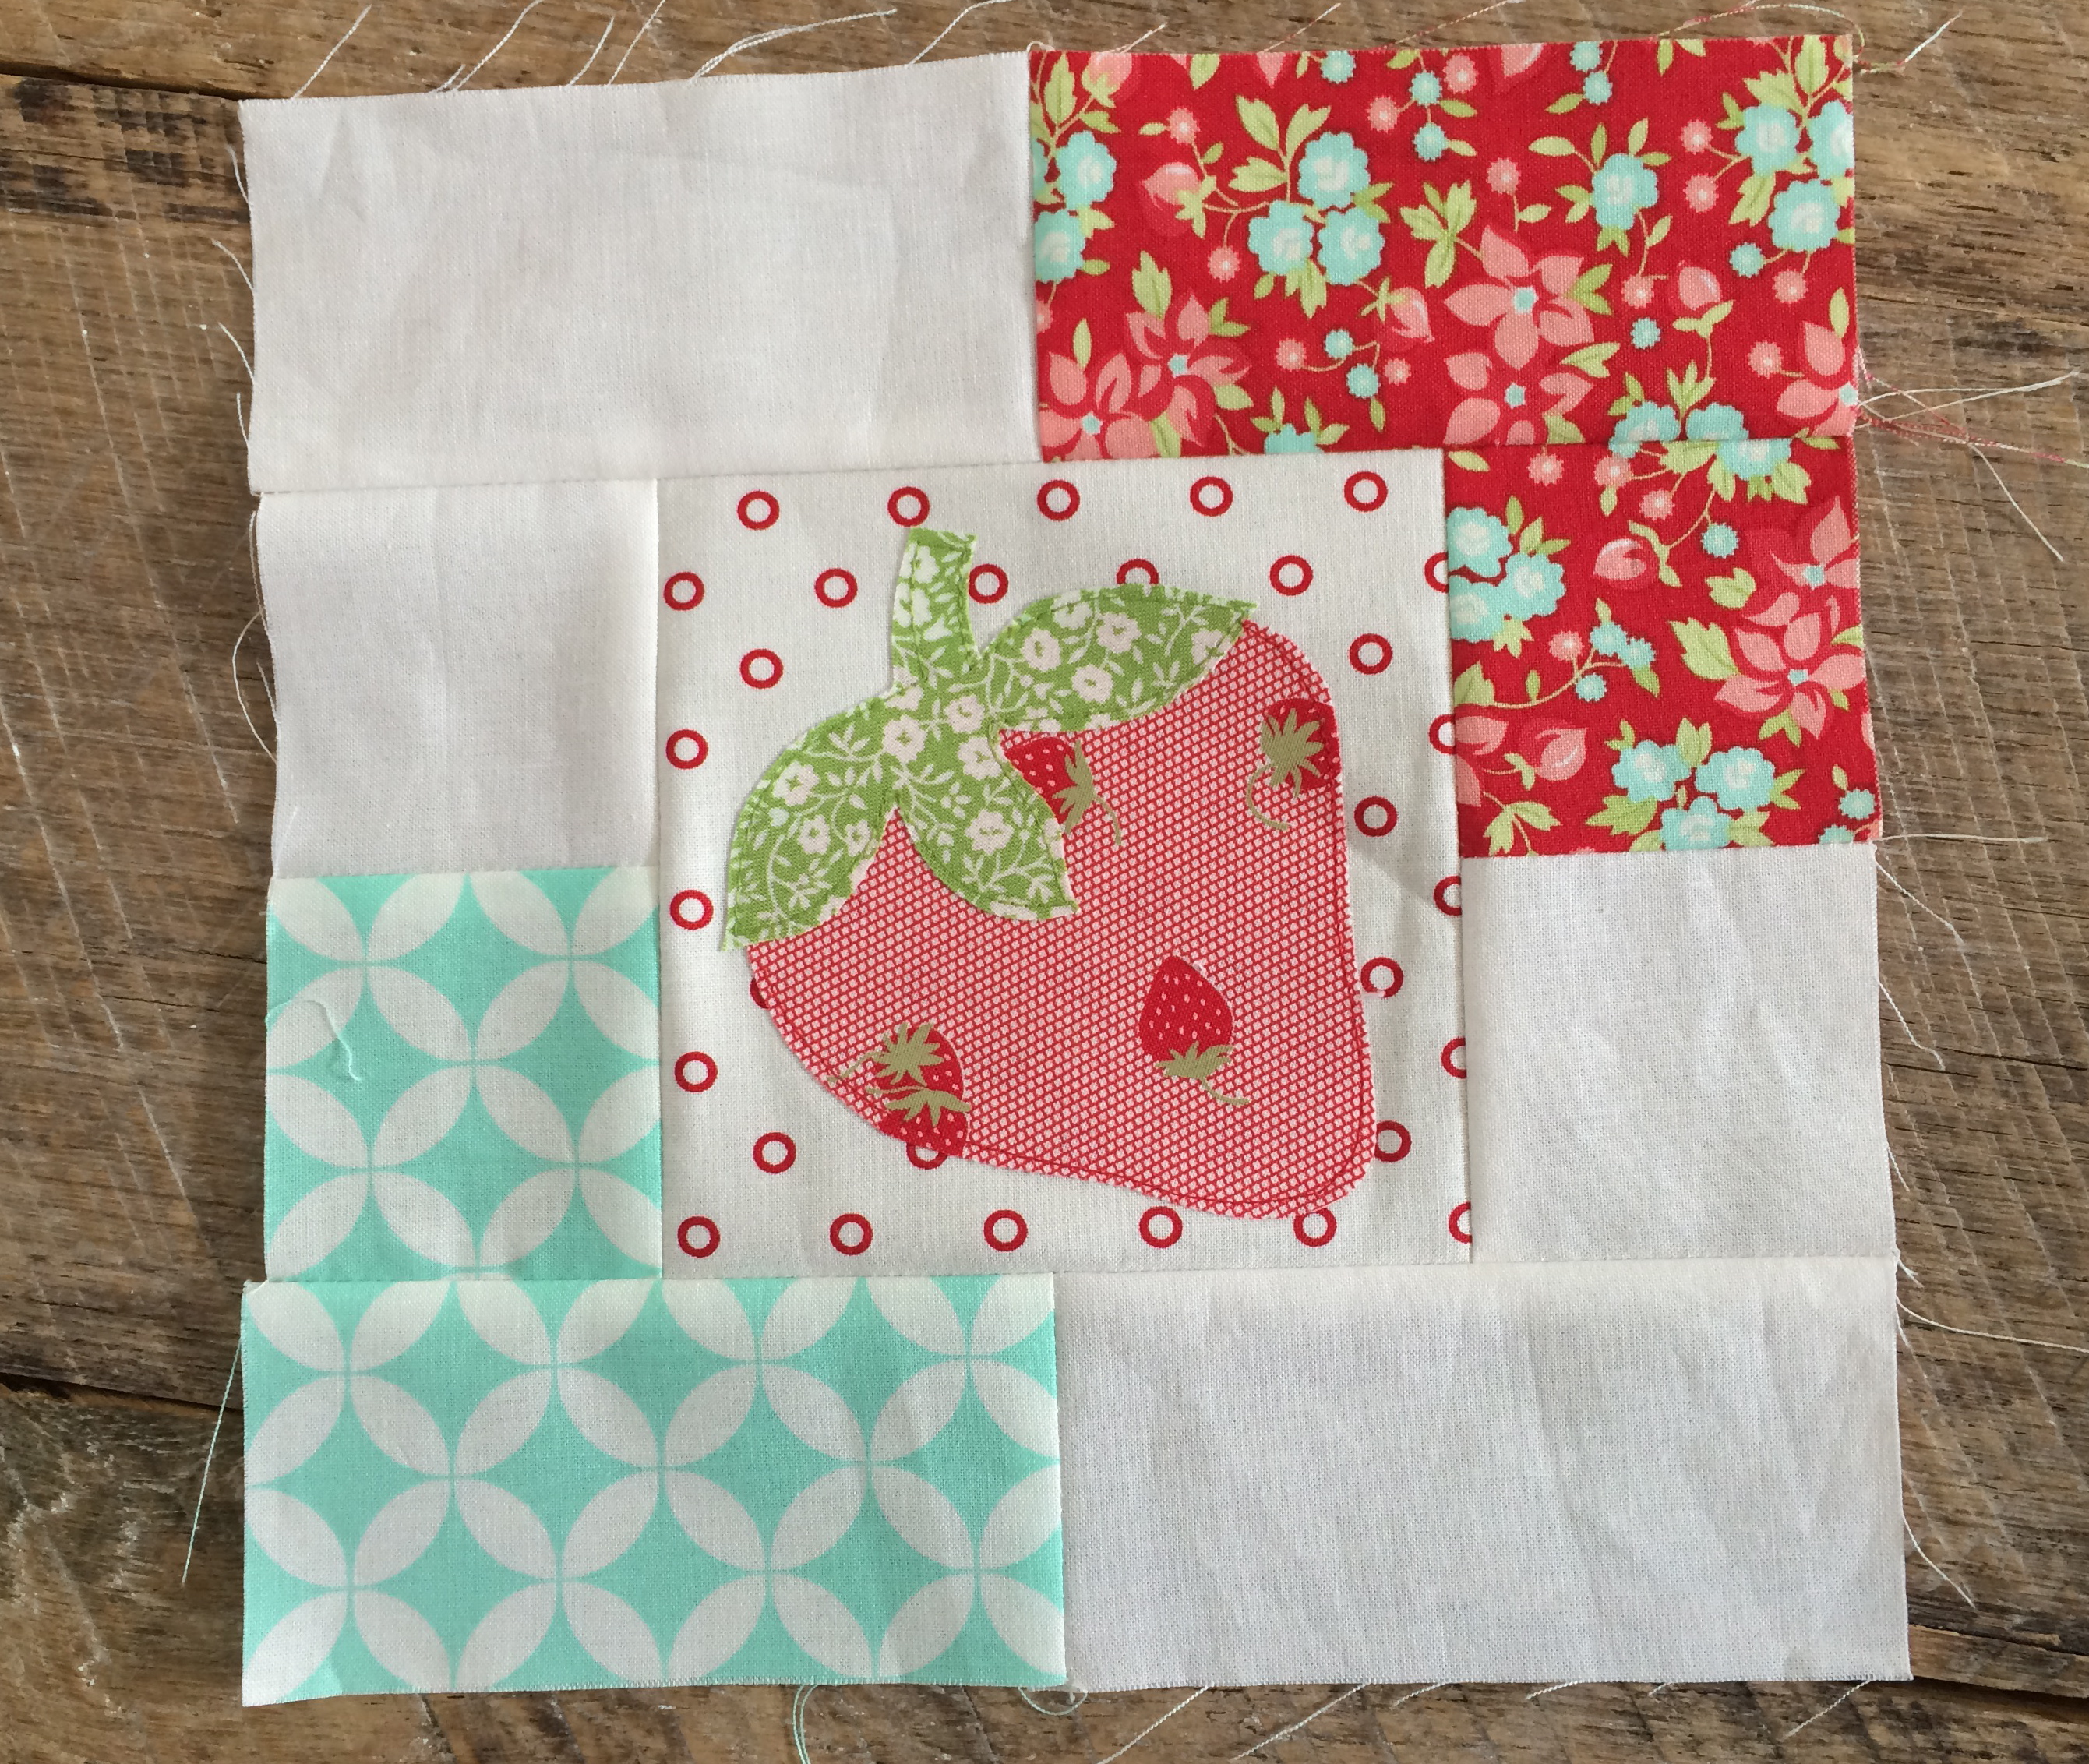
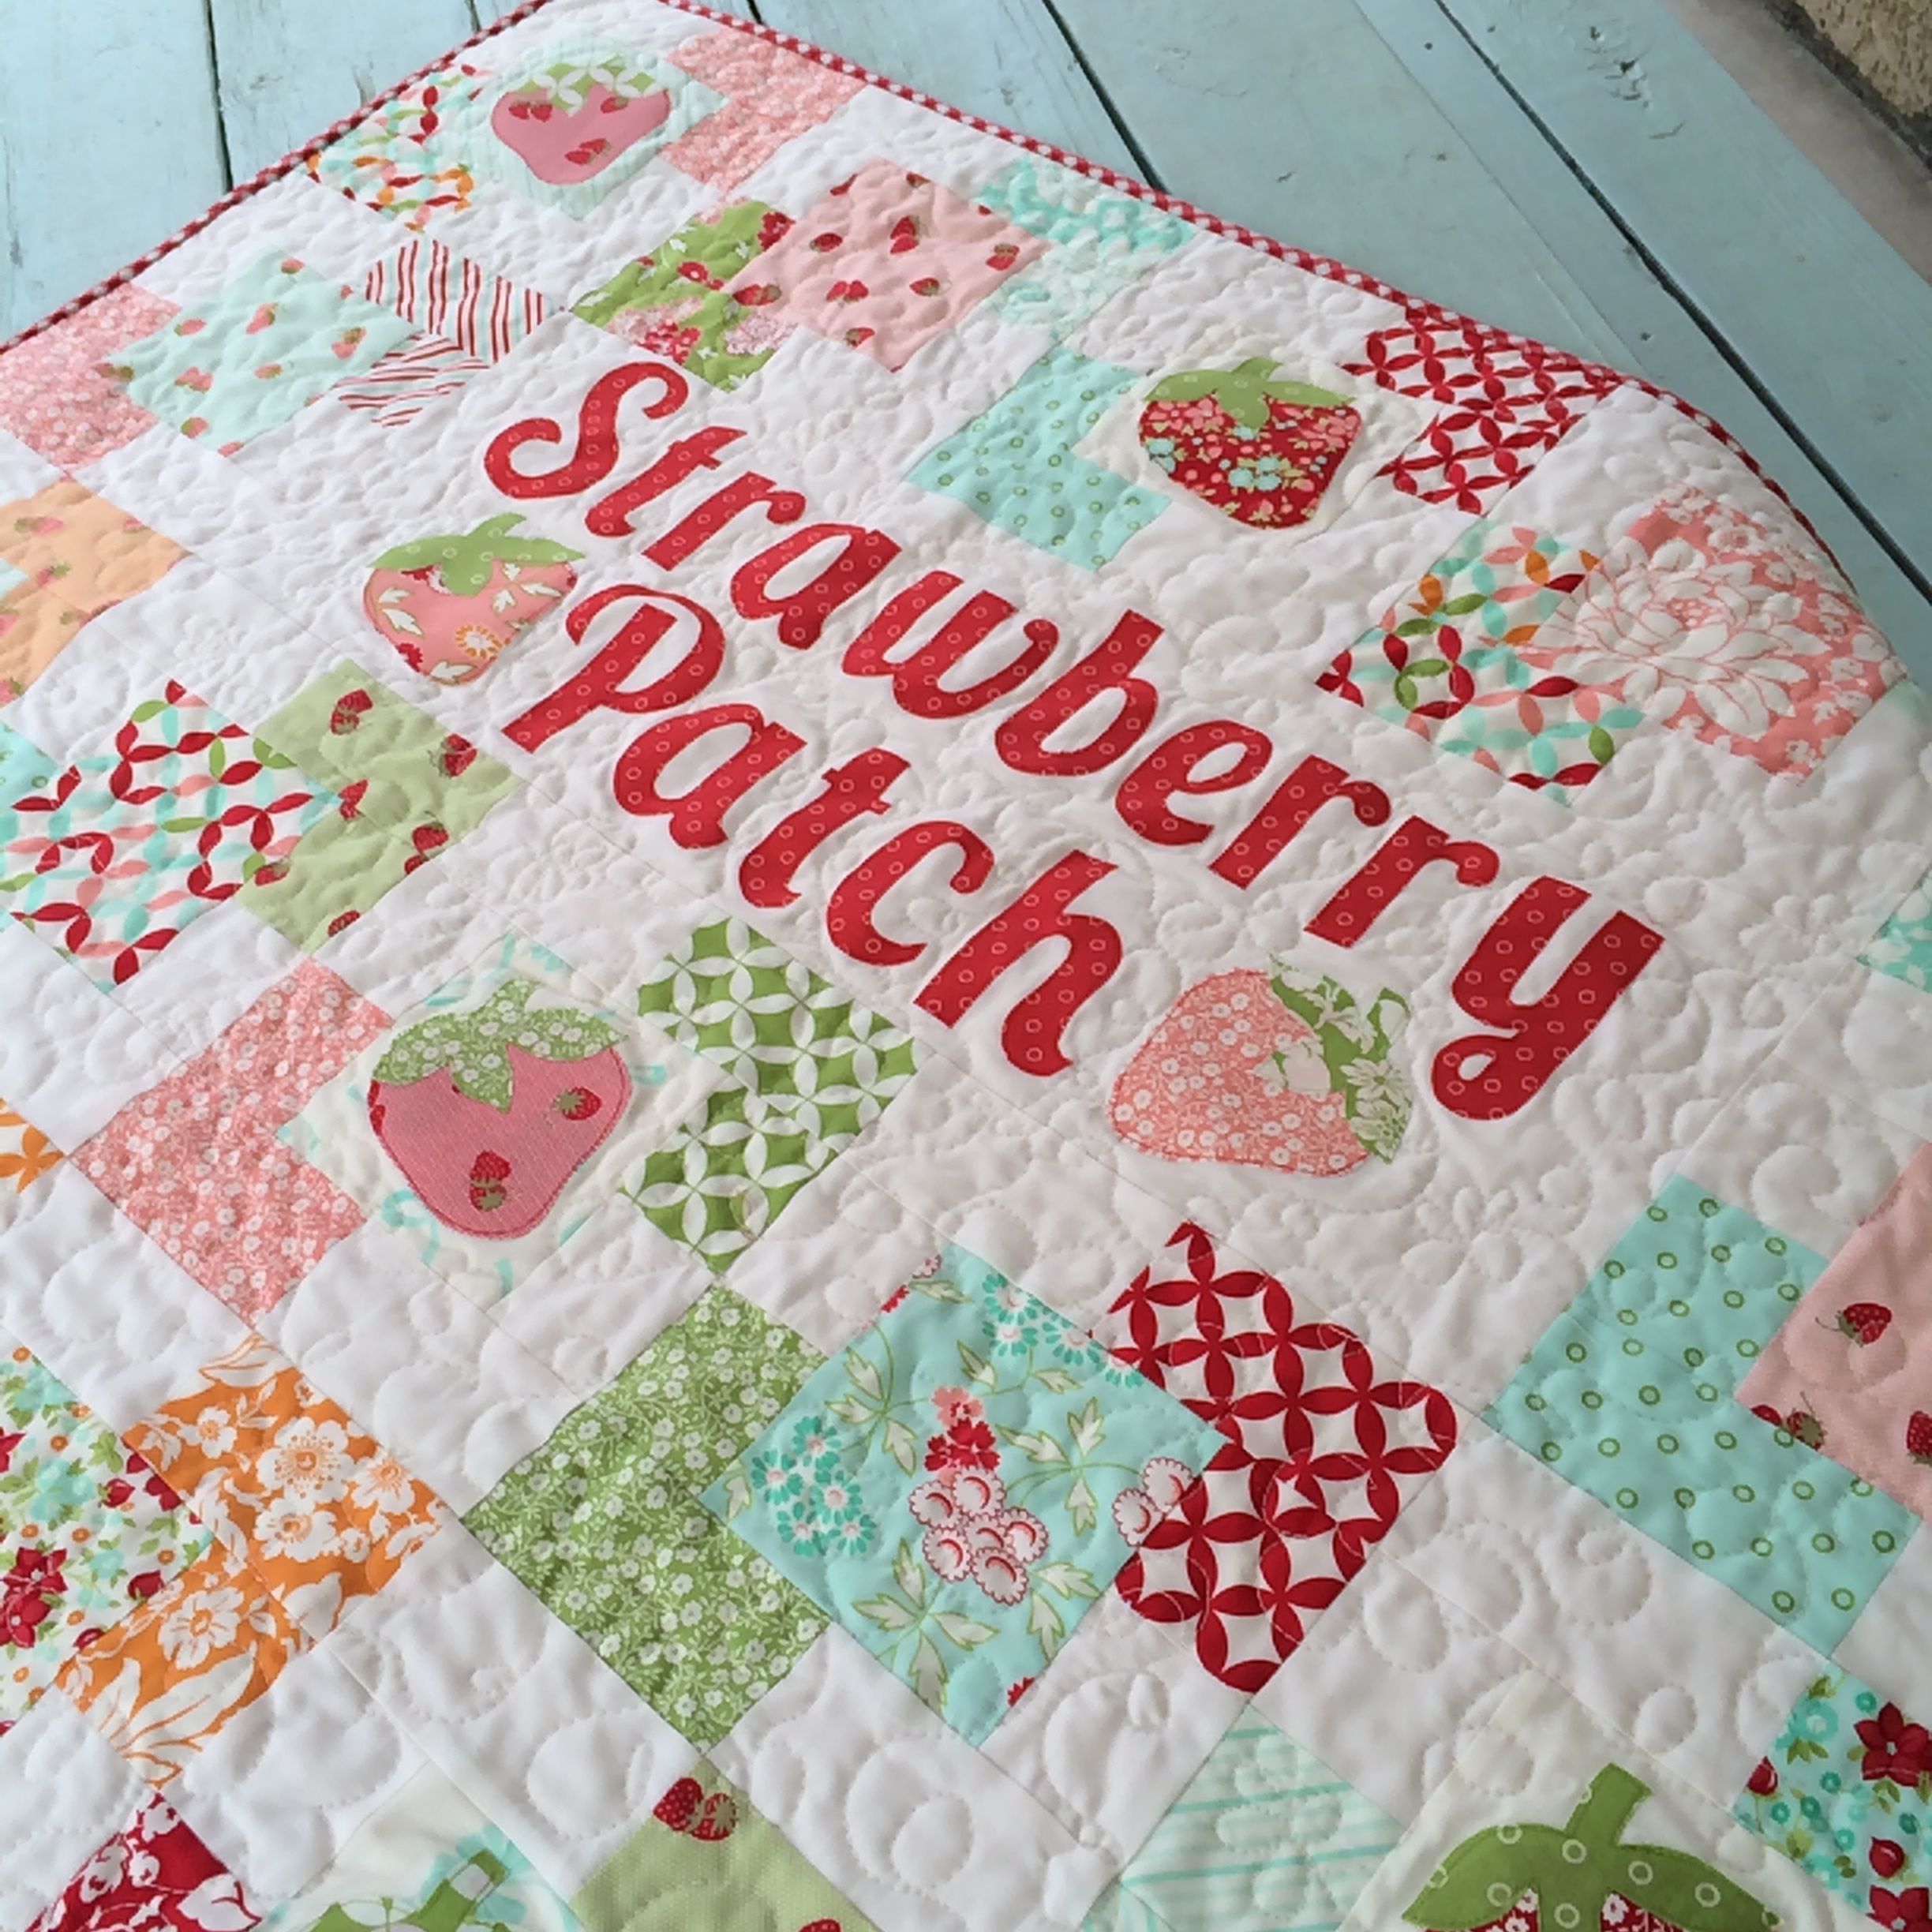
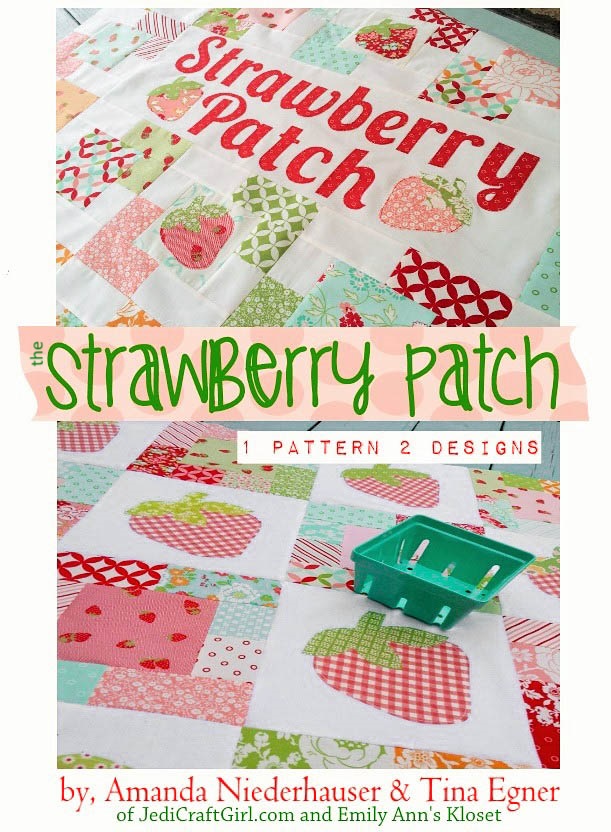
Homegrown strawberries in a New Jersey backyard, berries being grown all year round in Sunny California and two friends who lives miles apart….came together to design these yummy strawberry quilts…. JUST FOR YOU!  Tina from Emily Ann’s Klsoet and I had so much fun making these quilts – we know you will love the pattern as well!  It’s one pattern but there are 2 versions you can choose from!  The Strawberry Patch pattern is available in paper copy or PDF.  Come take a peek over at Emily Ann’s Kloset.

strawberry patch quilt hello darling moda 13

strawberry patch quilt hello darling moda 2

These yummy fabrics are from the Moda fabric line “Hello Darling”.  strawberry patch quilt hello darling moda 3

strawberry patch quilt hello darling moda 15
strawberry patch quilt hello darling moda 5

strawberry patch quilt hello darling moda 6

I have my quilt hanging in my family room – I smile whenever I walk by it 🙂
strawberry patch quilt hello darling moda 8


I even updated some decor times to have a strawberry theme.  It just feels so happy!!!strawberry patch quilt hello darling moda 9


I hope you love this quilt as much as I do!!!strawberry patch quilt hello darling moda 10

Baby Mufasa was very helpful in the quilt making process!!!
strawberry patch quilt hello darling moda

Through the Woods to Grandma’s House {Quilt Pattern}

through the woodscover-2
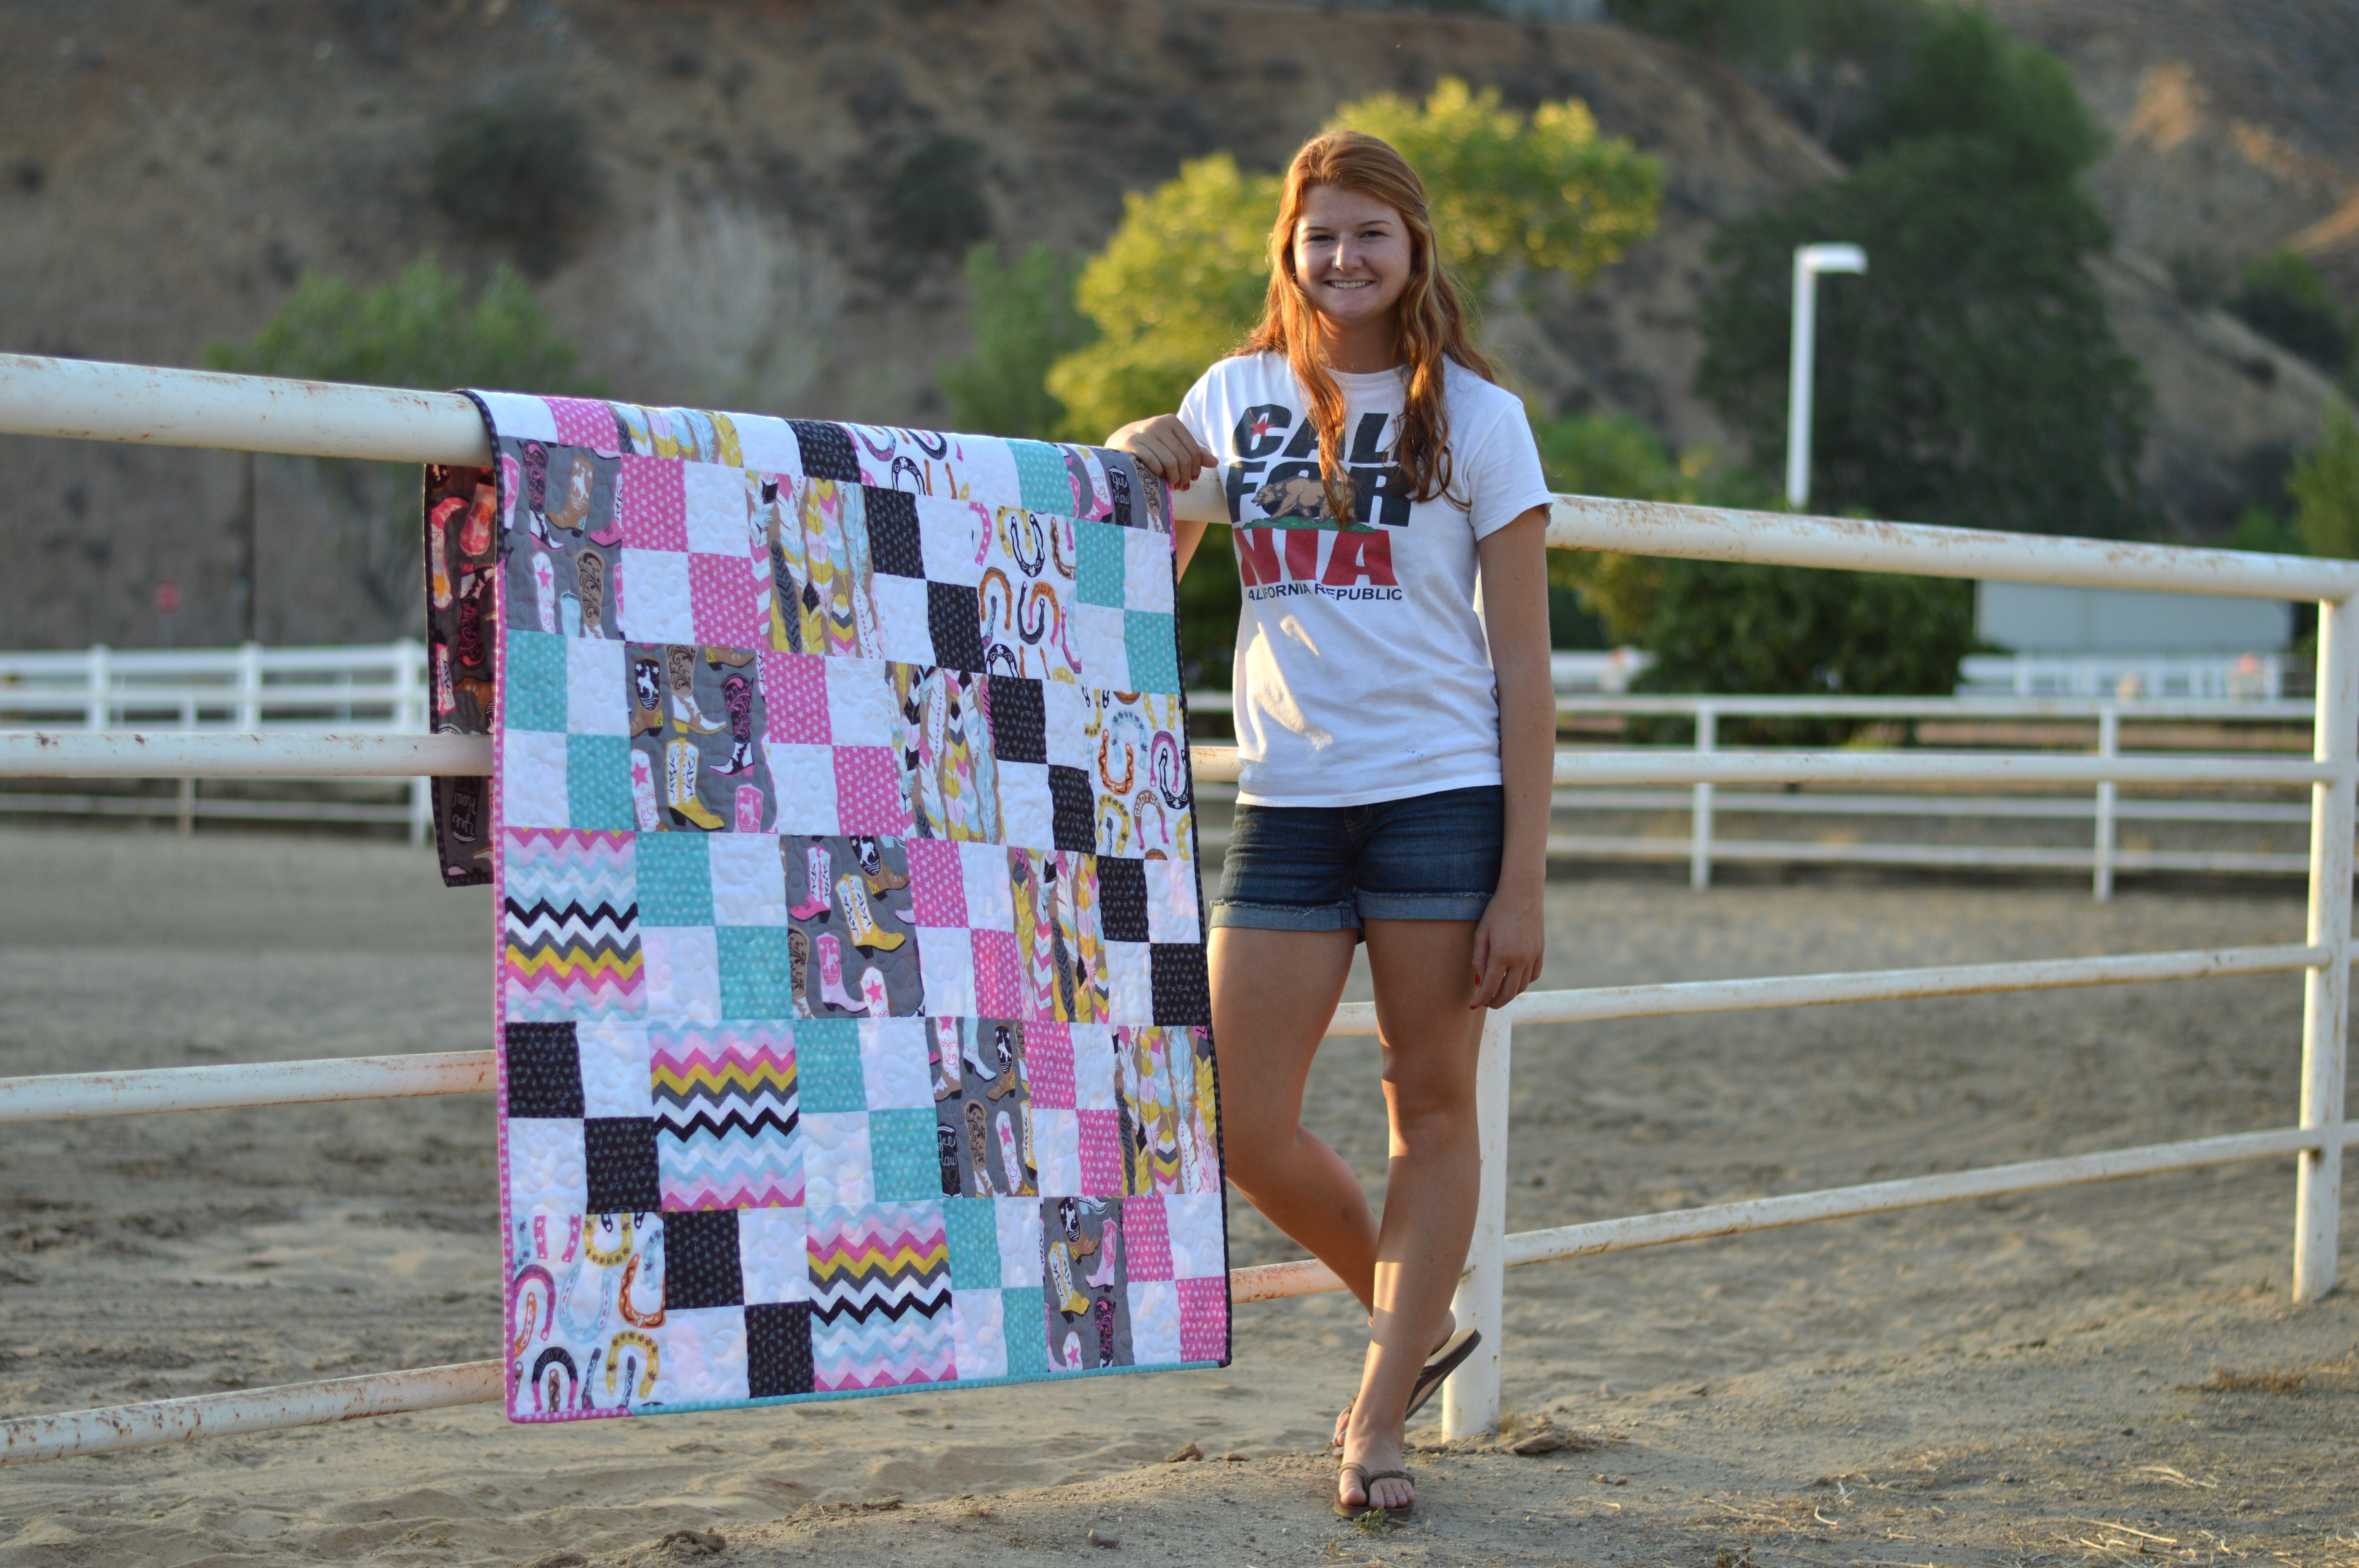
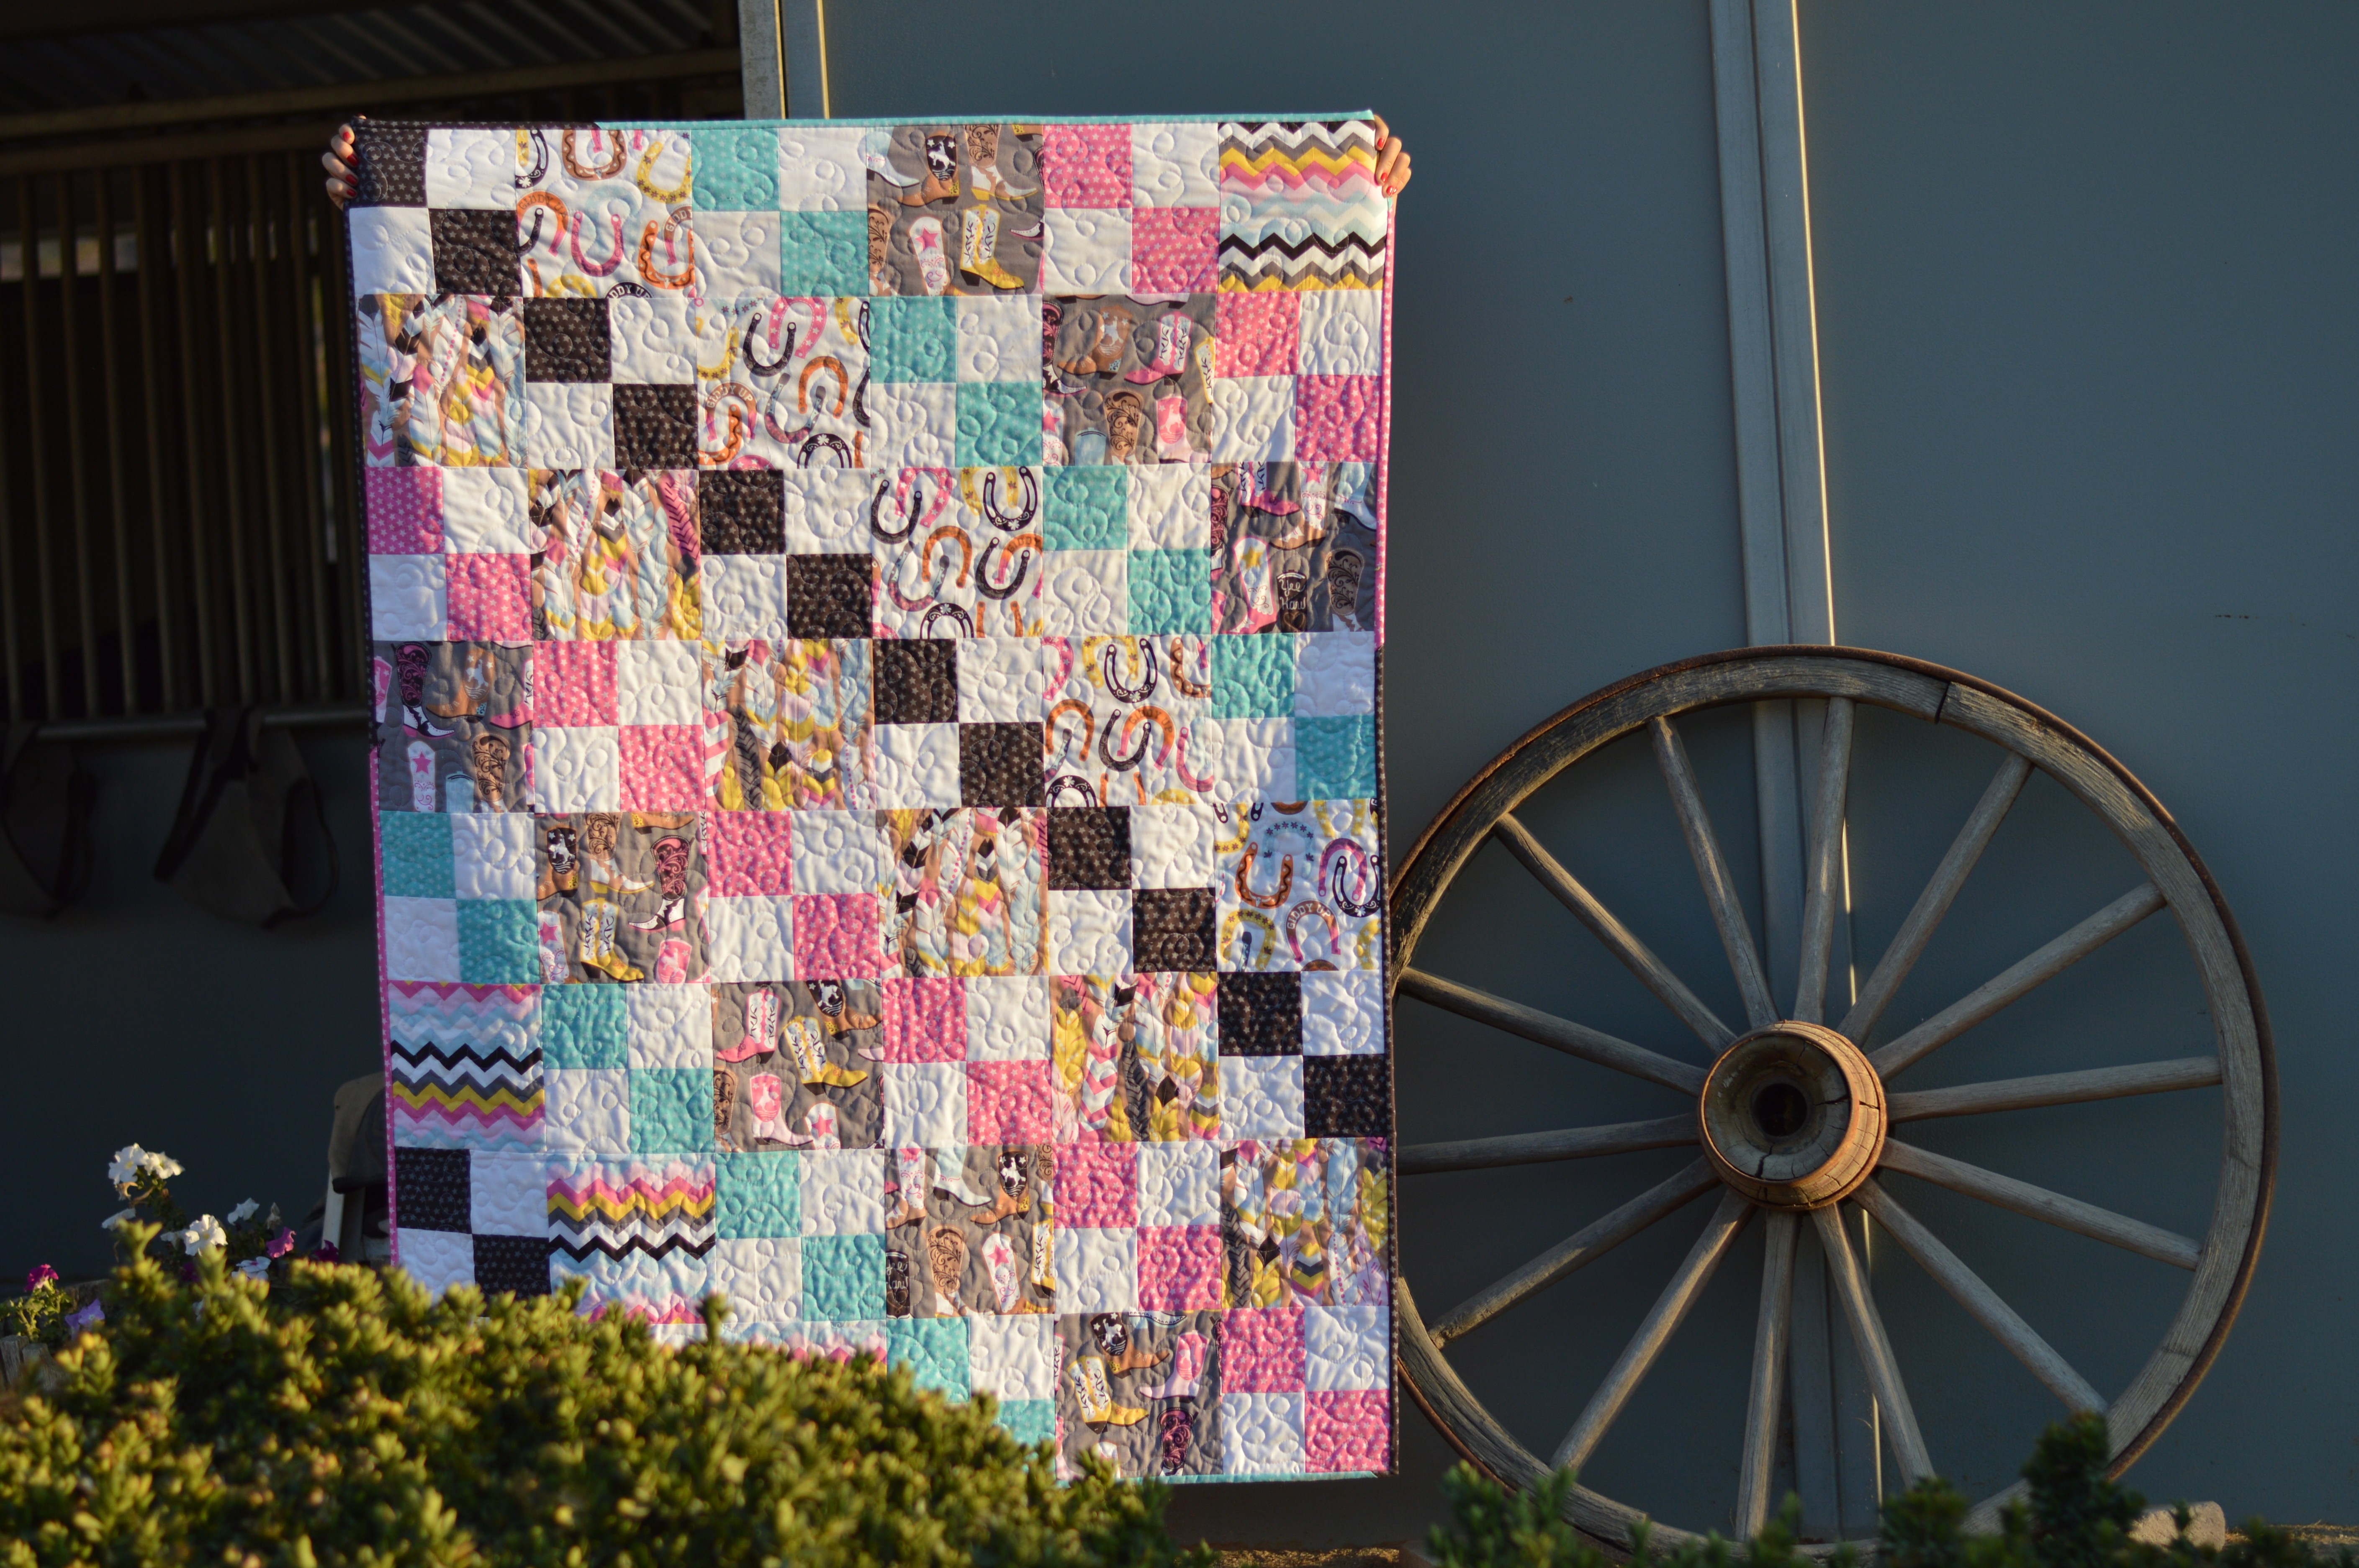
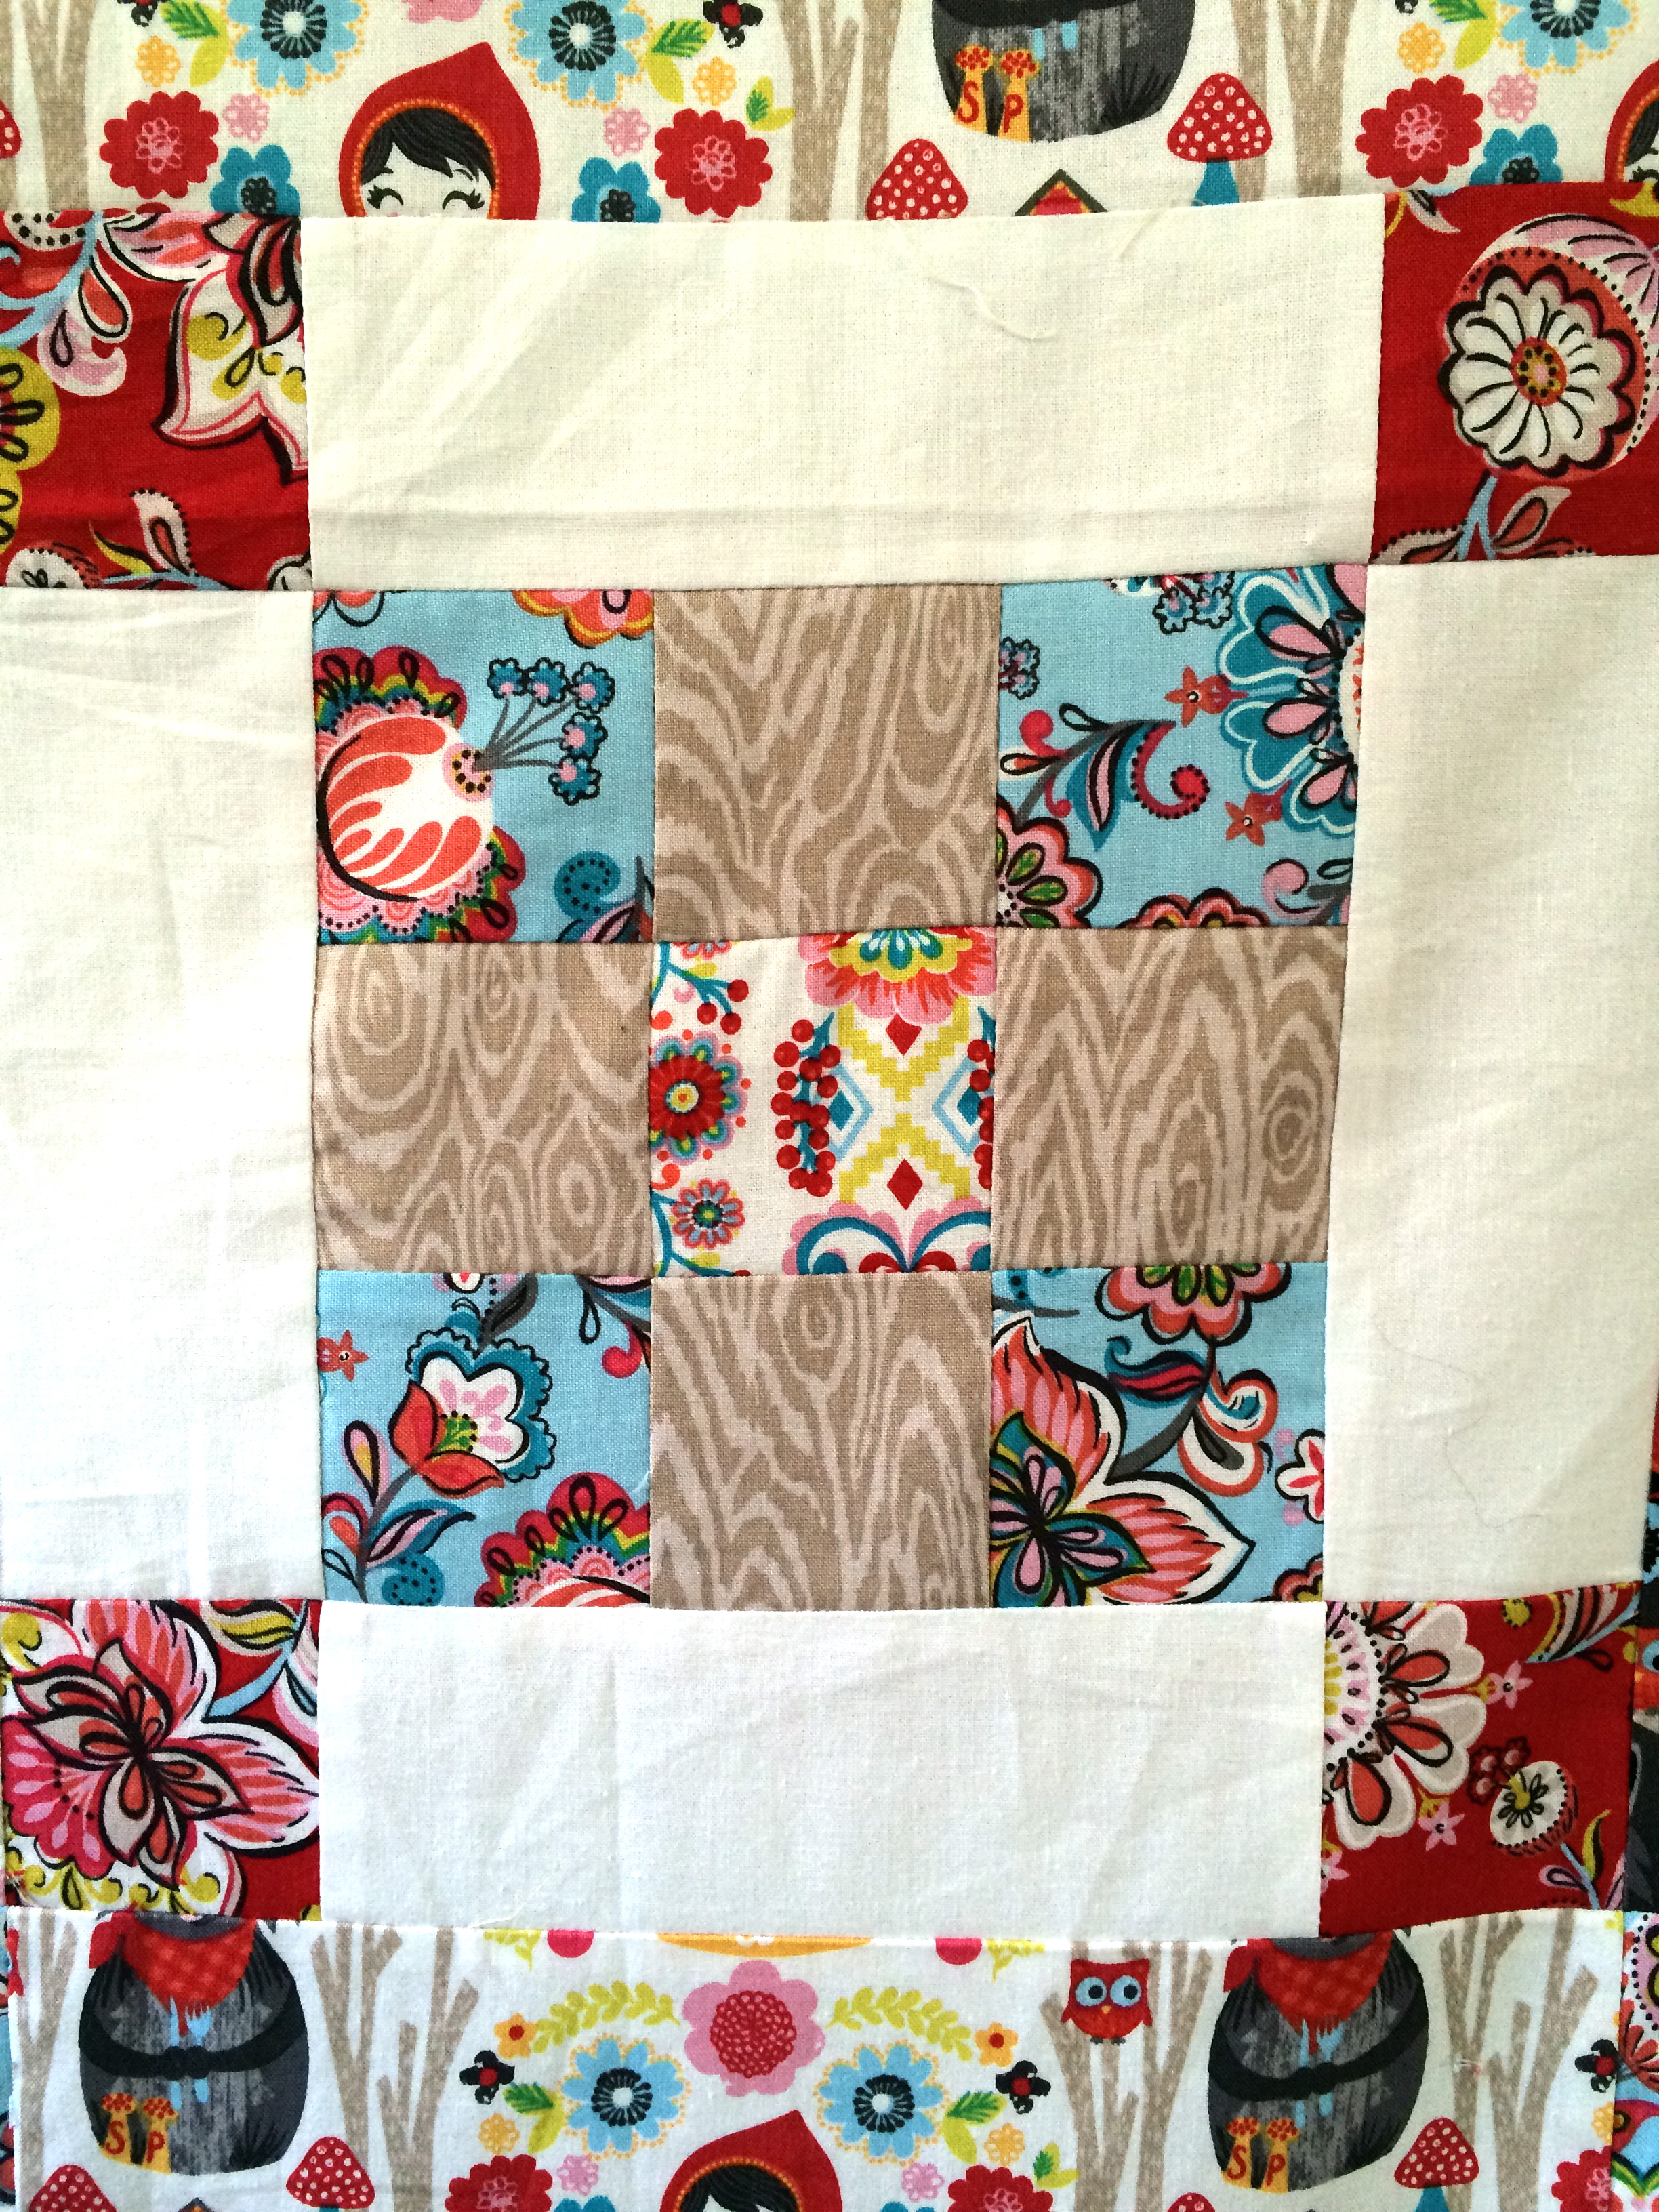
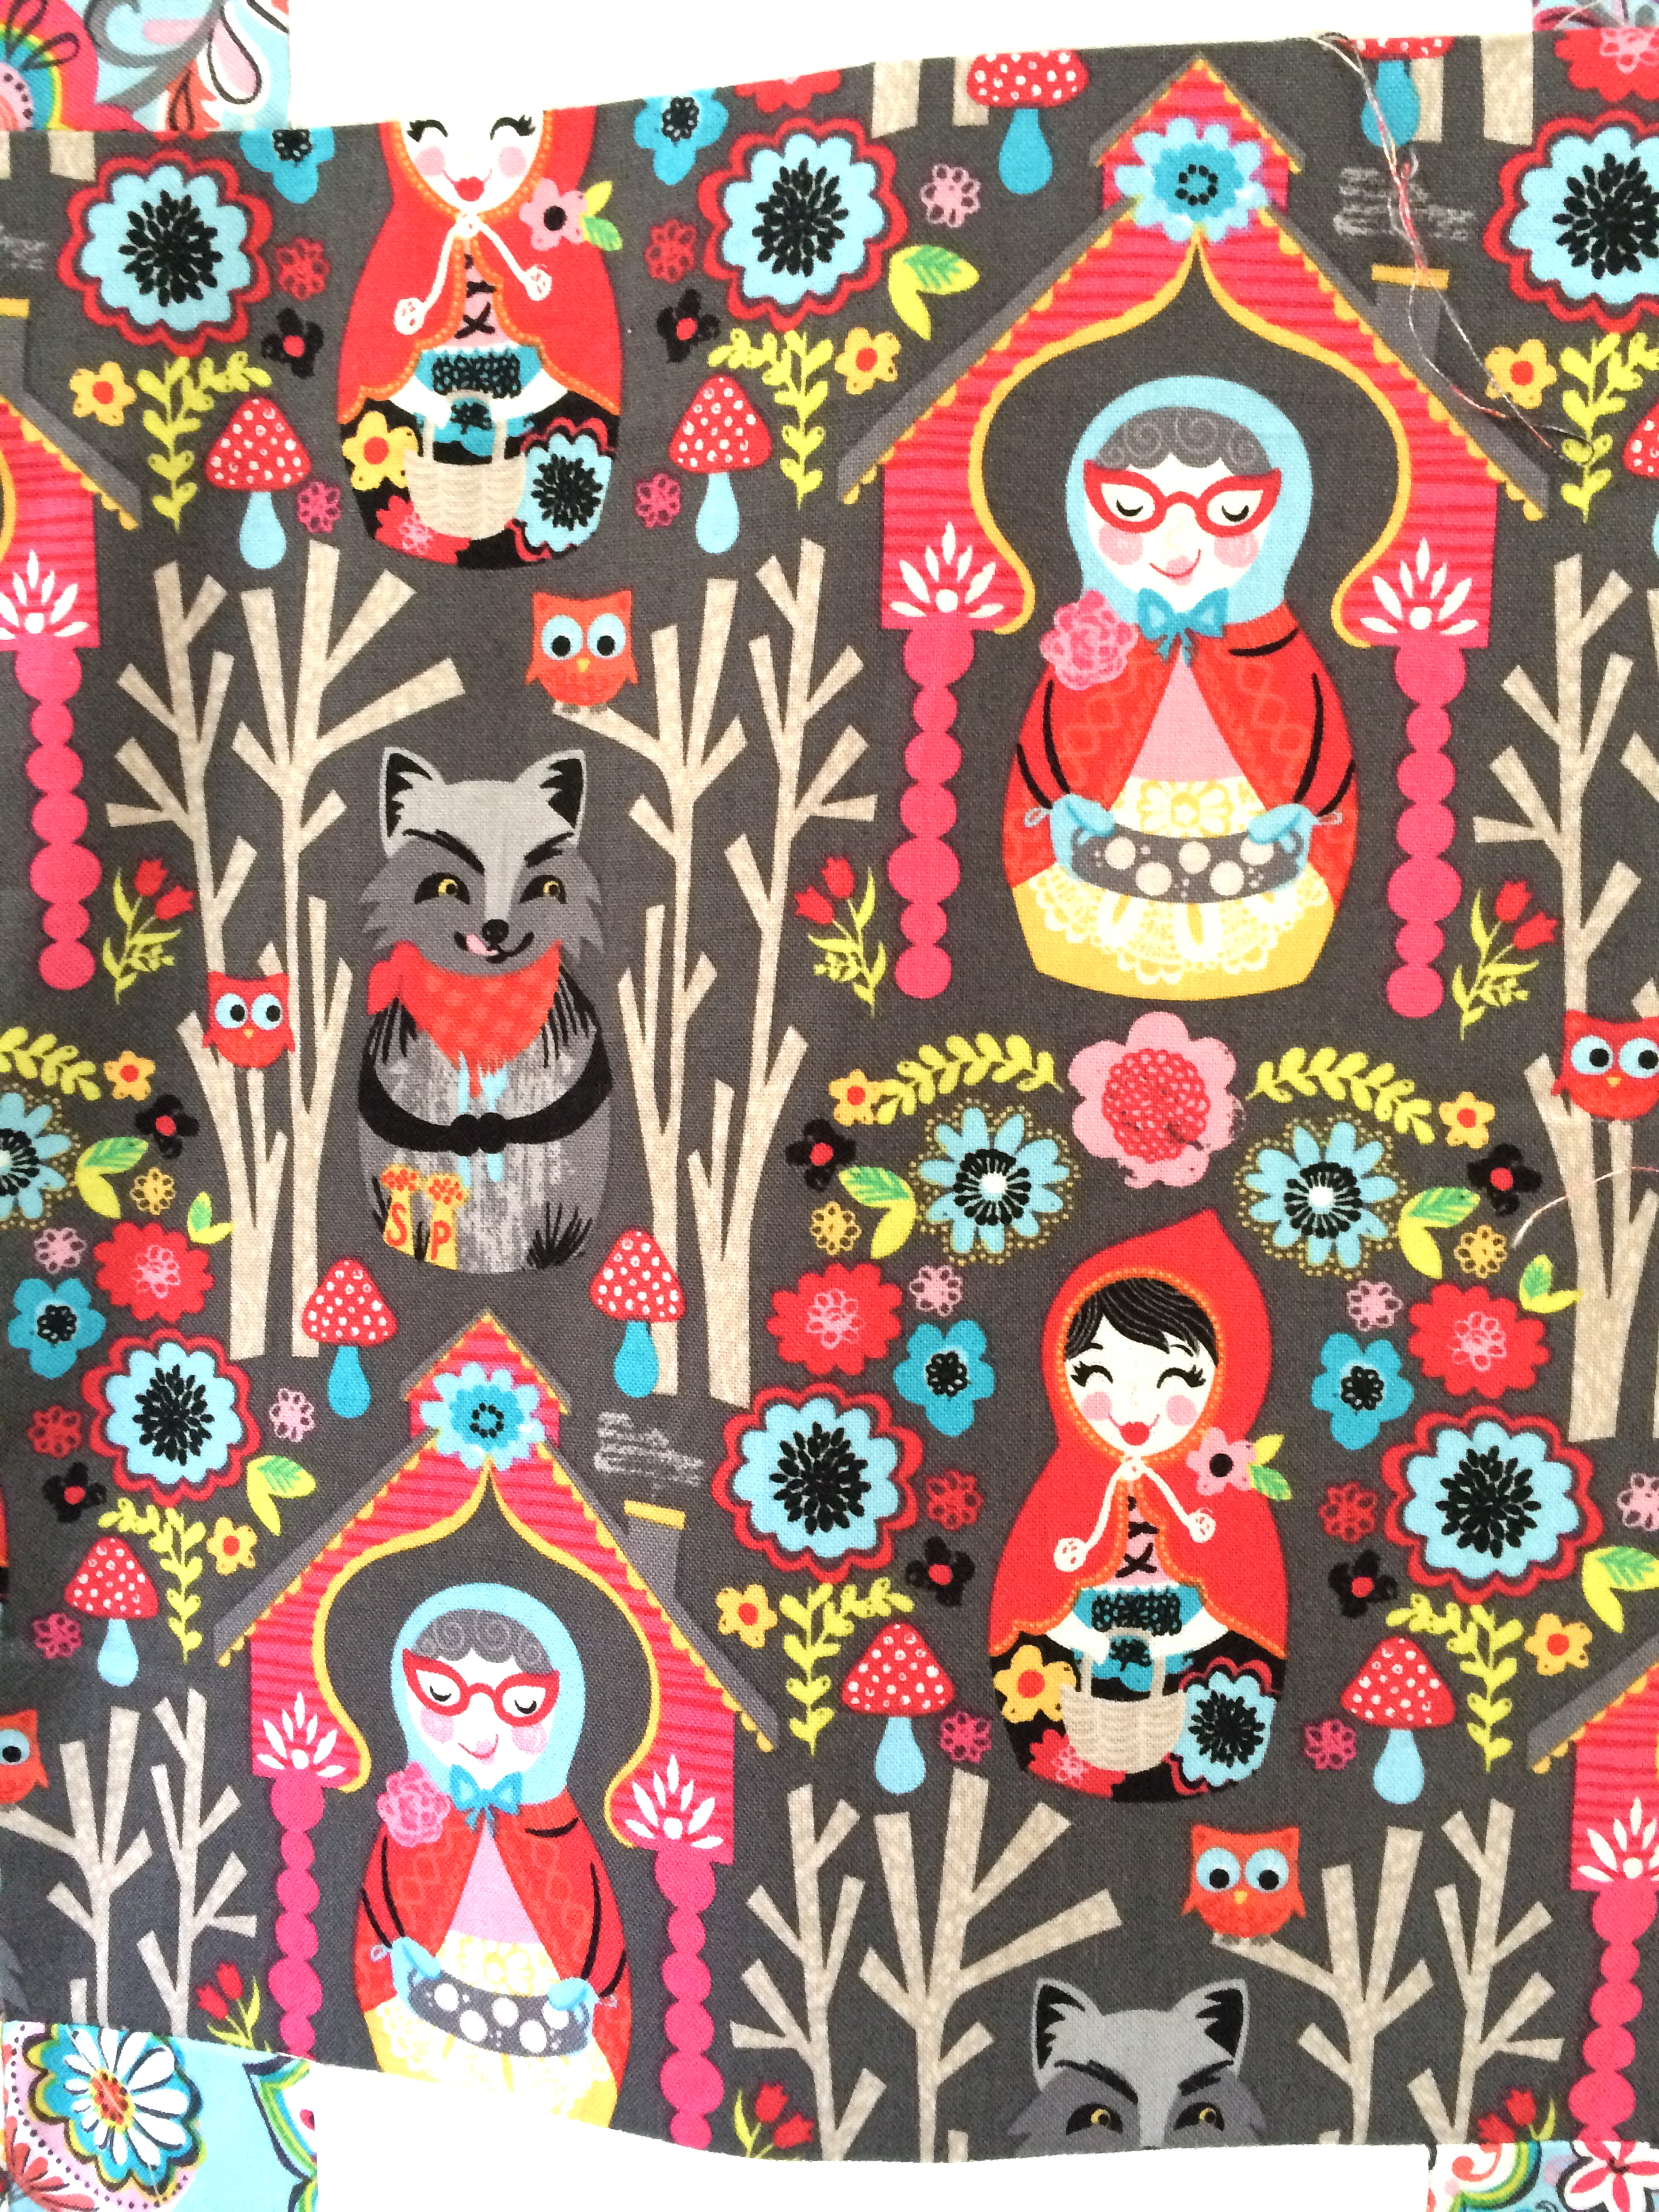
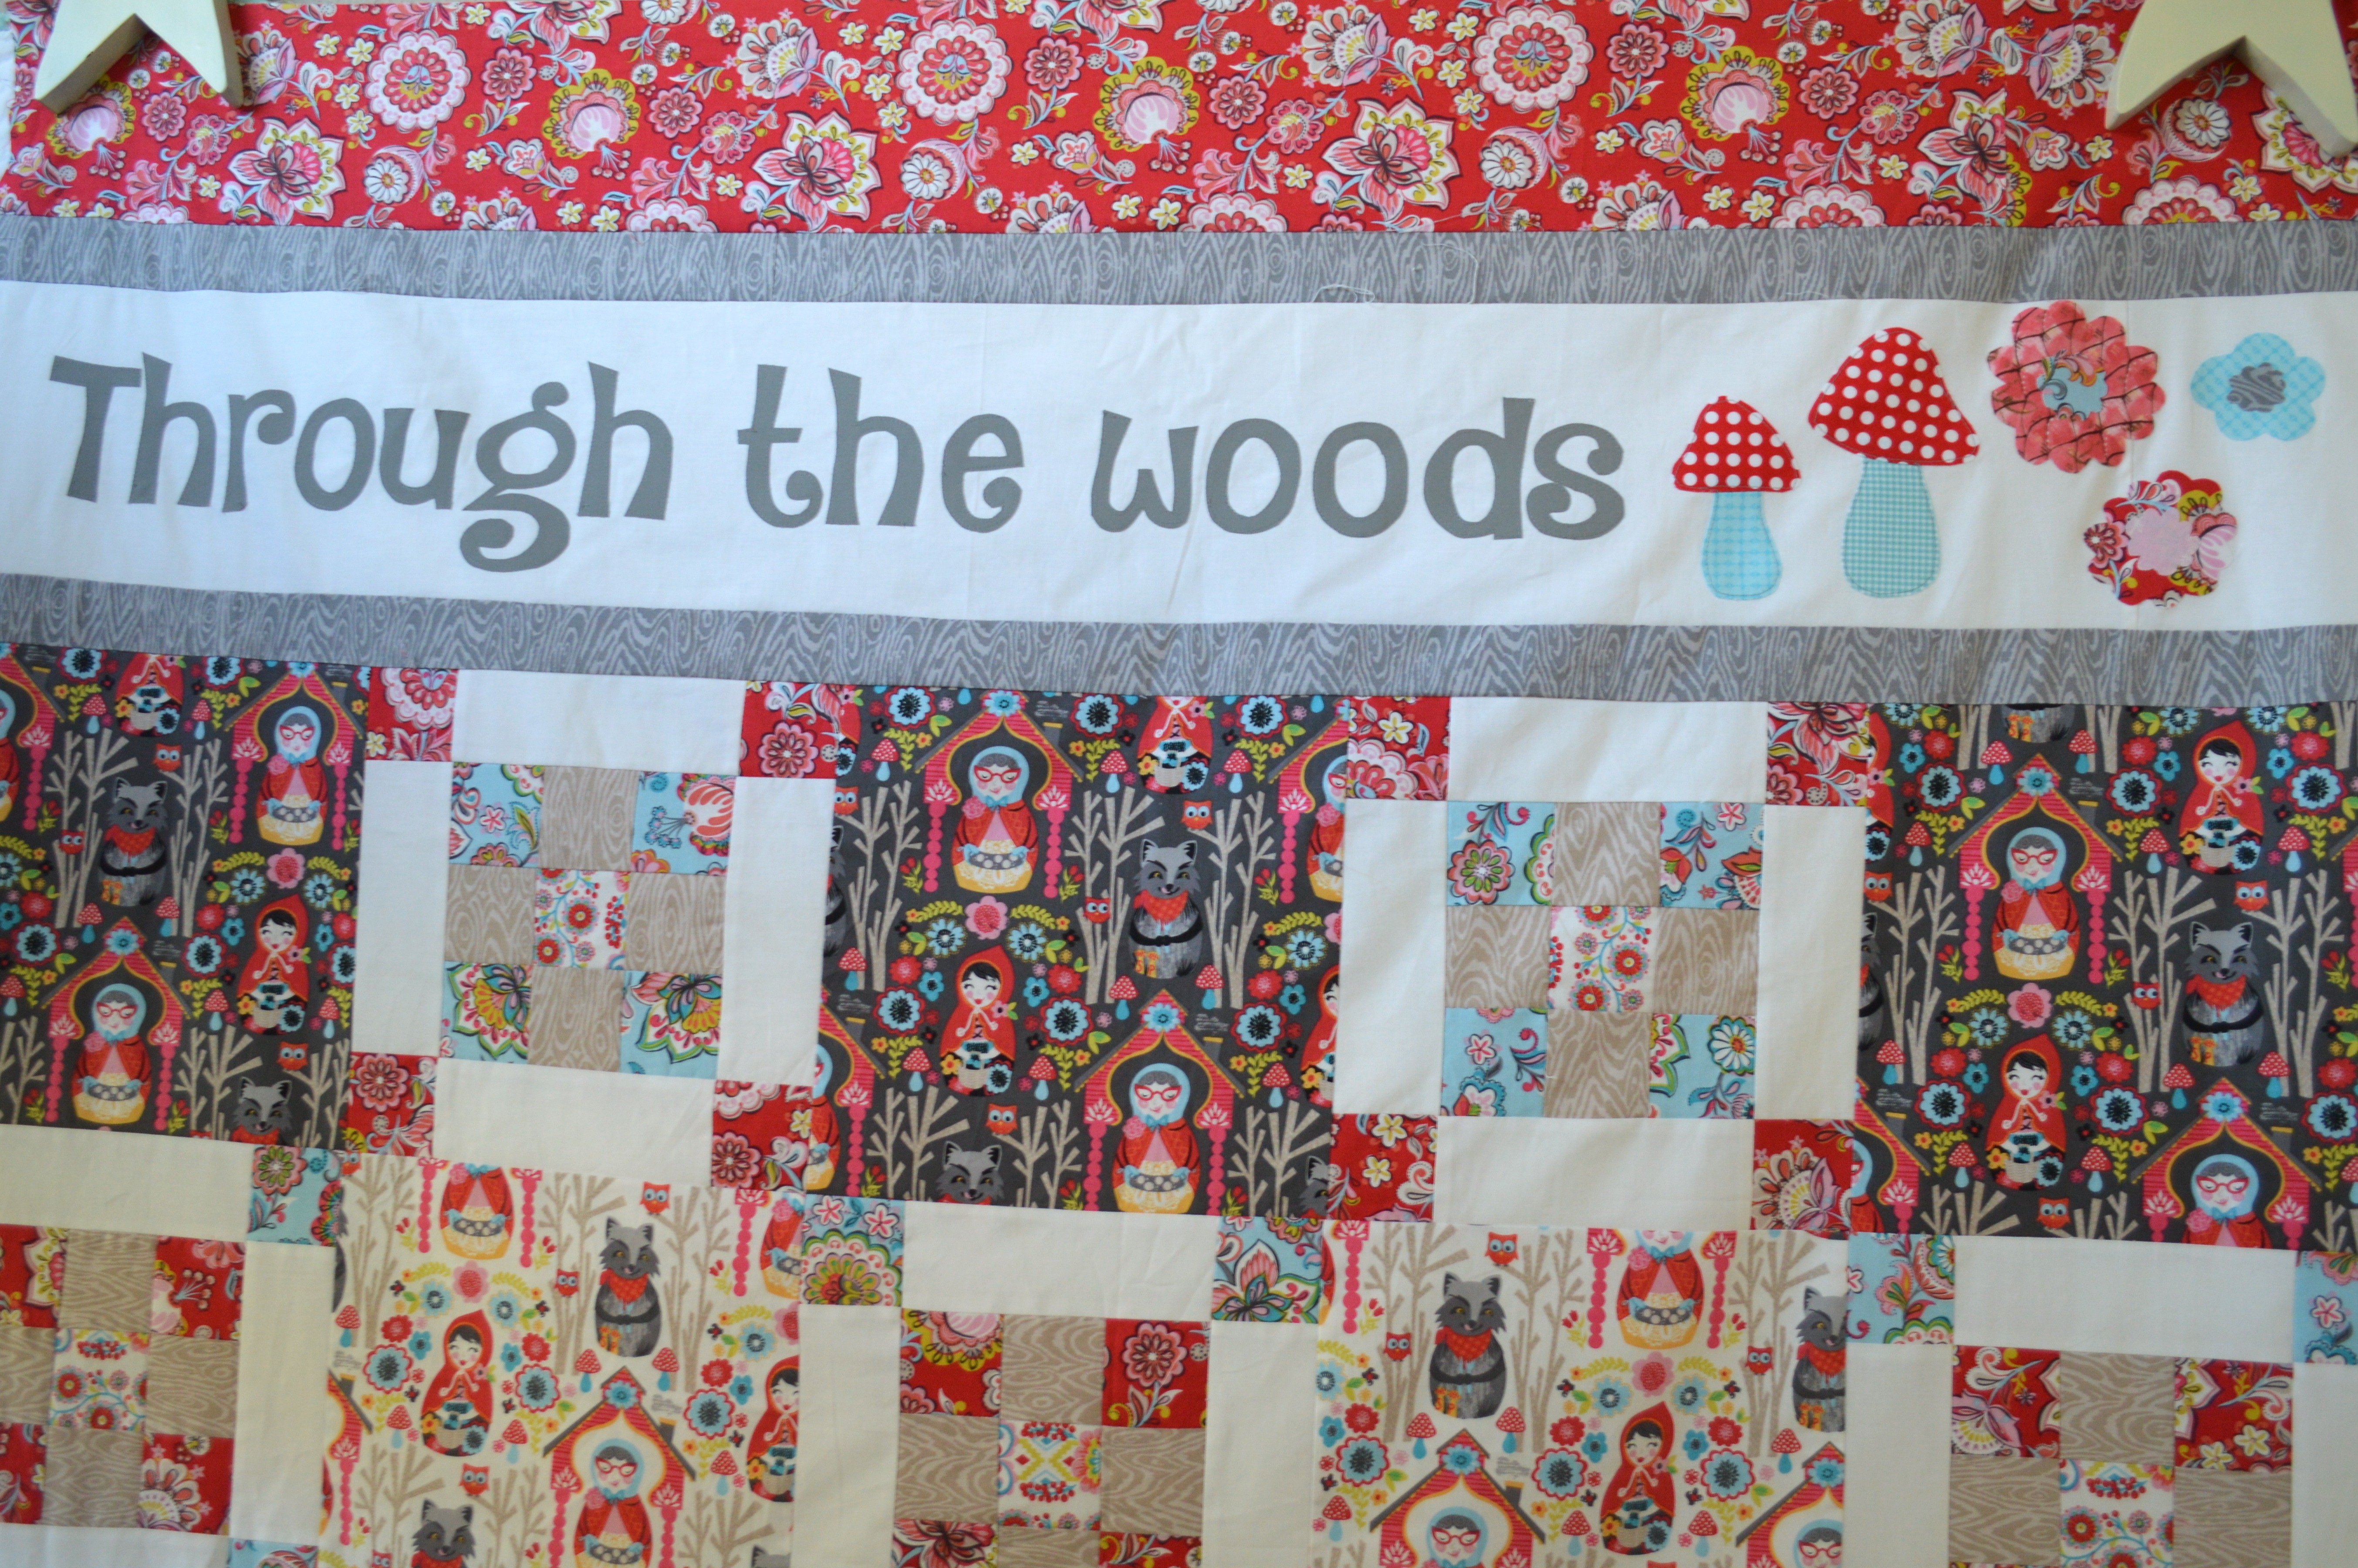
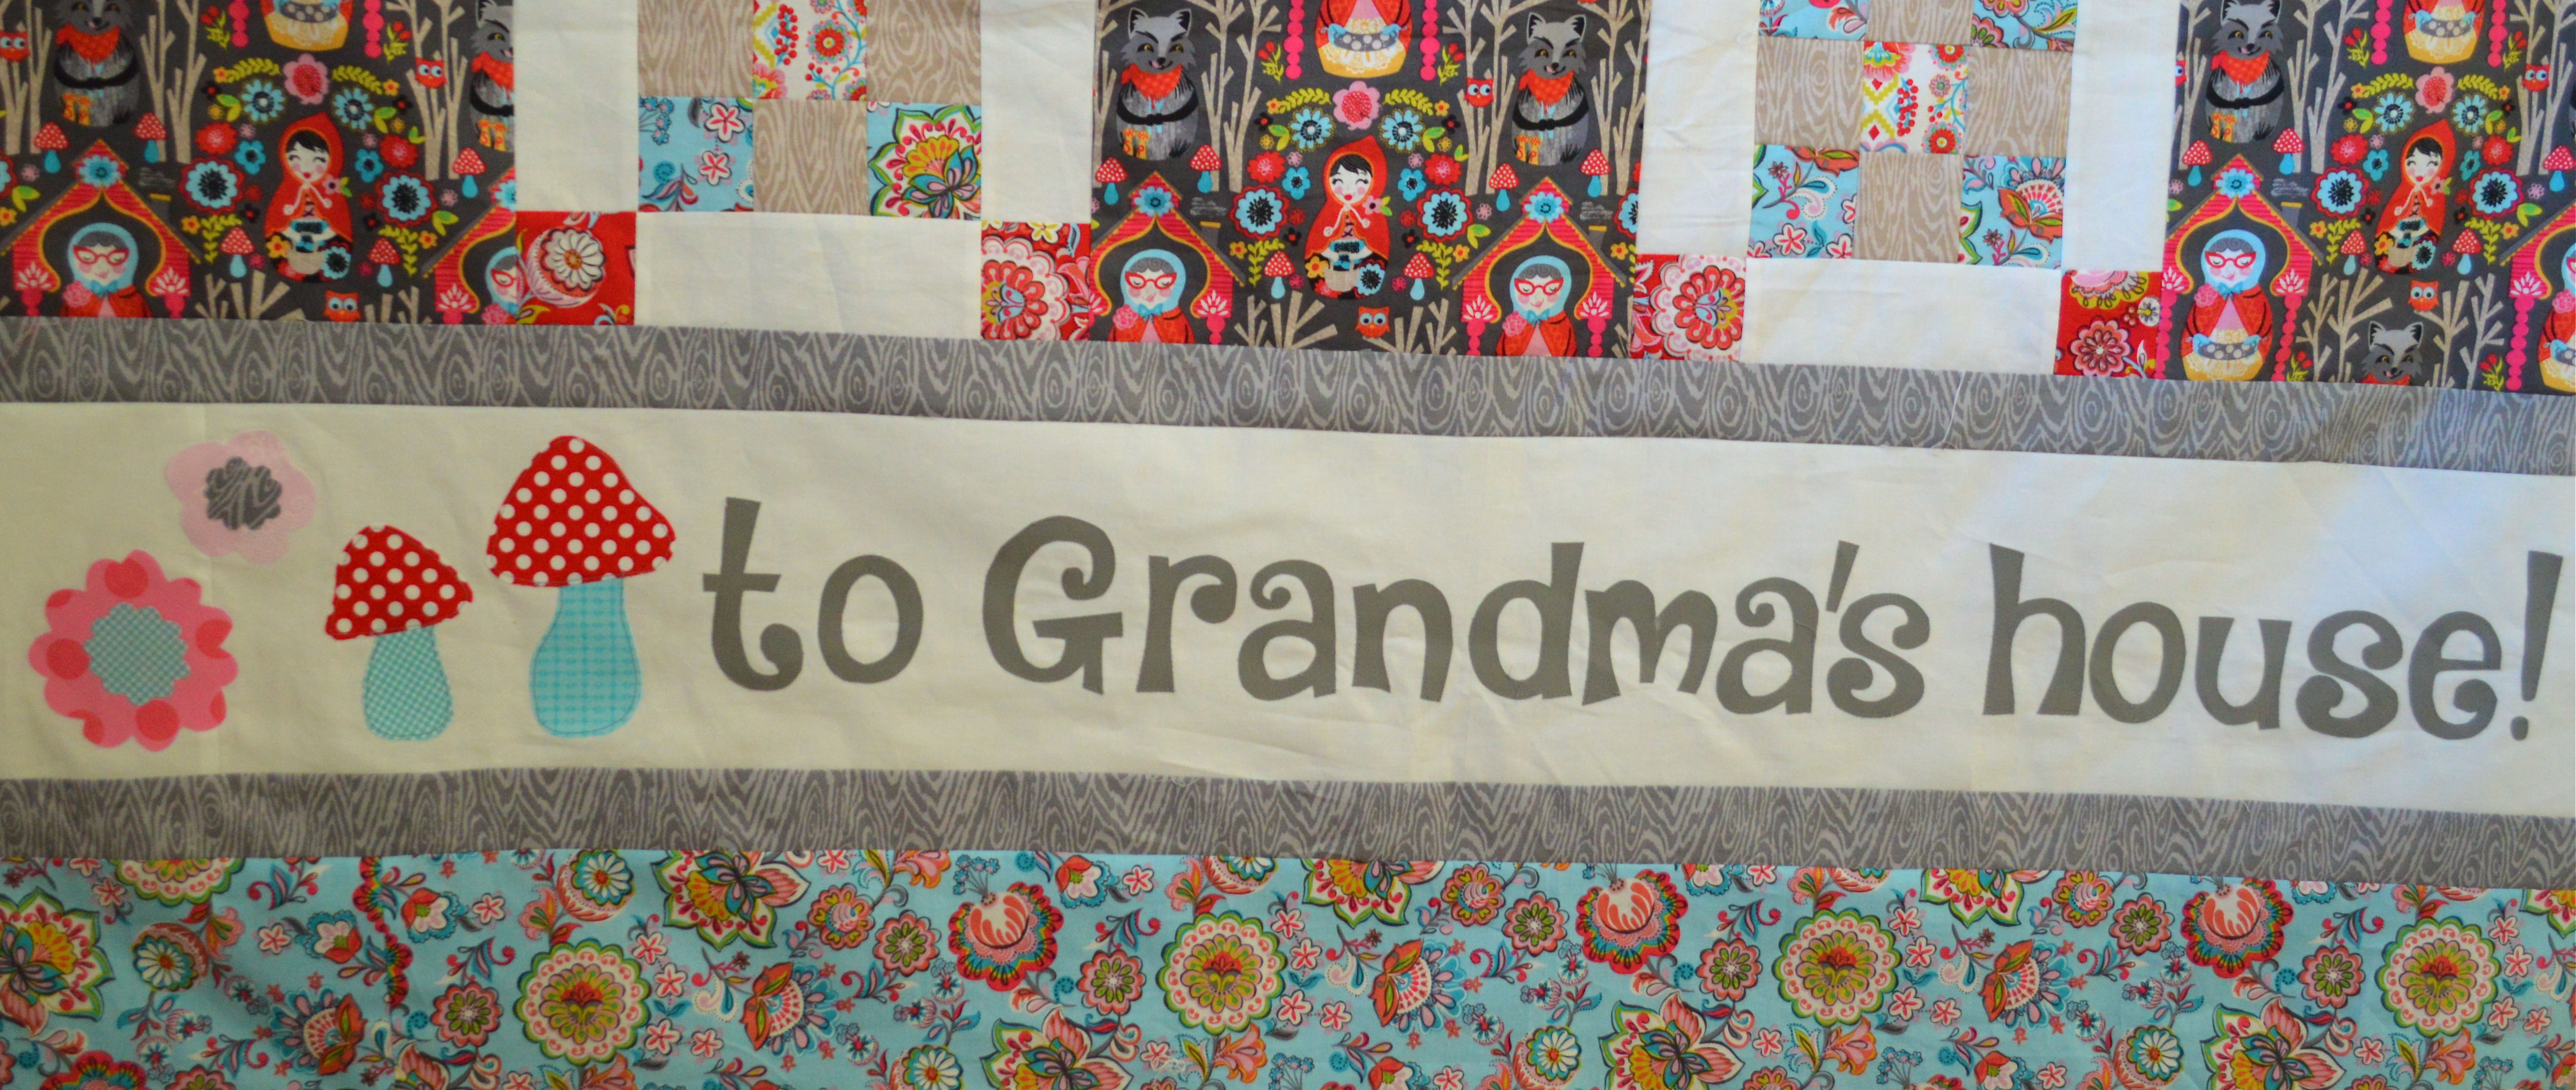
Through the woods to Grandma’s House! This Little Red Riding-hood inspired quilt is perfect the perfect size to take to Grandma’s house or the perfect size to keep at Grandma’s house for special little visitors. With optional “Nana” version, it would also make a lovely gift. Try this pattern with your favorite woodland animal or nature prints. This whimsical quilt features traditional block piecing alternating with a theme print block. Finished block size: 10″ Finished quilt size: 50″ x 78″
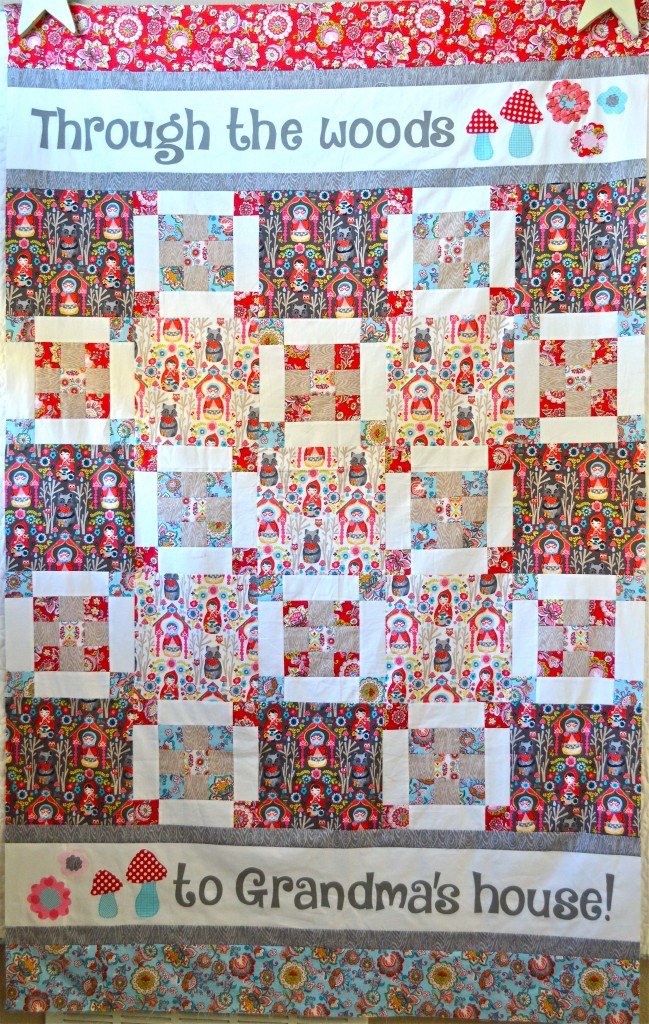
through the woods quilt

The fabrics are from Blend Fabrics’ “Riding Hood ” line.  Aren’t they the cutest!  You can purchase this quilt pattern PDF from my Craftsy shop or from Emily Ann’s Kloset.IMG_6198

IMG_6199

through the woods quilt 3

The Harper Stocking Tutorial

christmas stocking quiltedWhen I was little, my mom made everyone in our family “quilted” stockings with appliqué motifs on them.  To me, all stockings must be quilted 🙂  I made my husband and children these quilted stockings many years ago.

stocking
The fabrics are a little dated but we still love them!  Here are a few more peeks at stockings I have made over the years with this same pattern.

IMG_2199

DSCN5264

DSCN5180


There are so many wonderful fabrics out there to make stockings with.  I love this line from Blend called Treelicious.  I’ve made a few other projects with it, here and here.  Below is the pattern and instructions for making this “Harper” stocking which I made my friend’s baby’s first Christmas.  You can change the fabric piecing to be more intricate or you can use a plain piece of fabric and quilt it.  It’s fun to customize each stocking to your children’s personalities.

Supplies:

fat quarters of 3 fabrics for stocking and stocking tab

1/2 yard for the stocking lining

piece of lace

1/4 yard faux fur, fleece, or I used a type of cloud fleece with a diamond pattern…anything soft and white

Heat n Bond EZ print appliqué sheets or heat n bond appliqué transfer paper

quilt batting

Stocking Pattern, Click HERE

Note – the length of the cutting measurements are approximates, you just need enough to fit the stocking pattern on

Begin by cutting the pink trees 9″ x 12″

Gray deer 5″ x 12″

Pink 8″ x 20″

Piece together using 1/4″ seams, press

Try to place the pieces like this – it’s just rough background to quilt then cut the stocking from.


quilted christmas stocking 2


Using Spray n Bond spray basting (or pins) baste the fabric on a scrap of cotton batting – I love projects like this that use batting scraps!

quilted christmas stocking 4


Quilt as desired – I sewed loop de loos.

Print the pattern out (here).  It’s in 4 pieces.  Assemble them together like this.  I added some dotted lines to help with matching up each piece.  Don’t laugh at how rough my pattern is, it’s the middle of December and who has time for perfection!!  Cut out the pattern.

IMG_2299_2

Next, pin the stocking pattern to the quilted piece and cut out.  If you want the stocking a little larger, cut out 1/4″ away from the pattern and the finished stocking will be the size of the pattern.  Just make sure to cut the same for the lining.quilted christmas stocking 5


You can add some lace embellishment if you want.  Choose a font you like and print it in reverse on the EZ print sheets, or print in reverse and draw onto the Heat n Bond appliqué paper.  Press the letters to the wrong side of the white fabric.  Cut out each letter.  Peel off the backing and press into place.  It’s always a trick to get the letters to fit – I like to make them as big as I possibly can.  Top stitch in gray thread.
quilted christmas stocking 6


Here is a close up of the letters.  You can see my white fabric has a little silver detail in it!quilted christmas stocking 18

Now do the same process with the back of the stocking.  Only remember the stocking will be opposite.

quilted christmas stocking 7


Instead of cutting the stocking out again and trying to match it, I pinned the appliquéd part to the newly quilted piece, matching the seams along the sides.  Sew using 1/4″ seams all the way around the stocking leaving the top open.  Cut around the seam.quilted christmas stocking 8


For the lining of the stocking, cut the same pattern out of a coordinating cotton (2).  Sew right sides together all the way around the stocking.quilted christmas stocking 9


Prepare the fur cuff.  Cut the fur 18.5″ x 11″quilted christmas stocking 10


Fold it in half fat ways, right sides together and sew about 1/2″seam along the side:quilted christmas stocking 11


Turn the cuff right side out like this:
quilted christmas stocking 14


For the stocking holder, cut a strip of fabric 10″ x 3″.  Folding in half lengthwise with right sides together, sew 1/4″ seam and turn right side out.  Press the seam in the center like this:quilted christmas stocking 13


This is how it will look from the outside:quilted christmas stocking 12


Place the stocking lining inside the stocking, just how you want it to look, with the right side of the lining facing out.

Baste the stocking holder by bringing both raw edge ends together and pin it inside the stocking centering on the seam.  Sew about 1/8″ to keep it in place.quilted christmas stocking 16

Next, place the cuff inside the stocking & lining, aligning all raw edges:

quilted christmas stocking 17


Pin all the way around matching the seam in the cuff with the side seam in the stocking.  Sew 1/4″ to 1/2″ seam all the way around using a walking foot – it gets pretty thick by the seams but it will work.  Turn the cuff right side out and it’s done!  Kind of magical!!quilted christmas stocking 23

quilted christmas stocking 21

quilted christmas stocking 20

quilted christmas stocking 1